
Limited Warranty (U.S. Only)
Page 1
... after this Limited Warranty, Sony will become the property of protection to its option, repair or replace with the Product for the time periods and as fuses or batteries). It is required. 3-272-643-01 ® Car Audio LIMITED WARRANTY (U.S. Only) Sony Electronics Inc. ("Sony") warrants this Limited Warranty will , at its original specifications. Any parts or product replaced under this product against defects...
... after this Limited Warranty, Sony will become the property of protection to its option, repair or replace with the Product for the time periods and as fuses or batteries). It is required. 3-272-643-01 ® Car Audio LIMITED WARRANTY (U.S. Only) Sony Electronics Inc. ("Sony") warrants this Limited Warranty will , at its original specifications. Any parts or product replaced under this product against defects...
Operating Instructions
Page 1
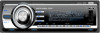
Record the serial number in the space provided below. CDX-GT81UW © 2007 Sony Corporation CDX-GT81UW Serial No. Para cancelar la pantalla de demostración (Demo), consulte la página 15. Refer to these numbers whenever you call upon your Sony dealer regarding this product. Model No. 2-898-878-11 (1) FM/AM Compact Disc Player Operating Instructions US Manual de instrucciones ES Owner's Record The model and serial numbers are located on the bottom of the unit. To cancel the demonstration (Demo) display, see page 12.
Record the serial number in the space provided below. CDX-GT81UW © 2007 Sony Corporation CDX-GT81UW Serial No. Para cancelar la pantalla de demostración (Demo), consulte la página 15. Refer to these numbers whenever you call upon your Sony dealer regarding this product. Model No. 2-898-878-11 (1) FM/AM Compact Disc Player Operating Instructions US Manual de instrucciones ES Owner's Record The model and serial numbers are located on the bottom of the unit. To cancel the demonstration (Demo) display, see page 12.

Operating Instructions
Page 2
... installation and connections, see your nearest authorized Sony dealer for details on , the user is turned off . Increase the separation between the equipment and receiver. - CAUTION The use of Sony Corporation. If you do not set the Auto Off function, press and hold (OFF) until the display disappears each time you turn the ignition off , which prevents battery drain. Manufactured under one or more of Sirius Satellite Radio...
... installation and connections, see your nearest authorized Sony dealer for details on , the user is turned off . Increase the separation between the equipment and receiver. - CAUTION The use of Sony Corporation. If you do not set the Auto Off function, press and hold (OFF) until the display disappears each time you turn the ignition off , which prevents battery drain. Manufactured under one or more of Sirius Satellite Radio...
Operating Instructions
Page 3
... 16 Removing the unit 17 Specifications 18 Troubleshooting 19 Error displays/Messages 20 3 LIST 9 USB devices Playback of USB devices 9 Display items 9 Listening to music on a Mass Storage Class type audio device 10 Listening to music on discs 14 About USB devices 15 Playback order of controls and basic operations Main unit 6 Card remote commander RM-X152 6 CD Display items 8 Repeat and shuffle play 8 Radio Storing and receiving stations 8 Storing automatically - BTM 8 Storing manually 8 Receiving the stored stations 8 Tuning automatically 8 Receiving a station through...
... 16 Removing the unit 17 Specifications 18 Troubleshooting 19 Error displays/Messages 20 3 LIST 9 USB devices Playback of USB devices 9 Display items 9 Listening to music on a Mass Storage Class type audio device 10 Listening to music on discs 14 About USB devices 15 Playback order of controls and basic operations Main unit 6 Card remote commander RM-X152 6 CD Display items 8 Repeat and shuffle play 8 Radio Storing and receiving stations 8 Storing automatically - BTM 8 Storing manually 8 Receiving the stored stations 8 Tuning automatically 8 Receiving a station through...
Operating Instructions
Page 4
... first time, or after replacing the car battery or changing the connections, you must reset the unit. Getting Started Resetting the unit Before operating the unit for purchasing this Sony Compact Disc Player. BBE MP: Improves digitally compressed sound such as desired. - USB device: A Mass Storage Class USB device or "Walkman" (ATRAC Audio Device) can store up to 3: press M or m instead of audio devices can be connected, and operated from the unit. - Preparing the card remote commander Before using virtual speaker...
... first time, or after replacing the car battery or changing the connections, you must reset the unit. Getting Started Resetting the unit Before operating the unit for purchasing this Sony Compact Disc Player. BBE MP: Improves digitally compressed sound such as desired. - USB device: A Mass Storage Class USB device or "Walkman" (ATRAC Audio Device) can store up to 3: press M or m instead of audio devices can be connected, and operated from the unit. - Preparing the card remote commander Before using virtual speaker...
Operating Instructions
Page 6
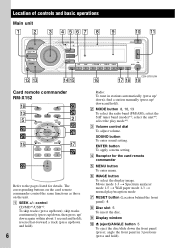
... remote commander RM-X152 qk qd 5 w; wa qg OFF ATT SOURCE SOUND MENU + MODE LIST/ CAT ENTER - The corresponding buttons on the card remote commander control the same functions as those on the unit. B MODE button 8, 10, 13 To select the radio band (FM/AM); select the SAT tuner band (mode)*3; select the unit*4; ENTER button To apply a menu setting. D Receptor for details. Movie mode 1-3 t Spectrum analyzer mode 1-5 t Wall paper mode 1-3 t normal play mode*5. I Display window J Z (eject)/ANGLE button 5 To eject the disc...
... remote commander RM-X152 qk qd 5 w; wa qg OFF ATT SOURCE SOUND MENU + MODE LIST/ CAT ENTER - The corresponding buttons on the card remote commander control the same functions as those on the unit. B MODE button 8, 10, 13 To select the radio band (FM/AM); select the SAT tuner band (mode)*3; select the unit*4; ENTER button To apply a menu setting. D Receptor for details. Movie mode 1-3 t Spectrum analyzer mode 1-5 t Wall paper mode 1-3 t normal play mode*5. I Display window J Z (eject)/ANGLE button 5 To eject the disc...
Operating Instructions
Page 7
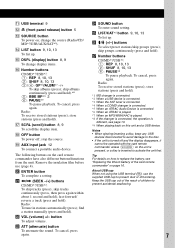
K USB terminal 9 L (front panel release) button 5 M SOURCE button To power on the card remote commander have also different buttons/functions from the unit. R OFF button To power off; Remove the insulation film before use (page 4). ENTER button To complete a setting. Q SCRL (scroll) button 8, 9 To scroll the display item. stop the source. S AUX input jack 12 To connect a portable audio device. w; wa skip albums continuously (press and hold ). The following buttons on ; change display items. P Number buttons CD/MD*1/USB*2: (1): REP 8, 10...
K USB terminal 9 L (front panel release) button 5 M SOURCE button To power on the card remote commander have also different buttons/functions from the unit. R OFF button To power off; Remove the insulation film before use (page 4). ENTER button To complete a setting. Q SCRL (scroll) button 8, 9 To scroll the display item. stop the source. S AUX input jack 12 To connect a portable audio device. w; wa skip albums continuously (press and hold ). The following buttons on ; change display items. P Number buttons CD/MD*1/USB*2: (1): REP 8, 10...
Operating Instructions
Page 8
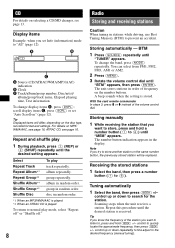
..., Elapsed playing time, Text information To change the band, press (MODE) repeatedly. Tip Displayed items will be replaced. ATRAC CD, see page 16; disc in the display. To change display items C, press (DSPL); The unit stores stations in stations while driving, use Best Tuning Memory (BTM) to store another station on MP3/ WMA/AAC, see page 16. Receiving the stored stations 1 Select the band, then press a number button ((1) to quickly locate the approximate frequency, then...
..., Elapsed playing time, Text information To change the band, press (MODE) repeatedly. Tip Displayed items will be replaced. ATRAC CD, see page 16; disc in the display. To change display items C, press (DSPL); The unit stores stations in stations while driving, use Best Tuning Memory (BTM) to store another station on MP3/ WMA/AAC, see page 16. Receiving the stored stations 1 Select the band, then press a number button ((1) to quickly locate the approximate frequency, then...
Operating Instructions
Page 9
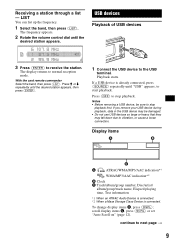
... volume control dial until the desired station appears, then press (ENTER). 1 Connect the USB device to vibration, or cause a loose connection. Display items A ATRAC/WMA/MP3/AAC indication*1 WMA/MP3/AAC indication*2 B Clock C Track/album/group number, Disc/artist/ album/group/track name, Elapsed playing time, Text information *1 When an ATRAC Audio Device is connected. *2 When a Mass Storage Class Device is already connected, press (SOURCE) repeatedly until "USB" appears, to receive...
... volume control dial until the desired station appears, then press (ENTER). 1 Connect the USB device to vibration, or cause a loose connection. Display items A ATRAC/WMA/MP3/AAC indication*1 WMA/MP3/AAC indication*2 B Clock C Track/album/group number, Disc/artist/ album/group/track name, Elapsed playing time, Text information *1 When an ATRAC Audio Device is connected. *2 When a Mass Storage Class Device is already connected, press (SOURCE) repeatedly until "USB" appears, to receive...
Operating Instructions
Page 11
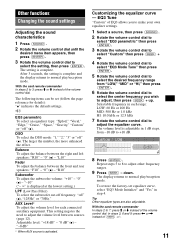
... to make your own equalizer settings. 1 Select a source, then press (SOUND). 2 Rotate the volume control dial to select "EQ3 parametric" then press (ENTER). 3 Rotate the volume control dial to select "Custom" then press (SEEK) + up. 4 Rotate the volume control dial to select "EQ3 Mode Tune" then press (ENTER). 5 Rotate the volume control dial to select the desired frequency range from -10 dB to normal play /reception mode. Balance To adjust the balance between the front and rear speakers...
... to make your own equalizer settings. 1 Select a source, then press (SOUND). 2 Rotate the volume control dial to select "EQ3 parametric" then press (ENTER). 3 Rotate the volume control dial to select "Custom" then press (SEEK) + up. 4 Rotate the volume control dial to select "EQ3 Mode Tune" then press (ENTER). 5 Rotate the volume control dial to select the desired frequency range from -10 dB to normal play /reception mode. Balance To adjust the balance between the front and rear speakers...
Operating Instructions
Page 12
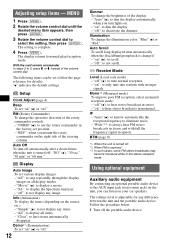
... "60 min." The volume level is complete. 4 Press (MENU). Adjusting setup items - "REV": when you turn lights on the right side of the display. - "All": to have items automatically disappear. "Auto" (z): to dim the display. - Illumination To change the operative direction of the volume control dial. Receive Mode Local (Local seek mode) - Auto Off To shut off automatically after a desired time when the unit is turned off " (z): to select the setting, then press (ENTER...
... "60 min." The volume level is complete. 4 Press (MENU). Adjusting setup items - "REV": when you turn lights on the right side of the display. - "All": to have items automatically disappear. "Auto" (z): to dim the display. - Illumination To change the operative direction of the volume control dial. Receive Mode Local (Local seek mode) - Auto Off To shut off automatically after a desired time when the unit is turned off " (z): to select the setting, then press (ENTER...

Operating Instructions
Page 13
... more MD changers are connected and one is connected. 2 Connect to "AUX". To return to use a straight type plug. 3 Turn down the volume on how you assign a name to next page t Locating a disc by name - The source automatically switches to the unit. CD/MD changer Selecting the changer 1 Press (SOURCE) repeatedly until "CD" or "MD" appears. 2 Press (MODE) repeatedly until the desired setting appears. Select To play Repeat Disc*1 disc repeatedly. album continuously discs discs continuously...
... more MD changers are connected and one is connected. 2 Connect to "AUX". To return to use a straight type plug. 3 Turn down the volume on how you assign a name to next page t Locating a disc by name - The source automatically switches to the unit. CD/MD changer Selecting the changer 1 Press (SOURCE) repeatedly until "CD" or "MD" appears. 2 Press (MODE) repeatedly until the desired setting appears. Select To play Repeat Disc*1 disc repeatedly. album continuously discs discs continuously...
Operating Instructions
Page 14
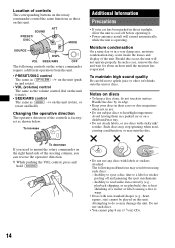
... buttons on the rotary commander control the same functions as those on this unit. Notes on a dashboard/rear tray. • Do not attach labels, or use such discs. • You cannot play 8 cm (3 1/4 in a very damp area, moisture condensation may damage the unit. Avoid leaving them in direct sunlight, allow the unit to a label or sticker peeling off before operating it. • Power antenna...
... buttons on the rotary commander control the same functions as those on this unit. Notes on a dashboard/rear tray. • Do not attach labels, or use such discs. • You cannot play 8 cm (3 1/4 in a very damp area, moisture condensation may damage the unit. Avoid leaving them in direct sunlight, allow the unit to a label or sticker peeling off before operating it. • Power antenna...
Operating Instructions
Page 15
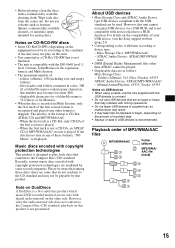
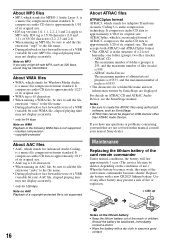
... is compatible with copyright protection technologies This product is displayed. ATRAC Audio Device: ATRAC/MP3/WMA/ AAC • DRM (Digital Rights Management) files other format is recommended. Playback order of the format is played. folders (albums): 150 (including root and empty folders). - Recently, various music discs encoded with driving operations. • Do not leave USB devices in USB devices is skipped). Note on this unit...
... is compatible with copyright protection technologies This product is displayed. ATRAC Audio Device: ATRAC/MP3/WMA/ AAC • DRM (Digital Rights Management) files other format is recommended. Playback order of the format is played. folders (albums): 150 (including root and empty folders). - Recently, various music discs encoded with driving operations. • Do not leave USB devices in USB devices is skipped). Note on this unit...
Operating Instructions
Page 16
... ATRAC Audio Device, see the SonicStage manual. lossless compression - It compresses audio CD data to approximately 1/10 of a VBR (variable bit rate) AAC file, elapsed playing time may not display accurately. * only for Advanced Audio Coding, is not supported. 16 About ATRAC files ATRAC3plus format ATRAC3, which stands for 64 kbps Note on AAC Playback of a copyright-protected file is a music file...
... ATRAC Audio Device, see the SonicStage manual. lossless compression - It compresses audio CD data to approximately 1/10 of a VBR (variable bit rate) AAC file, elapsed playing time may not display accurately. * only for Advanced Audio Coding, is not supported. 16 About ATRAC files ATRAC3plus format ATRAC3, which stands for 64 kbps Note on AAC Playback of a copyright-protected file is a music file...
Operating Instructions
Page 17
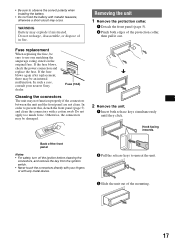
... the original fuse. Otherwise, the connectors may not function properly if the connectors between the unit and the front panel are not clean. WARNING Battery may be sure to unseat the unit. 3 Slide the unit out of the mounting. 17 Do not apply too much force. x 2 Remove the unit. 1 Insert both edges of in fire. If the fuse blows, check the power connection and replace the fuse.
... the original fuse. Otherwise, the connectors may not function properly if the connectors between the unit and the front panel are not clean. WARNING Battery may be sure to unseat the unit. 3 Slide the unit out of the mounting. 17 Do not apply too much force. x 2 Remove the unit. 1 Insert both edges of in fire. If the fuse blows, check the power connection and replace the fuse.

Operating Instructions
Page 18
...;V USB Player section Interface: USB (Full-speed) Maximum current: 500mA Power amplifier section Outputs: Speaker outputs (sure seal connectors) Speaker impedance: 4 - 8 ohms Maximum power output: 52 W × 4 (at 4 ohms) General Outputs: Audio outputs terminal (front/rear) Subwoofer output terminal (mono) Power antenna (aerial) relay control terminal Power amplifier control terminal Inputs: Telephone ATT control terminal Illumination control terminal BUS control input terminal BUS audio input terminal 18 Remote controller input terminal Antenna (aerial) input terminal AUX input jack (stereo...
...;V USB Player section Interface: USB (Full-speed) Maximum current: 500mA Power amplifier section Outputs: Speaker outputs (sure seal connectors) Speaker impedance: 4 - 8 ohms Maximum power output: 52 W × 4 (at 4 ohms) General Outputs: Audio outputs terminal (front/rear) Subwoofer output terminal (mono) Power antenna (aerial) relay control terminal Power amplifier control terminal Inputs: Telephone ATT control terminal Illumination control terminal BUS control input terminal BUS audio input terminal 18 Remote controller input terminal Antenna (aerial) input terminal AUX input jack (stereo...
Operating Instructions
Page 19
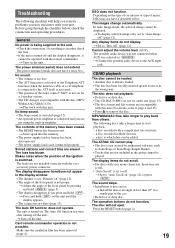
... operated with the car's accessory power connector. The disc will help you remedy problems you may not have a desirable effect. If everything is in order, check the fuse. • If the unit is set to off. t Play back with this unit. The fuse has blown. The Auto Off function does not operate. The Auto Off function activates after turning off " (page 12). In Auto Image mode, the selected image cannot be added. The disc...
... operated with the car's accessory power connector. The disc will help you remedy problems you may not have a desirable effect. If everything is in order, check the fuse. • If the unit is set to off. t Play back with this unit. The fuse has blown. The Auto Off function does not operate. The Auto Off function activates after turning off " (page 12). In Auto Image mode, the selected image cannot be added. The disc...
Operating Instructions
Page 20
t Perform manual tuning. USB playback You cannot play because of some problem. Cannot play back items. • Play back music files are not supported on this model to stop playback first for about 1 second.) When the SAT tuner is connected, storing an SAT radio channel into a preset failed. During playback, the USB device has been disconnected. t Before disconnecting a USB device, make sure to check the connection. The sound may be received. Checking The unit is...
t Perform manual tuning. USB playback You cannot play because of some problem. Cannot play back items. • Play back music files are not supported on this model to stop playback first for about 1 second.) When the SAT tuner is connected, storing an SAT radio channel into a preset failed. During playback, the USB device has been disconnected. t Before disconnecting a USB device, make sure to check the connection. The sound may be received. Checking The unit is...
Operating Instructions
Page 21
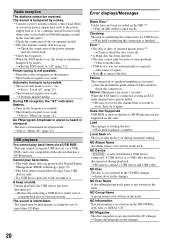
... (SOURCE). Push Reset The CD unit and CD/MD changer cannot be displayed with a music file in it may be repaired because of the MD changer is open or the MDs are not inserted properly. t Load the disc, then select it on in the display, consult your nearest Sony dealer. Not Supported (USB Not Support) The connected USB device is overloaded. Over Load USB device is not supported. t Press the RESET button (page 4). t Connect a USB device...
... (SOURCE). Push Reset The CD unit and CD/MD changer cannot be displayed with a music file in it may be repaired because of the MD changer is open or the MDs are not inserted properly. t Load the disc, then select it on in the display, consult your nearest Sony dealer. Not Supported (USB Not Support) The connected USB device is overloaded. Over Load USB device is not supported. t Press the RESET button (page 4). t Connect a USB device...


