Operating Instructions
Page 3
... stations 8 Storing automatically - I -TA 11 Setting BBE MP 11 Optimizing your nearest authorized Sony dealer for details on discs 17 About MP3/WMA files 18 About ATRAC CD 18 Maintenance 19 Removing the unit 19 Specifications 20 Troubleshooting 21 Error displays/Messages 22 The conversion... unit 4 Setting the clock 4 Detaching the front panel 4 Attaching the front panel 5 Inserting the disc in the United States and/or other countries. 3 Please see your sound - MENU 14 Using optional equipment 15 CD/MD changer 15 Auxiliary audio equipment 16 Rotary commander...
... stations 8 Storing automatically - I -TA 11 Setting BBE MP 11 Optimizing your nearest authorized Sony dealer for details on discs 17 About MP3/WMA files 18 About ATRAC CD 18 Maintenance 19 Removing the unit 19 Specifications 20 Troubleshooting 21 Error displays/Messages 22 The conversion... unit 4 Setting the clock 4 Detaching the front panel 4 Attaching the front panel 5 Inserting the disc in the United States and/or other countries. 3 Please see your sound - MENU 14 Using optional equipment 15 CD/MD changer 15 Auxiliary audio equipment 16 Rotary commander...

Operating Instructions
Page 4
...to 4: press M or m instead of this unit to prevent theft. in a parked car or on the front panel and display window. • Do not subject the front panel to heat/high temperature or moisture. Custom memory of HDEQ, DSO 3D and Intelligent Time Alignment (I-TA) will erase ... 1 Press (MENU). 2 Press (GP/ALBM) +/- repeatedly until "SETUP" appears, then press (ENTER). 3 Press (GP/ALBM) +/- Detaching the front panel You can detach the front panel of the (GP/ALBM) +/-; RESET button Note Pressing the RESET button will not be erased (page 11). Avoid leaving it in step 4: press...
...to 4: press M or m instead of this unit to prevent theft. in a parked car or on the front panel and display window. • Do not subject the front panel to heat/high temperature or moisture. Custom memory of HDEQ, DSO 3D and Intelligent Time Alignment (I-TA) will erase ... 1 Press (MENU). 2 Press (GP/ALBM) +/- repeatedly until "SETUP" appears, then press (ENTER). 3 Press (GP/ALBM) +/- Detaching the front panel You can detach the front panel of the (GP/ALBM) +/-; RESET button Note Pressing the RESET button will not be erased (page 11). Avoid leaving it in step 4: press...
Operating Instructions
Page 5
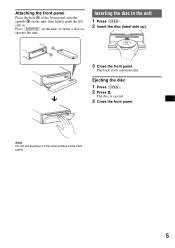
Inserting the disc in . Note Do not put anything on the unit, then lightly push the left side in the unit 1 Press (OPEN). 2 Insert the disc (label side up). The disc is ejected. 3 Close the front panel. Attaching the front panel Place the hole A of the front panel onto the spindle B on the inner surface of the front panel. 5 Ejecting the disc 1 Press (OPEN). 2 Press Z. Playback starts automatically. A B x 3 Close the front panel. Press (SOURCE) on the unit (or insert a disc) to operate the unit.
Inserting the disc in . Note Do not put anything on the unit, then lightly push the left side in the unit 1 Press (OPEN). 2 Insert the disc (label side up). The disc is ejected. 3 Close the front panel. Attaching the front panel Place the hole A of the front panel onto the spindle B on the inner surface of the front panel. 5 Ejecting the disc 1 Press (OPEN). 2 Press Z. Playback starts automatically. A B x 3 Close the front panel. Press (SOURCE) on the unit (or insert a disc) to operate the unit.
Operating Instructions
Page 6
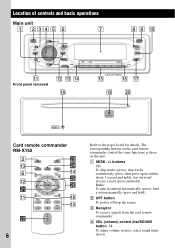
... pages listed for details. The corresponding buttons on the card remote commander control the same functions as those on the unit. A SEEK -/+ buttons CD: To skip tracks (press); select sound items (press). fast-forward/ reverse a track (press and hold ). C Receptor To receive signals from... SOUND MENU SEEK+ ENTER GP/ALBM MODE SOURCE REP SHUF PAUSE 1 2 3 4 5 6 OPEN BBE BBE MP IMAGE HDEQ SCRL qa Front panel removed qs qd qf qk CDX-GT705DX qg qh qj ql w; Location of controls and basic operations Main unit 1 234 5 6 7 8 9 q; skip tracks continuously (press, then...
... pages listed for details. The corresponding buttons on the card remote commander control the same functions as those on the unit. A SEEK -/+ buttons CD: To skip tracks (press); select sound items (press). fast-forward/ reverse a track (press and hold ). C Receptor To receive signals from... SOUND MENU SEEK+ ENTER GP/ALBM MODE SOURCE REP SHUF PAUSE 1 2 3 4 5 6 OPEN BBE BBE MP IMAGE HDEQ SCRL qa Front panel removed qs qd qf qk CDX-GT705DX qg qh qj ql w; Location of controls and basic operations Main unit 1 234 5 6 7 8 9 q; skip tracks continuously (press, then...
Operating Instructions
Page 19
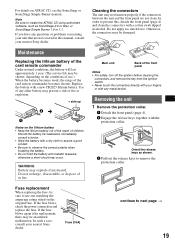
... When the battery becomes weak, the range of in this , detach the front panel (page 4) and clean the connectors with any questions or problems concerning your nearest Sony dealer. Note Be sure to create the ATRAC CD using authorized software, such as shown. 3 Pull out the release keys to prevent ...Keep the lithium battery out of the reach of any other battery may not function properly if the connectors between the unit and the front panel are not covered in fire. WARNING Battery may occur. Do not recharge, disassemble, or dispose of the card remote commander becomes shorter....
... When the battery becomes weak, the range of in this , detach the front panel (page 4) and clean the connectors with any questions or problems concerning your nearest Sony dealer. Note Be sure to create the ATRAC CD using authorized software, such as shown. 3 Pull out the release keys to prevent ...Keep the lithium battery out of the reach of any other battery may not function properly if the connectors between the unit and the front panel are not covered in fire. WARNING Battery may occur. Do not recharge, disassemble, or dispose of the card remote commander becomes shorter....


