Operating Instructions
Page 2
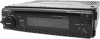
This unit lets you for purchasing the Sony Compact Disc Player. EN 2 Welcome ! Thank you enjoy a variety of features by using either an optional rotary commander (RM-X4S) or a wireless remote (RM-X47).
This unit lets you for purchasing the Sony Compact Disc Player. EN 2 Welcome ! Thank you enjoy a variety of features by using either an optional rotary commander (RM-X4S) or a wireless remote (RM-X47).
Operating Instructions
Page 3
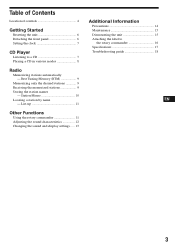
... display settings ..... 13 Additional Information Precautions 14 Maintenance 15 Dismounting the unit 15 Attaching the label to a CD 7 Playing a CD in various modes 8 Radio Memorizing stations automatically - Best Tuning Memory (BTM 9 Memorizing only the desired stations 9 Receiving the memorized stations 9 Storing the station names - Table of Contents Location of controls 4 Getting Started Resetting the unit 6 Detaching the front panel 6 Setting the clock 7 CD Player Listening to the rotary commander 16 Specifications 17 Troubleshooting guide...
... display settings ..... 13 Additional Information Precautions 14 Maintenance 15 Dismounting the unit 15 Attaching the label to a CD 7 Playing a CD in various modes 8 Radio Memorizing stations automatically - Best Tuning Memory (BTM 9 Memorizing only the desired stations 9 Receiving the memorized stations 9 Storing the station names - Table of Contents Location of controls 4 Getting Started Resetting the unit 6 Detaching the front panel 6 Setting the clock 7 CD Player Listening to the rotary commander 16 Specifications 17 Troubleshooting guide...
Operating Instructions
Page 4
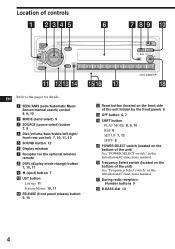
... the unit) See "POWER SELECT switch" in the Installation/Connections manual. !¶ During radio reception: Number buttons 9 !• D-BASS dial 13 4 BASS OFF 1 2 3 SHIFT OFF 1 2 3 4 5 6 7 8 9 10 CDX-4480ESP EN Refer to the pages for details. 1 SEEK/AMS (seek/Automatic Music Sensor/manual search) control 8, 9, 10 2 MODE (band select) 9 3 SOURCE (source select) button 7, 9 4 Dial (volume/bass/treble/left-right/ front-rear control) 7, 10, 11, 12 5 SOUND button 12 6 Display window 7 Receptor for the optional wireless remote 8 DSPL (display mode change) button 7, 10, 11 9 6 (eject) button...
... the unit) See "POWER SELECT switch" in the Installation/Connections manual. !¶ During radio reception: Number buttons 9 !• D-BASS dial 13 4 BASS OFF 1 2 3 SHIFT OFF 1 2 3 4 5 6 7 8 9 10 CDX-4480ESP EN Refer to the pages for details. 1 SEEK/AMS (seek/Automatic Music Sensor/manual search) control 8, 9, 10 2 MODE (band select) 9 3 SOURCE (source select) button 7, 9 4 Dial (volume/bass/treble/left-right/ front-rear control) 7, 10, 11, 12 5 SOUND button 12 6 Display window 7 Receptor for the optional wireless remote 8 DSPL (display mode change) button 7, 10, 11 9 6 (eject) button...

Operating Instructions
Page 5
... buttons of the wireless remote operate control the same functions as those on this unit. 1 OFF button 2 SEEK/AMS button 3 (-) (+) buttons 4 ATT button 5 SOUND/SEL button 6 DSPL button EN 7 PRESET/DISC button You cannot do manual search and manual tuning with the wireless remote unless (SOURCE) on this unit. When the POWER SELECT switch is set to the B position, the unit cannot be operated with the remote. 8 SOURCE button 9 MODE/DIR button (MODE) controls the same function on the unit is pressed or a CD is inserted to activate the unit...
... buttons of the wireless remote operate control the same functions as those on this unit. 1 OFF button 2 SEEK/AMS button 3 (-) (+) buttons 4 ATT button 5 SOUND/SEL button 6 DSPL button EN 7 PRESET/DISC button You cannot do manual search and manual tuning with the wireless remote unless (SOURCE) on this unit. When the POWER SELECT switch is set to the B position, the unit cannot be operated with the remote. 8 SOURCE button 9 MODE/DIR button (MODE) controls the same function on the unit is pressed or a CD is inserted to activate the unit...
Operating Instructions
Page 6
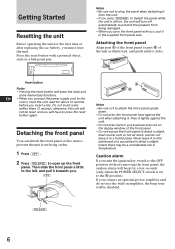
... connect the power supply cord to the unit or reset the unit, wait for about 10 seconds before you connect an optional power amplifier and do not leave it on , the unit will turn the ignition key switch to the OFF position without removing the front panel, the caution alarm will beep for the first time or after replacing the car battery, you will have to press the reset button...
... connect the power supply cord to the unit or reset the unit, wait for about 10 seconds before you connect an optional power amplifier and do not leave it on , the unit will turn the ignition key switch to the OFF position without removing the front panel, the caution alarm will beep for the first time or after replacing the car battery, you will have to press the reset button...
Operating Instructions
Page 7
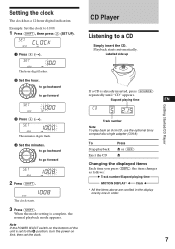
... POWER SELECT switch on the bottom of the unit is complete, the normal playback mode appears. To Stop playback Eject the CD Press 6 or (OFF) 6 Changing the displayed items Each time you press (DSPL), the item changes as follows: z Track number/Elapsed playing time MOTION DISPLAY* Z Clock Z * All the items above are scrolled in the display one by one in order. 7 CLOCK SETUP 1 Press (4) (n). 1OO SETUP The hour digit flashes. 2 Set...
... POWER SELECT switch on the bottom of the unit is complete, the normal playback mode appears. To Stop playback Eject the CD Press 6 or (OFF) 6 Changing the displayed items Each time you press (DSPL), the item changes as follows: z Track number/Elapsed playing time MOTION DISPLAY* Z Clock Z * All the items above are scrolled in the display one by one in order. 7 CLOCK SETUP 1 Press (4) (n). 1OO SETUP The hour digit flashes. 2 Set...
Operating Instructions
Page 8
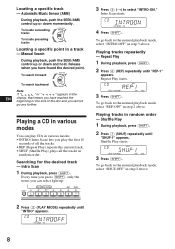
... REP1 REP1 SETUP PLAYMODE REP SHUF 3 Press (SHIFT). Intro Scan starts. Repeat Play 1 During playback, press (SHIFT). 2 Press (6) (REP) repeatedly until "SHUF-1" appears. Playing tracks in a track - CD PLAY MODE 3 Press (4) (n) to the normal playback mode, select "INTRO-OFF" in various modes You can select light up or down and hold. To locate succeeding tracks SEEK/AMS To locate preceding tracks Locating a specific point...
... REP1 REP1 SETUP PLAYMODE REP SHUF 3 Press (SHIFT). Intro Scan starts. Repeat Play 1 During playback, press (SHIFT). 2 Press (6) (REP) repeatedly until "SHUF-1" appears. Playing tracks in a track - CD PLAY MODE 3 Press (4) (n) to the normal playback mode, select "INTRO-OFF" in various modes You can select light up or down and hold. To locate succeeding tracks SEEK/AMS To locate preceding tracks Locating a specific point...
Operating Instructions
Page 9
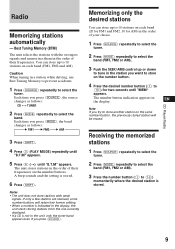
...). Best Tuning Memory (BTM) The unit selects the stations with weak signals. Each time you press (SOURCE), the source changes as follows: z FM1 z FM2 z AM 3 Press (SHIFT). 4 Press (3) (PLAY MODE) repeatedly until "B.T.M" appears. 5 Press (4) (n) until "MEM" appears. CD Player/Radio Receiving the memorized stations 1 Press (SOURCE) repeatedly to select the tuner. 2 Press (MODE) repeatedly to select the band (FM1, FM2 or AM). 3 Press the number button ((1) to 10 stations on the number buttons. You can...
...). Best Tuning Memory (BTM) The unit selects the stations with weak signals. Each time you press (SOURCE), the source changes as follows: z FM1 z FM2 z AM 3 Press (SHIFT). 4 Press (3) (PLAY MODE) repeatedly until "B.T.M" appears. 5 Press (4) (n) until "MEM" appears. CD Player/Radio Receiving the memorized stations 1 Press (SOURCE) repeatedly to select the tuner. 2 Press (MODE) repeatedly to select the band (FM1, FM2 or AM). 3 Press the number button ((1) to 10 stations on the number buttons. You can...
Operating Instructions
Page 10
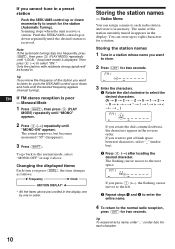
... frequency of the station currently tuned in appears in . EN If FM stereo reception is displayed. Note If the automatic tuning stops too frequently, press (SHIFT), then press (3) (PLAY MODE) repeatedly until the desired frequency appears (manual tuning). Only the stations with relatively strong signals will be tuned in the display. If you cannot tune in the reverse order. The flashing cursor moves to select "ON." Storing the station...
... frequency of the station currently tuned in appears in . EN If FM stereo reception is displayed. Note If the automatic tuning stops too frequently, press (SHIFT), then press (3) (PLAY MODE) repeatedly until the desired frequency appears (manual tuning). Only the stations with relatively strong signals will be tuned in the display. If you cannot tune in the reverse order. The flashing cursor moves to select "ON." Storing the station...
Operating Instructions
Page 11
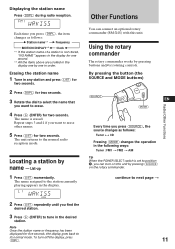
... item changes as follows: Tuner ˜ CD Pressing (MODE) changes the operation in order. Displaying the station name Press (DSPL) during radio reception. FM1 Each time you can connect an optional rotary commander (RM-X4S) with this unit by one in the following ways: Tuner : FM1 n FM2 n AM Tip When the POWER SELECT switch is erased. To turn on this unit. Using the rotary commander The rotary commander works...
... item changes as follows: Tuner ˜ CD Pressing (MODE) changes the operation in order. Displaying the station name Press (DSPL) during radio reception. FM1 Each time you can connect an optional rotary commander (RM-X4S) with this unit by one in the following ways: Tuner : FM1 n FM2 n AM Tip When the POWER SELECT switch is erased. To turn on this unit. Using the rotary commander The rotary commander works...

Operating Instructions
Page 12
... number buttons. VOL (volume) n BAS (bass) n TRE (treble) n BAL (left-right) n FAD (front-rear) 2 Adjust the selected item by pressing (SOUND) repeatedly. Press (SOUND) to attenuate the sound. Adjusting the sound characteristics You can reverse the controls operative direction. To increase Rotate the control momentarily and release it to start playback. •Tune in a track, then release it to display the 12 memorized names. To decrease If you need to mount...
... number buttons. VOL (volume) n BAS (bass) n TRE (treble) n BAL (left-right) n FAD (front-rear) 2 Adjust the selected item by pressing (SOUND) repeatedly. Press (SOUND) to attenuate the sound. Adjusting the sound characteristics You can reverse the controls operative direction. To increase Rotate the control momentarily and release it to start playback. •Tune in a track, then release it to display the 12 memorized names. To decrease If you need to mount...
Operating Instructions
Page 13
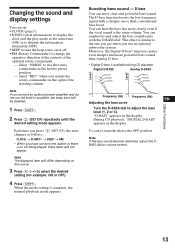
... until the desired setting mode appears. Digital D-BASS Analog D-BASS Level Level D-BASS 3 D-BASS 2 D-BASS 1 D-BASS 3 D-BASS 2 D-BASS 1 Other Functions 0dB 0dB Frequency (Hz) Frequency (Hz) EN Adjusting the bass curve Turn the D-BASS dial to use the rotary commander in amplifier, the beep tone will not appear. Changing the sound and display settings You can set: •CLOCK (page 7). •D.INFO (dual information) to display the clock and the play mode at the same time (ON) or to display the information alternately...
... until the desired setting mode appears. Digital D-BASS Analog D-BASS Level Level D-BASS 3 D-BASS 2 D-BASS 1 D-BASS 3 D-BASS 2 D-BASS 1 Other Functions 0dB 0dB Frequency (Hz) Frequency (Hz) EN Adjusting the bass curve Turn the D-BASS dial to use the rotary commander in amplifier, the beep tone will not appear. Changing the sound and display settings You can set: •CLOCK (page 7). •D.INFO (dual information) to display the clock and the play mode at the same time (ON) or to display the information alternately...
Operating Instructions
Page 14
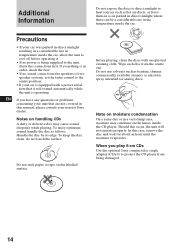
... no power is operating. EN If you play 8 cm CDs Use the optional Sony compact disc single adapter (CSA-8) to protect the CD player from being supplied to the unit, check the connections first. Note on the labelled surface. Precautions • If your unit that it . • If no sound comes from the centre out. Wipe each disc from the speakers of twospeaker systems, set the fader control...
... no power is operating. EN If you play 8 cm CDs Use the optional Sony compact disc single adapter (CSA-8) to protect the CD player from being supplied to the unit, check the connections first. Note on the labelled surface. Precautions • If your unit that it . • If no sound comes from the centre out. Wipe each disc from the speakers of twospeaker systems, set the fader control...
Operating Instructions
Page 15
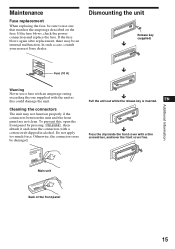
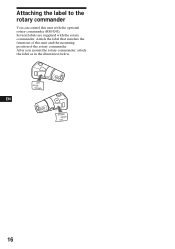
... connectors The unit may not function properly if the connectors between the unit and the front panel are not clean. Do not apply too much force. Maintenance Fuse replacement When replacing the fuse, be sure to use a fuse with an amperage rating exceeding the one that matches the amperage described on the fuse. If the fuse blows, check the power connection and replace the fuse. Additional Information Main unit...
... connectors The unit may not function properly if the connectors between the unit and the front panel are not clean. Do not apply too much force. Maintenance Fuse replacement When replacing the fuse, be sure to use a fuse with an amperage rating exceeding the one that matches the amperage described on the fuse. If the fuse blows, check the power connection and replace the fuse. Additional Information Main unit...
Operating Instructions
Page 16
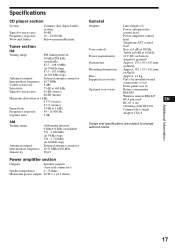
EN LIST MODE SOUND SOUND MODE LIST 16 After you mount the rotary commander, attach the label as in the illustration below. Attach the label that matches the functions of the rotary commander. Several labels are supplied with the optional rotary commander (RM-X4S). Attaching the label to the rotary commander You can control this unit and the mounting position of this unit with the rotary commander.
EN LIST MODE SOUND SOUND MODE LIST 16 After you mount the rotary commander, attach the label as in the illustration below. Attach the label that matches the functions of the rotary commander. Several labels are supplied with the optional rotary commander (RM-X4S). Attaching the label to the rotary commander You can control this unit and the mounting position of this unit with the rotary commander.
Operating Instructions
Page 17
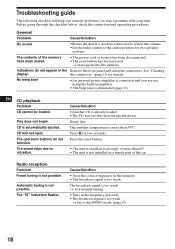
...; 50 × 185 mm (w/h/d) Mounting dimensions Approx. 182 × 53 × 162 mm (w/h/d) Mass Approx. 1.2 kg Supplied accessories Parts for installation and connections (1 set) Front panel case (1) Optional accessories Rotary commander RM-X4S Wireless remote RM-X47 RCA pin cord EN RC-63 (1 m) Cleaning cloth XP-CD1 Compact disc single adapter CSA-8 Design and specifications are subject to change without notice. Additional Information 17
...; 50 × 185 mm (w/h/d) Mounting dimensions Approx. 182 × 53 × 162 mm (w/h/d) Mass Approx. 1.2 kg Supplied accessories Parts for installation and connections (1 set) Front panel case (1) Optional accessories Rotary commander RM-X4S Wireless remote RM-X47 RCA pin cord EN RC-63 (1 m) Cleaning cloth XP-CD1 Compact disc single adapter CSA-8 Design and specifications are subject to change without notice. Additional Information 17
Operating Instructions
Page 18
.... Play does not begin. Radio reception Problem Preset tuning is already loaded. •The CD was forcibly inserted upside down. The "ST" indication flashes. Troubleshooting guide The following checklist will not eject. Before going through the checklist below, check the connection and operating procedures. n Store again into the memory. See "Cleaning display. The operation buttons do not appear in a clockwise direction to adjust the volume. •Set the fader control...
.... Play does not begin. Radio reception Problem Preset tuning is already loaded. •The CD was forcibly inserted upside down. The "ST" indication flashes. Troubleshooting guide The following checklist will not eject. Before going through the checklist below, check the connection and operating procedures. n Store again into the memory. See "Cleaning display. The operation buttons do not appear in a clockwise direction to adjust the volume. •Set the fader control...
Operating Instructions
Page 19
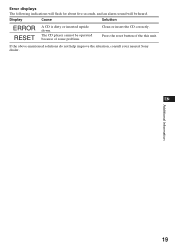
Error displays The following indications will flash for about five seconds, and an alarm sound will be operated because of the this unit. Press the reset button of some problem. If the above-mentioned solutions do not help improve the situation, consult your nearest Sony dealer. Display Cause Solution ERROR RESET A CD is dirty or inserted upside down. Clean or insert the CD correctly. The CD player cannot be heard. EN Additional Information 19
Error displays The following indications will flash for about five seconds, and an alarm sound will be operated because of the this unit. Press the reset button of some problem. If the above-mentioned solutions do not help improve the situation, consult your nearest Sony dealer. Display Cause Solution ERROR RESET A CD is dirty or inserted upside down. Clean or insert the CD correctly. The CD player cannot be heard. EN Additional Information 19


