
Limited Warranty (US Only)
Page 1
... pay for all labor charges. 2. 4-557-172-02 General Stereo/Hifi Components/Tape Decks ® CD Players/Mini Disc Players/Audio Systems Hifi Audio LIMITED WARRANTY Sony Electronics Inc. ("Sony") warrants this Product is determined to be presented to any authorized Sony service facility. This warranty is valid only in Japan has established telephone numbers for frequently...
... pay for all labor charges. 2. 4-557-172-02 General Stereo/Hifi Components/Tape Decks ® CD Players/Mini Disc Players/Audio Systems Hifi Audio LIMITED WARRANTY Sony Electronics Inc. ("Sony") warrants this Product is determined to be presented to any authorized Sony service facility. This warranty is valid only in Japan has established telephone numbers for frequently...

Operating Instructions
Page 3
...and tips for example, "CDPXE500 only." The CDP-XE500 is clearly indicated in this manual: Indicates that you for future reference. Any difference in this manual thoroughly and retain it for purchasing the Sony Compact Disc Player. Conventions • Instructions in operation is the... model used in the text, for making the task easier. Playing CDs Using the Display 7 Locating a Specific Track or a Particular Point ...
...and tips for example, "CDPXE500 only." The CDP-XE500 is clearly indicated in this manual: Indicates that you for future reference. Any difference in this manual thoroughly and retain it for purchasing the Sony Compact Disc Player. Conventions • Instructions in operation is the... model used in the text, for making the task easier. Playing CDs Using the Display 7 Locating a Specific Track or a Particular Point ...

Operating Instructions
Page 4
...the CD player to direct sunlight or lighting apparatuses. When the remote no longer operates the player, replace all the batteries with new ones. GGeettttininggStSatraterdted Unpacking Check that you don't use , the batteries should last for CDP-XE200) You can control the player using...If you received the following items: • Audio connecting cord (1) • Remote commander (remote) (except for CDP-XE200) (1) • Sony SUM-3 (NS) batteries (except for CDP-XE200) (2) Inserting batteries into the remote casing, particularly when replacing the batteries. • Do not expose the ...
...the CD player to direct sunlight or lighting apparatuses. When the remote no longer operates the player, replace all the batteries with new ones. GGeettttininggStSatraterdted Unpacking Check that you don't use , the batteries should last for CDP-XE200) You can control the player using...If you received the following items: • Audio connecting cord (1) • Remote commander (remote) (except for CDP-XE200) (1) • Sony SUM-3 (NS) batteries (except for CDP-XE200) (2) Inserting batteries into the remote casing, particularly when replacing the batteries. • Do not expose the ...

Operating Instructions
Page 5
...Optical cable (not supplied) CD player Digital component Connecting the AC power cord Connect the AC power cord to the maximum level. • If you 're ready to the amplifier (CDP-XE500 and CDP-XE300 only) Press LINE OUT LEVEL +/- Take off the player, the output level automatically ...returns to a wall outlet. Now you have a digital component such as a CD-ROM. 5EN If you cannot use your player. Getting Started You can reduce ...
...Optical cable (not supplied) CD player Digital component Connecting the AC power cord Connect the AC power cord to the maximum level. • If you 're ready to the amplifier (CDP-XE500 and CDP-XE300 only) Press LINE OUT LEVEL +/- Take off the player, the output level automatically ...returns to a wall outlet. Now you have a digital component such as a CD-ROM. 5EN If you cannot use your player. Getting Started You can reduce ...
Operating Instructions
Page 6
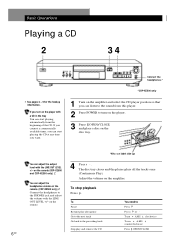
... you can start playing automatically from this player. 2 Press POWER to turn on the player. 3 Press § OPEN/CLOSE, and place a disc on the amplifier and select the CD player position so that you want. 1 Turn on the disc tray. on the remote (CDP-XE500 only) Z Connect the headphones to the... the tray You can listen to the sound from the beginning of the CD. The disc tray closes and the player plays all the tracks once (Continuous Play). Basic Operations Playing a CD 2 34 Connect the headphones.* *CDP-XE500 only • See pages 4 - 5 for the hookup information. With ...
... you can start playing automatically from this player. 2 Press POWER to turn on the player. 3 Press § OPEN/CLOSE, and place a disc on the amplifier and select the CD player position so that you want. 1 Turn on the disc tray. on the remote (CDP-XE500 only) Z Connect the headphones to the... the tray You can listen to the sound from the beginning of the CD. The disc tray closes and the player plays all the tracks once (Continuous Play). Basic Operations Playing a CD 2 34 Connect the headphones.* *CDP-XE500 only • See pages 4 - 5 for the hookup information. With ...

Operating Instructions
Page 7
Playing CDs Playing CDs Using the Display You can check information about the disc using the display. • CDP-XE500 Display information while playing a disc While playing a disc, the display shows the current track number, playing time and the music calendar. Checking the total number and playing time of the remaining time. Playing ...
Playing CDs Playing CDs Using the Display You can check information about the disc using the display. • CDP-XE500 Display information while playing a disc While playing a disc, the display shows the current track number, playing time and the music calendar. Checking the total number and playing time of the remaining time. Playing ...

Operating Instructions
Page 8
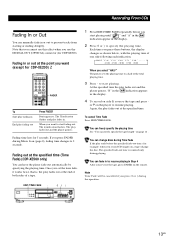
..." disappears from the display. 8EN Playing CDs Locating a Specific Track or a Particular Point in a Track You can quickly locate any play track number 30 Press >10 first, then 3 and 10. MUSIC SCAN 0/) (CDP-XE500 only) · ≠ AMS ...± Number buttons >10 (except for CDP-XE200). Each time you were pressing ). Press 0 or turn ≠ AMS ± counterclockwise to The next or succeeding tracks Turn ≠ AMS ± clockwise until you want appears in the display. The player repeats the tracks as follows: When the disc...
..." disappears from the display. 8EN Playing CDs Locating a Specific Track or a Particular Point in a Track You can quickly locate any play track number 30 Press >10 first, then 3 and 10. MUSIC SCAN 0/) (CDP-XE500 only) · ≠ AMS ...± Number buttons >10 (except for CDP-XE200). Each time you were pressing ). Press 0 or turn ≠ AMS ± counterclockwise to The next or succeeding tracks Turn ≠ AMS ± clockwise until you want appears in the display. The player repeats the tracks as follows: When the disc...

Operating Instructions
Page 9
...REPEAT 1" appears in a random order. • CDP-XE500 Creating Your Own Program (Program Play) You can arrange the order of the tracks on the player 1 Press PLAYMODE repeatedly until the track number you...SHUFFLE (except for CDPXE200). PLAYMODE · p ENTER Creating a program on a disc and create your own program. Track numbers being programmed are flashing in the display. When using the... playmode. Playing CDs Repeating the current track You can repeat only the current track in the display. Playing in Random Order (Shuffle Play) You can have the player "shuffle" tracks...
...REPEAT 1" appears in a random order. • CDP-XE500 Creating Your Own Program (Program Play) You can arrange the order of the tracks on the player 1 Press PLAYMODE repeatedly until the track number you...SHUFFLE (except for CDPXE200). PLAYMODE · p ENTER Creating a program on a disc and create your own program. Track numbers being programmed are flashing in the display. When using the... playmode. Playing CDs Repeating the current track You can repeat only the current track in the display. Playing in Random Order (Shuffle Play) You can have the player "shuffle" tracks...

Operating Instructions
Page 10
When tracks, which aren't numerically consecutive on the disc, are programmed consecutively (i.e. 1, 3, 5 etc.) A one -second access time blank is added between the tracks. Last programmed track Playing order After one second Programmed tracks Creating a program using the remote (except for CDP-XE200) Z Number buttons >10 ( PROGRAM CLEAR CHECK Total playing time ...track Playing order After one second Programmed tracks Total playing time To select a track with a number over 10 Use >10 button (see page 8). Playing CDs 3 Press ENTER to program in the order 2, 8 and 5.
When tracks, which aren't numerically consecutive on the disc, are programmed consecutively (i.e. 1, 3, 5 etc.) A one -second access time blank is added between the tracks. Last programmed track Playing order After one second Programmed tracks Creating a program using the remote (except for CDP-XE200) Z Number buttons >10 ( PROGRAM CLEAR CHECK Total playing time ...track Playing order After one second Programmed tracks Total playing time To select a track with a number over 10 Use >10 button (see page 8). Playing CDs 3 Press ENTER to program in the order 2, 8 and 5.

Operating Instructions
Page 11
...number you want appears in "Creating a program using the remote, press the number button of the tracks to Step 4. Playing CDs Recording from CDs Playing CDs The program remains even after the Program Play ends When you press (, you can change your program before or after you ...the tape or on both sides of the tape, the player pauses at the end of a tape. • CDP-XE500 ENTER ≠ AMS ± PLAYMODE • CDP-XE300 and CDP-XE200 ENTER · P ≠ AMS ± PLAYMODE · P 1 Create your program (for CDP-XE200). When using the remote" on a tape) while...
...number you want appears in "Creating a program using the remote, press the number button of the tracks to Step 4. Playing CDs Recording from CDs Playing CDs The program remains even after the Program Play ends When you press (, you can change your program before or after you ...the tape or on both sides of the tape, the player pauses at the end of a tape. • CDP-XE500 ENTER ≠ AMS ± PLAYMODE • CDP-XE300 and CDP-XE200 ENTER · P ≠ AMS ± PLAYMODE · P 1 Create your program (for CDP-XE200). When using the remote" on a tape) while...

Operating Instructions
Page 12
Recording a CD by Specifying Tape Length (Time Edit) (CDP-XE500 only) You can program the tracks you record on side B, reverse the tape and press · or P on both sides of the tape, the player pauses at the end of each indication. n HALF ˜ C-46 ˜ C-54 ˜ C-60 ˜ C-74...resume playing. "B" in the indication flashes in the display, then press ENTER . The display shows the programmed tracks. When you record on the disc, are programmed consecutively (i.e. 1, 3, 5 etc.) A one -second access time blank is added between the tracks. When tracks, which aren't ...
Recording a CD by Specifying Tape Length (Time Edit) (CDP-XE500 only) You can program the tracks you record on side B, reverse the tape and press · or P on both sides of the tape, the player pauses at the end of each indication. n HALF ˜ C-46 ˜ C-54 ˜ C-60 ˜ C-74...resume playing. "B" in the indication flashes in the display, then press ENTER . The display shows the programmed tracks. When you record on the disc, are programmed consecutively (i.e. 1, 3, 5 etc.) A one -second access time blank is added between the tracks. When tracks, which aren't ...
Operating Instructions
Page 13
.... EDIT/TIME FADE · 0/) 1 Press EDIT/TIME FADE repeatedly before the specified fade-out time, (for CDP-XE500). Note Time Fade will be cancelled if you press 0 or ) during playing. Recording From CDs Fading In or Out You can manually fade in Step 4 After you reverse the tape, press FADER on... time. The specified fade-out time is , the play fading out Press FADER During pause. You can change the disc. The q indication flashes. The play fades out and the player pauses. You can fade in to resume playing in or out to 2 seconds. "B" in the indication appears in ...
.... EDIT/TIME FADE · 0/) 1 Press EDIT/TIME FADE repeatedly before the specified fade-out time, (for CDP-XE500). Note Time Fade will be cancelled if you press 0 or ) during playing. Recording From CDs Fading In or Out You can manually fade in Step 4 After you reverse the tape, press FADER on... time. The specified fade-out time is , the play fading out Press FADER During pause. You can change the disc. The q indication flashes. The play fades out and the player pauses. You can fade in to resume playing in or out to 2 seconds. "B" in the indication appears in ...

Operating Instructions
Page 14
... the recording level on the deck. 3 Press p on the disc. Wipe the disc from the display. Recording From CDs Additional Information Adjusting the Recording Level (Peak Search) (CDP-XE500 only) The player locates the highest level among the tracks to be damaged. • After playing, store the disc in its edge. PEAK SEARCH p 1 Before you try the...
... the recording level on the deck. 3 Press p on the disc. Wipe the disc from the display. Recording From CDs Additional Information Adjusting the Recording Level (Peak Search) (CDP-XE500 only) The player locates the highest level among the tracks to be damaged. • After playing, store the disc in its edge. PEAK SEARCH p 1 Before you try the...

Operating Instructions
Page 15
...surface on the disc tray correctly. / Clean the CD (see page 2). There's no sound. / Check that the player is the value measured at 50 kilohms) DIGITAL OUT (OPTICAL) (CDP-XE500 only) Optical -18 dBm output connector Wave length: 660 nm PHONES (CDP-XE500 only) Stereo...2 V Over 10 kilohms (at a distance of the following difficulties while using the player, use this troubleshooting guide to help you remedy the problem. on the remote during recording. Specifications Compact disc player Laser Semiconductor laser (λ = 780 nm) Emission duration: continuous Laser output Max ...
...surface on the disc tray correctly. / Clean the CD (see page 2). There's no sound. / Check that the player is the value measured at 50 kilohms) DIGITAL OUT (OPTICAL) (CDP-XE500 only) Optical -18 dBm output connector Wave length: 660 nm PHONES (CDP-XE500 only) Stereo...2 V Over 10 kilohms (at a distance of the following difficulties while using the player, use this troubleshooting guide to help you remedy the problem. on the remote during recording. Specifications Compact disc player Laser Semiconductor laser (λ = 780 nm) Emission duration: continuous Laser output Max ...
Operating Instructions
Page 16
... 7 ·6 P6 p6 0/) 8 =/+ 8 >10 8 Number 8 Switch POWER 6 Connector DIGITAL OUT (OPTICAL) 5 Jacks PHONES 6 LINE OUT 5 Others Disc tray 6 Display 7 ≠ AMS ± 6 g4 16EN See Recording F, G Fading 13 Time Fade 13 H, I, J, K Half disc (HALF) 12 Handling CDs 15 Hookups 4 overview 4 L Locating by monitoring 8 by observing the display 8 by scanning 8 directly 8 using AMS 8 M, N, O Music...
... 7 ·6 P6 p6 0/) 8 =/+ 8 >10 8 Number 8 Switch POWER 6 Connector DIGITAL OUT (OPTICAL) 5 Jacks PHONES 6 LINE OUT 5 Others Disc tray 6 Display 7 ≠ AMS ± 6 g4 16EN See Recording F, G Fading 13 Time Fade 13 H, I, J, K Half disc (HALF) 12 Handling CDs 15 Hookups 4 overview 4 L Locating by monitoring 8 by observing the display 8 by scanning 8 directly 8 using AMS 8 M, N, O Music...


