
Limited Warranty (US Only)
Page 1
...-172-02 General Stereo/Hifi Components/Tape Decks ® CD Players/Mini Disc Players/Audio Systems Hifi Audio LIMITED WARRANTY Sony Electronics Inc. ("Sony") warrants this Product is determined to be presented to obtain warranty service. This warranty does not cover Products sold AS IS or WITH ALL FAULTS, or consumables (such as follows: 1. This warranty is invalid if the factory applied serial number has been altered...
...-172-02 General Stereo/Hifi Components/Tape Decks ® CD Players/Mini Disc Players/Audio Systems Hifi Audio LIMITED WARRANTY Sony Electronics Inc. ("Sony") warrants this Product is determined to be presented to obtain warranty service. This warranty does not cover Products sold AS IS or WITH ALL FAULTS, or consumables (such as follows: 1. This warranty is invalid if the factory applied serial number has been altered...
Operating Instructions
Page 2
.... Welcome! The CLASS 1 LASER PRODUCT MARKING is intended for purchasing the Sony Compact Disc Player. WARNING To prevent shock hazard, do not expose the unit to qualified personnel only. Conventions • Instructions in this manual describe the controls on the rear exterior. Indicates hints and tips for Class 1. To avoid electrical shock, do the task using the remote. Thank you can do...
.... Welcome! The CLASS 1 LASER PRODUCT MARKING is intended for purchasing the Sony Compact Disc Player. WARNING To prevent shock hazard, do not expose the unit to qualified personnel only. Conventions • Instructions in this manual describe the controls on the rear exterior. Indicates hints and tips for Class 1. To avoid electrical shock, do the task using the remote. Thank you can do...
Operating Instructions
Page 3
TABLE OF CONTENTS Getting Started Unpacking ...4 Hooking Up the System ...4 Inserting CDs ...6 Playing a CD ...8 Playing CDs Using the Display ...10 Locating a Specific Disc 11 Specifying the Next Disc to Play 13 Locating a Specific Track or a Point in a Track 13 Playing Repeatedly ...14 Playing in Random Order (Shuffle Play 14 Creating Your Own Program (Program Play 15 Storing Information About CDs (Custom Files) What You Can Do With the Custom Files 18 Labeling Discs (Disc Memo 18 Storing Specific Tracks (Delete...
TABLE OF CONTENTS Getting Started Unpacking ...4 Hooking Up the System ...4 Inserting CDs ...6 Playing a CD ...8 Playing CDs Using the Display ...10 Locating a Specific Disc 11 Specifying the Next Disc to Play 13 Locating a Specific Track or a Point in a Track 13 Playing Repeatedly ...14 Playing in Random Order (Shuffle Play 14 Creating Your Own Program (Program Play 15 Storing Information About CDs (Custom Files) What You Can Do With the Custom Files 18 Labeling Discs (Disc Memo 18 Storing Specific Tracks (Delete...
Operating Instructions
Page 4
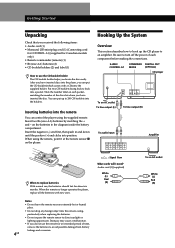
... helps you locate the disc easily. S-LINK/ CONTROL A1 COMMAND DIGITAL OUT MODE (OPTICAL) CD player To an AC outlet To line output (L) To line output (R) To audio input Amplifier When to an amplifier. on the batteries to avoid possible damage from battery leakage and corrosion. : Signal flow What cords will I need? Doing so may cause a malfunction. • If you can control the player using the remote, point it at the...
... helps you locate the disc easily. S-LINK/ CONTROL A1 COMMAND DIGITAL OUT MODE (OPTICAL) CD player To an AC outlet To line output (L) To line output (R) To audio input Amplifier When to an amplifier. on the batteries to avoid possible damage from battery leakage and corrosion. : Signal flow What cords will I need? Doing so may cause a malfunction. • If you can control the player using the remote, point it at the...
Operating Instructions
Page 5
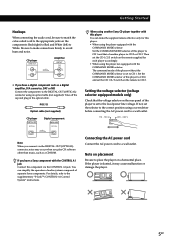
... local power line voltage. CD player LINE OUT L R Amplifier INPUT CD L R • If you play CD software other than music, such as a digital amplifier, D/A converter, DAT or MD Connect the component via the CONTROL A1 jack. POC-15 Optical cable (not supplied) CD player DIGITAL OUT OPTICAL Digital component DIGITAL INPUT OPTICAL When using the player equipped with the CONTROL A1 jack Connect the component via the DIGITAL OUT (OPTICAL) connector using a screwdriver before connecting the AC power cord to CD 1. Set the COMMAND MODE selector of separate Sony components...
... local power line voltage. CD player LINE OUT L R Amplifier INPUT CD L R • If you play CD software other than music, such as a digital amplifier, D/A converter, DAT or MD Connect the component via the CONTROL A1 jack. POC-15 Optical cable (not supplied) CD player DIGITAL OUT OPTICAL Digital component DIGITAL INPUT OPTICAL When using the player equipped with the CONTROL A1 jack Connect the component via the DIGITAL OUT (OPTICAL) connector using a screwdriver before connecting the AC power cord to CD 1. Set the COMMAND MODE selector of separate Sony components...
Operating Instructions
Page 7
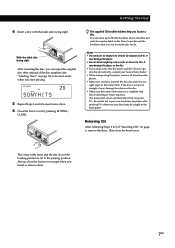
... to the rotary table. Always close the front cover. ALL DISCS CD1 DISC SONYHITS 20 5 Repeat Steps 3 and 4 to CDs. Be careful not to put in the front panel. The supplied CD booklet holdGeres htetPlpinlyaogyu ilSonctagaterCateDds disc You can input the original disc titles instead of the disc numbers (see "Labeling Discs" on page 6, remove the discs. The rotary table turns and the disc slot at a right...
... to the rotary table. Always close the front cover. ALL DISCS CD1 DISC SONYHITS 20 5 Repeat Steps 3 and 4 to CDs. Be careful not to put in the front panel. The supplied CD booklet holdGeres htetPlpinlyaogyu ilSonctagaterCateDds disc You can input the original disc titles instead of the disc numbers (see "Labeling Discs" on page 6, remove the discs. The rotary table turns and the disc slot at a right...
Operating Instructions
Page 8
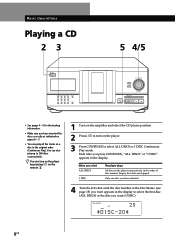
... disc number. Only one disc you have inserted the discs correctly as indicated on pages 6 - 7. • You can also play all the tracks on the player. 3 Press CONTINUE to select the first disc (ALL DISCS) or the disc you want (1␣ DISC). Basic Operations Playing a CD 23 5 4/5 STANDBY I /u to turn on the player by pressing I/u on the remote Z 1 Turn on the amplifier and select the CD player position. 2 Press I / u CONTINUE SHUFFLE PROGRAM REPEAT TIME...
... disc number. Only one disc you have inserted the discs correctly as indicated on pages 6 - 7. • You can also play all the tracks on the player. 3 Press CONTINUE to select the first disc (ALL DISCS) or the disc you want (1␣ DISC). Basic Operations Playing a CD 23 5 4/5 STANDBY I /u to turn on the player by pressing I/u on the remote Z 1 Turn on the amplifier and select the CD player position. 2 Press I / u CONTINUE SHUFFLE PROGRAM REPEAT TIME...
Operating Instructions
Page 9
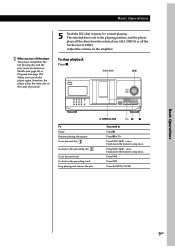
... the tracks once (1␣ DISC). Hold down the button to skip discs. Press DISC SKIP - Press ± Press ≠ Press § OPEN/CLOSE Basic Operations 9GB Adjust the volume on the player again, therefore, the player plays the same disc in the same play mode (Continuous, Shuffle (see page 14) or Program (see page 15)). once. Basic Operations When you turn off the player The player remembers the last playing disc and the play mode. 5 Push...
... the tracks once (1␣ DISC). Hold down the button to skip discs. Press DISC SKIP - Press ± Press ≠ Press § OPEN/CLOSE Basic Operations 9GB Adjust the volume on the player again, therefore, the player plays the same disc in the same play mode (Continuous, Shuffle (see page 14) or Program (see page 15)). once. Basic Operations When you turn off the player The player remembers the last playing disc and the play mode. 5 Push...
Operating Instructions
Page 10
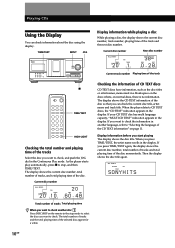
... the remote in the Continuous Play mode. The total number of tracks and the total playing time of the disc. Playing CDs Using the Display You can check the current disc title, artist name and track title. The display shows the current disc number, total number of tracks, and total playing time of the selected disc appear for a while. Current disc number Next disc number ALL DISCS DISC 20 CD1 TRACK 1 3 8 NEXT DISC MIN SEC 0.28 Current track number Playing time of the track p TIME/TEXT...
... the remote in the Continuous Play mode. The total number of tracks and the total playing time of the disc. Playing CDs Using the Display You can check the current disc title, artist name and track title. The display shows the current disc number, total number of tracks, and total playing time of the selected disc appear for a while. Current disc number Next disc number ALL DISCS DISC 20 CD1 TRACK 1 3 8 NEXT DISC MIN SEC 0.28 Current track number Playing time of the track p TIME/TEXT...
Operating Instructions
Page 11
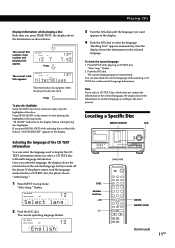
....)." 1 Press INPUT in the stop mode. You can select the language used to the disc's priority. The current disc number, track number and playing time appear. ALL DISCS MULTI CD TEXT CD1 12 English 3 Turn the JOG dial until you press TIME/TEXT, the display shows the information as shown below. GettPinlagyiSntgarCteDds Display information while playing a disc Each time you turn off the player. Press HIGH-LIGHT on the remote to play only the...
....)." 1 Press INPUT in the stop mode. You can select the language used to the disc's priority. The current disc number, track number and playing time appear. ALL DISCS MULTI CD TEXT CD1 12 English 3 Turn the JOG dial until you press TIME/TEXT, the display shows the information as shown below. GettPinlagyiSntgarCteDds Display information while playing a disc Each time you turn off the player. Press HIGH-LIGHT on the remote to play only the...
Operating Instructions
Page 12
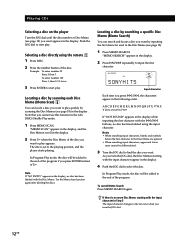
Selecting a disc directly using the input character. Note that you cannot use this function in the following order. ALL DISCS S CD1 SONYHITS Input character Each time you press ≠/±, the characters appear in the ALL DISCS Shuffle Play mode. 1 Press MEMO SCAN. In Program Play mode, the disc will be differentiated. 3 Turn the JOG dial to the playing position, and the player starts playing. "MEMO SEARCH" appears in the Disc Memo are...
Selecting a disc directly using the input character. Note that you cannot use this function in the following order. ALL DISCS S CD1 SONYHITS Input character Each time you press ≠/±, the characters appear in the ALL DISCS Shuffle Play mode. 1 Press MEMO SCAN. In Program Play mode, the disc will be differentiated. 3 Turn the JOG dial to the playing position, and the player starts playing. "MEMO SEARCH" appears in the Disc Memo are...

Operating Instructions
Page 13
... Disc Memo (see page 18) changes as you have specified starts playing. Note If "- Press ≠ or 0 on the remote and hold down until you want appears in Continuous or 1 DISC Shuffle Play mode. To cancel the disc you turn the JOG dial. You can also locate a specific point in a track while playing a disc. ≠/± Number buttons >10 =/+ 0/) To locate Press the next or succeeding tracks ± repeatedly...
... Disc Memo (see page 18) changes as you have specified starts playing. Note If "- Press ≠ or 0 on the remote and hold down until you want appears in Continuous or 1 DISC Shuffle Play mode. To cancel the disc you turn the JOG dial. You can also locate a specific point in a track while playing a disc. ≠/± Number buttons >10 =/+ 0/) To locate Press the next or succeeding tracks ± repeatedly...
Operating Instructions
Page 14
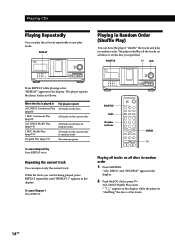
... random order. SHUFFLE DISC Number buttons ENTER · Playing all discs or on the disc you want is "shuffling" the discs or the tracks. 14GB ALL DISCS Shuffle Play starts. While the track you specified. To cancel Repeat 1 Press REPEAT. The player shuffles all the tracks on all tracks on the current disc in the display. Playing CDs Playing Repeatedly You can repeat only the current track. REPEAT Playing in Random Order (Shuffle Play) You can have the player "shuffle" the tracks and play discs/tracks repeatedly in random...
... random order. SHUFFLE DISC Number buttons ENTER · Playing all discs or on the disc you want is "shuffling" the discs or the tracks. 14GB ALL DISCS Shuffle Play starts. While the track you specified. To cancel Repeat 1 Press REPEAT. The player shuffles all the tracks on all tracks on the current disc in the display. Playing CDs Playing Repeatedly You can repeat only the current track. REPEAT Playing in Random Order (Shuffle Play) You can have the player "shuffle" the tracks and play discs/tracks repeatedly in random...
Operating Instructions
Page 16
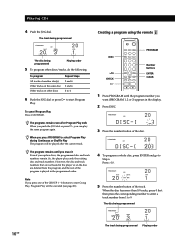
... press PROGRAM to select Program Play during Continuous or Shuffle Play The program will be canceled (see page 21). 16GB Creating a program using the remote Z DISC >10 CHECK · PROGRAM Number buttons ENTER CLEAR 1 Press PROGRAM until you erase it Even if you press one of the GROUP 1 - 8 buttons to start Program Play. However, the disc and track numbers that are deleted from 1 to start Group Play, Program Play will be played after Program Play ends...
... press PROGRAM to select Program Play during Continuous or Shuffle Play The program will be canceled (see page 21). 16GB Creating a program using the remote Z DISC >10 CHECK · PROGRAM Number buttons ENTER CLEAR 1 Press PROGRAM until you erase it Even if you press one of the GROUP 1 - 8 buttons to start Program Play. However, the disc and track numbers that are deleted from 1 to start Group Play, Program Play will be played after Program Play ends...
Operating Instructions
Page 19
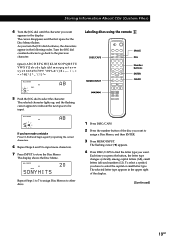
... the display. Labeling discs using the remote Z DISC/CAPS MEMO INPUT =/+ SPACE DEL Number buttons ENTER CLEAR 1 Press DISC/CAPS. 2 Press the number button of the display. (Continued) 19GB Each time you want to assign a Disc Memo, and then ENTER. 3 Press MEMO INPUT. To select a symbol, you have made a mistake Press CLEAR and begin again by inputting the correct characters. 6 Repeat Steps 4 and 5 to input more characters. 7 Press INPUT to...
... the display. Labeling discs using the remote Z DISC/CAPS MEMO INPUT =/+ SPACE DEL Number buttons ENTER CLEAR 1 Press DISC/CAPS. 2 Press the number button of the display. (Continued) 19GB Each time you want to assign a Disc Memo, and then ENTER. 3 Press MEMO INPUT. To select a symbol, you have made a mistake Press CLEAR and begin again by inputting the correct characters. 6 Repeat Steps 4 and 5 to input more characters. 7 Press INPUT to...
Operating Instructions
Page 21
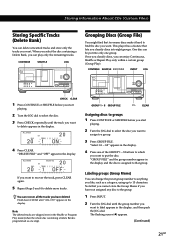
... group. Storing Information About CDs (Custom Files) Storing Specific Tracks (Delete Bank) You can delete unwanted tracks and store only the tracks you want to delete appears in the display. CONTINUE SHUFFLE ≠/± INPUT JOG CHECK CLEAR 1 Press CONTINUE or SHUFFLE before you start playing. 2 Turn the JOG dial to select the disc. 3 Press CHECK repeatedly until the group number you want . "Select...
... group. Storing Information About CDs (Custom Files) Storing Specific Tracks (Delete Bank) You can delete unwanted tracks and store only the tracks you want to delete appears in the display. CONTINUE SHUFFLE ≠/± INPUT JOG CHECK CLEAR 1 Press CONTINUE or SHUFFLE before you start playing. 2 Turn the JOG dial to select the disc. 3 Press CHECK repeatedly until the group number you want . "Select...
Operating Instructions
Page 22
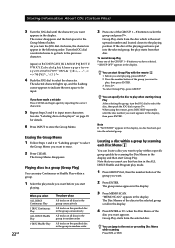
... the disc at the playing position is the most upward number and located closest to the next or preceding Disc Memo while scanning Press ≠ or ±. When using the remote, press DISC SKIP repeatedly until the character you want appears in the display. You can locate a disc you want to play mode. 1 Press GROUP first, then the number button of the GROUP 1 - 8 buttons you...
... the disc at the playing position is the most upward number and located closest to the next or preceding Disc Memo while scanning Press ≠ or ±. When using the remote, press DISC SKIP repeatedly until the character you want appears in the display. You can locate a disc you want to play mode. 1 Press GROUP first, then the number button of the GROUP 1 - 8 buttons you...
Operating Instructions
Page 24
... power cord must be changed only at the qualified service shop. • The unswitched socket outlets remain live, independently of power switch setting, at the rear of optical instruments with very low level inputs or no audio signals. In this case, leave the player turned on the lenses inside the car. • After removing a disc from the center out. • Do not use any questions or problems...
... power cord must be changed only at the qualified service shop. • The unswitched socket outlets remain live, independently of power switch setting, at the rear of optical instruments with very low level inputs or no audio signals. In this case, leave the player turned on the lenses inside the car. • After removing a disc from the center out. • Do not use any questions or problems...
Operating Instructions
Page 25
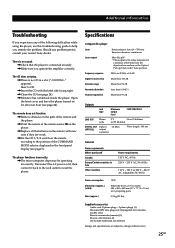
... may be operating incorrectly. projecting parts 9.5 kg (21 lbs) Supplied accessories Audio cord (2 phono plugs - 2 phono plugs) (1) Monaural (2P) mini-plug cord (1) (supplied for about an hour (see page 24). /Moisture has condensed inside the player. PlayingAdCdDistiionnVaal rIniofuosrmMaotdioens Troubleshooting If you experience any problem persist, consult your nearest Sony dealer. Should any of the remote and the player. /Point the remote at 50 kilohms) DIGITAL OUT Optical -18 dBm (OPTICAL) output connector...
... may be operating incorrectly. projecting parts 9.5 kg (21 lbs) Supplied accessories Audio cord (2 phono plugs - 2 phono plugs) (1) Monaural (2P) mini-plug cord (1) (supplied for about an hour (see page 24). /Moisture has condensed inside the player. PlayingAdCdDistiionnVaal rIniofuosrmMaotdioens Troubleshooting If you experience any problem persist, consult your nearest Sony dealer. Should any of the remote and the player. /Point the remote at 50 kilohms) DIGITAL OUT Optical -18 dBm (OPTICAL) output connector...

Operating Instructions
Page 26
... TIME/TEXT 10 ≠/± 9 ·9 P9 p9 =/+ 13 0/) 13 >10 13 Switches CD 1/2/3 5 I Inserting CDs 6 J, K JOG dial 6 L Labeling a disc 18 Locating a specific point 13 a specific track 13 by monitoring 13 by observing the display 13 directly 13 discs 12 using AMS 13 M, N, O Memo Scan 12 Memo Search 12 P, Q Playback Continuous Play 8 Group Play 21 Program Play 15 Repeat Play 14 Shuffle Play 14 Program changing 17 checking 17 erasing 17 R Remote control 4 Repeating 14 Rotary table...
... TIME/TEXT 10 ≠/± 9 ·9 P9 p9 =/+ 13 0/) 13 >10 13 Switches CD 1/2/3 5 I Inserting CDs 6 J, K JOG dial 6 L Labeling a disc 18 Locating a specific point 13 a specific track 13 by monitoring 13 by observing the display 13 directly 13 discs 12 using AMS 13 M, N, O Memo Scan 12 Memo Search 12 P, Q Playback Continuous Play 8 Group Play 21 Program Play 15 Repeat Play 14 Shuffle Play 14 Program changing 17 checking 17 erasing 17 R Remote control 4 Repeating 14 Rotary table...


