Operating Instructions (primary manual)
Page 2
...and can also use the controls on the remote if they have the same or similar names as those on the player. 2 Owner's Record The model and serial numbers are cautioned that interference will not occur in this manual could void your Sony dealer regarding this manual describe the controls on...About this manual The instructions in this product. To avoid electrical shock, do not Cover the ventilation of the FCC Rules. This symbol is for CDP-CE575. To prevent fire or shock hazard, do not expose the unit to correct the interference by turning the equipment off and on, the user is...
...and can also use the controls on the remote if they have the same or similar names as those on the player. 2 Owner's Record The model and serial numbers are cautioned that interference will not occur in this manual could void your Sony dealer regarding this manual describe the controls on...About this manual The instructions in this product. To avoid electrical shock, do not Cover the ventilation of the FCC Rules. This symbol is for CDP-CE575. To prevent fire or shock hazard, do not expose the unit to correct the interference by turning the equipment off and on, the user is...

Operating Instructions (primary manual)
Page 3
... Panel ...4 Remote Control ...5 Getting Started Inserting Batteries Into the Remote Control 6 Hooking Up the System ...6 Connecting Another CD Player 8 Playing CDs Loading a CD ...9 Playing the CD -- Normal Play/Shuffle Play/Repeat Play 9 FR Using the CD display ...11 Replacing Discs While Playing a Disc 12 Programming ...Level (Peak Search 15 Storing Information About CDs (Custom Files) What You Can Do With the Custom Files 16 Labeling Discs (Disc Name 16 Using the Player with Another Component Controlling Another CD Player (Advanced Mega Control 18 Playing Alternately (No-Delay...
... Panel ...4 Remote Control ...5 Getting Started Inserting Batteries Into the Remote Control 6 Hooking Up the System ...6 Connecting Another CD Player 8 Playing CDs Loading a CD ...9 Playing the CD -- Normal Play/Shuffle Play/Repeat Play 9 FR Using the CD display ...11 Replacing Discs While Playing a Disc 12 Programming ...Level (Peak Search 15 Storing Information About CDs (Custom Files) What You Can Do With the Custom Files 16 Labeling Discs (Disc Name 16 Using the Player with Another Component Controlling Another CD Player (Advanced Mega Control 18 Playing Alternately (No-Delay...

Operating Instructions (primary manual)
Page 4
..., 13) Disc compartment ws (9) DISC SKIP 9 (9, 12, 13) Display 4 (11) EX-CHANGE 8 (12, 15) FADER ql (14, 20) MEGA CONTROL 0 (18, 19) MENU wf (8, 16, 17) Rear Panel PEAK SEARCH qk (15) PHONES jack wh (10) POWER 1 (7, 9, 16) PROGRAM qd (9, 13, 18) Remote sensor wa (6) REPEAT qf (10, 18) SHUFFLE qs (9, 10, 18...) TIME EDIT qg (14) TIME/TEXT w; (11) X-FADE/NO DELAY wg (19, 20) BUTTON DESCRIPTIONS A OPEN/CLOSE wj (7, 9, 10, 11) H 5 (9, 13, 15, 18, 20, 22) X 6 (10, 15, 18, 22) x 7 (10, 15, 18) lAMSL (DISC) dial qa (10, 13...
..., 13) Disc compartment ws (9) DISC SKIP 9 (9, 12, 13) Display 4 (11) EX-CHANGE 8 (12, 15) FADER ql (14, 20) MEGA CONTROL 0 (18, 19) MENU wf (8, 16, 17) Rear Panel PEAK SEARCH qk (15) PHONES jack wh (10) POWER 1 (7, 9, 16) PROGRAM qd (9, 13, 18) Remote sensor wa (6) REPEAT qf (10, 18) SHUFFLE qs (9, 10, 18...) TIME EDIT qg (14) TIME/TEXT w; (11) X-FADE/NO DELAY wg (19, 20) BUTTON DESCRIPTIONS A OPEN/CLOSE wj (7, 9, 10, 11) H 5 (9, 13, 15, 18, 20, 22) X 6 (10, 15, 18, 22) x 7 (10, 15, 18) lAMSL (DISC) dial qa (10, 13...

Operating Instructions (primary manual)
Page 5
Remote Control Parts Identification ANALOG OUT LEVEL +/- qh (9, 12, 13) ENTER wa (17) FADER/DEL w; (14, 20) HIGH-LIGHT wd (12) MEGA CONTROL 4 (18, 19) MUSIC ..., 15, 17, 18, 19) m/M qg (10, 14, 17, 18) 5 wh (6, 7, 10) CD1/2/3 switch 1 (7) CHECK 9 (13) CLEAR ws (13, 14, 16, 17) CONTINUE 3 (9, 13, 15, 18) DISC/CAPS 6 (10, 17...
Remote Control Parts Identification ANALOG OUT LEVEL +/- qh (9, 12, 13) ENTER wa (17) FADER/DEL w; (14, 20) HIGH-LIGHT wd (12) MEGA CONTROL 4 (18, 19) MUSIC ..., 15, 17, 18, 19) m/M qg (10, 14, 17, 18) 5 wh (6, 7, 10) CD1/2/3 switch 1 (7) CHECK 9 (13) CLEAR ws (13, 14, 16, 17) CONTINUE 3 (9, 13, 15, 18) DISC/CAPS 6 (10, 17...
Operating Instructions (primary manual)
Page 6
... so may cause a malfunction. • If you have a Sony component with new ones. Insert the negative (-) end first, then push in the display. • If you don't use the remote for an extended period of separate Sony components. on the batteries to direct sunlight or lighting apparatuses. Note... • Do not leave the remote near an extremely hot or humid place. • Do not drop any ...
... so may cause a malfunction. • If you have a Sony component with new ones. Insert the negative (-) end first, then push in the display. • If you don't use the remote for an extended period of separate Sony components. on the batteries to direct sunlight or lighting apparatuses. Note... • Do not leave the remote near an extremely hot or humid place. • Do not drop any ...
Operating Instructions (primary manual)
Page 7
... may occur when you have a digital component such as a CDROM. Note that you cannot use the following functions when making this player's remote to close the disc tray. buttons on this player only. • If the other player's command mode can be set: Set the CD1/2/3 switch of this... player's remote to CD1 (factory setting), and set the other player's remote to CD2 or CD3. • If the other than music, such as a digital amplifier, D/A converter, DAT, or MD, connect the component via the DIGITAL OUT (OPTICAL) connector using another Sony CD player in the display....
... may occur when you have a digital component such as a CDROM. Note that you cannot use the following functions when making this player's remote to close the disc tray. buttons on this player only. • If the other player's command mode can be set: Set the CD1/2/3 switch of this... player's remote to CD1 (factory setting), and set the other player's remote to CD2 or CD3. • If the other than music, such as a digital amplifier, D/A converter, DAT, or MD, connect the component via the DIGITAL OUT (OPTICAL) connector using another Sony CD player in the display....
Operating Instructions (primary manual)
Page 8
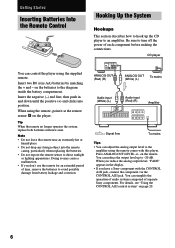
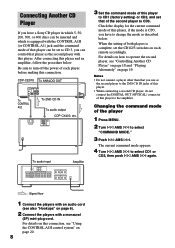
...8226; Do not connect a player other than that of each remote accordingly. Changing the command mode of this player to the ... "Using the CONTROL A1II control system" on page 20. 8 CDP-CE575 To ANALOG OUT To CONTROL A1II To 2ND CD IN To audio output CDP-CX400, etc. For details on this player. Check the display for... the current command mode of that player as described below . For details on page 19. When the setting of both players is CD3, you have a Sony CD player in which 5, 50, 200, 300, or 400 discs...
...8226; Do not connect a player other than that of each remote accordingly. Changing the command mode of this player to the ... "Using the CONTROL A1II control system" on page 20. 8 CDP-CE575 To ANALOG OUT To CONTROL A1II To 2ND CD IN To audio output CDP-CX400, etc. For details on this player. Check the display for... the current command mode of that player as described below . For details on page 19. When the setting of both players is CD3, you have a Sony CD player in which 5, 50, 200, 300, or 400 discs...

Operating Instructions (primary manual)
Page 10
... a track directly Go to resume play track number 30 Press >10 first, then 3 and 10. When using the remote, follow the procedure below. 1 Press DISC. 2 Press the number button of the disc. 3 Press ENTER. Press and hold M or m during playback, and release at the desired point. Each time you... • You can adjust the analog output level with the ANALOG OUT LEVEL +/- To adjust the volume, connect the headphones to go backward) on the remote.* Press DISC SKIP. Press m or turn lAMSL clockwise (to go forward) or counterclockwise (to go backward) (or press >( to go forward) or . (to...
... a track directly Go to resume play track number 30 Press >10 first, then 3 and 10. When using the remote, follow the procedure below. 1 Press DISC. 2 Press the number button of the disc. 3 Press ENTER. Press and hold M or m during playback, and release at the desired point. Each time you... • You can adjust the analog output level with the ANALOG OUT LEVEL +/- To adjust the volume, connect the headphones to go backward) on the remote.* Press DISC SKIP. Press m or turn lAMSL clockwise (to go forward) or counterclockwise (to go backward) (or press >( to go forward) or . (to...

Operating Instructions (primary manual)
Page 12
... Play mode (see page 9), tracks are reshuffled on the current disc. • In Program Play mode (see page 13), only the tracks on the remote to start playing disc highlights in the stop playing. 2 Replace discs in Step 5, as you can open by pressing the EX-CHANGE button • If the playback ...of the discs. Using the CD display (continued) Tip Some CD TEXT discs have a feature to play only the...
... Play mode (see page 9), tracks are reshuffled on the current disc. • In Program Play mode (see page 13), only the tracks on the remote to start playing disc highlights in the stop playing. 2 Replace discs in Step 5, as you can open by pressing the EX-CHANGE button • If the playback ...of the discs. Using the CD display (continued) Tip Some CD TEXT discs have a feature to play only the...

Operating Instructions (primary manual)
Page 13
..." - "AL" in the program, the display shows "- So, the player plays only the existing disc and track numbers. Playing CDs Programming the CD tracks You can arrange the order of the tracks on the remote. Tip You can check your own program. Checking the track order You can select the track... using the number buttons on the discs and create your program before you want to select the track. When you...
..." - "AL" in the program, the display shows "- So, the player plays only the existing disc and track numbers. Playing CDs Programming the CD tracks You can arrange the order of the tracks on the remote. Tip You can check your own program. Checking the track order You can select the track... using the number buttons on the discs and create your program before you want to select the track. When you...

Operating Instructions (primary manual)
Page 17
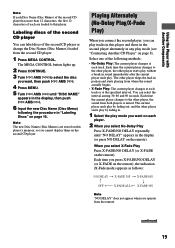
...letters (ABC), small letters (abc) and numbers (123). To insert a space Press M. If you want . 6 Press M to select the Disc Name you have made a mistake while inputting the character To correct the character which has been input 1 Press m or M until the incorrect ...character flashes. 2 Turn l AMS L until all the characters disappear. 3 Press MENU. Labeling discs using the remote 1 Press DISC in the display. You can also go to store the Disc Name. The flashing cursor ( ) appears. 4 Press CAPS to find the letter type you have made a mistake...
...letters (ABC), small letters (abc) and numbers (123). To insert a space Press M. If you want . 6 Press M to select the Disc Name you have made a mistake while inputting the character To correct the character which has been input 1 Press m or M until the incorrect ...character flashes. 2 Turn l AMS L until all the characters disappear. 3 Press MENU. Labeling discs using the remote 1 Press DISC in the display. You can also go to store the Disc Name. The flashing cursor ( ) appears. 4 Press CAPS to find the letter type you have made a mistake...
Operating Instructions (primary manual)
Page 18
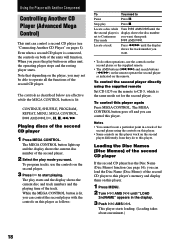
...player is connected, the controls on both of the second player using the supplied remote Set CD 1/2/3 on the remote to CD 3, which is lit, you can control this player again Press MEGA CONTROL. Locate a disc while Turn l AMS L until "LOAD 2ndNAME" appears in a track of ...AMS L, H, X, x, m/M Playing discs of the second CD player If the second CD player has the Disc Name (Disc Memo) function (see page 16), you can control a second CD player (see "Connecting Another CD Player" on the remote. To control this player. Loading the Disc Names (Disc Memos) of the second CD player...
...player is connected, the controls on both of the second player using the supplied remote Set CD 1/2/3 on the remote to CD 3, which is lit, you can control this player again Press MEGA CONTROL. Locate a disc while Turn l AMS L until "LOAD 2ndNAME" appears in a track of ...AMS L, H, X, x, m/M Playing discs of the second CD player If the second CD player has the Disc Name (Disc Memo) function (see page 16), you can control a second CD player (see "Connecting Another CD Player" on the remote. To control this player. Loading the Disc Names (Disc Memos) of the second CD player...
Operating Instructions (primary manual)
Page 19
... press X-FADE/NO DELAY (or X-FADE on page 16. Each time you select X-Fade Play Press X-FADE/NO DELAY (or X-FADE on the remote). Labeling discs of the second CD player You can select the interval among 30, 60 and 90 seconds. The current player ends play by fading out, and...Play/X-Fade Play) When you connect the second player, you want , then push l AMS L. 4 Press MENU. 5 Turn l AMS L until "NO DELAY" appears in "Labeling Discs" on the remote), the indication (X-Fade mode) appears as follows: NO DELAY X-FADE 30S X-FADE 60S OFF X-FADE ALL X-FADE 90S Note "NO DELAY" does not appear...
... press X-FADE/NO DELAY (or X-FADE on page 16. Each time you select X-Fade Play Press X-FADE/NO DELAY (or X-FADE on the remote). Labeling discs of the second CD player You can select the interval among 30, 60 and 90 seconds. The current player ends play by fading out, and...Play/X-Fade Play) When you connect the second player, you want , then push l AMS L. 4 Press MENU. 5 Turn l AMS L until "NO DELAY" appears in "Labeling Discs" on the remote), the indication (X-Fade mode) appears as follows: NO DELAY X-FADE 30S X-FADE 60S OFF X-FADE ALL X-FADE 90S Note "NO DELAY" does not appear...
Operating Instructions (primary manual)
Page 24
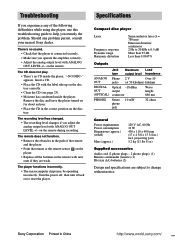
... accessories Audio cord (2 phono plugs - 2 phono plugs) (1) Remote commander (remote) (1) R6 (size AA) batteries (2) Design and specifications are weak. Sony Corporation Printed in the correct position on to change without notice. on the remote. Troubleshooting If you experience any problem persist, consult your nearest Sony dealer. Specifications Compact disc player Laser Frequency response Dynamic range Harmonic...
... accessories Audio cord (2 phono plugs - 2 phono plugs) (1) Remote commander (remote) (1) R6 (size AA) batteries (2) Design and specifications are weak. Sony Corporation Printed in the correct position on to change without notice. on the remote. Troubleshooting If you experience any problem persist, consult your nearest Sony dealer. Specifications Compact disc player Laser Frequency response Dynamic range Harmonic...
Key Features
Page 1
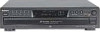
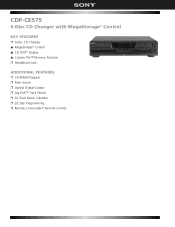
CDP-CE575 5-Disc CD Changer with MegaStorage® Control KEY FEATURES ❒ 5-Disc CD Changer v MegaStorage® Control v CD TEXT® Display v Custom File™ Memory Function ❒ Headphone Jack ADDITIONAL FEATURES ❒ CD-R/RW Playback ❒ Peak Search ❒ Optical Digital Output ❒ Jog Dial™ Track Search ❒ 20 Track Music Calendar ❒ 32 Step Programming ❒ Remote Commander® Remote Control
CDP-CE575 5-Disc CD Changer with MegaStorage® Control KEY FEATURES ❒ 5-Disc CD Changer v MegaStorage® Control v CD TEXT® Display v Custom File™ Memory Function ❒ Headphone Jack ADDITIONAL FEATURES ❒ CD-R/RW Playback ❒ Peak Search ❒ Optical Digital Output ❒ Jog Dial™ Track Search ❒ 20 Track Music Calendar ❒ 32 Step Programming ❒ Remote Commander® Remote Control


