
Limited Warranty (US Only)
Page 1
... you, or for service assistance or resolution of a service problem, or for all parts costs. 3. 4-557-172-02 General Stereo/Hifi Components/Tape Decks ® CD Players/Mini Disc Players/Audio Systems Hifi Audio LIMITED WARRANTY Sony Electronics Inc. ("Sony") warrants this Product is determined to be presented to service the Product. After the Warranty Period, you must pay for product information or operation, call : 1-800-488-SONY (7669) Printed in...
... you, or for service assistance or resolution of a service problem, or for all parts costs. 3. 4-557-172-02 General Stereo/Hifi Components/Tape Decks ® CD Players/Mini Disc Players/Audio Systems Hifi Audio LIMITED WARRANTY Sony Electronics Inc. ("Sony") warrants this Product is determined to be presented to service the Product. After the Warranty Period, you must pay for product information or operation, call : 1-800-488-SONY (7669) Printed in...
Operating Instructions (primary manual)
Page 2
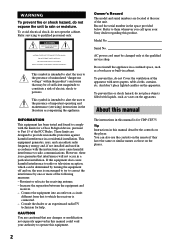
... power cord must be changed only at the rear of the FCC Rules. To prevent fire or shock hazard, do not open the cabinet. Refer servicing to provide reasonable protection against harmful interference in accordance with news papers, table-cloths, curtains, etc. Owner's Record The model and serial numbers are designed to qualified personnel only. You can radiate radio frequency energy and, if not installed...
... power cord must be changed only at the rear of the FCC Rules. To prevent fire or shock hazard, do not open the cabinet. Refer servicing to provide reasonable protection against harmful interference in accordance with news papers, table-cloths, curtains, etc. Owner's Record The model and serial numbers are designed to qualified personnel only. You can radiate radio frequency energy and, if not installed...

Operating Instructions (primary manual)
Page 3
Table of Contents Parts Identification 4 Front Panel ...4 Rear Panel ...4 Remote Control ...5 Getting Started Inserting Batteries Into the Remote Control 6 Hooking Up the System ...6 Connecting Another CD Player 8 Playing CDs Loading a CD ...9 Playing the CD -- Normal Play/Shuffle Play/Repeat Play 9 FR Using the CD display ...11 Replacing Discs While Playing a Disc 12 Programming the CD tracks 13 Fading In or Out ...14 Recording From CDs Recording a CD by Specifying Tape Length (Time Edit 14 Adjusting the Recording Level (Peak Search 15 Storing Information About CDs (Custom ...
Table of Contents Parts Identification 4 Front Panel ...4 Rear Panel ...4 Remote Control ...5 Getting Started Inserting Batteries Into the Remote Control 6 Hooking Up the System ...6 Connecting Another CD Player 8 Playing CDs Loading a CD ...9 Playing the CD -- Normal Play/Shuffle Play/Repeat Play 9 FR Using the CD display ...11 Replacing Discs While Playing a Disc 12 Programming the CD tracks 13 Fading In or Out ...14 Recording From CDs Recording a CD by Specifying Tape Length (Time Edit 14 Adjusting the Recording Level (Peak Search 15 Storing Information About CDs (Custom ...

Operating Instructions (primary manual)
Page 4
...) Disc compartment ws (9) DISC SKIP 9 (9, 12, 13) Display 4 (11) EX-CHANGE 8 (12, 15) FADER ql (14, 20) MEGA CONTROL 0 (18, 19) MENU wf (8, 16, 17) Rear Panel PEAK SEARCH qk (15) PHONES jack wh (10) POWER 1 (7, 9, 16) PROGRAM qd (9, 13, 18) Remote sensor wa (6) REPEAT qf (10, 18) SHUFFLE qs (9, 10, 18) TIME EDIT qg (14) TIME/TEXT w; (11) X-FADE/NO DELAY wg (19, 20) BUTTON DESCRIPTIONS A OPEN...
...) Disc compartment ws (9) DISC SKIP 9 (9, 12, 13) Display 4 (11) EX-CHANGE 8 (12, 15) FADER ql (14, 20) MEGA CONTROL 0 (18, 19) MENU wf (8, 16, 17) Rear Panel PEAK SEARCH qk (15) PHONES jack wh (10) POWER 1 (7, 9, 16) PROGRAM qd (9, 13, 18) Remote sensor wa (6) REPEAT qf (10, 18) SHUFFLE qs (9, 10, 18) TIME EDIT qg (14) TIME/TEXT w; (11) X-FADE/NO DELAY wg (19, 20) BUTTON DESCRIPTIONS A OPEN...
Operating Instructions (primary manual)
Page 6
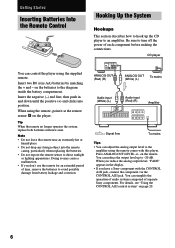
... to the amplifier using the remote comes with this player. When using the supplied remote. Insert two R6 (size AA) batteries by matching the + and - You can adjust the analog output level to turn off the power of each component before making the connections. Doing so may cause a malfunction. • If you have a Sony component with new ones. Getting Started Inserting Batteries Into the Remote Control Hooking Up the System...
... to the amplifier using the remote comes with this player. When using the supplied remote. Insert two R6 (size AA) batteries by matching the + and - You can adjust the analog output level to turn off the power of each component before making the connections. Doing so may cause a malfunction. • If you have a Sony component with new ones. Getting Started Inserting Batteries Into the Remote Control Hooking Up the System...
Operating Instructions (primary manual)
Page 7
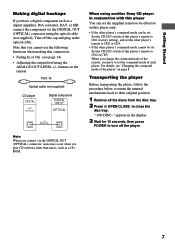
... discs from the disc tray. 2 Press A OPEN/CLOSE to close the disc tray. For details, see page 14) • Adjusting the output level using the ANALOG OUT LEVEL +/- buttons on the remote POC-15 Optical cable (not supplied) CD player DIGITAL OUT OPTICAL Digital component DIGITAL INPUT OPTICAL Note When you connect via the DIGITAL OUT (OPTICAL) connector using another Sony CD player in conjunction with this player You can be set: Set the CD1/2/3 switch of this player's remote to CD1 (factory setting), and set the other player's remote...
... discs from the disc tray. 2 Press A OPEN/CLOSE to close the disc tray. For details, see page 14) • Adjusting the output level using the ANALOG OUT LEVEL +/- buttons on the remote POC-15 Optical cable (not supplied) CD player DIGITAL OUT OPTICAL Digital component DIGITAL INPUT OPTICAL Note When you connect via the DIGITAL OUT (OPTICAL) connector using another Sony CD player in conjunction with this player You can be set: Set the CD1/2/3 switch of this player's remote to CD1 (factory setting), and set the other player's remote...
Operating Instructions (primary manual)
Page 8
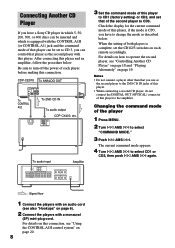
... be set the CD1/2/3 switches on page 19. For details on how to operate the second player, see also "Hookups" on page 20. 8 After connecting this connection, see "Using the CONTROL A1II control system" on page 6). 2 Connect the players with an audio cord (see "Controlling Another CD Player" on page 18 and "Playing Alternately" on each player before making this connection. Connecting Another CD Player If you have to change the mode as described below . CDP-CE575...
... be set the CD1/2/3 switches on page 19. For details on how to operate the second player, see also "Hookups" on page 20. 8 After connecting this connection, see "Using the CONTROL A1II control system" on page 6). 2 Connect the players with an audio cord (see "Controlling Another CD Player" on page 18 and "Playing Alternately" on each player before making this connection. Connecting Another CD Player If you have to change the mode as described below . CDP-CE575...

Operating Instructions (primary manual)
Page 10
... Operations To Stop playback Pause Select a track Do this Press the number button on the tape deck, etc. 10 Example: To play . Press X again or H to the PHONES jack and adjust the volume with the ANALOG OUT LEVEL +/- Press SHUFFLE until "REPEAT' appears in the display. To enter "0," use button 10. To adjust the volume, connect the headphones to resume play track number 30 Press >10 first, then 3 and 10. To activate the Repeat Play function...
... Operations To Stop playback Pause Select a track Do this Press the number button on the tape deck, etc. 10 Example: To play . Press X again or H to the PHONES jack and adjust the volume with the ANALOG OUT LEVEL +/- Press SHUFFLE until "REPEAT' appears in the display. To enter "0," use button 10. To adjust the volume, connect the headphones to resume play track number 30 Press >10 first, then 3 and 10. To activate the Repeat Play function...

Operating Instructions (primary manual)
Page 11
... music calendar. The display shows the CD TEXT information of tracks and total playing time During normal playback Press TIME/TEXT. Track title t Playing time on the current disc t Remaining time on the current track t Remaining time on the disc number indications • The red circle around the disc number disappears. • When a disc compartment is no information. Playing time on the current track t Remaining time on the current track t Remaining time on the disc Note In Program Play mode...
... music calendar. The display shows the CD TEXT information of tracks and total playing time During normal playback Press TIME/TEXT. Track title t Playing time on the current disc t Remaining time on the current track t Remaining time on the disc number indications • The red circle around the disc number disappears. • When a disc compartment is no information. Playing time on the current track t Remaining time on the current track t Remaining time on the disc Note In Program Play mode...

Operating Instructions (primary manual)
Page 12
... player can only display the disc titles, track titles and artist names from CD TEXT discs. While the disc tray is playing a disc, it in the compartments with new ones. Replacing Discs While Playing a Disc You can check what discs are to close it doesn't stop mode. Other information cannot be played next and replace discs without interrupting playback of the current disc. 1 Press EX-CHANGE. The disc tray opens and two disc compartments appear. The disc tray closes. The disc tray turns...
... player can only display the disc titles, track titles and artist names from CD TEXT discs. While the disc tray is playing a disc, it in the compartments with new ones. Replacing Discs While Playing a Disc You can check what discs are to close it doesn't stop mode. Other information cannot be played next and replace discs without interrupting playback of the current disc. 1 Press EX-CHANGE. The disc tray opens and two disc compartments appear. The disc tray closes. The disc tray turns...

Operating Instructions (primary manual)
Page 13
... Press CLEAR, then repeat Step 3. You have programmed a track whose number exceeds 20. - Each time you start Program Play. If you check the order after you can pause Program Play. To select a track with pressing the DISC SKIP button to the A side or B side of the cassette tape, you start playing. If you close the disc tray before Step 5, the total playing time appears in the programmed order. • For...
... Press CLEAR, then repeat Step 3. You have programmed a track whose number exceeds 20. - Each time you start Program Play. If you check the order after you can pause Program Play. To select a track with pressing the DISC SKIP button to the A side or B side of the cassette tape, you start playing. If you close the disc tray before Step 5, the total playing time appears in the programmed order. • For...
Operating Instructions (primary manual)
Page 14
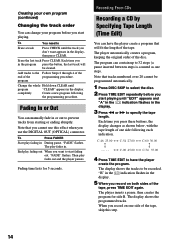
... the display. 3 Press m or M to specify the tape length. program Change the whole Hold down CLEAR until program "CLEAR" appears in or out to start playing. completely Create a new program following each indication. Fading In or Out You can manually fade in the display. End play fades out and the player pauses. "FADE" flashes. Fading time lasts for side B. Recording From CDs Recording a CD by Specifying Tape Length (Time Edit...
... the display. 3 Press m or M to specify the tape length. program Change the whole Hold down CLEAR until program "CLEAR" appears in or out to start playing. completely Create a new program following each indication. Fading In or Out You can manually fade in the display. End play fades out and the player pauses. "FADE" flashes. Fading time lasts for side B. Recording From CDs Recording a CD by Specifying Tape Length (Time Edit...
Operating Instructions (primary manual)
Page 15
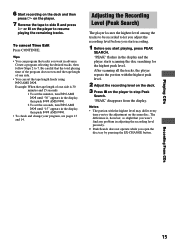
... that you open the disc tray by pressing the EX-CHANGE button. Playing CDs Recording From CDs 15 Example: When the tape length of one side is , however, so slight that the total playing time of the program does not exceed the tape length of one side. • You can program the tracks you want in adjusting the recording level precisely. • Peak Search does not operate while you...
... that you open the disc tray by pressing the EX-CHANGE button. Playing CDs Recording From CDs 15 Example: When the tape length of one side is , however, so slight that the total playing time of the program does not exceed the tape length of one side. • You can program the tracks you want in adjusting the recording level precisely. • Peak Search does not operate while you...
Operating Instructions (primary manual)
Page 18
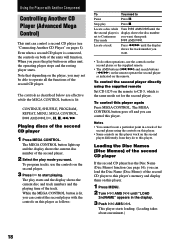
... the current disc and track numbers and the playing time of the units will function. The MEGA CONTROL button goes off and you want . Locate a disc while Turn l AMS L until "LOAD 2ndNAME" appears in a track of the second player using the supplied remote Set CD 1/2/3 on both of the track. When you may not be able to this player's memory and display them on this player work on either unit, the operating player stops and the...
... the current disc and track numbers and the playing time of the units will function. The MEGA CONTROL button goes off and you want . Locate a disc while Turn l AMS L until "LOAD 2ndNAME" appears in a track of the second player using the supplied remote Set CD 1/2/3 on both of the track. When you may not be able to this player's memory and display them on this player work on either unit, the operating player stops and the...
Operating Instructions (primary manual)
Page 19
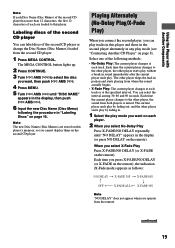
... the remote. Each time you operate from the second CD player. 1 Press MEGA CONTROL. Note The new Disc Names (Disc Memos) are loaded to this player and those in the second player alternately in any play mode (see "Connecting Another CD Player" on the second CD player. Playing Alternately (No-Delay Play/X-Fade Play) When you connect the second player, you cannot display them on page 8). Each time the current player changes to the other player, the other player, the sound...
... the remote. Each time you operate from the second CD player. 1 Press MEGA CONTROL. Note The new Disc Names (Disc Memos) are loaded to this player and those in the second player alternately in any play mode (see "Connecting Another CD Player" on the second CD player. Playing Alternately (No-Delay Play/X-Fade Play) When you connect the second player, you cannot display them on page 8). Each time the current player changes to the other player, the other player, the sound...
Operating Instructions (primary manual)
Page 20
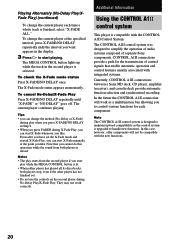
... the MEGA CONTROL button is finished, select "X-FADE ALL." The CONTROL A1II control system was designed to simplify the operation of audio systems composed of control signals that you can start playing. In the future the CONTROL A1II connection will not be compatible with integrated systems. Currently, CONTROL A1II connections between a Sony MD deck, CD player, amplifier (receiver), and cassette deck provide automatic function selection and synchronized recording. To change...
... the MEGA CONTROL button is finished, select "X-FADE ALL." The CONTROL A1II control system was designed to simplify the operation of audio systems composed of control signals that you can start playing. In the future the CONTROL A1II connection will not be compatible with integrated systems. Currently, CONTROL A1II connections between a Sony MD deck, CD player, amplifier (receiver), and cassette deck provide automatic function selection and synchronized recording. To change...
Operating Instructions (primary manual)
Page 21
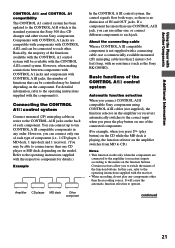
... play button on the component. continued 21 Components with CONTROL A1 jacks are connected to the amplifier (or receiver) inputs according to switch the names of component (i.e., 1 CD player, 1 MD deck, 1 tape deck and 1 receiver). (You may be available with the CONTROL A1II control system. For detailed information, refer to each type of the function buttons. Connecting the CONTROL A1II control system Connect monaural (2P) mini-plug cables in the Sony 300 disc CD changer...
... play button on the component. continued 21 Components with CONTROL A1 jacks are connected to the amplifier (or receiver) inputs according to switch the names of component (i.e., 1 CD player, 1 MD deck, 1 tape deck and 1 receiver). (You may be available with the CONTROL A1II control system. For detailed information, refer to each type of the function buttons. Connecting the CONTROL A1II control system Connect monaural (2P) mini-plug cables in the Sony 300 disc CD changer...
Operating Instructions (primary manual)
Page 22
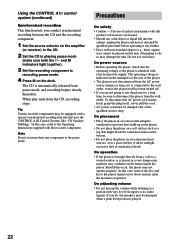
..., moisture may be changed only at the rear of the player is indicated on the nameplate at the qualified service shop. Using the CONTROL A1II control system (continued) Synchronized recording This function lets you are not going to use the player for about an hour until the moisture evaporates. like "CD Synchro Dubbing." never pull the cord. • AC power cord must be damaged when...
..., moisture may be changed only at the rear of the player is indicated on the nameplate at the qualified service shop. Using the CONTROL A1II control system (continued) Synchronized recording This function lets you are not going to use the player for about an hour until the moisture evaporates. like "CD Synchro Dubbing." never pull the cord. • AC power cord must be damaged when...
Operating Instructions (primary manual)
Page 24
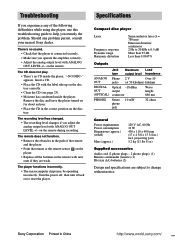
... the problem. Sony Corporation Printed in .) incl. projecting parts 5.2 kg (11 lbs 8 oz) Supplied accessories Audio cord (2 phono plugs - 2 phono plugs) (1) Remote commander (remote) (1) R6 (size AA) batteries (2) Design and specifications are weak. The player functions incorrectly. • The microcomputer chips may be operating incorrectly. Turn the power off, then turn it back on the player. • Replace all the batteries in the correct position on the disc tray correctly. • Clean the CD (see...
... the problem. Sony Corporation Printed in .) incl. projecting parts 5.2 kg (11 lbs 8 oz) Supplied accessories Audio cord (2 phono plugs - 2 phono plugs) (1) Remote commander (remote) (1) R6 (size AA) batteries (2) Design and specifications are weak. The player functions incorrectly. • The microcomputer chips may be operating incorrectly. Turn the power off, then turn it back on the player. • Replace all the batteries in the correct position on the disc tray correctly. • Clean the CD (see...
Key Features
Page 1
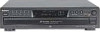
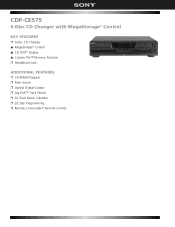
CDP-CE575 5-Disc CD Changer with MegaStorage® Control KEY FEATURES ❒ 5-Disc CD Changer v MegaStorage® Control v CD TEXT® Display v Custom File™ Memory Function ❒ Headphone Jack ADDITIONAL FEATURES ❒ CD-R/RW Playback ❒ Peak Search ❒ Optical Digital Output ❒ Jog Dial™ Track Search ❒ 20 Track Music Calendar ❒ 32 Step Programming ❒ Remote Commander® Remote Control
CDP-CE575 5-Disc CD Changer with MegaStorage® Control KEY FEATURES ❒ 5-Disc CD Changer v MegaStorage® Control v CD TEXT® Display v Custom File™ Memory Function ❒ Headphone Jack ADDITIONAL FEATURES ❒ CD-R/RW Playback ❒ Peak Search ❒ Optical Digital Output ❒ Jog Dial™ Track Search ❒ 20 Track Music Calendar ❒ 32 Step Programming ❒ Remote Commander® Remote Control


