Operating Instructions
Page 4
...Before you record one-time events, you use The heat of images recorded or edited with Mavica discs*. • While the image is lit, do not affect the recording in this camera, and page 120 for effective use. Precaution on copyright Television programs, films, video tapes... to page 18 for Camera File system universal standard established by the JEITA (Japan Electronics and Information Technology Industries Association). • Playback of your camera This digital still camera uses 8 cm CD-Rs/CDRWs as "disc" in any way. • Be careful when placing the camera near a window or ...
...Before you record one-time events, you use The heat of images recorded or edited with Mavica discs*. • While the image is lit, do not affect the recording in this camera, and page 120 for effective use. Precaution on copyright Television programs, films, video tapes... to page 18 for Camera File system universal standard established by the JEITA (Japan Electronics and Information Technology Industries Association). • Playback of your camera This digital still camera uses 8 cm CD-Rs/CDRWs as "disc" in any way. • Be careful when placing the camera near a window or ...
Operating Instructions
Page 6
... images on /off your camera .. 41 Changing the menu settings 41 Changing the items in the SET UP screen 41 How to use the control button 15 Setting the date and time 16 Shooting still images Inserting and removing a disc 18 Initializing a disc 19 What is initialization 19... battery pack 11 Using an external power source 14 Using your camera abroad 14 Turning on a TV screen 34 Deleting still images Deleting images 36 Formatting a CD-RW 39 Before advanced operations How to setup and operate your camera 15 How to the subject - Exposure Bracket...........55 Adjusting color ...
... images on /off your camera .. 41 Changing the menu settings 41 Changing the items in the SET UP screen 41 How to use the control button 15 Setting the date and time 16 Shooting still images Inserting and removing a disc 18 Initializing a disc 19 What is initialization 19... battery pack 11 Using an external power source 14 Using your camera abroad 14 Turning on a TV screen 34 Deleting still images Deleting images 36 Formatting a CD-RW 39 Before advanced operations How to setup and operate your camera 15 How to the subject - Exposure Bracket...........55 Adjusting color ...

Operating Instructions
Page 7
...before write 66 Using an external flash 67 Using the Sony HVL-F32X Flash ......67 Using the Sony HVL-F1000 Flash .....68 Using a commercially available external... 84 Viewing images using CD-ROM drive .. 85 Finalizing a disc 85 What is finalization 85 Canceling finalization (Unfinalize) (CD-RW only 86 Using the supplied 8cm CD adapter... 87 Viewing images through a CD-ROM drive 88 Image ...92 Connecting the camera to scene conditions - Folder 69 Enlarging a portion of images that can be saved or shooting time 110 Menu items 112 SET UP items 116 Precautions 119 On discs 120 On "...
...before write 66 Using an external flash 67 Using the Sony HVL-F32X Flash ......67 Using the Sony HVL-F1000 Flash .....68 Using a commercially available external... 84 Viewing images using CD-ROM drive .. 85 Finalizing a disc 85 What is finalization 85 Canceling finalization (Unfinalize) (CD-RW only 86 Using the supplied 8cm CD adapter... 87 Viewing images through a CD-ROM drive 88 Image ...92 Connecting the camera to scene conditions - Folder 69 Enlarging a portion of images that can be saved or shooting time 110 Menu items 112 SET UP items 116 Precautions 119 On discs 120 On "...

Operating Instructions
Page 8
... digital still camera is complete. View on the camera (page 32) Record Disc preparation for recording on your computer using application software. View through a CD-ROM drive is required (page 85). 8 Flow chart for disc operations Start A new disc : CD-R : CD-RW Initialize (page 19) Preparation for recording is capable of recording still images and movies onto 8 cm CD-R/CD-RW discs...
... digital still camera is complete. View on the camera (page 32) Record Disc preparation for recording on your computer using application software. View through a CD-ROM drive is required (page 85). 8 Flow chart for disc operations Start A new disc : CD-R : CD-RW Initialize (page 19) Preparation for recording is capable of recording still images and movies onto 8 cm CD-R/CD-RW discs...

Operating Instructions
Page 9
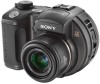
You will be unable to firmly secure the camera to tripods having longer screws, and may damage the camera. • Use ACC jack to connect an external flash or other equipment. • Do not touch the microphone while recording. 9 Identifying the parts See the ... (27) F Battery cover (11) G Lens H Tripod receptacle (bottom surface) qf qg qh I Flash emitter (27) J Advanced accessory shoe (67) K Hook for lens cap/shoulder strap L Disc cover OPEN lever (18) M ACC (Accessory) jack (67) N Lens cap O (USB) jack (93) P A/V OUT (MONO) jack (34) • Use a tripod with a screw length of less...
You will be unable to firmly secure the camera to tripods having longer screws, and may damage the camera. • Use ACC jack to connect an external flash or other equipment. • Do not touch the microphone while recording. 9 Identifying the parts See the ... (27) F Battery cover (11) G Lens H Tripod receptacle (bottom surface) qf qg qh I Flash emitter (27) J Advanced accessory shoe (67) K Hook for lens cap/shoulder strap L Disc cover OPEN lever (18) M ACC (Accessory) jack (67) N Lens cap O (USB) jack (93) P A/V OUT (MONO) jack (34) • Use a tripod with a screw length of less...

Operating Instructions
Page 13
... actual numbers may be less than indicated depending on the conditions of images that can be recorded or viewed take into account changing the supplied disc as time passes (page 122). - [AF Mode] is set to [Fine] - The power turns on and off once every ten times - [AF Mode] is low.... The numbers of use it more and more and as necessary. Shooting one time every 30 seconds - The zoom is low - The camera has been turned on and off many times - The battery power is set to [Monitor] in the SET UP settings 13
... actual numbers may be less than indicated depending on the conditions of images that can be recorded or viewed take into account changing the supplied disc as time passes (page 122). - [AF Mode] is set to [Fine] - The power turns on and off once every ten times - [AF Mode] is low.... The numbers of use it more and more and as necessary. Shooting one time every 30 seconds - The zoom is low - The camera has been turned on and off many times - The battery power is set to [Monitor] in the SET UP settings 13
Operating Instructions
Page 18
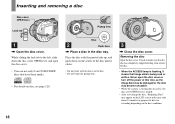
... not touch the pickup lens. 3 , Close the disc cover. Never open the disc cover. • You can use only 8 cm CD-R/CD-RW discs that image data is locked. • After you change the disc, "Repairing Data" may become unusable. • While the camera is writing data on a disc, the disc cover OPEN lever is being read or written...
... not touch the pickup lens. 3 , Close the disc cover. Never open the disc cover. • You can use only 8 cm CD-R/CD-RW discs that image data is locked. • After you change the disc, "Repairing Data" may become unusable. • While the camera is writing data on a disc, the disc cover OPEN lever is being read or written...

Operating Instructions
Page 19
... the mode dial is required to record images on the disc. Mode dial 1 , Insert a new disc and set to P, S, A, M, SCN or . • You can also perform initialization using your camera to view images through a CD-ROM drive, initialization is initialization? Shooting still images Initializing a disc What is also automatically performed, and you can continue to...
... the mode dial is required to record images on the disc. Mode dial 1 , Insert a new disc and set to P, S, A, M, SCN or . • You can also perform initialization using your camera to view images through a CD-ROM drive, initialization is initialization? Shooting still images Initializing a disc What is also automatically performed, and you can continue to...
Operating Instructions
Page 21
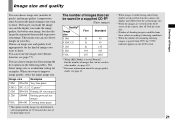
... size is a minimum setting for the kind of images that can be saved in a supplied CD-R2) (Units: images) Quality3) Image size Fine Standard 5.0M 51 95 4.5M(3:2) 51 ... images later (Resize function, see page 43. • When images recorded using earlier Sony models are played back on this camera, the display may differ from the actual image size. • When the images are...and the higher you want to preserve your disc. You can choose image size (number of pixels) and image quality (compression ratio) based on the LCD screen of the camera, they all look the same size. •...
... size is a minimum setting for the kind of images that can be saved in a supplied CD-R2) (Units: images) Quality3) Image size Fine Standard 5.0M 51 95 4.5M(3:2) 51 ... images later (Resize function, see page 43. • When images recorded using earlier Sony models are played back on this camera, the display may differ from the actual image size. • When the images are...and the higher you want to preserve your disc. You can choose image size (number of pixels) and image quality (compression ratio) based on the LCD screen of the camera, they all look the same size. •...

Operating Instructions
Page 22
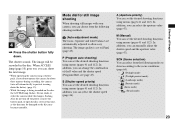
... flashing to the subject is ready for shooting. (The LCD screen may be stored in the disc (page 43). 22 2 , Hold the camera steadily with your fingers. • The minimum focal distance to steadily lit, the camera is 50 cm (19 3/4 inches). AE/AF lock indicator 3 Flashes green t Lights up and ...halfway down. Basic still image shooting - The lens portion moves when you release the shutter button, the recording will be canceled. • When the camera does not beep, the AF adjustment is not set properly (except in the center of the focus frame. Do not cover the lens or flash...
... flashing to the subject is ready for shooting. (The LCD screen may be stored in the disc (page 43). 22 2 , Hold the camera steadily with your fingers. • The minimum focal distance to steadily lit, the camera is 50 cm (19 3/4 inches). AE/AF lock indicator 3 Flashes green t Lights up and ...halfway down. Basic still image shooting - The lens portion moves when you release the shutter button, the recording will be canceled. • When the camera does not beep, the AF adjustment is not set properly (except in the center of the focus frame. Do not cover the lens or flash...
Operating Instructions
Page 23
Mode dial for about three minutes during recording, the camera turns off the power, remove the battery pack, or open the disc cover at this lamp is being recorded on the disc, the ACCESS lamp flashes. A (Aperture priority) You can manually adjust the shutter speed and the aperture value (page 47). In addition, you...
Mode dial for about three minutes during recording, the camera turns off the power, remove the battery pack, or open the disc cover at this lamp is being recorded on the disc, the ACCESS lamp flashes. A (Aperture priority) You can manually adjust the shutter speed and the aperture value (page 47). In addition, you...

Operating Instructions
Page 36
.... 2 , Press (Delete). Then, select [Delete] with V on the control button, then press z. 36 If you may not be deleted with v on the camera. To cancel deleting Select [Exit] with v and press z. The image has not yet been deleted at this point. • You cannot delete the protected image... b/B on the control button to select the image you want to delete. • When using a CD-R, the disc remaining space does not increase even if you delete images. • When using a CD-RW, the disc remaining space increases only if you delete the last image you shot while is not sufficient, you...
.... 2 , Press (Delete). Then, select [Delete] with V on the control button, then press z. 36 If you may not be deleted with v on the camera. To cancel deleting Select [Exit] with v and press z. The image has not yet been deleted at this point. • You cannot delete the protected image... b/B on the control button to select the image you want to delete. • When using a CD-R, the disc remaining space does not increase even if you delete images. • When using a CD-RW, the disc remaining space increases only if you delete the last image you shot while is not sufficient, you...

Operating Instructions
Page 38
... Delete Exit 101-0002 2003 7 4 10:30PM OK BACK/NEXT 4 , Press (Delete) and select [OK] with b/B on the control button, then press z. When the message "Disc access" disappears, the images have been deleted. To cancel deleting Select [Exit] with b on the control button, then press z. 1 , While an index (triple-image) screen...
... Delete Exit 101-0002 2003 7 4 10:30PM OK BACK/NEXT 4 , Press (Delete) and select [OK] with b/B on the control button, then press z. When the message "Disc access" disappears, the images have been deleted. To cancel deleting Select [Exit] with b on the control button, then press z. 1 , While an index (triple-image) screen...

Operating Instructions
Page 39
..." disappears, the image has been deleted. Set the mode dial to SET UP, and turn on the camera. • A CD-R cannot be formatted. • Formatting is also automatically initialized after formatting. 2 , Select 1 (Disc Tool 1) with v/V, then press B. • We recommend using the AC Adaptor to prevent the power from turning off partway through...
..." disappears, the image has been deleted. Set the mode dial to SET UP, and turn on the camera. • A CD-R cannot be formatted. • Formatting is also automatically initialized after formatting. 2 , Select 1 (Disc Tool 1) with v/V, then press B. • We recommend using the AC Adaptor to prevent the power from turning off partway through...

Operating Instructions
Page 40
To cancel formatting Select [Cancel] with V on the control button, then press z. 4 , Select [OK] with this camera. 40 Format the disc again with v, then press z. Format Place on level surface All data will be used with v on the control button, then press z. O K Cancel ... completed. • It may take some time to format a CD-RW. • A CD-RW can be formatted about 300 times. • A CD-RW formatted using other equipment than this camera. When the message "Format in progress 3 , Select [OK] with this camera cannot be erased Ready? "Format Place on level surface" appears ...
To cancel formatting Select [Cancel] with V on the control button, then press z. 4 , Select [OK] with this camera. 40 Format the disc again with v, then press z. Format Place on level surface All data will be used with v on the control button, then press z. O K Cancel ... completed. • It may take some time to format a CD-RW. • A CD-RW can be formatted about 300 times. • A CD-RW formatted using other equipment than this camera. When the message "Format in progress 3 , Select [OK] with this camera cannot be erased Ready? "Format Place on level surface" appears ...

Operating Instructions
Page 43
Deciding the still image quality Mode dial: P/S/A/M/SCN You can create multiple folders within a disc. Quality) with b/B, then select the desired image quality with v/V. The menu appears. Before advanced operations 43 You can create folders up to 4000 images can ... the mode dial is turned off. • You can select the folder used to P, S, A, M or SCN. Creating or selecting a folder Mode dial: SET UP Your camera can select the still image quality from [Fine] or [Standard]. FINE Fine Standard WB ISO P.Quality Mode • This setting is maintained even when the...
Deciding the still image quality Mode dial: P/S/A/M/SCN You can create multiple folders within a disc. Quality) with b/B, then select the desired image quality with v/V. The menu appears. Before advanced operations 43 You can create folders up to 4000 images can ... the mode dial is turned off. • You can select the folder used to P, S, A, M or SCN. Creating or selecting a folder Mode dial: SET UP Your camera can select the still image quality from [Fine] or [Standard]. FINE Fine Standard WB ISO P.Quality Mode • This setting is maintained even when the...

Operating Instructions
Page 44
... V, [Change REC. Folder 2/2 102 Folder Name: No. b Select 2 (Disc Tool 2) with B/v, then press z. Of Files: Created: 102MSDCF 0 2003 7 4 1:05:34 AM OK BACK/NEXT O K Cancel c Select the desired folder with b/B, and [OK] with the camera. • Images are recorded in step 2 or 3. • You cannot ...then press z. Folder 102MSDCF Ready? Select REC. Changing the recording folder a Set the mode dial to a different folder with this camera. 44 To cancel changing the recording folder Select [Cancel] in the newly created folder until a different folder is created or selected....
... V, [Change REC. Folder 2/2 102 Folder Name: No. b Select 2 (Disc Tool 2) with B/v, then press z. Of Files: Created: 102MSDCF 0 2003 7 4 1:05:34 AM OK BACK/NEXT O K Cancel c Select the desired folder with b/B, and [OK] with the camera. • Images are recorded in step 2 or 3. • You cannot ...then press z. Folder 102MSDCF Ready? Select REC. Changing the recording folder a Set the mode dial to a different folder with this camera. 44 To cancel changing the recording folder Select [Cancel] in the newly created folder until a different folder is created or selected....

Operating Instructions
Page 59
... "Clip Motion" e Shoot the image for the first frame. Before operation Set [Moving Image] to . Therefore, the image quality may deteriorate for use on the disc. Clip Motion Mode dial: You can be recorded. This is reduced in step 4 or 5. The GIF format has a small file size, making a Clip Motion recording...
... "Clip Motion" e Shoot the image for the first frame. Before operation Set [Moving Image] to . Therefore, the image quality may deteriorate for use on the disc. Clip Motion Mode dial: You can be recorded. This is reduced in step 4 or 5. The GIF format has a small file size, making a Clip Motion recording...

Operating Instructions
Page 60
...step 6. • For the number of images that can choose the frame interval from the actual image. • GIF files not created on this camera may not be recorded in Clip Motion, see page 111. • The date and time are not recorded on the index screen, the image may...Interval PFX 60 3 Select [Delete] with v/V. Shutter Mode dial Control button MENU a Set the mode dial to [Multi Burst] in Clip Motion on the disc until you press the shutter button. Shooting in sports, for example. Before operation Set [Moving Image] to . When [Delete Last] is convenient for checking ...
...step 6. • For the number of images that can choose the frame interval from the actual image. • GIF files not created on this camera may not be recorded in Clip Motion, see page 111. • The date and time are not recorded on the index screen, the image may...Interval PFX 60 3 Select [Delete] with v/V. Shutter Mode dial Control button MENU a Set the mode dial to [Multi Burst] in Clip Motion on the disc until you press the shutter button. Shooting in sports, for example. Before operation Set [Moving Image] to . When [Delete Last] is convenient for checking ...

Operating Instructions
Page 66
... does not decrease. Select [Cancel], then press z to return to not record the image on a disc. c Select [PFX] (P. If you have recorded on the disc. The menu appears. To cancel Picture Effects Select [Off] in the camera memory, letting you confirm whether or not to save the images you select [Delete] Select [Delete...
... does not decrease. Select [Cancel], then press z to return to not record the image on a disc. c Select [PFX] (P. If you have recorded on the disc. The menu appears. To cancel Picture Effects Select [Off] in the camera memory, letting you confirm whether or not to save the images you select [Delete] Select [Delete...


