Operating Instructions
Page 3
...Europe This product has been tested and found compliant with or mark) must be used rechargeable batteries to power this equipment has a detachable fuse cover, be replaced, a 5 AMP fuse ... and convenience. Should the fuse in the United Kingdom A moulded plug complying with your nearest Sony service station. This statement is fitted to discontinue midway (fail), restart the application or disconnect ...you change the fuse. Notice If static electricity or electromagnetism causes data transfer to this camera. You can help preserve our environment by ASTA or BSI to attach the fuse ...
...Europe This product has been tested and found compliant with or mark) must be used rechargeable batteries to power this equipment has a detachable fuse cover, be replaced, a 5 AMP fuse ... and convenience. Should the fuse in the United Kingdom A moulded plug complying with your nearest Sony service station. This statement is fitted to discontinue midway (fail), restart the application or disconnect ...you change the fuse. Notice If static electricity or electromagnetism causes data transfer to this camera. You can help preserve our environment by ASTA or BSI to attach the fuse ...
Operating Instructions
Page 6
... still images Viewing images on the LCD screen of contents Before using your camera 4 Introduction 8 Identifying the parts 9 Getting started Charging the battery pack 11 Using an external power source 14 Using your camera abroad 14 Turning on a TV screen 34 Deleting still images Deleting images ...36 Formatting a CD-RW 39 Before advanced operations How to setup and operate your camera 15 How to use the...
... still images Viewing images on the LCD screen of contents Before using your camera 4 Introduction 8 Identifying the parts 9 Getting started Charging the battery pack 11 Using an external power source 14 Using your camera abroad 14 Turning on a TV screen 34 Deleting still images Deleting images ...36 Formatting a CD-RW 39 Before advanced operations How to setup and operate your camera 15 How to use the...

Operating Instructions
Page 7
...on your computer through a CD-ROM drive 88 Image file storage destinations and image file names 89 Copying images into your computer - Confirm before write 66 Using an external flash 67 Using the Sony HVL-F32X Flash ......67 Using the Sony HVL-F1000 Flash .....68 ...CD adapter... 87 Viewing images through a USB connection 91 Installing the PTP Manager 91 Installing "ImageMixer 92 Connecting the camera to print - Folder 69 Enlarging a portion of images that can be saved or shooting time 110 Menu items 112 SET UP items 116 Precautions 119 On discs 120 On "InfoLITHIUM" battery...
...on your computer through a CD-ROM drive 88 Image file storage destinations and image file names 89 Copying images into your computer - Confirm before write 66 Using an external flash 67 Using the Sony HVL-F32X Flash ......67 Using the Sony HVL-F1000 Flash .....68 ...CD adapter... 87 Viewing images through a USB connection 91 Installing the PTP Manager 91 Installing "ImageMixer 92 Connecting the camera to print - Folder 69 Enlarging a portion of images that can be saved or shooting time 110 Menu items 112 SET UP items 116 Precautions 119 On discs 120 On "InfoLITHIUM" battery...

Operating Instructions
Page 9
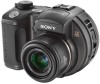
You will be unable to firmly secure the camera to tripods having longer screws, and may damage the camera. • Use ACC jack to connect an external flash or other equipment. • Do not touch the microphone while recording. 9 Identifying the parts ...4 5 qd 6 Attaching the shoulder strap 7 8 A Microphone B POWER ON/OFF (CHG) switch (15) C Shutter button (22) D Hologram AF emitter (29, 116) E Self-timer lamp (27) F Battery cover (11) G Lens H Tripod receptacle (bottom surface) qf qg qh I Flash emitter (27) J Advanced accessory shoe (67) K Hook for lens cap/shoulder strap L Disc cover...
You will be unable to firmly secure the camera to tripods having longer screws, and may damage the camera. • Use ACC jack to connect an external flash or other equipment. • Do not touch the microphone while recording. 9 Identifying the parts ...4 5 qd 6 Attaching the shoulder strap 7 8 A Microphone B POWER ON/OFF (CHG) switch (15) C Shutter button (22) D Hologram AF emitter (29, 116) E Self-timer lamp (27) F Battery cover (11) G Lens H Tripod receptacle (bottom surface) qf qg qh I Flash emitter (27) J Advanced accessory shoe (67) K Hook for lens cap/shoulder strap L Disc cover...

Operating Instructions
Page 11
...8226; Clean the DC plug of the arrow. • Be sure to turn off your camera. Insert the battery pack with the b mark facing toward the battery compartment as this may not properly charge the battery pack. 11 Connect the DC plug with the v mark facing up . 3 AC Adaptor ... the DC IN jack of your camera when charging the battery pack (page 15). • Your camera operates only with the "InfoLITHIUM" NP-FM50 battery pack (M series) (supplied) (page 121). 2 Battery eject lever , Install the battery pack, then close the cover. • The battery pack is firmly inserted all the way...
...8226; Clean the DC plug of the arrow. • Be sure to turn off your camera. Insert the battery pack with the b mark facing toward the battery compartment as this may not properly charge the battery pack. 11 Connect the DC plug with the v mark facing up . 3 AC Adaptor ... the DC IN jack of your camera when charging the battery pack (page 15). • Your camera operates only with the "InfoLITHIUM" NP-FM50 battery pack (M series) (supplied) (page 121). 2 Battery eject lever , Install the battery pack, then close the cover. • The battery pack is firmly inserted all the way...

Operating Instructions
Page 12
...mains lead) 1 4 AC Adaptor , Connect the power cord (mains lead) to the AC Adaptor and then to drop the battery pack when removing it. Slide the battery eject lever in the illustration shows the actual remaining time. • The displayed remaining time may not be correct under certain ... screen shows the remaining shooting or viewing time. 60min 5.0M 101 4 M AF • The black portion of your camera. 12 To remove the battery pack Battery eject lever Open the battery cover. The /CHG lamp (orange) lights up when charging begins, and goes off when charging is completed. /CHG lamp...
...mains lead) 1 4 AC Adaptor , Connect the power cord (mains lead) to the AC Adaptor and then to drop the battery pack when removing it. Slide the battery eject lever in the illustration shows the actual remaining time. • The displayed remaining time may not be correct under certain ... screen shows the remaining shooting or viewing time. 60min 5.0M 101 4 M AF • The black portion of your camera. 12 To remove the battery pack Battery eject lever Open the battery cover. The /CHG lamp (orange) lights up when charging begins, and goes off when charging is completed. /CHG lamp...

Operating Instructions
Page 13
...supplied disc as necessary. Note that can be recorded/viewed when you use . of images Battery life (min.) 5.0M Approx. 220 Approx. 110 VGA Approx. 250 Approx. 125 1) Shooting in the following conditions: - The camera has been turned on and off once every ten times - [AF Mode] is set ...to [Monitor] in the SET UP settings Viewing still images2) NP-FM50 (supplied) Image size No. Getting started Number of images and battery life that can be recorded/ viewed The...
...supplied disc as necessary. Note that can be recorded/viewed when you use . of images Battery life (min.) 5.0M Approx. 220 Approx. 110 VGA Approx. 250 Approx. 125 1) Shooting in the following conditions: - The camera has been turned on and off once every ten times - [AF Mode] is set ...to [Monitor] in the SET UP settings Viewing still images2) NP-FM50 (supplied) Image size No. Getting started Number of images and battery life that can be recorded/ viewed The...

Operating Instructions
Page 15
... WB ISO Mode 400 200 100 Auto WB ISO Mode To change the current settings of the camera, bring up and the power is on the power when the mode dial is operating using a battery pack. Do not touch the lens portion while it is plugged into the (USB) jack or the... A/V OUT (MONO) jack. How to use the control button to prevent wearing down the battery. Auto power-off function only operates when the camera is set to make the changes. When you do not operate the camera for the first time, the Clock Set screen appears (page 16). The auto power-off...
... WB ISO Mode 400 200 100 Auto WB ISO Mode To change the current settings of the camera, bring up and the power is on the power when the mode dial is operating using a battery pack. Do not touch the lens portion while it is plugged into the (USB) jack or the... A/V OUT (MONO) jack. How to use the control button to prevent wearing down the battery. Auto power-off function only operates when the camera is set to make the changes. When you do not operate the camera for the first time, the Clock Set screen appears (page 16). The auto power-off...
Operating Instructions
Page 16
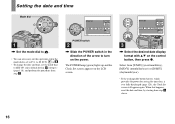
... this happens, reset the date and time, by starting from [Y/M/D] (year/month/day), [M/D/Y] (month/day/year) or [D/M/Y] (day/month/year). • If the rechargeable button battery, which provides the power for saving the time data, is set to P, S, A, M, SCN, or . • To change the date and time, set the mode dial...
... this happens, reset the date and time, by starting from [Y/M/D] (year/month/day), [M/D/Y] (month/day/year) or [D/M/Y] (day/month/year). • If the rechargeable button battery, which provides the power for saving the time data, is set to P, S, A, M, SCN, or . • To change the date and time, set the mode dial...
Operating Instructions
Page 23
...cover at this lamp is flashing. When ACCESS lamp (page 10) goes out, you can shoot the next image. • When operating the camera using a battery pack, if you do not turn off automatically to [Fine] (page 43). In addition, you can choose from the following shooting methods. (... shooting functions using menus (pages 41 and 112). Shooting still images 60min 5.0M 101 95 M AF 4 , Press the shutter button fully down the battery (page 15). • While the image is being recorded on the disc, the ACCESS lamp flashes. M (Manual) You can select the aperture value...
...cover at this lamp is flashing. When ACCESS lamp (page 10) goes out, you can shoot the next image. • When operating the camera using a battery pack, if you do not turn off automatically to [Fine] (page 43). In addition, you can choose from the following shooting methods. (... shooting functions using menus (pages 41 and 112). Shooting still images 60min 5.0M 101 95 M AF 4 , Press the shutter button fully down the battery (page 15). • While the image is being recorded on the disc, the ACCESS lamp flashes. M (Manual) You can select the aperture value...

Operating Instructions
Page 24
... subject. • A backlit subject. In such cases, release the shutter button, then recompose the shot and focus again. • The subject is distant from the camera and dark. • The contrast between the subject and its background is poor. • The subject is deleted. 24 Quick Review 60min Review 5.0M 101..., then press z. Auto Focus When you shot - Checking the last image you try to shoot a subject that is difficult to the AF response and the battery consumption. The Auto Focus function may have difficulty working under the following conditions.
... subject. • A backlit subject. In such cases, release the shutter button, then recompose the shot and focus again. • The subject is distant from the camera and dark. • The contrast between the subject and its background is poor. • The subject is deleted. 24 Quick Review 60min Review 5.0M 101..., then press z. Auto Focus When you shot - Checking the last image you try to shoot a subject that is difficult to the AF response and the battery consumption. The Auto Focus function may have difficulty working under the following conditions.

Operating Instructions
Page 47
...your purpose. 60min M 5.0MFINE 101 4 M AF 0EV F5.6 50 The difference between the set value and the appropriate exposure determined by the camera is displayed on the zoom position. • The shutter speed is automatically adjusted from F2 to F8. • The range of values that the...c Select the aperture value. AF range finder frame The AF range finder frame selects the focus position according to the AF response and the battery consumption. Mode dial Jog dial FOCUS Control button Advanced still image shooting 47 a Set the mode dial to A. Aperture priority mode This function ...
...your purpose. 60min M 5.0MFINE 101 4 M AF 0EV F5.6 50 The difference between the set value and the appropriate exposure determined by the camera is displayed on the zoom position. • The shutter speed is automatically adjusted from F2 to F8. • The range of values that the...c Select the aperture value. AF range finder frame The AF range finder frame selects the focus position according to the AF response and the battery consumption. Mode dial Jog dial FOCUS Control button Advanced still image shooting 47 a Set the mode dial to A. Aperture priority mode This function ...

Operating Instructions
Page 49
...the center. • Focus adjustment may be faster than Macro mode is Monitoring AF. • Battery consumption may be faster than in the following three focus modes for your camera. The factory setting is recommended. c Select the desired mode with the focus already adjusted. Continuous ... Monitoring AF mode. - For quicker shooting, using a different mode than in order to SET UP. Advanced still image shooting 49 The camera operates in the dark place - Single AF This mode allows accurate focusing over a wide range from the following cases, and the C AF indicator...
...the center. • Focus adjustment may be faster than Macro mode is Monitoring AF. • Battery consumption may be faster than in the following three focus modes for your camera. The factory setting is recommended. c Select the desired mode with the focus already adjusted. Continuous ... Monitoring AF mode. - For quicker shooting, using a different mode than in order to SET UP. Advanced still image shooting 49 The camera operates in the dark place - Single AF This mode allows accurate focusing over a wide range from the following cases, and the C AF indicator...
Operating Instructions
Page 98
... AC Adaptor is working (page 109). 2 Should your camera still not work properly, consult your Sony dealer or local authorized Sony service facility. p Install the battery pack while pushing the battery eject lever up when charging a • The battery pack is not installed correctly. • The battery pack has malfunctioned. p Install the battery pack correctly (page 11). - 98
... AC Adaptor is working (page 109). 2 Should your camera still not work properly, consult your Sony dealer or local authorized Sony service facility. p Install the battery pack while pushing the battery eject lever up when charging a • The battery pack is not installed correctly. • The battery pack has malfunctioned. p Install the battery pack correctly (page 11). - 98

Operating Instructions
Page 99
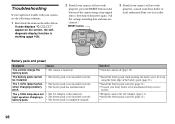
... (page 11). Cause Solution • You have used the camera for about three minutes when using a battery pack, the camera turns off suddenly. p Replace the battery pack with a new one . • If you do not operate the camera for a long time in the remaining battery time. - p Install the battery pack correctly (page 11). p Replace it with a new...
... (page 11). Cause Solution • You have used the camera for about three minutes when using a battery pack, the camera turns off suddenly. p Replace the battery pack with a new one . • If you do not operate the camera for a long time in the remaining battery time. - p Install the battery pack correctly (page 11). p Replace it with a new...

Operating Instructions
Page 104
...; You are not using the USB cable (page 93). Cause Solution • The camera is turned off. • The battery level is not correctly connected to a computer with the USB cable. • The CD-ROM drive does not support the packet- p Use the AC Adaptor (page 14).... You cannot copy images. p Follow the designated copy procedure for Sony" application software, click on the camera (page 15). MultiRead. • The disc may be scratched or dirty. 104 Symptom Your computer does not recognize your camera. p Disconnect the USB cable, and connect it again firmly....
...; You are not using the USB cable (page 93). Cause Solution • The camera is turned off. • The battery level is not correctly connected to a computer with the USB cable. • The CD-ROM drive does not support the packet- p Use the AC Adaptor (page 14).... You cannot copy images. p Follow the designated copy procedure for Sony" application software, click on the camera (page 15). MultiRead. • The disc may be scratched or dirty. 104 Symptom Your computer does not recognize your camera. p Disconnect the USB cable, and connect it again firmly....

Operating Instructions
Page 106
... an hour at room temperature for the moisture to the DC IN jack of the camera with a charged battery pack or use (page 120). p Clean the disc (page 120). You cannot identify an indicator on the camera. The lens does not move when you play back a file. Cause •... error. • The image was not recorded correctly. • The disc is on, but the camera does not work . Others Symptom Your camera does not work . The lens gets fogged. Solution p Use an "InfoLITHIUM" battery pack (page 121). p Replace the disc. 106 p Connect it with a pointed object, then turn...
... an hour at room temperature for the moisture to the DC IN jack of the camera with a charged battery pack or use (page 120). p Clean the disc (page 120). You cannot identify an indicator on the camera. The lens does not move when you play back a file. Cause •... error. • The image was not recorded correctly. • The disc is on, but the camera does not work . Others Symptom Your camera does not work . The lens gets fogged. Solution p Use an "InfoLITHIUM" battery pack (page 121). p Replace the disc. 106 p Connect it with a pointed object, then turn...

Operating Instructions
Page 108
... again Meaning/Corrective action • The battery is not the "InfoLITHIUM" type. • The battery level is too low to 10 minutes of remaining battery time left. • A CD-R or disc that has not been finalized is inserted. • A CD-R is inserted. • A disc formatted with equipment other than your camera (page 39). • A problem with...
... again Meaning/Corrective action • The battery is not the "InfoLITHIUM" type. • The battery level is too low to 10 minutes of remaining battery time left. • A CD-R or disc that has not been finalized is inserted. • A CD-R is inserted. • A disc formatted with equipment other than your camera (page 39). • A problem with...

Operating Instructions
Page 118
...Creates a folder for recording images (page 44). Sets the video output signal to see when using your camera with the battery pack. - Displayed only when using the camera outdoors or in selected language. Displays the menu items, warnings and messages in other bright locations, but ...also uses up the battery charge faster. Folder OK / Cancel Confirm B. Turns off the beep/shutter sound. Write On / xOff Description - ...
...Creates a folder for recording images (page 44). Sets the video output signal to see when using your camera with the battery pack. - Displayed only when using the camera outdoors or in selected language. Displays the menu items, warnings and messages in other bright locations, but ...also uses up the battery charge faster. Folder OK / Cancel Confirm B. Turns off the beep/shutter sound. Write On / xOff Description - ...
Operating Instructions
Page 119
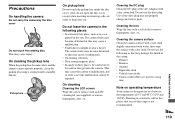
... dust out. On cleaning Cleaning the LCD screen Wipe the screen surface with a soft cloth to remove fingerprints, dust, etc. Cleaning the camera surface Clean the camera surface with a soft cloth slightly moistened with water, then wipe the surface with a dry cotton bud. Use of 0°C and 40&#...176;C (32° F and 104° F). The camera body may become deformed or this may not properly charge the battery pack. Cleaning the lens Wipe the lens with an LCD cleaning kit (not supplied) to remove fingerprints, dust, etc....
... dust out. On cleaning Cleaning the LCD screen Wipe the screen surface with a soft cloth to remove fingerprints, dust, etc. Cleaning the camera surface Clean the camera surface with a soft cloth slightly moistened with water, then wipe the surface with a dry cotton bud. Use of 0°C and 40&#...176;C (32° F and 104° F). The camera body may become deformed or this may not properly charge the battery pack. Cleaning the lens Wipe the lens with an LCD cleaning kit (not supplied) to remove fingerprints, dust, etc....


