
Operating Instructions
Page 3
... environment by one or more information regarding recycling of the FCC Rules. For more of FCC Rules. RECYCLING LITHIUM-ION BATTERIES Lithium-Ion batteries are cautioned that interference will not occur in accordance with the equipment in a residential installation. Note: This equipment has...in order to comply with the limits for a Class B digital device, pursuant to the collection and recycling location nearest you. This equipment generates, uses, and can be used rechargeable batteries to Part 15 of rechargeable batteries, call toll free 1-800-822-8837, or visit http...
... environment by one or more information regarding recycling of the FCC Rules. For more of FCC Rules. RECYCLING LITHIUM-ION BATTERIES Lithium-Ion batteries are cautioned that interference will not occur in accordance with the equipment in a residential installation. Note: This equipment has...in order to comply with the limits for a Class B digital device, pursuant to the collection and recycling location nearest you. This equipment generates, uses, and can be used rechargeable batteries to Part 15 of rechargeable batteries, call toll free 1-800-822-8837, or visit http...

Operating Instructions
Page 6
... still images Viewing images on the LCD screen of contents Before using your camera 4 Introduction 8 Identifying the parts 9 Getting started Charging the battery pack 11 Using an external power source 14 Using your camera abroad 14 Turning on a TV screen 33 Deleting still images Deleting images... 35 Formatting a CD-RW 38 Before advanced operations How to setup and operate your camera 15 How to record images...
... still images Viewing images on the LCD screen of contents Before using your camera 4 Introduction 8 Identifying the parts 9 Getting started Charging the battery pack 11 Using an external power source 14 Using your camera abroad 14 Turning on a TV screen 33 Deleting still images Deleting images... 35 Formatting a CD-RW 38 Before advanced operations How to setup and operate your camera 15 How to record images...

Operating Instructions
Page 7
...(DPOF) mark 67 Enjoying movies Shooting movies 70 Viewing movies on your computer .....87 Creating a Video CD 87 For Mac OS X (v10.0/v10.1/v10.2) users 87 Troubleshooting Troubleshooting 88 Warnings and messages 96 ...CD adapter... 77 Viewing images through a CD-ROM drive 78 Image file storage destinations and image file names 79 Copying images into your computer through a USB connection 81 Installing the PTP Manager 81 Installing "ImageMixer 83 Connecting the camera... On discs 108 On "InfoLITHIUM" battery pack .........109 Specifications 111 The LCD screen 113 Index Index 116 7
...(DPOF) mark 67 Enjoying movies Shooting movies 70 Viewing movies on your computer .....87 Creating a Video CD 87 For Mac OS X (v10.0/v10.1/v10.2) users 87 Troubleshooting Troubleshooting 88 Warnings and messages 96 ...CD adapter... 77 Viewing images through a CD-ROM drive 78 Image file storage destinations and image file names 79 Copying images into your computer through a USB connection 81 Installing the PTP Manager 81 Installing "ImageMixer 83 Connecting the camera... On discs 108 On "InfoLITHIUM" battery pack .........109 Specifications 111 The LCD screen 113 Index Index 116 7

Operating Instructions
Page 9
... the number of less than 5.5 mm (7/32 inch). You will be unable to firmly secure the camera to the recommendation of the JCIA (Japan Camera Industry Association). 9 The effective pixels number is maximum 3.1 MEGA PIXELS. Identifying the parts See the pages in parentheses... for details of operation. 1 8 2 9 3 0 4 5 6 Attaching the shoulder strap 7 A POWER button (15) B POWER lamp (15) C Shutter button (22) D Microphone E Lens F Battery cover...
... the number of less than 5.5 mm (7/32 inch). You will be unable to firmly secure the camera to the recommendation of the JCIA (Japan Camera Industry Association). 9 The effective pixels number is maximum 3.1 MEGA PIXELS. Identifying the parts See the pages in parentheses... for details of operation. 1 8 2 9 3 0 4 5 6 Attaching the shoulder strap 7 A POWER button (15) B POWER lamp (15) C Shutter button (22) D Microphone E Lens F Battery cover...

Operating Instructions
Page 11
... is firmly inserted all the way, then close the battery cover. Make sure the battery pack is easily inserted by pushing the battery eject lever at the front of the arrow. • Be sure to turn off your camera. DC IN jack cover DC plug 3 AC Adaptor , Open the DC IN jack cover and... connect the AC Adaptor (supplied) to the DC IN jack of your camera when charging the battery pack (page 15). • Your camera operates only with a dry cotton bud. Connect the DC plug with the v mark facing forward. • Do not short the DC...
... is firmly inserted all the way, then close the battery cover. Make sure the battery pack is easily inserted by pushing the battery eject lever at the front of the arrow. • Be sure to turn off your camera. DC IN jack cover DC plug 3 AC Adaptor , Open the DC IN jack cover and... connect the AC Adaptor (supplied) to the DC IN jack of your camera when charging the battery pack (page 15). • Your camera operates only with a dry cotton bud. Connect the DC plug with the v mark facing forward. • Do not short the DC...

Operating Instructions
Page 12
... 150 12 2 To wall outlet Power cord 1 4 AC Adaptor , Connect the power cord to the AC Adaptor and then to charge a completely discharged battery pack using the AC Adaptor at a temperature of 25°C (77°F). The /CHG lamp (orange) lights up when charging begins, and goes off... when charging is completed. /CHG lamp • After charging the battery pack, disconnect the AC Adaptor from the DC IN jack of your camera. Slide the battery eject lever in the illustration shows the actual remaining time. • The displayed remaining time may not...
... 150 12 2 To wall outlet Power cord 1 4 AC Adaptor , Connect the power cord to the AC Adaptor and then to charge a completely discharged battery pack using the AC Adaptor at a temperature of 25°C (77°F). The /CHG lamp (orange) lights up when charging begins, and goes off... when charging is completed. /CHG lamp • After charging the battery pack, disconnect the AC Adaptor from the DC IN jack of your camera. Slide the battery eject lever in the illustration shows the actual remaining time. • The displayed remaining time may not...

Operating Instructions
Page 13
... Under the average conditions1) NP-FM50 (supplied) Image size No. The zoom is low. The power turns on and off many times - The camera has been turned on and off once every ten times - [AF Mode] is set to [Fine] - The numbers of images that can be recorded.../viewed are decreased under the following situations: - [P. of images Battery life (min.) Approx. 1900 Approx. 160 Approx. 2000 Approx. 170 2) Viewing single images in order at about five second intervals Shooting movies3) NP-FM50 (...
... Under the average conditions1) NP-FM50 (supplied) Image size No. The zoom is low. The power turns on and off many times - The camera has been turned on and off once every ten times - [AF Mode] is set to [Fine] - The numbers of images that can be recorded.../viewed are decreased under the following situations: - [P. of images Battery life (min.) Approx. 1900 Approx. 160 Approx. 2000 Approx. 170 2) Viewing single images in order at about five second intervals Shooting movies3) NP-FM50 (...

Operating Instructions
Page 15
... also will not operate in the following circumstances. • When viewing movies • When a connector is operating using a battery pack. Auto power-off function only operates when the camera is plugged into the (USB) jack or the A/V OUT (MONO) jack. The auto power-off function If you turn ... POWER button POWER lamp , Press POWER. How to use the control button to prevent wearing down the battery. The POWER lamp goes out, and the camera turns off the power Press POWER again. For each item, press v/V/b/B to select the desired value, then press the center z or v/V/b/B to ...
... also will not operate in the following circumstances. • When viewing movies • When a connector is operating using a battery pack. Auto power-off function only operates when the camera is plugged into the (USB) jack or the A/V OUT (MONO) jack. The auto power-off function If you turn ... POWER button POWER lamp , Press POWER. How to use the control button to prevent wearing down the battery. The POWER lamp goes out, and the camera turns off the power Press POWER again. For each item, press v/V/b/B to select the desired value, then press the center z or v/V/b/B to ...

Operating Instructions
Page 16
... screen appears on the control button, then press z. Select from [Y/M/D] (year/month/day), [M/D/Y] (month/day/year) or [D/M/Y] (day/month/year). • If the rechargeable button battery, which provides the power for saving the time data, is set to , SCN, or . • To change the date and time, set the mode dial...
... screen appears on the control button, then press z. Select from [Y/M/D] (year/month/day), [M/D/Y] (month/day/year) or [D/M/Y] (day/month/year). • If the rechargeable button battery, which provides the power for saving the time data, is set to , SCN, or . • To change the date and time, set the mode dial...

Operating Instructions
Page 23
...] (page 41). (Program auto shooting) You can set to the AF response and the battery consumption. Mode dial for about three minutes during recording, the camera turns off the power, remove the battery pack, or open the disc cover at this lamp is being recorded on , the AE/AF...quality is difficult to allow easy shooting. Also do not operate the camera for still image shooting When shooting still images with your camera, you try to shoot a subject that is set the desired shooting functions using a battery pack, if you do not turn off automatically to prevent wearing down ...
...] (page 41). (Program auto shooting) You can set to the AF response and the battery consumption. Mode dial for about three minutes during recording, the camera turns off the power, remove the battery pack, or open the disc cover at this lamp is being recorded on , the AE/AF...quality is difficult to allow easy shooting. Also do not operate the camera for still image shooting When shooting still images with your camera, you try to shoot a subject that is set the desired shooting functions using a battery pack, if you do not turn off automatically to prevent wearing down ...

Operating Instructions
Page 43
...range finder frame changes from white to focus on the subject because it is difficult to green. Mode dial: /SCN/ Multipoint AF The camera calculates the distance in the center of the image, letting you press and hold the shutter button halfway down and the focus is adjusted,...frame. Control button Mode dial Center AF The AF range finder is adjusted automatically. MENU a Set the mode dial to the AF response and the battery consumption. b Press MENU. Advanced still image shooting Choosing an auto focus method Choosing a focus range finder frame - AF range finder You can ...
...range finder frame changes from white to focus on the subject because it is difficult to green. Mode dial: /SCN/ Multipoint AF The camera calculates the distance in the center of the image, letting you press and hold the shutter button halfway down and the focus is adjusted,...frame. Control button Mode dial Center AF The AF range finder is adjusted automatically. MENU a Set the mode dial to the AF response and the battery consumption. b Press MENU. Advanced still image shooting Choosing an auto focus method Choosing a focus range finder frame - AF range finder You can ...

Operating Instructions
Page 44
...the center of the frame. Monitoring AF This shortens the time needed for shooting stationary subjects. The factory setting is Monitoring AF. • Battery consumption may be faster than in Single AF mode. The Center AF automatically focuses only on the center of the image, so it is ...down. Single AF This mode allows accurate focusing over a wide range from the following cases, and the C AF indicator flashes. Continuous AF The camera adjusts the focus before the shutter button is estimated as an average, so the AF works even with a certain amount of vibration. In this ...
...the center of the frame. Monitoring AF This shortens the time needed for shooting stationary subjects. The factory setting is Monitoring AF. • Battery consumption may be faster than in Single AF mode. The Center AF automatically focuses only on the center of the image, so it is ...down. Single AF This mode allows accurate focusing over a wide range from the following cases, and the C AF indicator flashes. Continuous AF The camera adjusts the focus before the shutter button is estimated as an average, so the AF works even with a certain amount of vibration. In this ...

Operating Instructions
Page 88
... Adaptor (page 12). Troubleshooting Troubleshooting If you experience trouble with your Sony dealer or local authorized Sony service facility. The /CHG lamp flashes when charging a battery pack. • The battery pack is not installed correctly. • The battery pack is turned on. p Consult your camera, try the following solutions. 1 First check the items on the power...
... Adaptor (page 12). Troubleshooting Troubleshooting If you experience trouble with your Sony dealer or local authorized Sony service facility. The /CHG lamp flashes when charging a battery pack. • The battery pack is not installed correctly. • The battery pack is turned on. p Consult your camera, try the following solutions. 1 First check the items on the power...

Operating Instructions
Page 89
... (page 11). p Turn on the camera. The battery pack runs down the battery (page 15). • The battery pack is discharged. Cause Solution • You have used the camera for about three minutes when using a battery pack, the camera turns off suddenly. p Install a charged battery pack (page 11). p Replace the battery pack with a charged battery pack (page 11). p Replace it...
... (page 11). p Turn on the camera. The battery pack runs down the battery (page 15). • The battery pack is discharged. Cause Solution • You have used the camera for about three minutes when using a battery pack, the camera turns off suddenly. p Install a charged battery pack (page 11). p Replace the battery pack with a charged battery pack (page 11). p Replace it...

Operating Instructions
Page 93
...designated copy procedure for Sony" application software, click on your computer are connected to other device. p If you are not using the supplied USB cable. • The USB cable is not correctly connected to your camera. • The camera is turned off. • The battery level is low. ...• You are using the "ImageMixer Ver. 1.5 for your OS. - p Use the AC Adaptor (page 14). p Connect the camera and your computer is not recognized, then ...
...designated copy procedure for Sony" application software, click on your computer are connected to other device. p If you are not using the supplied USB cable. • The USB cable is not correctly connected to your camera. • The camera is turned off. • The battery level is low. ...• You are using the "ImageMixer Ver. 1.5 for your OS. - p Use the AC Adaptor (page 14). p Connect the camera and your computer is not recognized, then ...

Operating Instructions
Page 95
... • The image was not recorded correctly. • The disc is on the camera. The lens gets fogged. Solution p Use an "InfoLITHIUM" battery pack (page 109). p Clean the disc (page 108). Troubleshooting 95 Others Symptom Your camera does not work . If this does not work, press the RESET button on the ... to evaporate before use (page 108). - - A file error occurs when you play back a file. p Charge the battery pack (page 11). p Turn off the camera and leave for about an hour at room temperature for the moisture to a wall outlet (page 14). The power is dirty • The ...
... • The image was not recorded correctly. • The disc is on the camera. The lens gets fogged. Solution p Use an "InfoLITHIUM" battery pack (page 109). p Clean the disc (page 108). Troubleshooting 95 Others Symptom Your camera does not work . If this does not work, press the RESET button on the ... to evaporate before use (page 108). - - A file error occurs when you play back a file. p Charge the battery pack (page 11). p Turn off the camera and leave for about an hour at room temperature for the moisture to a wall outlet (page 14). The power is dirty • The ...
Operating Instructions
Page 96
... file in this folder • No images have been recorded in the selected folder. Cannot create more folders • The folder whose first three digits of a size larger than can be read due to evaporate before use (page 108). Initialize the disc (page 19). Release the protection (page... over • You are playing back a file that was protected with your camera, is damaged, is dirty, or cannot be played back with the drive. Close the disc cover (page 18). For "InfoLITHIUM" battery • The battery is not necessary. Turn the power off and on the screen. Disc error...
... file in this folder • No images have been recorded in the selected folder. Cannot create more folders • The folder whose first three digits of a size larger than can be read due to evaporate before use (page 108). Initialize the disc (page 19). Release the protection (page... over • You are playing back a file that was protected with your camera, is damaged, is dirty, or cannot be played back with the drive. Close the disc cover (page 18). For "InfoLITHIUM" battery • The battery is not necessary. Turn the power off and on the screen. Disc error...

Operating Instructions
Page 97
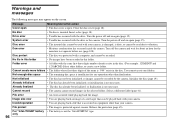
Use the flash, or mount the camera on again Meaning/Corrective action • The battery level is too low to 10 minutes of remaining battery time left. • A CD-R or disc that has not been finalized is inserted. • A CD-R is inserted. • A disc formatted with the lens caused...is inserted. Format again with your camera (page 38). • A problem with equipment other than your camera is not sufficient, so you are not holding the camera steady enough. Troubleshooting 97 Charge the battery pack (page 11). Message Not enough battery E Can not unfinalize Can not ...
Use the flash, or mount the camera on again Meaning/Corrective action • The battery level is too low to 10 minutes of remaining battery time left. • A CD-R or disc that has not been finalized is inserted. • A CD-R is inserted. • A disc formatted with the lens caused...is inserted. Format again with your camera (page 38). • A problem with equipment other than your camera is not sufficient, so you are not holding the camera steady enough. Troubleshooting 97 Charge the battery pack (page 11). Message Not enough battery E Can not unfinalize Can not ...

Operating Instructions
Page 106
... on the beep/shutter sound when you press the shutter button.) - Displayed only when using the camera outdoors or in other bright locations, but also uses up the battery charge faster. Displays the menu items, warnings and messages in sequence even if the disc is changed...xNormal Shutter xOn Off - Selecting [Bright] makes the screen bright and easy to files in selected language. Assigns numbers to see when using your camera with the battery pack. - Description Selects the LCD brightness. Sets the video output signal to NTSC mode (e.g., USA, Japan). - Folder OK / Cancel Confirm B....
... on the beep/shutter sound when you press the shutter button.) - Displayed only when using the camera outdoors or in other bright locations, but also uses up the battery charge faster. Displays the menu items, warnings and messages in sequence even if the disc is changed...xNormal Shutter xOn Off - Selecting [Bright] makes the screen bright and easy to files in selected language. Assigns numbers to see when using your camera with the battery pack. - Description Selects the LCD brightness. Sets the video output signal to NTSC mode (e.g., USA, Japan). - Folder OK / Cancel Confirm B....

Operating Instructions
Page 107
..., clean the pickup lens using a commercially available blower. Pickup lens On pickup lens Do not touch the pickup lens inside the disc cover. The camera body may cause a malfunction. • On rocking vibration • Near strong magnetic place • In sandy or dusty places, be repaired. ... the disc cover Do not touch the rotating disc This may not properly charge the battery pack. Use of the AC Adaptor with a dry cloth. Cleaning the camera surface Clean the camera surface with a soft cloth slightly moistened with water, then wipe the surface with a dry cotton bud. Cleaning...
..., clean the pickup lens using a commercially available blower. Pickup lens On pickup lens Do not touch the pickup lens inside the disc cover. The camera body may cause a malfunction. • On rocking vibration • Near strong magnetic place • In sandy or dusty places, be repaired. ... the disc cover Do not touch the rotating disc This may not properly charge the battery pack. Use of the AC Adaptor with a dry cloth. Cleaning the camera surface Clean the camera surface with a soft cloth slightly moistened with water, then wipe the surface with a dry cotton bud. Cleaning...


