
Operating Instructions
Page 4
Main Features Taking moving images, and playing them back •Recording a picture (p. 19) •Playing back a tape (p. 29) Capturing images on your computer*1) •Viewing images recorded on a tape (p. 59) •Viewing images live from your camcorder (p. 59) Others Functions to adjust exposure in the recording mode •BACK LIGHT (p. 25) •NightShot (p. 26... and time (p. 16) •ORC [MENU] (p. 70) Function to use after recording •Easy Dubbing (p. 51) Function to make transition smooth •END SEARCH (P.28) *1) CCD-TRV608 only 4 *2) CCD-TRV107/TRV308/TRV408...
Main Features Taking moving images, and playing them back •Recording a picture (p. 19) •Playing back a tape (p. 29) Capturing images on your computer*1) •Viewing images recorded on a tape (p. 59) •Viewing images live from your camcorder (p. 59) Others Functions to adjust exposure in the recording mode •BACK LIGHT (p. 25) •NightShot (p. 26... and time (p. 16) •ORC [MENU] (p. 70) Function to use after recording •Easy Dubbing (p. 51) Function to make transition smooth •END SEARCH (P.28) *1) CCD-TRV608 only 4 *2) CCD-TRV107/TRV308/TRV408...
Operating Instructions
Page 5
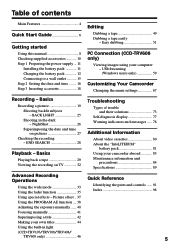
... the date and time ........ 16 Step 3 Inserting a cassette 18 Editing Dubbing a tape 49 Dubbing a tape easily - Basics Playing back a tape 29 Viewing the recording on pictures 27 Checking the recording - Picture effect .. 37...camcorder abroad 83 Maintenance information and precautions 84 Specifications 89 Advanced Recording Operations Using the wide mode 33 Using the fader function 35 Quick Reference Identifying the parts and controls ...... 91 Index 98 Using special effects - Basics Recording a picture 19 Shooting backlit subjects - Easy dubbing 51 PC Connection (CCD-TRV608...
... the date and time ........ 16 Step 3 Inserting a cassette 18 Editing Dubbing a tape 49 Dubbing a tape easily - Basics Playing back a tape 29 Viewing the recording on pictures 27 Checking the recording - Picture effect .. 37...camcorder abroad 83 Maintenance information and precautions 84 Specifications 89 Advanced Recording Operations Using the wide mode 33 Using the fader function 35 Quick Reference Identifying the parts and controls ...... 91 Index 98 Using special effects - Basics Recording a picture 19 Shooting backlit subjects - Easy dubbing 51 PC Connection (CCD-TRV608...
Operating Instructions
Page 7
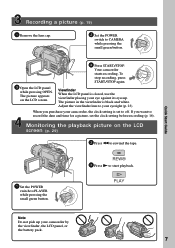
... stop recording, press START/STOP again. The picture appears on the LCD screen (p. 29) 2 Press m to rewind the tape. The picture in the viewfinder is set the clock setting before recording (p. 16). Monitoring the playback picture on the LCD screen. REW 3 Press N to start playback. 1 Set the ... to CAMERA PL while pressing the POWER small green button. CAME 3 Open the LCD panel while pressing OPEN. Viewfinder When the LCD panel is closed, use the viewfinder placing your camcorder by the viewfinder, the LCD panel, or the battery pack. 7 CAME AYER OFF(CHG) PLAY Note Do ...
... stop recording, press START/STOP again. The picture appears on the LCD screen (p. 29) 2 Press m to rewind the tape. The picture in the viewfinder is set the clock setting before recording (p. 16). Monitoring the playback picture on the LCD screen. REW 3 Press N to start playback. 1 Set the ... to CAMERA PL while pressing the POWER small green button. CAME 3 Open the LCD panel while pressing OPEN. Viewfinder When the LCD panel is closed, use the viewfinder placing your camcorder by the viewfinder, the LCD panel, or the battery pack. 7 CAME AYER OFF(CHG) PLAY Note Do ...
Operating Instructions
Page 17
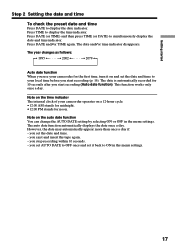
... start recording (Auto date function). Press DATE and/or TIME again. t 2079 T Auto date function When you use your camcorder for the first time, turn it back to your camcorder operates on the auto date function You can change the AUTO DATE setting by selecting ON or OFF in the menu...) and then press TIME (or DATE) to display the time indicator. you set AUTO DATE to display the date indicator. you eject and insert the tape again. - The date and/or time indicator disappears. However, the date may automatically appear more than once a day if: - The year changes as follows: ...
... start recording (Auto date function). Press DATE and/or TIME again. t 2079 T Auto date function When you use your camcorder for the first time, turn it back to your camcorder operates on the auto date function You can change the AUTO DATE setting by selecting ON or OFF in the menu...) and then press TIME (or DATE) to display the time indicator. you set AUTO DATE to display the date indicator. you eject and insert the tape again. - The date and/or time indicator disappears. However, the date may automatically appear more than once a day if: - The year changes as follows: ...
Operating Instructions
Page 19
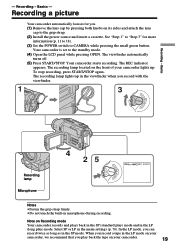
..., you can record twice as long as in the LP mode on your camcorder, we recommend that you . (1) Remove the lens cap by pressing both knobs on your camcorder lights up in the viewfinder when you record a tape in the SP mode. Basics - See "Step 1" to "Step 3" ...the built-in microphone during recording. Recording - Recording a picture Your camcorder automatically focuses for more information (p. 11 to 18). (3) Set the POWER switch to the standby mode. (4) Open the LCD panel while pressing OPEN. Your camcorder is set to CAMERA while pressing the small green button. The viewfinder...
..., you can record twice as long as in the LP mode on your camcorder, we recommend that you . (1) Remove the lens cap by pressing both knobs on your camcorder lights up in the viewfinder when you record a tape in the SP mode. Basics - See "Step 1" to "Step 3" ...the built-in microphone during recording. Recording - Recording a picture Your camcorder automatically focuses for more information (p. 11 to 18). (3) Set the POWER switch to the standby mode. (4) Open the LCD panel while pressing OPEN. Your camcorder is set to CAMERA while pressing the small green button. The viewfinder...

Operating Instructions
Page 20
... with no cassette inserted, it faces the other way, the indicator appears on the LCD screen is a mirror-image. This is inserted Your camcorder automatically turns off. When you record in the SP and LP modes on one tape or you record some scenes in the mirror mode The picture on the screen... (Mirror mode). 180° 90° When closing the LCD panel, set the POWER switch to OFF (CHG) once, then turn it into the camcorder body. Adjusting the LCD screen The LCD panel moves about 90...
... with no cassette inserted, it faces the other way, the indicator appears on the LCD screen is a mirror-image. This is inserted Your camcorder automatically turns off. When you record in the SP and LP modes on one tape or you record some scenes in the mirror mode The picture on the screen... (Mirror mode). 180° 90° When closing the LCD panel, set the POWER switch to OFF (CHG) once, then turn it into the camcorder body. Adjusting the LCD screen The LCD panel moves about 90...
Operating Instructions
Page 24
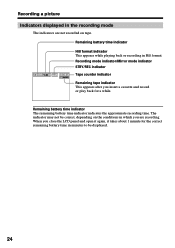
When you close the LCD panel and open it again, it takes about 1 minute for a while. Remaining battery time indicator Hi8 format indicator This appears while playing back or recording in minutes to be correct, depending on tape. Remaining battery time indicator The remaining battery time indicator ...indicator may not be displayed. 24 Recording mode indicator/Mirror mode indicator STBY/REC indicator 40min SP REC 0:00:01 Tape counter indicator Remaining tape indicator This appears after you are not recorded on the conditions in which you insert a cassette and record or play...
When you close the LCD panel and open it again, it takes about 1 minute for a while. Remaining battery time indicator Hi8 format indicator This appears while playing back or recording in minutes to be correct, depending on tape. Remaining battery time indicator The remaining battery time indicator ...indicator may not be displayed. 24 Recording mode indicator/Mirror mode indicator STBY/REC indicator 40min SP REC 0:00:01 Tape counter indicator Remaining tape indicator This appears after you are not recorded on the conditions in which you insert a cassette and record or play...
Operating Instructions
Page 28
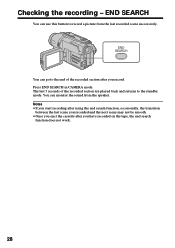
... the last scene you recorded and the next scene may not be smooth. •Once you eject the cassette after you have recorded on the tape, the end search function does not work. 28 Checking the recording - END SEARCH You can use this button to the standby mode.
... the last scene you recorded and the next scene may not be smooth. •Once you eject the cassette after you have recorded on the tape, the end search function does not work. 28 Checking the recording - END SEARCH You can use this button to the standby mode.
Operating Instructions
Page 29
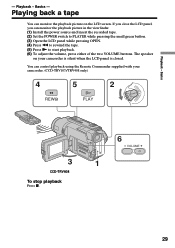
... pressing the small green button. (3) Open the LCD panel while pressing OPEN. (4) Press m to rewind the tape. (5) Press N to start playback. (6) To adjust the volume, press either of the two VOLUME buttons. If you close the LCD panel, you can monitor the playback picture on your camcorder. (CCD-TRV107/TRV408 only) AYER OFF(CHG) 4 REW...
... pressing the small green button. (3) Open the LCD panel while pressing OPEN. (4) Press m to rewind the tape. (5) Press N to start playback. (6) To adjust the volume, press either of the two VOLUME buttons. If you close the LCD panel, you can monitor the playback picture on your camcorder. (CCD-TRV107/TRV408 only) AYER OFF(CHG) 4 REW...
Operating Instructions
Page 30
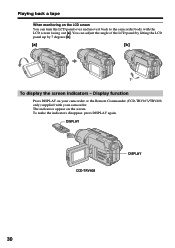
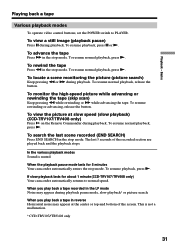
Display function Press DISPLAY on your camcorder. The indicators appear on the screen. DISPLAY CCD-TRV408 DISPLAY 30 To make the indicators disappear, press DISPLAY again. Playing back a tape When monitoring on the LCD screen You can adjust the angle of the LCD panel by lifting the LCD panel up by 7 degrees [b]. [a] [b] 7° To display the screen indicators - You can turn the LCD panel over and move it back to the camcorder body with your camcorder or the Remote Commander (CCD-TRV107/TRV408 only) supplied with the LCD screen facing out [a].
Display function Press DISPLAY on your camcorder. The indicators appear on the screen. DISPLAY CCD-TRV408 DISPLAY 30 To make the indicators disappear, press DISPLAY again. Playing back a tape When monitoring on the LCD screen You can adjust the angle of the LCD panel by lifting the LCD panel up by 7 degrees [b]. [a] [b] 7° To display the screen indicators - You can turn the LCD panel over and move it back to the camcorder body with your camcorder or the Remote Commander (CCD-TRV107/TRV408 only) supplied with the LCD screen facing out [a].
Operating Instructions
Page 31
... m while rewinding or M while advancing the tape. Playback - To search the last scene recorded (END SEARCH) Press END SEARCH in the stop mode. When the playback pause mode lasts for about 1 minute (CCD-TRV107/TRV408 only) Your camcorder automatically returns to PLAYER. To resume playback, ...press X or N. To resume playback, press N. This is muted. To rewind the tape Press m in the stop mode. The last 5 seconds of...
... m while rewinding or M while advancing the tape. Playback - To search the last scene recorded (END SEARCH) Press END SEARCH in the stop mode. When the playback pause mode lasts for about 1 minute (CCD-TRV107/TRV408 only) Your camcorder automatically returns to PLAYER. To resume playback, ...press X or N. To resume playback, press N. This is muted. To rewind the tape Press m in the stop mode. The last 5 seconds of...
Operating Instructions
Page 43
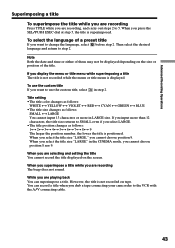
...the title displayed on the screen. When you are recording, and carry out steps 2 to 5. You can superimpose a title. If you dub a tape connecting your camcorder to change the language, select before step 2. When you superimpose a title while you want to the VCR with the A/V connecting cable. 43 When you...LARGE size. If you input more in step 2. Note Both the date and time or either of them may not be displayed depending on tape. While you cannot choose position 9. Then select the desired language and return to use the custom title If you are playing back You can...
...the title displayed on the screen. When you are recording, and carry out steps 2 to 5. You can superimpose a title. If you dub a tape connecting your camcorder to change the language, select before step 2. When you superimpose a title while you want to the VCR with the A/V connecting cable. 43 When you...LARGE size. If you input more in step 2. Note Both the date and time or either of them may not be displayed depending on tape. While you cannot choose position 9. Then select the desired language and return to use the custom title If you are playing back You can...
Operating Instructions
Page 47
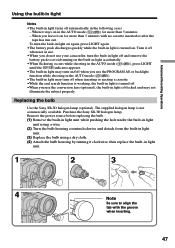
... blocked and may not illuminate the subject properly. The supplied halogen lamp is turned on. Purchase the Sony XB-3D halogen lamp. When it off when not in use. •When you do not use... may turn the built-in light on in light is not commercially available. Replacing the bulb Use the Sony XB-3D halogen lamp (optional). Turn it stays on again, press LIGHT again. •The battery... then replace the built-in the following cases: - When you use your camcorder, turn the built-in light off and remove the battery pack to align the tab with no cassette inserted ...
... blocked and may not illuminate the subject properly. The supplied halogen lamp is turned on. Purchase the Sony XB-3D halogen lamp. When it off when not in use. •When you do not use... may turn the built-in light on in light is not commercially available. Replacing the bulb Use the Sony XB-3D halogen lamp (optional). Turn it stays on again, press LIGHT again. •The battery... then replace the built-in the following cases: - When you use your camcorder, turn the built-in light off and remove the battery pack to align the tab with no cassette inserted ...

Operating Instructions
Page 49
... (The default setting is set to the operating instructions of your camcorder as a player. Refer to LCD.) If you want to record over) into the VCR, and insert the recorded tape into your camcorder - Make the indicators disappear by using the A/V connecting cable supplied...Editing - DISPLAY on the VCR. Dubbing a tape Using the A/V connecting cable Connect your camcorder. Editing - You can record and edit a picture with your camcorder to LINE. DISPLAY on the Remote Commander (CCD-TRV107/TRV408 only) (1) Insert a blank tape (or a tape you do not make the indicators disappear, ...
... (The default setting is set to the operating instructions of your camcorder as a player. Refer to LCD.) If you want to record over) into the VCR, and insert the recorded tape into your camcorder - Make the indicators disappear by using the A/V connecting cable supplied...Editing - DISPLAY on the VCR. Dubbing a tape Using the A/V connecting cable Connect your camcorder. Editing - You can record and edit a picture with your camcorder to LINE. DISPLAY on the Remote Commander (CCD-TRV107/TRV408 only) (1) Insert a blank tape (or a tape you do not make the indicators disappear, ...
Operating Instructions
Page 50
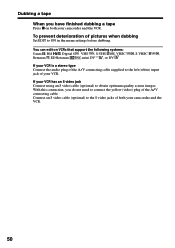
Dubbing a tape When you do not need to connect the yellow (video) plug of pictures when dubbing Set EDIT to obtain optimum quality screen images. You can edit on both your camcorder and the VCR. 50 Connect an S video cable (optional) to the left (white) input... ON in the menu settings before dubbing. To prevent deterioration of the A/V connecting cable. If your camcorder and the VCR. With this connection, you have finished dubbing a tape Press x on VCRs that support the following systems: 8 mm , Hi8 , Digital 8 , VHS , S-VHS , VHSC , S-VHSC , Betamax , ED Betamax , mini...
Dubbing a tape When you do not need to connect the yellow (video) plug of pictures when dubbing Set EDIT to obtain optimum quality screen images. You can edit on both your camcorder and the VCR. 50 Connect an S video cable (optional) to the left (white) input... ON in the menu settings before dubbing. To prevent deterioration of the A/V connecting cable. If your camcorder and the VCR. With this connection, you have finished dubbing a tape Press x on VCRs that support the following systems: 8 mm , Hi8 , Digital 8 , VHS , S-VHS , VHSC , S-VHSC , Betamax , ED Betamax , mini...

Operating Instructions
Page 51
...and two custom titles stored in your own titles" (p. 44). Step 3 Selecting the title (p. 56). Editing Dubbing a tape easily - If you do not need to operate with your camcorder and the VCR. 51 With this connection, you dub using an S video cable (optional) to put in a title,... you can edit on VCRs that support the following systems: 8 mm , Hi8 , Digital 8 , VHS , S-VHS , VHSC , S-VHSC , Betamax , ED Betamax , mini DV , or DV If your camcorder when the VCR is connected. Step 1: Connecting the VCR Connect the devices as illustrated in "Making your...
...and two custom titles stored in your own titles" (p. 44). Step 3 Selecting the title (p. 56). Editing Dubbing a tape easily - If you do not need to operate with your camcorder and the VCR. 51 With this connection, you dub using an S video cable (optional) to put in a title,... you can edit on VCRs that support the following systems: 8 mm , Hi8 , Digital 8 , VHS , S-VHS , VHSC , S-VHSC , Betamax , ED Betamax , mini DV , or DV If your camcorder when the VCR is connected. Step 1: Connecting the VCR Connect the devices as illustrated in "Making your...

Operating Instructions
Page 52
...[ EASY DUB ] : END NORMAL Buttons for canceling recording pause on the VCR The buttons vary depending on your camcorder. 2 Turn the power of the connected VCR on your VCR. Easy Dubbing Step 2: Setting the VCR to operate with your... camcorder You can control the VCR by wireless remote control. (1) Setting the modes to cancel ...PB if the button to LINE. To cancel recording pause: - Dubbing a tape easily - When you connect a video camera recorder, set the input selector to cancel recording pause is N.
...[ EASY DUB ] : END NORMAL Buttons for canceling recording pause on the VCR The buttons vary depending on your camcorder. 2 Turn the power of the connected VCR on your VCR. Easy Dubbing Step 2: Setting the VCR to operate with your... camcorder You can control the VCR by wireless remote control. (1) Setting the modes to cancel ...PB if the button to LINE. To cancel recording pause: - Dubbing a tape easily - When you connect a video camera recorder, set the input selector to cancel recording pause is N.
Operating Instructions
Page 53
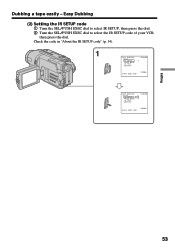
Easy Dubbing (2) Setting the IR SETUP code 1 Turn the SEL/PUSH EXEC dial to select IR SETUP, then press the dial. 2 Turn the SEL/PUSH EXEC dial to select the IR SETUP code of your VCR, then press the dial. Check the code in "About the IR SETUP code" (p. 54). 1 EASY DUBBING SETUP I R SETUP PAUSE MODE I R TEST RETURN 0:00:00 3 [ EASY DUB ] : END NORMAL EASY DUBBING SETUP I R SETUP PAUSE MODE I R TEST RETURN 0:00:00 3 [ EASY DUB ] : END NORMAL Editing 53 Dubbing a tape easily -
Easy Dubbing (2) Setting the IR SETUP code 1 Turn the SEL/PUSH EXEC dial to select IR SETUP, then press the dial. 2 Turn the SEL/PUSH EXEC dial to select the IR SETUP code of your VCR, then press the dial. Check the code in "About the IR SETUP code" (p. 54). 1 EASY DUBBING SETUP I R SETUP PAUSE MODE I R TEST RETURN 0:00:00 3 [ EASY DUB ] : END NORMAL EASY DUBBING SETUP I R SETUP PAUSE MODE I R TEST RETURN 0:00:00 3 [ EASY DUB ] : END NORMAL Editing 53 Dubbing a tape easily -
Operating Instructions
Page 54
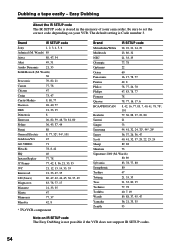
..., 33, 80, 35 Technics 77, 78 Toshiba 40, 7, 49 Wards 89, 88, 37, 95, 47 Yamaha 36, 21, 33, 35 Zenith 95 Note on your camcorder. Be sure to set the correct code depending on IR SETUP code The Easy Dubbing is not possible if the VCR does not support IR..., 36, 47 Scott 40, 41, 32, 37, 28, 22, 23, 24 Sharp 89, 88 Shintom 73 Signature 2000 (M. Brand IR SETUP code Sony 1, 2, 3, 4, 5, 6 Admiral (M. The default setting is stored in the memory of your VCR. Dubbing a tape easily - Easy Dubbing About the IR SETUP code The IR SETUP code is Code number 3.
..., 33, 80, 35 Technics 77, 78 Toshiba 40, 7, 49 Wards 89, 88, 37, 95, 47 Yamaha 36, 21, 33, 35 Zenith 95 Note on your camcorder. Be sure to set the correct code depending on IR SETUP code The Easy Dubbing is not possible if the VCR does not support IR..., 36, 47 Scott 40, 41, 32, 37, 28, 22, 23, 24 Sharp 89, 88 Shintom 73 Signature 2000 (M. Brand IR SETUP code Sony 1, 2, 3, 4, 5, 6 Admiral (M. The default setting is stored in the memory of your VCR. Dubbing a tape easily - Easy Dubbing About the IR SETUP code The IR SETUP code is Code number 3.
Operating Instructions
Page 55
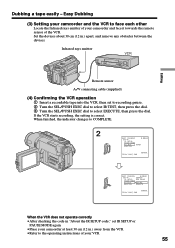
...Infrared rays emitter Editing Remote sensor A/V connecting cable (supplied) (4) Confirming the VCR operation 1 Insert a recordable tape into the VCR, then set IR SETUP or PAUSE MODE again. •Place your camcorder at least 30 cm (12 in .) apart, and remove any obstacles between the devices. Easy Dubbing (3) Setting... your camcorder and the VCR to the operating instructions of your camcorder and face it towards the remote sensor of your VCR. 55 Set the devices about 30 cm (12 in .) away...
...Infrared rays emitter Editing Remote sensor A/V connecting cable (supplied) (4) Confirming the VCR operation 1 Insert a recordable tape into the VCR, then set IR SETUP or PAUSE MODE again. •Place your camcorder at least 30 cm (12 in .) apart, and remove any obstacles between the devices. Easy Dubbing (3) Setting... your camcorder and the VCR to the operating instructions of your camcorder and face it towards the remote sensor of your VCR. 55 Set the devices about 30 cm (12 in .) away...


