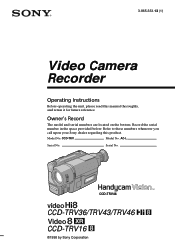
Operating Instructions
Page 1
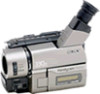
Model No. CCD-TRV46 CCD-TRV36/TRV43/TRV46 CCD-TRV16 ©1998 by Sony Corporation 3-865-333-13 (1) Video Camera Recorder Operating Instructions Before operating the unit, please read this product. Serial No. Owner's Record The model and serial numbers are located on the bottom. AC-L Serial No. Refer to these numbers whenever you call upon your Sony dealer regarding this manual thoroughly, and retain it for future reference. CCD-TRV Model No. Record the serial number in the space provided below.
Model No. CCD-TRV46 CCD-TRV36/TRV43/TRV46 CCD-TRV16 ©1998 by Sony Corporation 3-865-333-13 (1) Video Camera Recorder Operating Instructions Before operating the unit, please read this product. Serial No. Owner's Record The model and serial numbers are located on the bottom. AC-L Serial No. Refer to these numbers whenever you call upon your Sony dealer regarding this manual thoroughly, and retain it for future reference. CCD-TRV Model No. Record the serial number in the space provided below.
Operating Instructions
Page 3
... recording condition .. 48 Using the built-in light (CCD-TRV36/ TRV43/TRV46 only 49 Releasing the STEADYSHOT function (CCD-TRV43/TRV46 only 51 Basic operations Camera recording 11 Using the zoom feature 13 Selecting the START/STOP mode 14 Shooting with backlighting 30 Using the FADER function 31 Shooting in the camcorder 55 Resetting the date and time 57 Simple setting of the picture ... 23 Advanced operations Using alternative power sources ........ 24 Using the house current 25 Changing the mode settings...
... recording condition .. 48 Using the built-in light (CCD-TRV36/ TRV43/TRV46 only 49 Releasing the STEADYSHOT function (CCD-TRV43/TRV46 only 51 Basic operations Camera recording 11 Using the zoom feature 13 Selecting the START/STOP mode 14 Shooting with backlighting 30 Using the FADER function 31 Shooting in the camcorder 55 Resetting the date and time 57 Simple setting of the picture ... 23 Advanced operations Using alternative power sources ........ 24 Using the house current 25 Changing the mode settings...
Operating Instructions
Page 4
... differences in operation are clearly indicated in color) that constantly appear on a TV, you read through this manual, buttons and settings on copyright Television programs, films, video tapes, and other materials may be repaired [a]. •Never leave the camcorder exposed to the provision of the copyright laws. As you need an NTSC system-based TV. Types of differences CCDSystem Digital zoom SteadyShot Remote sensor Laser...
... differences in operation are clearly indicated in color) that constantly appear on a TV, you read through this manual, buttons and settings on copyright Television programs, films, video tapes, and other materials may be repaired [a]. •Never leave the camcorder exposed to the provision of the copyright laws. As you need an NTSC system-based TV. Types of differences CCDSystem Digital zoom SteadyShot Remote sensor Laser...
Operating Instructions
Page 5
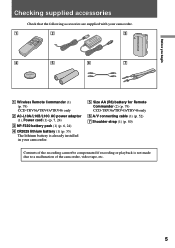
... only 2 AC-L10A/L10B/L10C AC power adaptor (1), Power cord (1) (p. 7, 24) 3 NP-F330 battery pack (1) (p. 6, 24) 4 CR2025 lithium battery (1) (p. 55) The lithium battery is already installed in your camcorder. 5 Size AA (R6) battery for Remote Commander (2) (p. 79) CCD-TRV36/TRV43/TRV46 only 6 A/V connecting cable (1) (p. 52) 7 Shoulder strap (1) (p. 80) Contents of the recording cannot be compensated if recording or playback is not made due to a malfunction of the camcorder, video tape, etc. 5
... only 2 AC-L10A/L10B/L10C AC power adaptor (1), Power cord (1) (p. 7, 24) 3 NP-F330 battery pack (1) (p. 6, 24) 4 CR2025 lithium battery (1) (p. 55) The lithium battery is already installed in your camcorder. 5 Size AA (R6) battery for Remote Commander (2) (p. 79) CCD-TRV36/TRV43/TRV46 only 6 A/V connecting cable (1) (p. 52) 7 Shoulder strap (1) (p. 80) Contents of the recording cannot be compensated if recording or playback is not made due to a malfunction of the camcorder, video tape, etc. 5
Operating Instructions
Page 8
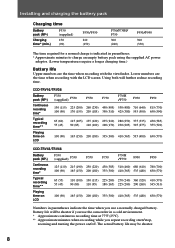
... recording start/stop, zooming and turning the power on LCD 100 (90) 165 (150) 200 (180) 335 (300) 410 (365) 535 (480) 630 (570) Numbers in parentheses indicate the time when you use the camcorder in parentheses. * Approximate minutes to charge an empty battery pack using the supplied AC power adaptor. (Lower temperatures require a longer charging time.) Battery life Upper numbers are the time when recording with the viewfinder. CCD-TRV16/TRV36 Battery...
... recording start/stop, zooming and turning the power on LCD 100 (90) 165 (150) 200 (180) 335 (300) 410 (365) 535 (480) 630 (570) Numbers in parentheses indicate the time when you use the camcorder in parentheses. * Approximate minutes to charge an empty battery pack using the supplied AC power adaptor. (Lower temperatures require a longer charging time.) Battery life Upper numbers are the time when recording with the viewfinder. CCD-TRV16/TRV36 Battery...
Operating Instructions
Page 11
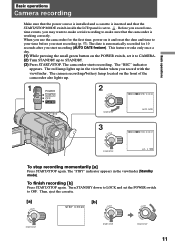
... start recording (p. 57). The camcorder starts recording. The "REC" indicator appears. Then, eject the cassette. When you use the camcorder for 10 seconds after you may want to make a trial recording to make sure that the START/STOP MODE switch inside the LCD panel is set to . Turn STANDBY down to LOCK and set it and reset the date and time to OFF. The date is working correctly. The red lamp lights up...
... start recording (p. 57). The camcorder starts recording. The "REC" indicator appears. Then, eject the cassette. When you use the camcorder for 10 seconds after you may want to make a trial recording to make sure that the START/STOP MODE switch inside the LCD panel is set to . Turn STANDBY down to LOCK and set it and reset the date and time to OFF. The date is working correctly. The red lamp lights up...
Operating Instructions
Page 12
... several seconds from the comcorder after using the tape counter as a guide. Turn the viewfinder lens adjustment ring so that you play back the tape. you reset the date and time. - you do not want to remove the battery pack from the actual time. Camera recording Note Be sure to hear the beep sound, select "OFF" in the menu system. To resume Standby mode, turn STANDBY down . Several beeps also...
... several seconds from the comcorder after using the tape counter as a guide. Turn the viewfinder lens adjustment ring so that you play back the tape. you reset the date and time. - you do not want to remove the battery pack from the actual time. Camera recording Note Be sure to hear the beep sound, select "OFF" in the menu system. To resume Standby mode, turn STANDBY down . Several beeps also...
Operating Instructions
Page 14
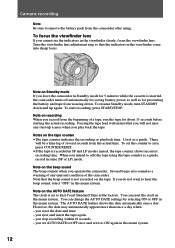
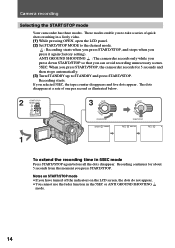
... you press it again (factory setting). If you press START/STOP. Notes on START/STOP mode •If you have turned off the indicators on the LCD screen, the dots do not appear. •You cannot use the fader function in a lively video. (1) While pressing OPEN, open the LCD panel. (2) Set START/STOP MODE to the desired mode. : Recording starts when you press START/STOP, and stops when you to STANDBY...
... you press it again (factory setting). If you press START/STOP. Notes on START/STOP mode •If you have turned off the indicators on the LCD screen, the dots do not appear. •You cannot use the fader function in a lively video. (1) While pressing OPEN, open the LCD panel. (2) Set START/STOP MODE to the desired mode. : Recording starts when you press START/STOP, and stops when you to STANDBY...
Operating Instructions
Page 15
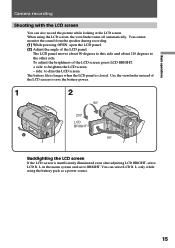
... the menu system and set to dim the LCD screen The battery life is longer when the LCD panel is insufficiently illuminated even after adjusting LCD BRIGHT, select LCD B. You cannot monitor the sound from the speaker during recording. (1) While pressing OPEN, open the LCD panel. (2) Adjust the angle of the LCD screen to save the battery power. 1 2 90° 210° LCD BRIGHT 90° Backlighting the LCD screen If the LCD screen is...
... the menu system and set to dim the LCD screen The battery life is longer when the LCD panel is insufficiently illuminated even after adjusting LCD BRIGHT, select LCD B. You cannot monitor the sound from the speaker during recording. (1) While pressing OPEN, open the LCD panel. (2) Adjust the angle of the LCD screen to save the battery power. 1 2 90° 210° LCD BRIGHT 90° Backlighting the LCD screen If the LCD screen is...
Operating Instructions
Page 19
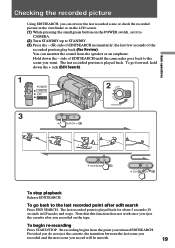
... of EDITSEARCH momentarily; The last recorded point is played back. Note that this function does not work once you eject the cassette after you recorded on the POWER switch, set it to CAMERA. (2) Turn STANDBY up to the last recorded point after edit search Press END SEARCH. Basic operations STA Checking the recorded picture Using EDITSEARCH, you can monitor the sound from the point you record will be smooth. 19...
... of EDITSEARCH momentarily; The last recorded point is played back. Note that this function does not work once you eject the cassette after you recorded on the POWER switch, set it to CAMERA. (2) Turn STANDBY up to the last recorded point after edit search Press END SEARCH. Basic operations STA Checking the recorded picture Using EDITSEARCH, you can monitor the sound from the point you record will be smooth. 19...
Operating Instructions
Page 20
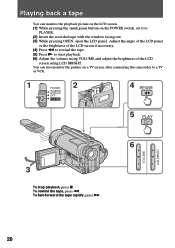
... stop playback, press p. To fast-forward the tape rapidly, press ). 20 You can monitor the playback picture on the LCD screen. (1) While pressing the small green button on a TV screen, after connecting the camcorder to start playback. (6) Adjust the volume using LCD BRIGHT. To rewind the tape, press 0. Playing back a tape You can also monitor the picture on the POWER switch, set it to PLAYER. (2) Insert the recorded tape with the window facing out. (3) While pressing OPEN, open...
... stop playback, press p. To fast-forward the tape rapidly, press ). 20 You can monitor the playback picture on the LCD screen. (1) While pressing the small green button on a TV screen, after connecting the camcorder to start playback. (6) Adjust the volume using LCD BRIGHT. To rewind the tape, press 0. Playing back a tape You can also monitor the picture on the POWER switch, set it to PLAYER. (2) Insert the recorded tape with the window facing out. (3) While pressing OPEN, open...
Operating Instructions
Page 21
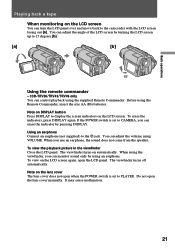
... earphone Connect an earphone (not supplied) to the camcorder with the LCD screen facing out [a]. The viewfinder turns on the LCD screen. The viewfinder turns off automatically. You can control playback using an earphone. Do not open the LCD panel. CCD-TRV36/TRV43/TRV46 only You can adjust the volume using the Remote Commander, insert the size AA (R6) batteries. Note on the lens cover The lens cover does not open when the POWER switch is set...
... earphone Connect an earphone (not supplied) to the camcorder with the LCD screen facing out [a]. The viewfinder turns on the LCD screen. The viewfinder turns off automatically. You can control playback using an earphone. Do not open the LCD panel. CCD-TRV36/TRV43/TRV46 only You can adjust the volume using the Remote Commander, insert the size AA (R6) batteries. Note on the lens cover The lens cover does not open when the POWER switch is set...
Operating Instructions
Page 23
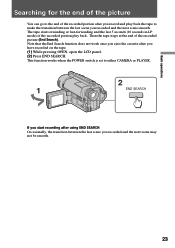
... recorded on the tape. (1) While pressing OPEN, open the LCD panel. (2) Press END SEARCH. This function works when the POWER switch is set to either CAMERA or PLAYER. 2 1 END SEARCH If you start recording after using END SEARCH Occasionally, the transition between the last scene you recorded and the next scene smooth. Note that the End Search function does not work once you eject the cassette after you recorded...
... recorded on the tape. (1) While pressing OPEN, open the LCD panel. (2) Press END SEARCH. This function works when the POWER switch is set to either CAMERA or PLAYER. 2 1 END SEARCH If you start recording after using END SEARCH Occasionally, the transition between the last scene you recorded and the next scene smooth. Note that the End Search function does not work once you eject the cassette after you recorded...
Operating Instructions
Page 60
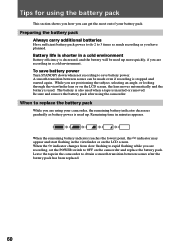
When the i indicator changes from slow flashing to 3 times as much recording as battery power is used up . Preparing the battery pack Always carry additional batteries Have sufficient battery pack power to do 2 to rapid flashing while you are recording in a cold environment. Battery life is shorter in the viewfinder or on the LCD screen, the lens moves automatically and the battery is used when a tape is inserted or removed. A smooth transition between...
When the i indicator changes from slow flashing to 3 times as much recording as battery power is used up . Preparing the battery pack Always carry additional batteries Have sufficient battery pack power to do 2 to rapid flashing while you are recording in a cold environment. Battery life is shorter in the viewfinder or on the LCD screen, the lens moves automatically and the battery is used when a tape is inserted or removed. A smooth transition between...
Operating Instructions
Page 62
... battery pack with video equipment not having the mark and then recharge fully. Even if 5 to recording standby mode and point towards a stationary object. Do not move the camcorder for using a fully charged (or normal charged) battery pack in the display window. 62 The continuous recording time in the operating instructions is a trademark of the camcorder, the "InfoLITHIUM" battery pack measures the battery consumption and calculates the remaining battery power...
... battery pack with video equipment not having the mark and then recharge fully. Even if 5 to recording standby mode and point towards a stationary object. Do not move the camcorder for using a fully charged (or normal charged) battery pack in the display window. 62 The continuous recording time in the operating instructions is a trademark of the camcorder, the "InfoLITHIUM" battery pack measures the battery consumption and calculates the remaining battery power...
Operating Instructions
Page 66
... leave the built-in the CAMERA and PLAYER modes and play back a tape for a long time, remove the tape. Periodically operate the camcorder both in light on the rear of tape and if the recording tab is not a malfunction. This is in light. Be particularly careful of the lens. •Keep the POWER switch setting to sense the type of tape, thickness of the cassette. CCD-TRV36/TRV43/TRV46 only • Do...
... leave the built-in the CAMERA and PLAYER modes and play back a tape for a long time, remove the tape. Periodically operate the camcorder both in light on the rear of tape and if the recording tab is not a malfunction. This is in light. Be particularly careful of the lens. •Keep the POWER switch setting to sense the type of tape, thickness of the cassette. CCD-TRV36/TRV43/TRV46 only • Do...
Operating Instructions
Page 70
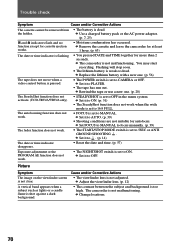
...) The tape does not move when a video control button is pressed. • The POWER switch is set to AUTO. (p. 39) • Shooting conditions are not suitable for cassette ejection works. • Moisture condensation has occurred. m Set FOCUS to MANUAL to focus manually. (p. 39) The fader function does not work . • The NIGHTSHOT switch is flashing. • You pressed DATE and TIME together for more than 2 seconds. m The camcorder is not adjusted. m Replace the lithium battery with a new...
...) The tape does not move when a video control button is pressed. • The POWER switch is set to AUTO. (p. 39) • Shooting conditions are not suitable for cassette ejection works. • Moisture condensation has occurred. m Set FOCUS to MANUAL to focus manually. (p. 39) The fader function does not work . • The NIGHTSHOT switch is flashing. • You pressed DATE and TIME together for more than 2 seconds. m The camcorder is not adjusted. m Replace the lithium battery with a new...

Operating Instructions
Page 71
... POWER switch to CAMERA without inserting a cassette, the camcorder automatically starts the demonstration or DEMO MODE is set to ON in a bright place. m Check the code and solve the problem. (p. 72) Picture is recorded in incorrect/ unnatural color. • The NIGHTSHOT switch is set to ON. Cause and/or Corrective Actions • COMMANDER is set ON in a dark place. (p. 33) Others Symptom The supplied Remote Commander does not work. (CCD-TRV36...
... POWER switch to CAMERA without inserting a cassette, the camcorder automatically starts the demonstration or DEMO MODE is set to ON in a bright place. m Check the code and solve the problem. (p. 72) Picture is recorded in incorrect/ unnatural color. • The NIGHTSHOT switch is set to ON. Cause and/or Corrective Actions • COMMANDER is set ON in a dark place. (p. 33) Others Symptom The supplied Remote Commander does not work. (CCD-TRV36...
Operating Instructions
Page 73
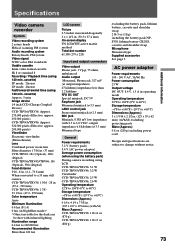
... g) CCD-TRV43/TRV46: 1 lb 15 oz (880 g) excluding the battery pack, lithium battery, cassette and shoulder strap 2 lb 3 oz (1 kg) including the battery pack NPF330, lithium battery CR2025, cassette and shoulder strap Microphone Monaural type Supplied accessories See page 5. Specifications Video camera recorder System Video recording system 2 rotary heads Helical scanning FM system Audio recording system Rotary heads, FM system Video signal NTSC color, EIA standards Usable cassette 8mm video format cassette Hi 8 or standard 8 Recording / Playback time (using 120...
... g) CCD-TRV43/TRV46: 1 lb 15 oz (880 g) excluding the battery pack, lithium battery, cassette and shoulder strap 2 lb 3 oz (1 kg) including the battery pack NPF330, lithium battery CR2025, cassette and shoulder strap Microphone Monaural type Supplied accessories See page 5. Specifications Video camera recorder System Video recording system 2 rotary heads Helical scanning FM system Audio recording system Rotary heads, FM system Video signal NTSC color, EIA standards Usable cassette 8mm video format cassette Hi 8 or standard 8 Recording / Playback time (using 120...
Operating Instructions
Page 83
... SHOOTING 14 Auto focus 39 Backlight 30 Beep 12 C, D Camera recording 11 Car battery 24 Charging battery 7 Cleaning video heads 64 Clock set 57 Connection 52 COUNTER RESET 12 DATE/TIME 47 DEMO 29, 80 Digital zoom 13 DISPLAY 21 E EDIT 29 Editing 54 EDITSEARCH 19 END SEARCH 23 Exposure 42 L LANC 77 LASER LINK 53 Lithium battery 55 M, N Manual focus 38 Menu system 26 MIC (microphone) jack .......... 78 NIGHTSHOT 33 O, P, Q ORC 48 PICTURE EFFECT 40 Playback pause 22 Power...
... SHOOTING 14 Auto focus 39 Backlight 30 Beep 12 C, D Camera recording 11 Car battery 24 Charging battery 7 Cleaning video heads 64 Clock set 57 Connection 52 COUNTER RESET 12 DATE/TIME 47 DEMO 29, 80 Digital zoom 13 DISPLAY 21 E EDIT 29 Editing 54 EDITSEARCH 19 END SEARCH 23 Exposure 42 L LANC 77 LASER LINK 53 Lithium battery 55 M, N Manual focus 38 Menu system 26 MIC (microphone) jack .......... 78 NIGHTSHOT 33 O, P, Q ORC 48 PICTURE EFFECT 40 Playback pause 22 Power...


