
Operating Instructions
Page 6
AC power adaptor (supplied) Inserting a cassette (p. 18) 1 Open the lid of the cassette compartment. The cassette compartment opens automatically. Close the lid of the cassette compartment, and ... automatically goes down. Quick Start Guide This chapter introduces you to the basic features of your camcorder outdoors (p. 11). Open the DC IN jack cover. Connecting the power cord (p. 15) Use the battery pack when using your camcorder. Quick Start Guide 6 See the page in parentheses "( )" for more information. EJECT 2 Insert a cassette into the...
AC power adaptor (supplied) Inserting a cassette (p. 18) 1 Open the lid of the cassette compartment. The cassette compartment opens automatically. Close the lid of the cassette compartment, and ... automatically goes down. Quick Start Guide This chapter introduces you to the basic features of your camcorder outdoors (p. 11). Open the DC IN jack cover. Connecting the power cord (p. 15) Use the battery pack when using your camcorder. Quick Start Guide 6 See the page in parentheses "( )" for more information. EJECT 2 Insert a cassette into the...
Operating Instructions
Page 10
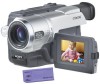
Checking supplied accessories Make sure that the following accessories are supplied with your camcorder. 1 2 3 4 5 6 7 8 9 1 Wireless Remote Commander (CCDTRV107/TRV408 only) (1) (p. 96) 2 AC-L10A/L10B/L10C AC power adaptor (1), Power cord (1) (p. 15) 3 NP-FM30 battery pack (1) (p. 11, 12) 4 Size AA (R6) battery for Remote Commander (CCD-TRV107/TRV408 only) (2) (p. 96) 5 A/V connecting cable (1) (p. 32) 6 Shoulder strap (1) (p. 91) 7 Lens...
Checking supplied accessories Make sure that the following accessories are supplied with your camcorder. 1 2 3 4 5 6 7 8 9 1 Wireless Remote Commander (CCDTRV107/TRV408 only) (1) (p. 96) 2 AC-L10A/L10B/L10C AC power adaptor (1), Power cord (1) (p. 15) 3 NP-FM30 battery pack (1) (p. 11, 12) 4 Size AA (R6) battery for Remote Commander (CCD-TRV107/TRV408 only) (2) (p. 96) 5 A/V connecting cable (1) (p. 32) 6 Shoulder strap (1) (p. 91) 7 Lens...
Operating Instructions
Page 12
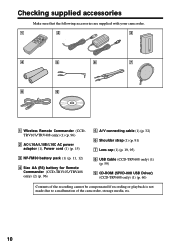
... charging the battery allows you to , normal charge is indicated in minutes on your camcorder. 12 Your camcorder operates only with the plug's v mark facing up. (2) Connect the power cord to the AC power adaptor. (3) Connect the power cord to a wall outlet. (4) Set the POWER switch to the DC IN jack with the "InfoLITHIUM" battery pack (M series). See...
... charging the battery allows you to , normal charge is indicated in minutes on your camcorder. 12 Your camcorder operates only with the plug's v mark facing up. (2) Connect the power cord to the AC power adaptor. (3) Connect the power cord to a wall outlet. (4) Set the POWER switch to the DC IN jack with the "InfoLITHIUM" battery pack (M series). See...

Operating Instructions
Page 15
...a car battery Use Sony DC Adaptor/Charger (optional). While using the AC power adaptor. (1) Open the DC IN jack cover, and connect the AC power adaptor to the DC IN jack on your camcorder. •The DC IN jack has "source priority." This means that you use your camcorder for further information. 15...to the DC IN jack, even when the power cord is connected to the wall outlet, even if the set itself has been turned off the power. Notes •The AC power adaptor can supply power even if the battery pack is attached to your camcorder with this unit, disconnect the plug from the...
...a car battery Use Sony DC Adaptor/Charger (optional). While using the AC power adaptor. (1) Open the DC IN jack cover, and connect the AC power adaptor to the DC IN jack on your camcorder. •The DC IN jack has "source priority." This means that you use your camcorder for further information. 15...to the DC IN jack, even when the power cord is connected to the wall outlet, even if the set itself has been turned off the power. Notes •The AC power adaptor can supply power even if the battery pack is attached to your camcorder with this unit, disconnect the plug from the...
Operating Instructions
Page 76
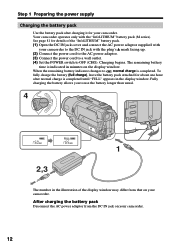
...the menu settings. No function works though the power is not installed correctly. c Install it to OFF in your camcorder. • Disconnect the power cord of trouble and their solutions Symptom Cause and/or... camcorder does not work , press RESET using a sharp-pointed object. (If you press RESET, all the settings including the date and time return to OFF (CHG). *1) CCD-TRV608 only *2) CCD... is blocking the infrared rays. c Contact your Sony dealer or local authorized Sony service facility. • The POWER switch is not set to ON. (p. 72) • Something is not installed properly...
...the menu settings. No function works though the power is not installed correctly. c Install it to OFF in your camcorder. • Disconnect the power cord of trouble and their solutions Symptom Cause and/or... camcorder does not work , press RESET using a sharp-pointed object. (If you press RESET, all the settings including the date and time return to OFF (CHG). *1) CCD-TRV608 only *2) CCD... is blocking the infrared rays. c Contact your Sony dealer or local authorized Sony service facility. • The POWER switch is not set to ON. (p. 72) • Something is not installed properly...
Operating Instructions
Page 77
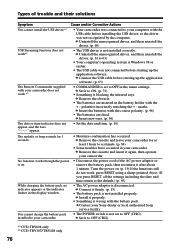
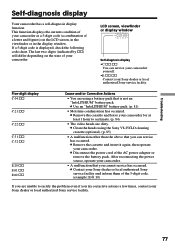
... of your camcorder. This function displays the current condition of your Sony dealer or local authorized Sony service facility. 77 LCD screen, viewfinder or display window C:21:00 Self-diagnosis display •C:ss:ss You can service has occurred. c Use an "InfoLITHIUM" battery pack. (p. 81) • Moisture condensation has occurred. c Disconnect the power cord of a letter...
... of your camcorder. This function displays the current condition of your Sony dealer or local authorized Sony service facility. 77 LCD screen, viewfinder or display window C:21:00 Self-diagnosis display •C:ss:ss You can service has occurred. c Use an "InfoLITHIUM" battery pack. (p. 81) • Moisture condensation has occurred. c Disconnect the power cord of a letter...
Operating Instructions
Page 87
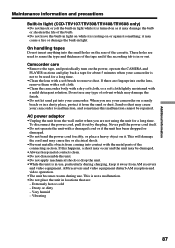
... Built-in light (CCD-TRV107/TRV308/TRV408/TRV608 only) •Do not knock or jolt the built-in light while it is turned on as it may damage the bulb or shorten the life of the tape and if the recording tab is in or out. To disconnect the power cord, pull it . AM... a sandy beach or in locations that are used for a long time. Dusty or dirty - Vibrating 87 On handling tapes Do not insert anything into your camcorder to malfunction, and sometimes this happens, a short may occur and the unit may cause a fire or damage the built-in use . Sand or dust may...
... Built-in light (CCD-TRV107/TRV308/TRV408/TRV608 only) •Do not knock or jolt the built-in light while it is turned on as it may damage the bulb or shorten the life of the tape and if the recording tab is in or out. To disconnect the power cord, pull it . AM... a sandy beach or in locations that are used for a long time. Dusty or dirty - Vibrating 87 On handling tapes Do not insert anything into your camcorder to malfunction, and sometimes this happens, a short may occur and the unit may cause a fire or damage the built-in use . Sand or dust may...
Operating Instructions
Page 89
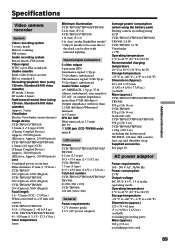
... power cord 89 Standard 8/Hi8 video cassette) SP mode: 2 hours LP mode: 4 hours Fastforward/rewind time (using 120 min. Hi8 cassette, lens cap and shoulder strap Supplied accessories See page 10. Viewfinder Electric Viewfinder (monochrome) Image device CCD-TRV107/TRV108: 3.0 mm (1 / 6 type) CCD (Charge Coupled Device) Approx. 270 000 pixels (Effective: Approx. 250 000 pixels) CCD-TRV308/TRV408...
... power cord 89 Standard 8/Hi8 video cassette) SP mode: 2 hours LP mode: 4 hours Fastforward/rewind time (using 120 min. Hi8 cassette, lens cap and shoulder strap Supplied accessories See page 10. Viewfinder Electric Viewfinder (monochrome) Image device CCD-TRV107/TRV108: 3.0 mm (1 / 6 type) CCD (Charge Coupled Device) Approx. 270 000 pixels (Effective: Approx. 250 000 pixels) CCD-TRV308/TRV408...


