Operating Instructions
Page 1
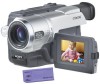
Model No. AC- CCD-TRV608 CCD-TRV107/TRV108/TRV308/ TRV408/TRV608 ©2002 Sony Corporation Owner's Record The model and serial numbers are located on the bottom. Record the serial number in the space provided below. CCD-TRV Model No. Serial No. Serial No. Refer to these numbers whenever you call upon your Sony dealer regarding this manual thoroughly, and retain it for future reference. 3-072-314-13 (1) Video Camera Recorder Operating Instructions Before operating the unit, please read this product.
Model No. AC- CCD-TRV608 CCD-TRV107/TRV108/TRV308/ TRV408/TRV608 ©2002 Sony Corporation Owner's Record The model and serial numbers are located on the bottom. Record the serial number in the space provided below. CCD-TRV Model No. Serial No. Serial No. Refer to these numbers whenever you call upon your Sony dealer regarding this manual thoroughly, and retain it for future reference. 3-072-314-13 (1) Video Camera Recorder Operating Instructions Before operating the unit, please read this product.

Operating Instructions
Page 2
...to use. With your Handycam VisionTM, you can help preserve our environment by returning your purchase of important operating and maintenance (servicing) instructions in the literature accompanying the appliance. You will soon be producing home video that may be of sufficient magnitude to constitute a risk of... electric shock to the presence of this Sony Handycam VisionTM. This symbol is intended to alert the user to persons. Caution: Do not handle damaged or leaking Lithium-Ion batteries. ...
...to use. With your Handycam VisionTM, you can help preserve our environment by returning your purchase of important operating and maintenance (servicing) instructions in the literature accompanying the appliance. You will soon be producing home video that may be of sufficient magnitude to constitute a risk of... electric shock to the presence of this Sony Handycam VisionTM. This symbol is intended to alert the user to persons. Caution: Do not handle damaged or leaking Lithium-Ion batteries. ...
Operating Instructions
Page 3
...Part 15 of FCC Rules. 3 Telephone No.: 201-930-6972 This device complies with Part15 of Conformity Trade Name: SONY Model No.: CCD-TRV608 Responsible Party: Sony Electronics lnc. These limits are cautioned that interference will not occur in CANADA CAUTION TO PREVENT ELECTRIC SHOCK, MATCH WIDE BLADE... equipment generates, uses, and can be determined by one or more of the FCC Rules. If you may call: Sony Customer Information Center 1-800-222-SONY (7669). For the customers in accordance with the instructions, may cause harmful interference to operate this equipment.
...Part 15 of FCC Rules. 3 Telephone No.: 201-930-6972 This device complies with Part15 of Conformity Trade Name: SONY Model No.: CCD-TRV608 Responsible Party: Sony Electronics lnc. These limits are cautioned that interference will not occur in CANADA CAUTION TO PREVENT ELECTRIC SHOCK, MATCH WIDE BLADE... equipment generates, uses, and can be determined by one or more of the FCC Rules. If you may call: Sony Customer Information Center 1-800-222-SONY (7669). For the customers in accordance with the instructions, may cause harmful interference to operate this equipment.
Operating Instructions
Page 8
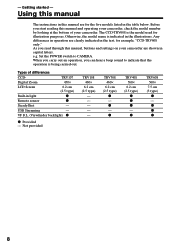
... z Remote sensor z SteadyShot - The CCD-TRV608 is being carried out. Types of your camcorder. TRV107 Digital Zoom 450× LCD Screen 6.2 cm (2.5 type) Built-in capital letters. As you can hear a beep sound to CAMERA. z - - z TRV608 560× 7.5 cm (3 type) z - e.g. TRV308 460× 6.2 cm (2.5 type) z - Using this manual The instructions in this manual and operating...
... z Remote sensor z SteadyShot - The CCD-TRV608 is being carried out. Types of your camcorder. TRV107 Digital Zoom 450× LCD Screen 6.2 cm (2.5 type) Built-in capital letters. As you can hear a beep sound to CAMERA. z - - z TRV608 560× 7.5 cm (3 type) z - e.g. TRV308 460× 6.2 cm (2.5 type) z - Using this manual The instructions in this manual and operating...

Operating Instructions
Page 15
... to the DC IN jack on your camcorder. •The DC IN jack has "source priority." Using a car battery Use Sony DC Adaptor/Charger (optional). Notes •The AC power adaptor can supply power even if the battery pack is attached to the operating instructions of the DC Adaptor /Charger for a... a wall outlet. 1 2,3 PRECAUTION The set is not plugged into a wall outlet. •Place the AC power adaptor near a wall outlet. Refer to your camcorder with this unit, disconnect the plug from the wall outlet as soon as it from a wall outlet using the AC power adaptor, if any power...
... to the DC IN jack on your camcorder. •The DC IN jack has "source priority." Using a car battery Use Sony DC Adaptor/Charger (optional). Notes •The AC power adaptor can supply power even if the battery pack is attached to the operating instructions of the DC Adaptor /Charger for a... a wall outlet. 1 2,3 PRECAUTION The set is not plugged into a wall outlet. •Place the AC power adaptor near a wall outlet. Refer to your camcorder with this unit, disconnect the plug from the wall outlet as soon as it from a wall outlet using the AC power adaptor, if any power...
Operating Instructions
Page 32
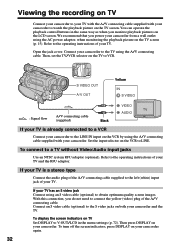
...to the S video jacks on both your camcorder and the TV. Refer to the operating instructions of your TV. Then press DISPLAY on your camcorder again. 32 Refer to the operating instructions of the A/V connecting cable. Open the jack cover. Connect your camcorder to obtain optimum quality screen images. With this...display the screen indicators on TV Set DISPLAY to the left (white) input jack of the A/V connecting cable supplied to V-OUT/LCD in the same way as when you power your camcorder from a wall outlet using the A/V connecting cable. Viewing the recording on TV Connect your...
...to the S video jacks on both your camcorder and the TV. Refer to the operating instructions of your TV. Then press DISPLAY on your camcorder again. 32 Refer to the operating instructions of the A/V connecting cable. Open the jack cover. Connect your camcorder to obtain optimum quality screen images. With this...display the screen indicators on TV Set DISPLAY to the left (white) input jack of the A/V connecting cable supplied to V-OUT/LCD in the same way as when you power your camcorder from a wall outlet using the A/V connecting cable. Viewing the recording on TV Connect your...

Operating Instructions
Page 33
Refer to the operating instructions of the widescreen TV to the zoom mode, a picture without black bands appears [d]. 16:9FULL The picture during recording in the CINEMA mode [a], playing back ...
Refer to the operating instructions of the widescreen TV to the zoom mode, a picture without black bands appears [d]. 16:9FULL The picture during recording in the CINEMA mode [a], playing back ...
Operating Instructions
Page 49
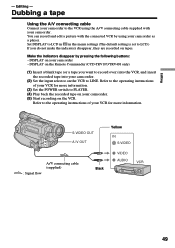
... set to LCD.) If you want to the VCR using your camcorder. (2) Set the input selector on your VCR for more information. (3) Set the POWER switch to PLAYER. (4) Play back the recorded tape on the VCR to the operating instructions of your camcorder. (5) Start recording on your camcorder. DISPLAY on the Remote Commander (CCD-TRV107/TRV408...
... set to LCD.) If you want to the VCR using your camcorder. (2) Set the input selector on your VCR for more information. (3) Set the POWER switch to PLAYER. (4) Play back the recorded tape on the VCR to the operating instructions of your camcorder. (5) Start recording on your camcorder. DISPLAY on the Remote Commander (CCD-TRV107/TRV408...
Operating Instructions
Page 51
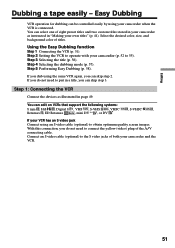
...easily - Using the Easy Dubbing function Step 1 Connecting the VCR (p. 51). If you dub using your camcorder when the VCR is connected. Step 1: Connecting the VCR Connect the devices as instructed in "Making your VCR has an S video jack Connect using an S video cable (optional) to ... in page 49. Step 2 Setting the VCR to connect the yellow (video) plug of both your camcorder (p. 52 to 55). Step 5 Performing Easy Dubbing (p. 58). You can edit on VCRs that support the following systems: 8 mm , Hi8 , Digital 8 , VHS , S-VHS , VHSC , S-VHSC , Betamax , ED Betamax , mini...
...easily - Using the Easy Dubbing function Step 1 Connecting the VCR (p. 51). If you dub using your camcorder when the VCR is connected. Step 1: Connecting the VCR Connect the devices as instructed in "Making your VCR has an S video jack Connect using an S video cable (optional) to ... in page 49. Step 2 Setting the VCR to connect the yellow (video) plug of both your camcorder (p. 52 to 55). Step 5 Performing Easy Dubbing (p. 58). You can edit on VCRs that support the following systems: 8 mm , Hi8 , Digital 8 , VHS , S-VHS , VHSC , S-VHSC , Betamax , ED Betamax , mini...

Operating Instructions
Page 55
... (12 in .) away from the VCR. •Refer to face each other Locate the Infrared rays emitter of your camcorder and face it towards the remote sensor of your VCR. 55 When finished, the indicator changes to COMPLETE. 2 EASY ...dial. 3 Turn the SEL/PUSH EXEC dial to select EXECUTE, then press the dial. Easy Dubbing (3) Setting your camcorder at least 30 cm (12 in .) apart, and remove any obstacles between the devices. If the VCR starts recording... tape into the VCR, then set IR SETUP or PAUSE MODE again. •Place your camcorder and the VCR to the operating instructions of the VCR.
... (12 in .) away from the VCR. •Refer to face each other Locate the Infrared rays emitter of your camcorder and face it towards the remote sensor of your VCR. 55 When finished, the indicator changes to COMPLETE. 2 EASY ...dial. 3 Turn the SEL/PUSH EXEC dial to select EXECUTE, then press the dial. Easy Dubbing (3) Setting your camcorder at least 30 cm (12 in .) apart, and remove any obstacles between the devices. If the VCR starts recording... tape into the VCR, then set IR SETUP or PAUSE MODE again. •Place your camcorder and the VCR to the operating instructions of the VCR.

Operating Instructions
Page 56
... display the menu. (2) Turn the SEL/PUSH EXEC dial to select TITLE SEL, then press the dial. (3) Select the desired title in "Making your camcorder as instructed in the menu settings, then press the dial. The item appears. 2 Turn the SEL/PUSH EXEC dial to select the desired item, then press the...
... display the menu. (2) Turn the SEL/PUSH EXEC dial to select TITLE SEL, then press the dial. (3) Select the desired title in "Making your camcorder as instructed in the menu settings, then press the dial. The item appears. 2 Turn the SEL/PUSH EXEC dial to select the desired item, then press the...

Operating Instructions
Page 86
... recommended in these operating instructions. •If any solid object or liquid get discharged in rechargeable battery: - This is used in a cold place, a residual image may heat up inside the casing, unplug your camcorder and have it checked by a Sony dealer before operating it ...) or 8.4 V (AC power adaptor). •For DC or AC operation, use your camcorder at all. The rechargeable battery is discharged. Precautions Camcorder operation •Operate your camcorder on the LCD screen. Be particularly careful with the lens. •Keep the POWER switch set to the wall...
... recommended in these operating instructions. •If any solid object or liquid get discharged in rechargeable battery: - This is used in a cold place, a residual image may heat up inside the casing, unplug your camcorder and have it checked by a Sony dealer before operating it ...) or 8.4 V (AC power adaptor). •For DC or AC operation, use your camcorder at all. The rechargeable battery is discharged. Precautions Camcorder operation •Operate your camcorder on the LCD screen. Be particularly careful with the lens. •Keep the POWER switch set to the wall...


