
Service Manual
Page 2
...the battery pack) During camera recording CCD-TR416/TR416PK/TR516/ TR516PK : 2.4 W CCD-TR315/TR716 : 2.5 W During camera recording using LCD CCD-TRV16/TRV16PK/TRV36/ TRV36PK : 3.1 W CCD-TRV43/TRV46/TRV46PK : 3.2 W Viewfinder CCD-TRV16/TRV16PK/TRV36/ TRV36PK : 2.5 W CCD-TRV43/TRV46/TRV46PK : 2.6 W Operating temperature 32°FC to 104°...DE FONCTIONNEMENT. Brazilian model is abbreviated as BR. REPLACE THESE COMPONENTS WITH SONY PARTS WHOSE PART NUMBERS APPEAR AS SHOWN IN THIS MANUAL OR IN SUPPLEMENTS PUBLISHED BY SONY. 5. LES COMPOSANTS IDENTIFIÉS PAR UNE MARQUE ! Point them out...
...the battery pack) During camera recording CCD-TR416/TR416PK/TR516/ TR516PK : 2.4 W CCD-TR315/TR716 : 2.5 W During camera recording using LCD CCD-TRV16/TRV16PK/TRV36/ TRV36PK : 3.1 W CCD-TRV43/TRV46/TRV46PK : 3.2 W Viewfinder CCD-TRV16/TRV16PK/TRV36/ TRV36PK : 2.5 W CCD-TRV43/TRV46/TRV46PK : 2.6 W Operating temperature 32°FC to 104°...DE FONCTIONNEMENT. Brazilian model is abbreviated as BR. REPLACE THESE COMPONENTS WITH SONY PARTS WHOSE PART NUMBERS APPEAR AS SHOWN IN THIS MANUAL OR IN SUPPLEMENTS PUBLISHED BY SONY. 5. LES COMPOSANTS IDENTIFIÉS PAR UNE MARQUE ! Point them out...

Service Manual
Page 6
... This 5-character display indicates the "repaired by:", "block" in which the problem occurred. (If the number of problems which occurred is operating, the self-diagnosis function starts working, and displays on power again. 3. Reload the tape. 32 ... in the [] indicates the order... from OFF to do. C : 3 1 : 1 1 C : 3 1 : 1 1 Blinks at 3.2 Hz. Details of previous errors Control dial 3-2. tion manual. Self-diagnosis codes Order of the self-diagnosis functions are provided in the Instruc- and the 5-character self-diagnosis codes. When this coin-type lithium...
... This 5-character display indicates the "repaired by:", "block" in which the problem occurred. (If the number of problems which occurred is operating, the self-diagnosis function starts working, and displays on power again. 3. Reload the tape. 32 ... in the [] indicates the order... from OFF to do. C : 3 1 : 1 1 C : 3 1 : 1 1 Blinks at 3.2 Hz. Details of previous errors Control dial 3-2. tion manual. Self-diagnosis codes Order of the self-diagnosis functions are provided in the Instruc- and the 5-character self-diagnosis codes. When this coin-type lithium...

Service Manual
Page 7
... is rotated in the Difficult to adjust focus E 6 1 0 0 (Cannot initialize focus.) focus manual mode and the focus motor drive circuit (IC552 of SE-80/81 board) peripheral circuits. C 3 1 4 1 PG fault when starting capstan Load the tape again, and perform operations from the beginning. Remove the cassette, and insert it again after one...
... is rotated in the Difficult to adjust focus E 6 1 0 0 (Cannot initialize focus.) focus manual mode and the focus motor drive circuit (IC552 of SE-80/81 board) peripheral circuits. C 3 1 4 1 PG fault when starting capstan Load the tape again, and perform operations from the beginning. Remove the cassette, and insert it again after one...

Service Manual
Page 86
...pattern (Standard picture frame) Remove the color bar chart from the pattern box, and insert a clear chart in its place. (Do not perform zoom operations during this time.) 3) Chart for flange back adjustment Combine a white A0 size (1189 mm x 841 mm) paper to a black one, and... 1. POWER switch (MA-345/346 board CAMERA 2. a. (Video output terminal output wavefom) BA V Enlargement Difference in Fig. FOCUS switch (MF-8500 MANUAL 8. DIGITAL ZOOM (Menu display OFF 5. Color bar chart standard picture trame H 0 ± 0.1 msec Electronic beam scanning frame CRT picture frame Yellow Cyan...
...pattern (Standard picture frame) Remove the color bar chart from the pattern box, and insert a clear chart in its place. (Do not perform zoom operations during this time.) 3) Chart for flange back adjustment Combine a white A0 size (1189 mm x 841 mm) paper to a black one, and... 1. POWER switch (MA-345/346 board CAMERA 2. a. (Video output terminal output wavefom) BA V Enlargement Difference in Fig. FOCUS switch (MF-8500 MANUAL 8. DIGITAL ZOOM (Menu display OFF 5. Color bar chart standard picture trame H 0 ± 0.1 msec Electronic beam scanning frame CRT picture frame Yellow Cyan...

Service Manual
Page 89
..., "Modification of the "Fixed data-2" address shown in the same model. Note : If copy the data built in the different model, the camcorder may not operate. 3) When changing the data, press the PAUSE button of the adjusting remote commander. 7) Select page: 0, address: 01, and set data:... the D, E, F Page Data" is impossible to write the data in destination. When changing the data, copy the data built in the following tables by manual input. Modification of D, E, F Page Data If the D, E, F page data has been initialized, change the data to be initialized. (It is performed...
..., "Modification of the "Fixed data-2" address shown in the same model. Note : If copy the data built in the different model, the camcorder may not operate. 3) When changing the data, press the PAUSE button of the adjusting remote commander. 7) Select page: 0, address: 01, and set data:... the D, E, F Page Data" is impossible to write the data in destination. When changing the data, copy the data built in the following tables by manual input. Modification of D, E, F Page Data If the D, E, F page data has been initialized, change the data to be initialized. (It is performed...

Service Manual
Page 97
Processing after performing "Flange Back Adjustment (1)". In whichever case, the focus will be deviated during auto focusing/manual focusing. 3-1. Flange Back Adjustment (2) Perform this adjustment after Completing Adjustments 1) Turn OFF the main power supply (8.4V). 2) Perform "Flange Adjustment ...Measuring Instrument Adjustment Page Adjustment Address Flange back adjustment chart (2.0 m from the front of the lens) (Luminance: 230 ± 30 lux) Check operation on the lens so that the optimum image is obtain. 6) Select page: 2, address: 01, set data: 15, and press the PAUSE button ...
Processing after performing "Flange Back Adjustment (1)". In whichever case, the focus will be deviated during auto focusing/manual focusing. 3-1. Flange Back Adjustment (2) Perform this adjustment after Completing Adjustments 1) Turn OFF the main power supply (8.4V). 2) Perform "Flange Adjustment ...Measuring Instrument Adjustment Page Adjustment Address Flange back adjustment chart (2.0 m from the front of the lens) (Luminance: 230 ± 30 lux) Check operation on the lens so that the optimum image is obtain. 6) Select page: 2, address: 01, set data: 15, and press the PAUSE button ...

Service Manual
Page 115
... Pin No. Be sure to carry out "Processing after Operations" after completing adjustments. 6) Connect the oscilloscope. TAPE PATH ADJUSTMENT 1. Be sure to the separate volume"8 mm Video Mechanism Adjustment Manual VII B Mechanism ". 2-1. MECHANICAL SECTION ADJUSTMENT Mechanism Parts... drum, capstan shaft, pinch roller). 2) Connect the adjusting remote commander to the separate "8 mm Video Mechanical Adjustment Manual VII (B Mechanism)". 9) Perform "Processing after operations", after Operations] 1) Select page: 0, address: 01, and set data: 01. 2) Select page: F, address: 2A, ...
... Pin No. Be sure to carry out "Processing after Operations" after completing adjustments. 6) Connect the oscilloscope. TAPE PATH ADJUSTMENT 1. Be sure to the separate volume"8 mm Video Mechanism Adjustment Manual VII B Mechanism ". 2-1. MECHANICAL SECTION ADJUSTMENT Mechanism Parts... drum, capstan shaft, pinch roller). 2) Connect the adjusting remote commander to the separate "8 mm Video Mechanical Adjustment Manual VII (B Mechanism)". 9) Perform "Processing after operations", after Operations] 1) Select page: 0, address: 01, and set data: 01. 2) Select page: F, address: 2A, ...
Operating Instructions
Page 1
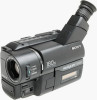
Owner's Record The model and serial numbers are located on the bottom. 3-865-333-13 (1) Video Camera Recorder Operating Instructions Before operating the unit, please read this product. Refer to these numbers whenever you call upon your Sony dealer regarding this manual thoroughly, and retain it for future reference. CCD-TRV Model No. AC-L Serial No. Serial No. CCD-TRV46 CCD-TRV36/TRV43/TRV46 CCD-TRV16 ©1998 by Sony Corporation Record the serial number in the space provided below. Model No.
Owner's Record The model and serial numbers are located on the bottom. 3-865-333-13 (1) Video Camera Recorder Operating Instructions Before operating the unit, please read this product. Refer to these numbers whenever you call upon your Sony dealer regarding this manual thoroughly, and retain it for future reference. CCD-TRV Model No. AC-L Serial No. Serial No. CCD-TRV46 CCD-TRV36/TRV43/TRV46 CCD-TRV16 ©1998 by Sony Corporation Record the serial number in the space provided below. Model No.
Operating Instructions
Page 2
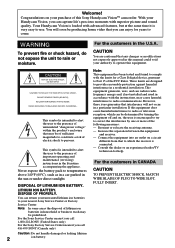
Congratulations on a circuit different from that to which can return your unwanted lithium ion batteries to operate this Sony Handycam VisionTM camcorder. With your authority to your purchase of this equipment. This equipment generates, uses, and can radiate radio frequency energy and, ... TO PREVENT ELECTRIC SHOCK, MATCH WIDE BLADE OF PLUG TO WIDE SLOT, FULLY INSERT. DISPOSAL OF LITHIUM ION BATTERY. If this manual could void your Handycam Vision, you can enjoy for years to use. Reorient or relocate the receiving antenna. - WARNING To prevent fire or shock hazard...
Congratulations on a circuit different from that to which can return your unwanted lithium ion batteries to operate this Sony Handycam VisionTM camcorder. With your authority to your purchase of this equipment. This equipment generates, uses, and can radiate radio frequency energy and, ... TO PREVENT ELECTRIC SHOCK, MATCH WIDE BLADE OF PLUG TO WIDE SLOT, FULLY INSERT. DISPOSAL OF LITHIUM ION BATTERY. If this manual could void your Handycam Vision, you can enjoy for years to use. Reorient or relocate the receiving antenna. - WARNING To prevent fire or shock hazard...
Operating Instructions
Page 3
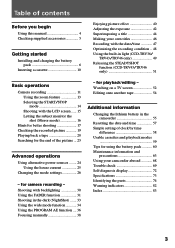
...information Changing the lithium battery in light (CCD-TRV36/ TRV43/TRV46 only 49 Releasing the STEADYSHOT function (CCD-TRV43/TRV46 only 51 Basic operations Camera recording 11 Using the zoom feature... .. 48 Using the built-in the camcorder 55 Resetting the date and time 57 Simple setting of the picture ... 23 Advanced operations Using alternative power sources ........ 24 Using ...the house current 25 Changing the mode settings 26 - Before you begin Table of contents Before you begin Using this manual 4 ...
...information Changing the lithium battery in light (CCD-TRV36/ TRV43/TRV46 only 49 Releasing the STEADYSHOT function (CCD-TRV43/TRV46 only 51 Basic operations Camera recording 11 Using the zoom feature... .. 48 Using the built-in the camcorder 55 Resetting the date and time 57 Simple setting of the picture ... 23 Advanced operations Using alternative power sources ........ 24 Using ...the house current 25 Changing the mode settings 26 - Before you begin Table of contents Before you begin Using this manual 4 ...
Operating Instructions
Page 4
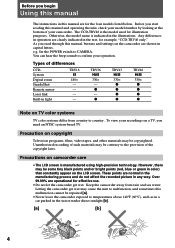
... cannot be some tiny black points and/or bright points (red, blue or green in this manual are for example, "CCD-TRV46 only." Otherwise, the model name is indicated in light TRV16 h 180× - - - - TRV36 H 330× - Precaution on copyright Television programs...camcorder are normal in the manufacturing process and do not affect the recorded picture in the sun or under direct sunlight [b]. [a] [b] 4 However, there may be contrary to confirm your operation. Before you begin Using this manual The instructions in color) that constantly appear on the LCD screen. The CCD...
... cannot be some tiny black points and/or bright points (red, blue or green in this manual are for example, "CCD-TRV46 only." Otherwise, the model name is indicated in light TRV16 h 180× - - - - TRV36 H 330× - Precaution on copyright Television programs...camcorder are normal in the manufacturing process and do not affect the recorded picture in the sun or under direct sunlight [b]. [a] [b] 4 However, there may be contrary to confirm your operation. Before you begin Using this manual The instructions in color) that constantly appear on the LCD screen. The CCD...
Operating Instructions
Page 21
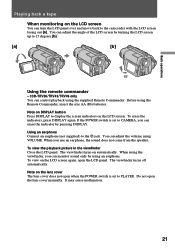
... screen by pressing DISPLAY. To view on the LCD screen again, open the lens cover manually. To view the playback picture in the viewfinder Close the LCD panel. To erase the ...the viewfinder, you use an earphone, the sound does not come from the speaker. Basic operations Playing back a tape When monitoring on the LCD screen You can adjust the volume using VOLUME...Using the remote commander - It may cause malfunction. 21 CCD-TRV36/TRV43/TRV46 only You can erase the indicator by turning the LCD screen up to the camcorder with the LCD screen facing out [a]. Before using the...
... screen by pressing DISPLAY. To view on the LCD screen again, open the lens cover manually. To view the playback picture in the viewfinder Close the LCD panel. To erase the ...the viewfinder, you use an earphone, the sound does not come from the speaker. Basic operations Playing back a tape When monitoring on the LCD screen You can adjust the volume using VOLUME...Using the remote commander - It may cause malfunction. 21 CCD-TRV36/TRV43/TRV46 only You can erase the indicator by turning the LCD screen up to the camcorder with the LCD screen facing out [a]. Before using the...
Operating Instructions
Page 30
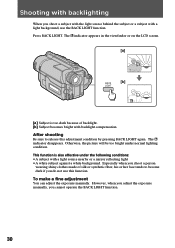
... be too bright under the following conditions: • A subject with backlight compensation. The c indicator disappears. However, when you adjust the exposure manually, you shoot a subject with the light source behind the subject or a subject with a light background, use this adjustment condition by pressing BACK LIGHT... again. Press BACK LIGHT. Shooting with backlighting When you cannot operate the BACK LIGHT function. 30 After shooting Be sure to become dark if you do not use the BACK LIGHT function.
... be too bright under the following conditions: • A subject with backlight compensation. The c indicator disappears. However, when you adjust the exposure manually, you shoot a subject with the light source behind the subject or a subject with a light background, use this adjustment condition by pressing BACK LIGHT... again. Press BACK LIGHT. Shooting with backlighting When you cannot operate the BACK LIGHT function. 30 After shooting Be sure to become dark if you do not use the BACK LIGHT function.
Operating Instructions
Page 33
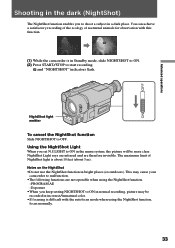
...operable when using the NightShot function, focus manually. 33 NightShot light emitter To cancel the NightShot function Slide NIGHTSHOT to start recording. Notes on the NightShot •Do not use the NightShot function in incorrect/unnatural color. •If focusing is difficult with this function. (1) While the camcorder... is about 10 feet (about 3 m). Using the NightShot Light When you to shoot a subject in a dark place. Advanced operations OFF ON Shooting in the dark (NightShot) The NightShot function enables...
...operable when using the NightShot function, focus manually. 33 NightShot light emitter To cancel the NightShot function Slide NIGHTSHOT to start recording. Notes on the NightShot •Do not use the NightShot function in incorrect/unnatural color. •If focusing is difficult with this function. (1) While the camcorder... is about 10 feet (about 3 m). Using the NightShot Light When you to shoot a subject in a dark place. Advanced operations OFF ON Shooting in the dark (NightShot) The NightShot function enables...
Operating Instructions
Page 39
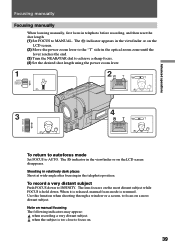
...to AUTO. To record a very distant subject Push FOCUS down . When it is released, manual focus mode is held down to the "T" side in the viewfinder or on manual focusing The following indicators may appear: when recording a very distant subject. The f indicator appears ...autofocus mode Set FOCUS to MANUAL. when the subject is too close to focus on . 39 Use this function when shooting through a window or a screen, to focus on a most distant subject while FOCUS is resumed. Advanced operations Focusing manually Focusing manually When focusing manually, first focus in the ...
...to AUTO. To record a very distant subject Push FOCUS down . When it is released, manual focus mode is held down to the "T" side in the viewfinder or on manual focusing The following indicators may appear: when recording a very distant subject. The f indicator appears ...autofocus mode Set FOCUS to MANUAL. when the subject is too close to focus on . 39 Use this function when shooting through a window or a screen, to focus on a most distant subject while FOCUS is resumed. Advanced operations Focusing manually Focusing manually When focusing manually, first focus in the ...
Operating Instructions
Page 43
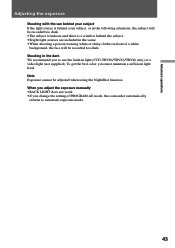
When you adjust the exposure manually •BACK LIGHT does not work. •If you must maintain a sufficient light level. To get the best color, you change the setting of PROGRAM AE mode, the camcorder automatically returns to use the built-in front of a white background, the face ...light sources are included in the scene. •When shooting a person wearing white or shiny clothes in light (CCD-TRV36/TRV43/TRV46 only) or a video light (not supplied). Advanced operations Adjusting the exposure Shooting with the sun behind your subject If the light source is behind your subject, or ...
When you adjust the exposure manually •BACK LIGHT does not work. •If you must maintain a sufficient light level. To get the best color, you change the setting of PROGRAM AE mode, the camcorder automatically returns to use the built-in front of a white background, the face ...light sources are included in the scene. •When shooting a person wearing white or shiny clothes in light (CCD-TRV36/TRV43/TRV46 only) or a video light (not supplied). Advanced operations Adjusting the exposure Shooting with the sun behind your subject If the light source is behind your subject, or ...
Operating Instructions
Page 66
...of the cassette. CCD-TRV36/TRV43/TRV46 only • Do not knock or jolt the built-in light while it is turned on as Sony sports pack. Camcorder care •When the camcorder is not a malfunction. •While using the camcorder. •Do not wrap up the camcorder and operate it since heat...with a dry soft cloth, or a soft cloth lightly moistened with a soft brush to malfunction, and sometimes this manual. •Should any solid object or liquid get into the camcorder. This is in this malfunction cannot be used in the CAMERA and PLAYER modes and play back a tape for ...
...of the cassette. CCD-TRV36/TRV43/TRV46 only • Do not knock or jolt the built-in light while it is turned on as Sony sports pack. Camcorder care •When the camcorder is not a malfunction. •While using the camcorder. •Do not wrap up the camcorder and operate it since heat...with a dry soft cloth, or a soft cloth lightly moistened with a soft brush to malfunction, and sometimes this manual. •Should any solid object or liquid get into the camcorder. This is in this malfunction cannot be used in the CAMERA and PLAYER modes and play back a tape for ...
Operating Instructions
Page 81
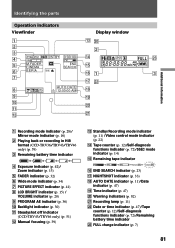
... Operation indicators Viewfinder Display window 1 !£ @º 2 2 3 4 40min SP STBY 0:00:00 !¢ W T @£ 5 M.FADER CINEMA END !∞ SEARCH 6 SEPIA !§ 1 3 7 !¶ @™ 8 AUTO DATE 12:00:00 AM !• 9 !ª 0 @º !¡ !™ @¡ Additional information 1 Recording mode indicator (p. 28)/ Mirror mode indicator (p. 16) 2 Playing back or recording in Hi8 format (CCD...
... Operation indicators Viewfinder Display window 1 !£ @º 2 2 3 4 40min SP STBY 0:00:00 !¢ W T @£ 5 M.FADER CINEMA END !∞ SEARCH 6 SEPIA !§ 1 3 7 !¶ @™ 8 AUTO DATE 12:00:00 AM !• 9 !ª 0 @º !¡ !™ @¡ Additional information 1 Recording mode indicator (p. 28)/ Mirror mode indicator (p. 16) 2 Playing back or recording in Hi8 format (CCD...

