

Primary User Manual
Page 1
Model No. Model No. AC-V Serial No Photo: CCD-FX430 Video8 Handycam ©1994 by Sony Corporation Record the serial number in the space provided below. CCD-Fx Serial No. Refer to these numbers whenever you call upon your Sony dealer regarding this manual thoroughly and retain it for future reference. SONY® 3-758-676-23 (1) Video Camera Recorder 8 CCD-FX430/FX435/FX530/FX630 Operation Manual Before operating the unit, please read this product. Owner's Record The model and serial numbers are located on the bottom.
Model No. Model No. AC-V Serial No Photo: CCD-FX430 Video8 Handycam ©1994 by Sony Corporation Record the serial number in the space provided below. CCD-Fx Serial No. Refer to these numbers whenever you call upon your Sony dealer regarding this manual thoroughly and retain it for future reference. SONY® 3-758-676-23 (1) Video Camera Recorder 8 CCD-FX430/FX435/FX530/FX630 Operation Manual Before operating the unit, please read this product. Owner's Record The model and serial numbers are located on the bottom.

Primary User Manual
Page 2
... following measures: - These limits are cautioned that to operate this Sony Handycame camcorder. However, there is intended to alert the user to comply with superior picture and sound quality. the user is connected. - Connect the equipment into an outlet on a circuit different from that any changes or modifications not expressly approved in this manual could void your authority to which can enjoy...
... following measures: - These limits are cautioned that to operate this Sony Handycame camcorder. However, there is intended to alert the user to comply with superior picture and sound quality. the user is connected. - Connect the equipment into an outlet on a circuit different from that any changes or modifications not expressly approved in this manual could void your authority to which can enjoy...

Primary User Manual
Page 3
...-out (CCD-FX435/FX530/FX630) 27 Focusing Manually (CCD-FX630 only) 28 Releasing the STEADY SHOT Function (CCD-FX630 only) 30 Changing the Mode Settings 31 Editing onto Another Tape 33 Additional Information Changing the Lithium Battery 34 Resetting the Date or Time 35 Playback Modes 36 Tips for Using the Battery Pack 36 Maintenance Information and Precautions 39 Using Your Camcorder Abroad 43 Trouble Check 44 Specifications 47 Identifying the Parts 49 Operation Indicators 52 Remote Commander...
...-out (CCD-FX435/FX530/FX630) 27 Focusing Manually (CCD-FX630 only) 28 Releasing the STEADY SHOT Function (CCD-FX630 only) 30 Changing the Mode Settings 31 Editing onto Another Tape 33 Additional Information Changing the Lithium Battery 34 Resetting the Date or Time 35 Playback Modes 36 Tips for Using the Battery Pack 36 Maintenance Information and Precautions 39 Using Your Camcorder Abroad 43 Trouble Check 44 Specifications 47 Identifying the Parts 49 Operation Indicators 52 Remote Commander...

Primary User Manual
Page 4
... model name is the model used in your model number by looking at the bottom of the copyright laws. Types of such materials may be copyrighted. Please check the list on page 43 to the provision of your recordings on the camcorder are shown in capital letters. and other materials may not be repaired. Unauthorized recording of differences Model number CCD-FX430 CCD-FX435 CCD-FX530 CCD-FX630 Audio...
... model name is the model used in your model number by looking at the bottom of the copyright laws. Types of such materials may be copyrighted. Please check the list on page 43 to the provision of your recordings on the camcorder are shown in capital letters. and other materials may not be repaired. Unauthorized recording of differences Model number CCD-FX430 CCD-FX435 CCD-FX530 CCD-FX630 Audio...
Primary User Manual
Page 6
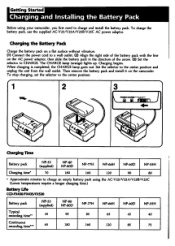
... outlet. To charge the battery pack, use the supplied AC-V25/V25A/V25B/V25C AC power adaptor. Set the selector to charge and install the battery pack. When charging is completed, the CHARGE lamp goes out. Charging begins. Getting Started Charging and Installing the Battery Pack Before using the AC-V25/V25A/V25B/V25C (Lower temperatures require a longer charging time.) Battery Life CCD-FX430/FX435/FX530 Battery pack Typical recording time' NP-55...
... outlet. To charge the battery pack, use the supplied AC-V25/V25A/V25B/V25C AC power adaptor. Set the selector to charge and install the battery pack. When charging is completed, the CHARGE lamp goes out. Charging begins. Getting Started Charging and Installing the Battery Pack Before using the AC-V25/V25A/V25B/V25C (Lower temperatures require a longer charging time.) Battery Life CCD-FX430/FX435/FX530 Battery pack Typical recording time' NP-55...
Primary User Manual
Page 7
.../s op or zooming and turning the power on charging the battery pack • The POWER lamp will remain lit for a while even if the battery pack is removed and the power cord is normal. • If the POWER lamp does not light, set the selector to CHARGE again. • You cannot operate the camcorder using the AC power adaptor while charging the battery pack. 7 CCD-FX630 Battery pack Typical recording time" Continuous recording time NP-55...
.../s op or zooming and turning the power on charging the battery pack • The POWER lamp will remain lit for a while even if the battery pack is removed and the power cord is normal. • If the POWER lamp does not light, set the selector to CHARGE again. • You cannot operate the camcorder using the AC power adaptor while charging the battery pack. 7 CCD-FX630 Battery pack Typical recording time" Continuous recording time NP-55...
Primary User Manual
Page 11
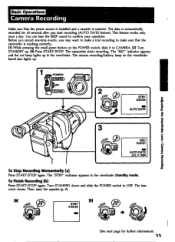
... the red lamp lights up . AUTO DATE JUL 4 1994 To Stop Recording Momentarily ral Press START/STOP again. This feature works only once a day. Turn STANDBY down and slide the POWER switch to OFF. The camcorder starts recording. To Finish Recording Da Press START/STOP again. Then, eject the cassette (p. 9). [al ib] STBY 0:3520 I =L4-ri3 FF wwl r • 1:.4Nofs STBY 0:00:00 AUTO DATE Adjusting the Viewfinder Lens / Camera Recording REC 0:00:01 ==. POWER...
... the red lamp lights up . AUTO DATE JUL 4 1994 To Stop Recording Momentarily ral Press START/STOP again. This feature works only once a day. Turn STANDBY down and slide the POWER switch to OFF. The camcorder starts recording. To Finish Recording Da Press START/STOP again. Then, eject the cassette (p. 9). [al ib] STBY 0:3520 I =L4-ri3 FF wwl r • 1:.4Nofs STBY 0:00:00 AUTO DATE Adjusting the Viewfinder Lens / Camera Recording REC 0:00:01 ==. POWER...
Primary User Manual
Page 12
... time are displayed as follows: - Note that the white balance is displayed. Note on the tape counter The tape counter indicates the recording or playback time. you reset the date and time. - If the date display setting has been made , nothing is properly adjusted. 12 press START/STOP. Note on the AUTO DATE feature The dock is not recorded on recording When you leave the camcorder in SP (standard play back the tape. If the time display setting...
... time are displayed as follows: - Note that the white balance is displayed. Note on the tape counter The tape counter indicates the recording or playback time. you reset the date and time. - If the date display setting has been made , nothing is properly adjusted. 12 press START/STOP. Note on the AUTO DATE feature The dock is not recorded on recording When you leave the camcorder in SP (standard play back the tape. If the time display setting...
Primary User Manual
Page 15
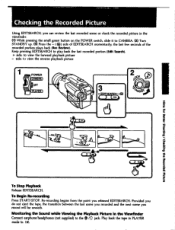
... for Better Shooting / Checking the Recorded Picture To Stop Playback Release EDITSEARCH. the last few seconds of EDITSEARCH momentarily; To Begin Re-recording Press START/STOP. Checking the Recorded Picture Using EDITSEARCH, you can review the last recorded scene or check the recorded picture in the viewfinder. (1) While pressing the small green button on the POWER switch, slide it to CAMERA. (2) Turn STANDBY up. (3) Press the - ( IR) side of the recorded portion plays back (Rec Review).
... for Better Shooting / Checking the Recorded Picture To Stop Playback Release EDITSEARCH. the last few seconds of EDITSEARCH momentarily; To Begin Re-recording Press START/STOP. Checking the Recorded Picture Using EDITSEARCH, you can review the last recorded scene or check the recorded picture in the viewfinder. (1) While pressing the small green button on the POWER switch, slide it to CAMERA. (2) Turn STANDBY up. (3) Press the - ( IR) side of the recorded portion plays back (Rec Review).
Primary User Manual
Page 16
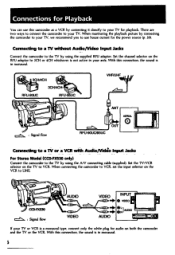
... the white plug for audio on both the camcorder and the TV or the VCR. Connecting to a TV without Audio/Video Input Jacks Connect the camcorder to VCR. When connecting the camcorder to VCR, set the input selector on the TV to the TV by using the supplied RFU adaptor. When monitoring the playback picture by connecting the camcorder to your TV, we recommend you to use this camcorder as a VCR by connecting it directly to LINE. 0 AUDIO VIDEO INPUT VIDEO CCD...
... the white plug for audio on both the camcorder and the TV or the VCR. Connecting to a TV without Audio/Video Input Jacks Connect the camcorder to VCR. When connecting the camcorder to VCR, set the input selector on the TV to the TV by using the supplied RFU adaptor. When monitoring the playback picture by connecting the camcorder to your TV, we recommend you to use this camcorder as a VCR by connecting it directly to LINE. 0 AUDIO VIDEO INPUT VIDEO CCD...
Primary User Manual
Page 18
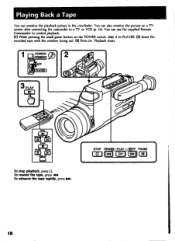
... green button on a TV screen, after connecting the camcorder to a TV or VCR (p. 16). To advance the tape rapidly, press No.. To rewind the tape, press N. lO 18 You can use the supplied Remote Commander to PLAYER. (2) Insert the recorded tape with the window facing out. (3) Press Playback starts. • • 1 POWER c..) CAMERA OFF „..oirpk PLAYER I • PLAY (c).0 N PLAY ME= slop MEE PAUSE SLOW 11 E] 0GRAY To stop playback, press...
... green button on a TV screen, after connecting the camcorder to a TV or VCR (p. 16). To advance the tape rapidly, press No.. To rewind the tape, press N. lO 18 You can use the supplied Remote Commander to PLAYER. (2) Insert the recorded tape with the window facing out. (3) Press Playback starts. • • 1 POWER c..) CAMERA OFF „..oirpk PLAYER I • PLAY (c).0 N PLAY ME= slop MEE PAUSE SLOW 11 E] 0GRAY To stop playback, press...
Primary User Manual
Page 33
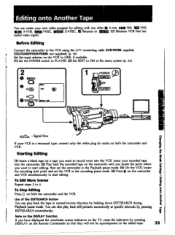
... set the VCR in the Playback pause mode. (3) On the VCR, locate the recording start editing. Editing onto Another Tape You can create your own video program by pressing DISPLAY on the Remote Commander so that has audio/video inputs. Before Editing Conned the camcorder to the VCR using the AN connecting cable (CCD-FX530: supplied, CCD-FX1130/FX435/FX630: not supplied). (p. 16) Set the input selector on the VCR to LINE, if available. (1) Set the POWER switch...
... set the VCR in the Playback pause mode. (3) On the VCR, locate the recording start editing. Editing onto Another Tape You can create your own video program by pressing DISPLAY on the Remote Commander so that has audio/video inputs. Before Editing Conned the camcorder to the VCR using the AN connecting cable (CCD-FX530: supplied, CCD-FX1130/FX435/FX630: not supplied). (p. 16) Set the input selector on the VCR to LINE, if available. (1) Set the POWER switch...
Primary User Manual
Page 36
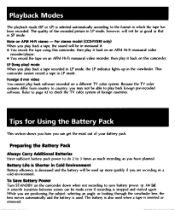
... a different TV color system. Foreign 8 mm video You cannot play back a tape recorded in LP mode, the LP indicator lights up more quickly if you are recording in a cold environment. or looking through the viewfinder lens, the lens moves automatically and the battery is inserted or removed. The battery is also used when a tape is used up in SP mode. Playback Modes The playback mode (SP or LP) is stopped and started again...
... a different TV color system. Foreign 8 mm video You cannot play back a tape recorded in LP mode, the LP indicator lights up more quickly if you are recording in a cold environment. or looking through the viewfinder lens, the lens moves automatically and the battery is inserted or removed. The battery is also used when a tape is used up in SP mode. Playback Modes The playback mode (SP or LP) is stopped and started again...
Primary User Manual
Page 41
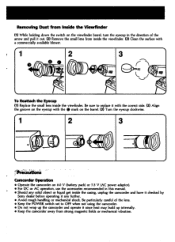
... to replace it with the correct side. (2) Align the groove on the eyecup with the • mark on 6.0 V (battery pack) or 7.5 V (AC power adaptor). • For DC or AC operation, use the accessories recommended in the direction of the lens. • Keep the POWER switch set to OFF when not using the camcorder. • Do not wrap up the camcorder and operate it out. (2) Remove...
... to replace it with the correct side. (2) Align the groove on the eyecup with the • mark on 6.0 V (battery pack) or 7.5 V (AC power adaptor). • For DC or AC operation, use the accessories recommended in the direction of the lens. • Keep the POWER switch set to OFF when not using the camcorder. • Do not wrap up the camcorder and operate it out. (2) Remove...
Primary User Manual
Page 42
... object on the power. However, the original battery capacity can be used to remove dust. disconnect the power source and remove the tape. Never pull the cord itself. • Do not operate the unit with a soft brush to sense the type. Camcorder Care • When the camcorder is normal. thickness of the connecting plate. This will disturb AM reception and video operation. • The unit...
... object on the power. However, the original battery capacity can be used to remove dust. disconnect the power source and remove the tape. Never pull the cord itself. • Do not operate the unit with a soft brush to sense the type. Camcorder Care • When the camcorder is normal. thickness of the connecting plate. This will disturb AM reception and video operation. • The unit...
Primary User Manual
Page 44
... Standby mode for more than recording. The battery is too low. - 36 The battery pack has Charge the battery pack again. The ambient temperature is dead. Rewind the tape or use a new one . 18 The POWER switch is not and TIME (NEXT) malfunctioning. Flashing will stop soon. - 2 seconds. The tape has run out. operate. set to CAMERA. You pressed DATE (+) The camcorder is Set it to CAMERA or 18 button is dead. Use a charged battery...
... Standby mode for more than recording. The battery is too low. - 36 The battery pack has Charge the battery pack again. The ambient temperature is dead. Rewind the tape or use a new one . 18 The POWER switch is not and TIME (NEXT) malfunctioning. Flashing will stop soon. - 2 seconds. The tape has run out. operate. set to CAMERA. You pressed DATE (+) The camcorder is Set it to CAMERA or 18 button is dead. Use a charged battery...

Primary User Manual
Page 45
... Sony V8-25CLH cleaning cassette. 40 The supplied Remote COMMANDER is Adjust the viewfinder lens. system. function does not activate. Picture The menu is not DISPLAY on the Press DISPLAY on the Remote displayed on the The viewfinder lens is set Set it to "I" or 32 (CCD-FX530 only) "2" in the menu system. the infrared rays. - The batteries are dead. The video heads may be dirty. Something is too high. - set the sound...
... Sony V8-25CLH cleaning cassette. 40 The supplied Remote COMMANDER is Adjust the viewfinder lens. system. function does not activate. Picture The menu is not DISPLAY on the Press DISPLAY on the Remote displayed on the The viewfinder lens is set Set it to "I" or 32 (CCD-FX530 only) "2" in the menu system. the infrared rays. - The batteries are dead. The video heads may be dirty. Something is too high. - set the sound...
Primary User Manual
Page 47
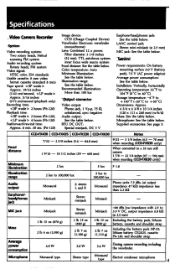
... control jack: Stereo mini-minijack (e 2.5 mm) MIC jack: See the table below. .7tl.enarel Power requirements: On battery mounting surface 6.0 V (battery pack), 7.5 V (AC power adaptor) Average power consumption: See the table below . Color temperature: Auto Minimum illumination: See the table below . Specifications Video Camera Recorder .system Video recording system: Two rotary heads, Helical scanning FM system Audio recording system: Rotary heads, FM system Video signal: NTSC color, EIA standards Usable cassette: 8 mm video format cassette (standard 8 mm) Tape speed...
... control jack: Stereo mini-minijack (e 2.5 mm) MIC jack: See the table below. .7tl.enarel Power requirements: On battery mounting surface 6.0 V (battery pack), 7.5 V (AC power adaptor) Average power consumption: See the table below . Color temperature: Auto Minimum illumination: See the table below . Specifications Video Camera Recorder .system Video recording system: Two rotary heads, Helical scanning FM system Audio recording system: Rotary heads, FM system Video signal: NTSC color, EIA standards Usable cassette: 8 mm video format cassette (standard 8 mm) Tape speed...

Primary User Manual
Page 50
Ei Viewfinder lens adjustment ring (p. 10) E Eyecup E Viewfinder (p. 10) E Camera recording/battery lamp g FADER button (CCD-FX435/FX530/FX630) (p. 27) g Tripod receptacle (p. 14) 50 g Focus ring (CCD-FX630 only) (p. 28) E 28) FOCUS switch (CCD-FX630 only) 1p. Identifying the Parts STOP REWQ« -PLAY -OFF PAUSE 0 De. 11 ER EFi CCD-FX630 El Tape transport buttons (p. 18) 0 (stop) 44I REW (rewind) (playback) 100. FF (fastforward) 11 PAUSE 14 Built4n microphone E Remote sensor (p. 54) Aim the Remote Commander here for remote control.
Ei Viewfinder lens adjustment ring (p. 10) E Eyecup E Viewfinder (p. 10) E Camera recording/battery lamp g FADER button (CCD-FX435/FX530/FX630) (p. 27) g Tripod receptacle (p. 14) 50 g Focus ring (CCD-FX630 only) (p. 28) E 28) FOCUS switch (CCD-FX630 only) 1p. Identifying the Parts STOP REWQ« -PLAY -OFF PAUSE 0 De. 11 ER EFi CCD-FX630 El Tape transport buttons (p. 18) 0 (stop) 44I REW (rewind) (playback) 100. FF (fastforward) 11 PAUSE 14 Built4n microphone E Remote sensor (p. 54) Aim the Remote Commander here for remote control.

Primary User Manual
Page 56
Index A AC power adaptor Adjusting viewfinder AFM Hi-Fi Sound AGE/EVENT AUTO DATE Auto focus A/V connecting cable B BACK LIGHT Battery pack BEEP C Camera recording Car battery Charging battery Cleaning video heads Clock set Connection COUNTER RESET F, G, H Q, R 6, 20 10 36 22 11 21 16 25 6 12 II 21 6 40 35 16 12 Fade-in Japan Tripod mounting Trouble check Twilight mode D, E DATE/TIME DISPLAY EDIT Editing EDITSEARCH EJECT 21 19 33 33 15 ........ 9 IN, X, Y, WIND Zoom 15 53 5I 18 16...
Index A AC power adaptor Adjusting viewfinder AFM Hi-Fi Sound AGE/EVENT AUTO DATE Auto focus A/V connecting cable B BACK LIGHT Battery pack BEEP C Camera recording Car battery Charging battery Cleaning video heads Clock set Connection COUNTER RESET F, G, H Q, R 6, 20 10 36 22 11 21 16 25 6 12 II 21 6 40 35 16 12 Fade-in Japan Tripod mounting Trouble check Twilight mode D, E DATE/TIME DISPLAY EDIT Editing EDITSEARCH EJECT 21 19 33 33 15 ........ 9 IN, X, Y, WIND Zoom 15 53 5I 18 16...


