
Primary User Manual
Page 1
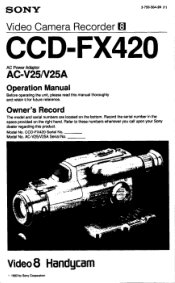
Refer to these numbers whenever you call upon your Sony dealer regarding this manual thoroughly and retain it for future reference. Model No. Model No. CCD-FX420 Serial No. AC-V25N25A Serial No. 010 andy Video8 Handycarn 1993 by Sony Corporation SONY 3-756-564-24 (1) Video Camera Recorder 8 CCD-FX420 AC Power Adaptor AC-V25N25A Operation Manual Before operating the unit, please read this product. Owner's Record The model and serial numbers are located on the right hand. Record the serial number in the space provided on the bottom.
Refer to these numbers whenever you call upon your Sony dealer regarding this manual thoroughly and retain it for future reference. Model No. Model No. CCD-FX420 Serial No. AC-V25N25A Serial No. 010 andy Video8 Handycarn 1993 by Sony Corporation SONY 3-756-564-24 (1) Video Camera Recorder 8 CCD-FX420 AC Power Adaptor AC-V25N25A Operation Manual Before operating the unit, please read this product. Owner's Record The model and serial numbers are located on the right hand. Record the serial number in the space provided on the bottom.
Primary User Manual
Page 2
... Camcorder CCD-FX420 and the AC Power Adaptor AC-V25A WARNING This equipment has been tested and found to compf with the limits for a Class B digital device, pursuant to Part 15 of important operating and maintenance (servicing) instructions in this manual could void your authority to operate this equipment does cause harmful interference to which can radiate radio frequency energy and, if not installed...
... Camcorder CCD-FX420 and the AC Power Adaptor AC-V25A WARNING This equipment has been tested and found to compf with the limits for a Class B digital device, pursuant to Part 15 of important operating and maintenance (servicing) instructions in this manual could void your authority to operate this equipment does cause harmful interference to which can radiate radio frequency energy and, if not installed...
Primary User Manual
Page 3
... out of your battery pack Advanced Camera Operation Connecting alternative power sources Using house current Using car battery Camera recording Recording the date or time Putting an age on your tape For low-position recording • Checking the last portion of a scene you just recorded (Rec Review) Checking recording in the viewfinder (EDITSEARCH) Re-recording on a previously recorded portion (EDITSEARCH) Helpful hints for recording O Inserting a scene in the middle of a recorded tape Recording with an external microphone Connecting a wired remote control unit Manual adjustments...
... out of your battery pack Advanced Camera Operation Connecting alternative power sources Using house current Using car battery Camera recording Recording the date or time Putting an age on your tape For low-position recording • Checking the last portion of a scene you just recorded (Rec Review) Checking recording in the viewfinder (EDITSEARCH) Re-recording on a previously recorded portion (EDITSEARCH) Helpful hints for recording O Inserting a scene in the middle of a recorded tape Recording with an external microphone Connecting a wired remote control unit Manual adjustments...

Primary User Manual
Page 4
Set the POWER switch to CAMERA. • Use "Identifying the Parts" as an index to look for years to come. When you want to view the playback picture on page 42 to see the TV color system of your camcorder. With your Handycam you want to use PAL-M system based TV, you will soon be able to use the RFU adaptor when you use the camcorder abroad...
Set the POWER switch to CAMERA. • Use "Identifying the Parts" as an index to look for years to come. When you want to view the playback picture on page 42 to see the TV color system of your camcorder. With your Handycam you want to use PAL-M system based TV, you will soon be able to use the RFU adaptor when you use the camcorder abroad...

Primary User Manual
Page 7
... (approx. Notes o 0 Op c , 00 TAPE/BATT CHECK The decreasing black bar indicates decreasing battery power. Notes • Make sure the battery is not installed properly, the camcorder will also blink in the direction of the arrow, and at the same time, slide out the battery pack to CAMERA, set the STANDBY switch up and press TAPE/BATT CHECK. Removing the battery pack Slide the BATT switch in the viewfinder. If...
... (approx. Notes o 0 Op c , 00 TAPE/BATT CHECK The decreasing black bar indicates decreasing battery power. Notes • Make sure the battery is not installed properly, the camcorder will also blink in the direction of the arrow, and at the same time, slide out the battery pack to CAMERA, set the STANDBY switch up and press TAPE/BATT CHECK. Removing the battery pack Slide the BATT switch in the viewfinder. If...
Primary User Manual
Page 10
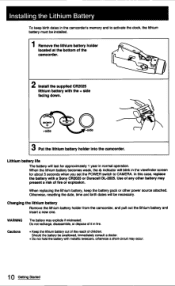
... last for about 5 seconds when you set the POWER switch to activate the clock, the lithium battery must be installed. 1 Remove the lithium battery holder located at the bottom of the camcorder. 0 2 Install the supplied CR2025 lithium battery with a Sony CR2025 or Duracell DL-2025. Use of fire or explosion. Lithium battery life The battery will blink in the viewfinder screen for approximately 1 year in fire...
... last for about 5 seconds when you set the POWER switch to activate the clock, the lithium battery must be installed. 1 Remove the lithium battery holder located at the bottom of the camcorder. 0 2 Install the supplied CR2025 lithium battery with a Sony CR2025 or Duracell DL-2025. Use of fire or explosion. Lithium battery life The battery will blink in the viewfinder screen for approximately 1 year in fire...
Primary User Manual
Page 11
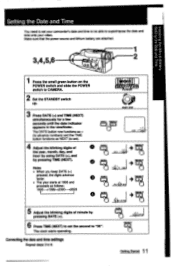
... NEXT (to set). 4 Adjust the blinking digits of minute by pressing TIME (NEXT). The clock starts operating. DAMN 4KAOPM Til IP Correcting the date and time settings Repeat steps 3 to CAMERA. Make sure that the power source and lithium battery are attached. 3,4,5,6 2 00 1 Press the small green button on the POWER switch and slide the POWER switch to 6. Setting the Date and Time You need to set your camcorders date and time to be able...
... NEXT (to set). 4 Adjust the blinking digits of minute by pressing TIME (NEXT). The clock starts operating. DAMN 4KAOPM Til IP Correcting the date and time settings Repeat steps 3 to CAMERA. Make sure that the power source and lithium battery are attached. 3,4,5,6 2 00 1 Press the small green button on the POWER switch and slide the POWER switch to 6. Setting the Date and Time You need to set your camcorders date and time to be able...
Primary User Manual
Page 14
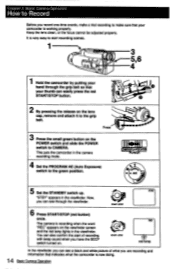
... of recording with beep sound when you have the BEEP switch turned on. . • START i STOP REC eo red lamp In the viewfinder you can see a black and white picture of what the camcorder is recording when the word "REC" appears on the POWER switch and slide the POWER switch to CAMERA. Keep the lens clean, or the focus cannot be adjusted properly. t4.1oF %Ir'ilk • OWE' Ci ) 5 Set the STANDBY switch...
... of recording with beep sound when you have the BEEP switch turned on. . • START i STOP REC eo red lamp In the viewfinder you can see a black and white picture of what the camcorder is recording when the word "REC" appears on the POWER switch and slide the POWER switch to CAMERA. Keep the lens clean, or the focus cannot be adjusted properly. t4.1oF %Ir'ilk • OWE' Ci ) 5 Set the STANDBY switch...
Primary User Manual
Page 15
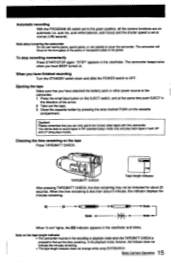
... the playback mode, however, the indicator does not indicate the minutes remaining. • The tape length indicator does not change while using EDITSEARCH. 15 Basic Camera Operation Automatic recording With the PROGRAM AE switch set at the same time push EJECT in the direction of the jacket. auto iris, auto white balance, auto focus) and the shutter speed is set to the camcorder. 1 Press the small blue button on the cassette compartment. The camcorder will be...
... the playback mode, however, the indicator does not indicate the minutes remaining. • The tape length indicator does not change while using EDITSEARCH. 15 Basic Camera Operation Automatic recording With the PROGRAM AE switch set at the same time push EJECT in the direction of the jacket. auto iris, auto white balance, auto focus) and the shutter speed is set to the camcorder. 1 Press the small blue button on the cassette compartment. The camcorder will be...
Primary User Manual
Page 17
... (DC OUT)/CHARGE selector on the AC power adaptor Video equipment cannot be operated unless the VTR (DC OUT)/CHARGE selector is disturbed. 17 Basic Camera Operation Note When you connect this camcorder to your TV, use this camcorder as a VCR by connecting it directly to your camcorder to a TV that the TV is turned off the power to prevent speaker damage. If your TV has audio/ video inputs, see...
... (DC OUT)/CHARGE selector on the AC power adaptor Video equipment cannot be operated unless the VTR (DC OUT)/CHARGE selector is disturbed. 17 Basic Camera Operation Note When you connect this camcorder to your TV, use this camcorder as a VCR by connecting it directly to your camcorder to a TV that the TV is turned off the power to prevent speaker damage. If your TV has audio/ video inputs, see...

Primary User Manual
Page 18
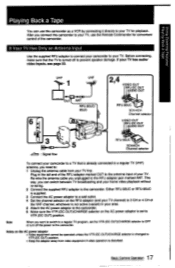
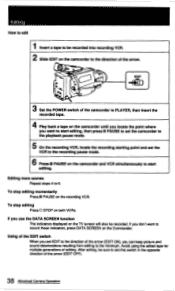
PLAY ° S) To stop playback, press O (STOP). To advance the tape rapidly, press (FF). If you adjusted the RFU adaptor (3 CH or 4 CH). When you have finished playback 1 Eject the tape, see page 15. 2 Slide the POWER switch to OFF. 3 Set the VTR (DC OUT)/CHARGE selector on the TV and select the channel to which you are connecting with audio/video inputs, set the POWER switch to PLAYER. 2 Insert a tape. (See...
PLAY ° S) To stop playback, press O (STOP). To advance the tape rapidly, press (FF). If you adjusted the RFU adaptor (3 CH or 4 CH). When you have finished playback 1 Eject the tape, see page 15. 2 Slide the POWER switch to OFF. 3 Set the VTR (DC OUT)/CHARGE selector on the TV and select the channel to which you are connecting with audio/video inputs, set the POWER switch to PLAYER. 2 Insert a tape. (See...

Primary User Manual
Page 26
... Recorded (Rec Review) You can check the recorded picture in the viewfinder using EDITSEARCH. 1 Put the camcorder in the viewfinder 1 Connect an earphone to the a (earphone) jack. 2 Press the small green button and slide the POWER switch to PLAYER. 3 Press 44 to rewind the tape and press 0 where you just recorded without changing the setting of the POWER switch using EDITSEARCH. To monitor the sound while viewing the playback picture in the standby mode...
... Recorded (Rec Review) You can check the recorded picture in the viewfinder using EDITSEARCH. 1 Put the camcorder in the viewfinder 1 Connect an earphone to the a (earphone) jack. 2 Press the small green button and slide the POWER switch to PLAYER. 3 Press 44 to rewind the tape and press 0 where you just recorded without changing the setting of the POWER switch using EDITSEARCH. To monitor the sound while viewing the playback picture in the standby mode...
Primary User Manual
Page 27
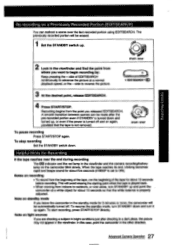
... other direction. 27 Advanced Camera Operation Note on standby mode If you want to begin recording by: Keep pressing the + side of the tape for about 10 seconds so that the tape is set to reverse the picture. Euiplooat:i elawe3 Re-recording on the camcorder blink slowly. Helpful Hints for Recording If the tape reaches near the end during recording The MI indicator and the red lamp...
... other direction. 27 Advanced Camera Operation Note on standby mode If you want to begin recording by: Keep pressing the + side of the tape for about 10 seconds so that the tape is set to reverse the picture. Euiplooat:i elawe3 Re-recording on the camcorder blink slowly. Helpful Hints for Recording If the tape reaches near the end during recording The MI indicator and the red lamp...
Primary User Manual
Page 31
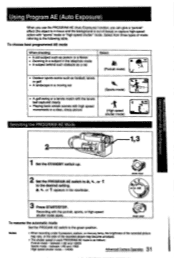
...) shutter mode) 0 C Selecting the PROGRAM AE Mode D 3 1›, 0 0 0 I_ - , I 1 3 a m (a/) 1 Set the STANDBY switch up. 2 Set the PROGRAM AE switch to a, %., or 1 to the following table. Using Program AE (Auto Exposure) When you use the PROGRAM AE (Auto Exposure) function, you can give a "portrait" effect (the object is in each PROGRAM AE mode is out of focus) or capture high-speed action with "sports" mode or "high speed shutter" mode. Notes...
...) shutter mode) 0 C Selecting the PROGRAM AE Mode D 3 1›, 0 0 0 I_ - , I 1 3 a m (a/) 1 Set the STANDBY switch up. 2 Set the PROGRAM AE switch to a, %., or 1 to the following table. Using Program AE (Auto Exposure) When you use the PROGRAM AE (Auto Exposure) function, you can give a "portrait" effect (the object is in each PROGRAM AE mode is out of focus) or capture high-speed action with "sports" mode or "high speed shutter" mode. Notes...
Primary User Manual
Page 38
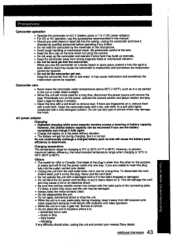
...). 38 Advanced Camera Operation Editing more scenes Repeat steps 4 to the direction of editing. If you use the DATA SCREEN function The indicators displayed on the TV screen will also be sure to set this switch in the opposite direction of the camcorder to PLAYER, then insert the recorded tape. 4 Play back a tape on the camcorder until you locate the point where you can keep picture and sound deteriorations resulting...
...). 38 Advanced Camera Operation Editing more scenes Repeat steps 4 to the direction of editing. If you use the DATA SCREEN function The indicators displayed on the TV screen will also be sure to set this switch in the opposite direction of the camcorder to PLAYER, then insert the recorded tape. 4 Play back a tape on the camcorder until you locate the point where you can keep picture and sound deteriorations resulting...
Primary User Manual
Page 43
...turn on the power, operate the camera section and player section and play back a tape for about 3 minutes. • Clean the lens with a mild detergent solution. When you use for a long time, disconnect the power source and remove the tape. To disconnect the cord...camcorder under direct sunlight. • When the unit will not be recovered if you use the camcorder on the lens when not using the camera. • Do not wrap up internally. • Keep the camcorder away from AM receivers and video equipment because it will get hot during charging, keep the metal contacts clean...
...turn on the power, operate the camera section and player section and play back a tape for about 3 minutes. • Clean the lens with a mild detergent solution. When you use for a long time, disconnect the power source and remove the tape. To disconnect the cord...camcorder under direct sunlight. • When the unit will not be recovered if you use the camcorder on the lens when not using the camera. • Do not wrap up internally. • Keep the camcorder away from AM receivers and video equipment because it will get hot during charging, keep the metal contacts clean...
Primary User Manual
Page 48
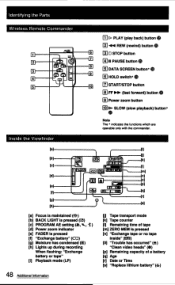
... II PAUSE button 0 8 M DATA SCREEN button* 9 El HOLD switch* 10 M START/STOP button 0 FF N (fast forward) button EJ Power zoom button gip- Identifying the Parts Wireless Remote Commander :h. SLOW (slow playback) button* 0 Note The * indicates the functions which are operable only with the commander. [d] [e] [a] Focus is maintained (c) [b] BACK LIGHT is pressed (13) [c] PROGRAM AE setting Rh, [d] Power zoom indicator [e] FADER is pressed [f] "Exchange battery" (C._ ) [g] Moisture has condensed (W) [h] Lights up during recording When flashing: "Exchange battery or tape" [I] Playback mode...
... II PAUSE button 0 8 M DATA SCREEN button* 9 El HOLD switch* 10 M START/STOP button 0 FF N (fast forward) button EJ Power zoom button gip- Identifying the Parts Wireless Remote Commander :h. SLOW (slow playback) button* 0 Note The * indicates the functions which are operable only with the commander. [d] [e] [a] Focus is maintained (c) [b] BACK LIGHT is pressed (13) [c] PROGRAM AE setting Rh, [d] Power zoom indicator [e] FADER is pressed [f] "Exchange battery" (C._ ) [g] Moisture has condensed (W) [h] Lights up during recording When flashing: "Exchange battery or tape" [I] Playback mode...

Primary User Manual
Page 49
... image on the tape is out (red). The battery pack has not been charged fully. The tab on the viewfinder screen is not selected on . The video heads may be removed from the compartment. Connect the adaptor to troubleshoot the problem. Rewind the tape or use a new one . Rewind the tape or use the camcorder for the camcorder is not clear. The playback picture is quickly discharged. The tape is set in the direction...
... image on the tape is out (red). The battery pack has not been charged fully. The tab on the viewfinder screen is not selected on . The video heads may be removed from the compartment. Connect the adaptor to troubleshoot the problem. Rewind the tape or use a new one . Rewind the tape or use the camcorder for the camcorder is not clear. The playback picture is quickly discharged. The tape is set in the direction...
Primary User Manual
Page 51
inch)/sec. (playback only) Recording time SP mode: 2 hours (P6-120) Playback time SP mode: 2 hours (P6-120) LP mode: 4 hours (P6-120) Fast forward/rewind time Approx. 6 min. 30 sec. (P6-120) Image device CCD (Charge Coupled Device) Viewfinder Electronic viewfinder (black and white) Lens Combined 10 x power zoom lens f=6.1 to 140°F) Dimensions Approx. 103 x 49 x 63 mm (w/h/d) (414/ x 1'3/4 x 2'/2 inches) including projecting parts and controls Weight Approx. 290 g (10 oz) (AC...
inch)/sec. (playback only) Recording time SP mode: 2 hours (P6-120) Playback time SP mode: 2 hours (P6-120) LP mode: 4 hours (P6-120) Fast forward/rewind time Approx. 6 min. 30 sec. (P6-120) Image device CCD (Charge Coupled Device) Viewfinder Electronic viewfinder (black and white) Lens Combined 10 x power zoom lens f=6.1 to 140°F) Dimensions Approx. 103 x 49 x 63 mm (w/h/d) (414/ x 1'3/4 x 2'/2 inches) including projecting parts and controls Weight Approx. 290 g (10 oz) (AC...

Primary User Manual
Page 52
... this product. Index A AC Adaptor Accessory Shoe Adjusting Viewfinder Age Button Audio Output AudioNideo Cable B Back Light Battery Battery lamp Battery Pack Beep C Camera Mode Camera Recording Lamp Car battery operation Charging Battery Cleaning Video Head Clock Set Close-up Connection Counter Reset D,E Data Screen Date/Time Dew Indication Earphone Jack Edit Switch Editing Editsearch Eject Exposure External Microphone Jack Eyecup F,G,H Fade in/Fade out Fast-Forward High Speed Shutter Hold Switch I,J,K,L Indoor Insert LANC Lens Cap Lithium Battery 6.22 29 9 12. 24 33 33 30...
... this product. Index A AC Adaptor Accessory Shoe Adjusting Viewfinder Age Button Audio Output AudioNideo Cable B Back Light Battery Battery lamp Battery Pack Beep C Camera Mode Camera Recording Lamp Car battery operation Charging Battery Cleaning Video Head Clock Set Close-up Connection Counter Reset D,E Data Screen Date/Time Dew Indication Earphone Jack Edit Switch Editing Editsearch Eject Exposure External Microphone Jack Eyecup F,G,H Fade in/Fade out Fast-Forward High Speed Shutter Hold Switch I,J,K,L Indoor Insert LANC Lens Cap Lithium Battery 6.22 29 9 12. 24 33 33 30...


