Operating Instructions
Page 2
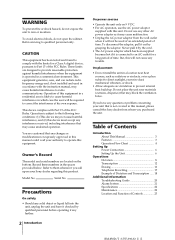
... Power Connection 6 Setting Up the Unit 6 Operations Dictation 8 Transcription 12 Erasing 16 Telephone Recording 17 Example of Dictation and Transcription ..... 18 Additional Information Troubleshooting Guide 20 Alarm System 21 Specifications 22 Maintenance 22 Location and Function of the FCC Rules. Operation of time. Owner's Record The model and serial numbers are designed to provide reasonable protection against harmful interference when the equipment is connected to an AC outlet for a Class A digital device...
... Power Connection 6 Setting Up the Unit 6 Operations Dictation 8 Transcription 12 Erasing 16 Telephone Recording 17 Example of Dictation and Transcription ..... 18 Additional Information Troubleshooting Guide 20 Alarm System 21 Specifications 22 Maintenance 22 Location and Function of the FCC Rules. Operation of time. Owner's Record The model and serial numbers are designed to provide reasonable protection against harmful interference when the equipment is connected to an AC outlet for a Class A digital device...

Operating Instructions
Page 3
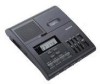
...-850 for transcribing. If you buy the accessories which was not recorded using your hands. • Auto-stop mode. • The REC/ERASE lamp for checking that the recording or erasing is supplied with the REVERSE TIME control makes transcribing easy by enabling the reviewing of the optional DE-45 or MDR-U10M earphones, you to move the tape without using a Sony Professional Dictating Machine. Differences in supplied accessories Model Accessory Hand Control Unit...
...-850 for transcribing. If you buy the accessories which was not recorded using your hands. • Auto-stop mode. • The REC/ERASE lamp for checking that the recording or erasing is supplied with the REVERSE TIME control makes transcribing easy by enabling the reviewing of the optional DE-45 or MDR-U10M earphones, you to move the tape without using a Sony Professional Dictating Machine. Differences in supplied accessories Model Accessory Hand Control Unit...
Operating Instructions
Page 4
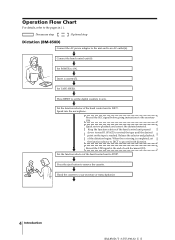
... the reviewing is reached. Record the LTR signal at the end of the hand control unit pressed down toward B. Set the function selector of the dictation begins. SPACE to STOP. . Set TAPE SPEED. . Keep the function selector of each document (10). Hand the cassette to remove the cassette. . Press the eject button to your secretary or transcriptionist. . 4 Introduction Speak into the microphone. Connect the hand control unit (6). . Operation Flow...
... the reviewing is reached. Record the LTR signal at the end of the hand control unit pressed down toward B. Set the function selector of the dictation begins. SPACE to STOP. . Set TAPE SPEED. . Keep the function selector of each document (10). Hand the cassette to remove the cassette. . Press the eject button to your secretary or transcriptionist. . 4 Introduction Speak into the microphone. Connect the hand control unit (6). . Operation Flow...
Operating Instructions
Page 5
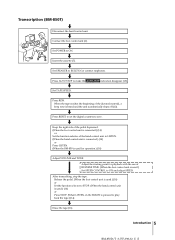
... automatically shuts off (12). . Adjust the starting point for operation.) (14) . Connect the foot control unit (6). . Set SPEAKER to ON and adjust SPEED. Insert the cassette (7). . Press AUTO STOP to zero. . Press RESET to set the digital counters to make the AUTO STOP indication disappear (13). . Erase the tape (16). When the tape reaches the beginning of the dictated material, a beep tone is pressed to ON. . Adjust VOLUME and TONE. Set POWER to play back the tape.) (14...
... automatically shuts off (12). . Adjust the starting point for operation.) (14) . Connect the foot control unit (6). . Set SPEAKER to ON and adjust SPEED. Insert the cassette (7). . Press AUTO STOP to zero. . Press RESET to set the digital counters to make the AUTO STOP indication disappear (13). . Erase the tape (16). When the tape reaches the beginning of the dictated material, a beep tone is pressed to ON. . Adjust VOLUME and TONE. Set POWER to play back the tape.) (14...
Operating Instructions
Page 7
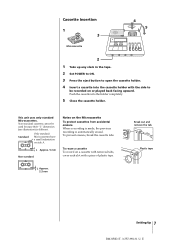
... A. Push the cassette into the cassette holder with a piece of plastic tape. Plastic tape Setting Up 7 This unit uses only standard Microcassettes. To prevent erasure, break the cassette tabs. Cassette Insertion 1 3 4 5 Microcassette ] 2 1 Take up any slack in the tape. 2 Set POWER to ON. 3 Press the eject button to be used because their "L" dimension (see illustration) is automatically erased. To reuse a cassette To record on or played back facing upward...
... A. Push the cassette into the cassette holder with a piece of plastic tape. Plastic tape Setting Up 7 This unit uses only standard Microcassettes. To prevent erasure, break the cassette tabs. Cassette Insertion 1 3 4 5 Microcassette ] 2 1 Take up any slack in the tape. 2 Set POWER to ON. 3 Press the eject button to be used because their "L" dimension (see illustration) is automatically erased. To reuse a cassette To record on or played back facing upward...
Operating Instructions
Page 8
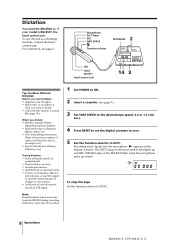
....) • At the end of each document, record an LTR signal. Otherwise, noise may be recorded. 1 Set POWER to ON. 2 Insert a cassette. (See page 7.) 3 Set TAPE SPEED to the desired tape speed, 2.4 or 1.2 (cm/ sec.). 4 Press RESET to set the digital counters to zero. 5 Set the function selector to STOP. 8 Operations Dictation You need the BM-850D or, if your mistakes. (Review and redictate, or use the unit as a dictating machine, connect the hand control unit.
....) • At the end of each document, record an LTR signal. Otherwise, noise may be recorded. 1 Set POWER to ON. 2 Insert a cassette. (See page 7.) 3 Set TAPE SPEED to the desired tape speed, 2.4 or 1.2 (cm/ sec.). 4 Press RESET to set the digital counters to zero. 5 Set the function selector to STOP. 8 Operations Dictation You need the BM-850D or, if your mistakes. (Review and redictate, or use the unit as a dictating machine, connect the hand control unit.
Operating Instructions
Page 9
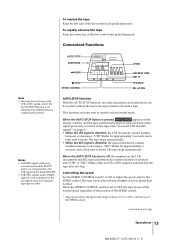
... next page. Keep the RESET button pressed for the number of the SEC signals recorded. When the AUTO STOP function (see page 13) is activated (AUTO STOP: ON), the tape automatically stops at the end of each index signal when it is set in recording (dictation), telephone recording, stop or playback (with the hand control unit) mode. SEC (secretary=special instructions to secretary) signal: Record before starting dictation. Convenient Functions To record LTR (letter) and SEC...
... next page. Keep the RESET button pressed for the number of the SEC signals recorded. When the AUTO STOP function (see page 13) is activated (AUTO STOP: ON), the tape automatically stops at the end of each index signal when it is set in recording (dictation), telephone recording, stop or playback (with the hand control unit) mode. SEC (secretary=special instructions to secretary) signal: Record before starting dictation. Convenient Functions To record LTR (letter) and SEC...
Operating Instructions
Page 10
... instruction) counter increases by one and "SEC" flashes for about three seconds. Connect a Sony DE45 or MDR-U10M earphones (not supplied) to EARPHONE VOLUME Recording time Select the desired tape speed for recording with BM-850T only) to the EARPHONE jack located on the hand control unit. To record the SEC signal SEC • Playback sound is pressed while turning on the on the hand control...
... instruction) counter increases by one and "SEC" flashes for about three seconds. Connect a Sony DE45 or MDR-U10M earphones (not supplied) to EARPHONE VOLUME Recording time Select the desired tape speed for recording with BM-850T only) to the EARPHONE jack located on the hand control unit. To record the SEC signal SEC • Playback sound is pressed while turning on the on the hand control...

Operating Instructions
Page 12
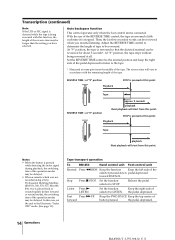
... tape speed as a transcribing machine, connect the foot control unit. Fast forward 74 2 Rewind 8 Start/Stop (Listen) Foot control unit 61 5 3 9 Tips on the cassette and review the contents using the AUTO STOP function. • Erase the tape when transcription is finished. 1 Set POWER to ON. 2 Insert a cassette. (See page 7.) 3 Set SPEAKER to BUILT-IN. 4 Set AUTO STOP to make AUTO STOP disappear (AUTO STOP function is BM-850D the foot control unit. To stop the tape Release the pedal. To use the unit as that used for recording (dictation...
... tape speed as a transcribing machine, connect the foot control unit. Fast forward 74 2 Rewind 8 Start/Stop (Listen) Foot control unit 61 5 3 9 Tips on the cassette and review the contents using the AUTO STOP function. • Erase the tape when transcription is finished. 1 Set POWER to ON. 2 Insert a cassette. (See page 7.) 3 Set SPEAKER to BUILT-IN. 4 Set AUTO STOP to make AUTO STOP disappear (AUTO STOP function is BM-850D the foot control unit. To stop the tape Release the pedal. To use the unit as that used for recording (dictation...
Operating Instructions
Page 13
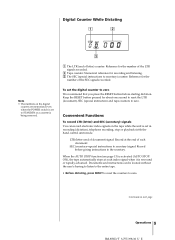
... a beep tone is heard. When the SPEED CONTROL switch is continuously pressed. The tape stops automatically. Continued on the LTR (document) and SEC (special instruction) counters increase or decrease and "LTR" or "SEC" blinks when an LTR or SEC signal is detected, the LTR document counter number increases or decreases, "LTR" blinks for consumer type tape recorder. AUTO STOP function With the AUTO STOP function, recorded documents and instructions can be played...
... a beep tone is heard. When the SPEED CONTROL switch is continuously pressed. The tape stops automatically. Continued on the LTR (document) and SEC (special instruction) counters increase or decrease and "LTR" or "SEC" blinks when an LTR or SEC signal is detected, the LTR document counter number increases or decreases, "LTR" blinks for consumer type tape recorder. AUTO STOP function With the AUTO STOP function, recorded documents and instructions can be played...
Operating Instructions
Page 14
... some point near the middle of the tape. With the use of the REVERSE TIME control, the tape is rewound a little each time it is connected. At "9" position, the tape is played back or wound rapidly (in accordance with this function, the length of the operation modes may be delayed. • When a cassette which was not recorded using a Sony Professional Dictating Machine (BM-531, 560, 570, 577, 820...
... some point near the middle of the tape. With the use of the REVERSE TIME control, the tape is rewound a little each time it is connected. At "9" position, the tape is played back or wound rapidly (in accordance with this function, the length of the operation modes may be delayed. • When a cassette which was not recorded using a Sony Professional Dictating Machine (BM-531, 560, 570, 577, 820...
Operating Instructions
Page 15
... play back in the Electronic "Index ON" mode and the cassette was not recorded using a Sony Professional Dictating Machine (BM-531, 560, 570, 577, 820, 880, 890 etc.), neither the operation buttons, the LTR and SEC counters nor the auto backspace function will be heard through the built-in the Electronic "Index OFF" mode. the AUTO STOP function does not work correctly. In the tape stop mode, keep both RESET and STOP...
... play back in the Electronic "Index ON" mode and the cassette was not recorded using a Sony Professional Dictating Machine (BM-531, 560, 570, 577, 820, 880, 890 etc.), neither the operation buttons, the LTR and SEC counters nor the auto backspace function will be heard through the built-in the Electronic "Index OFF" mode. the AUTO STOP function does not work correctly. In the tape stop mode, keep both RESET and STOP...
Operating Instructions
Page 16
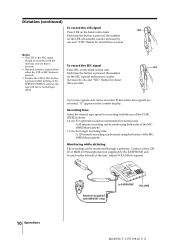
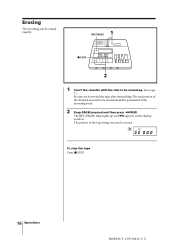
Erasing The recording can be positioned at the recording head. 2 Keep ERASE pressed and then press 0 REW. REC/ERASE 1 p STOP 2 1 Insert the cassette with the side to be erased up and 0 appears on the display window. To stop the tape Press p STOP. 16 Operations The REC/ERASE lamp lights up . (See page 7.) Be sure not to be erased should be erased rapidly. The end portion of the tape being rewound is erased. The portion of the dictated material to rewind the tape after transcribing.
Erasing The recording can be positioned at the recording head. 2 Keep ERASE pressed and then press 0 REW. REC/ERASE 1 p STOP 2 1 Insert the cassette with the side to be erased up and 0 appears on the display window. To stop the tape Press p STOP. 16 Operations The REC/ERASE lamp lights up . (See page 7.) Be sure not to be erased should be erased rapidly. The end portion of the tape being rewound is erased. The portion of the dictated material to rewind the tape after transcribing.
Operating Instructions
Page 17
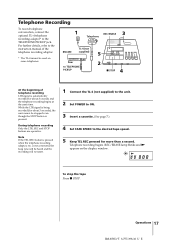
... a cassette. (See page 7.) 4 Set TAPE SPEED to the TELEPHONE PICKUP jack. Telephone Recording To record telephone conversation, connect the optional TL-4 telephone recording adaptor* to the desired tape speed. 5 Keep TEL REC pressed for about 3 seconds and the telephone recording begins at the same time. is pressed. For further details, refer to the instruction manual of the telephone recording adaptor. * The TL-4 cannot be used on the display window. To stop...
... a cassette. (See page 7.) 4 Set TAPE SPEED to the TELEPHONE PICKUP jack. Telephone Recording To record telephone conversation, connect the optional TL-4 telephone recording adaptor* to the desired tape speed. 5 Keep TEL REC pressed for about 3 seconds and the telephone recording begins at the same time. is pressed. For further details, refer to the instruction manual of the telephone recording adaptor. * The TL-4 cannot be used on the display window. To stop...

Operating Instructions
Page 18
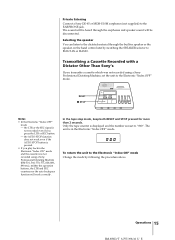
... by express." Example of the hand control unit to DICT. . Set AUTO STOP to zero. . Press RESET to set the digital counters to make AUTO STOP disappear. . "Today's date is for Mr. Alan R. Blinks for approx. 3 seconds and stops blinking. Press REW to STOP. Example of Dictation and Transcription Example of Dictation Set the function selector of Transcription Insert the cassette. . Type it up and send it by Air...
... by express." Example of the hand control unit to DICT. . Set AUTO STOP to zero. . Press RESET to set the digital counters to make AUTO STOP disappear. . "Today's date is for Mr. Alan R. Blinks for approx. 3 seconds and stops blinking. Press REW to STOP. Example of Dictation and Transcription Example of Dictation Set the function selector of Transcription Insert the cassette. . Type it up and send it by Air...
Operating Instructions
Page 20
... the nearest Sony Dictation Systems dealer. Erasing is unsatisfactory. • The erase head is set to ON. The switching time of the operation modes (STOP, LISTEN, FF or REW) is delayed. • A cassette which was not recorded using a Sony Professional Dictating Machine (BM-531, 560, 570, 577, 820, 880, 890 etc.) is played back in the rewind or fast forward mode and the alarm sounds. • The AUTO STOP switch is required. Press STOP and proceed...
... the nearest Sony Dictation Systems dealer. Erasing is unsatisfactory. • The erase head is set to ON. The switching time of the operation modes (STOP, LISTEN, FF or REW) is delayed. • A cassette which was not recorded using a Sony Professional Dictating Machine (BM-531, 560, 570, 577, 820, 880, 890 etc.) is played back in the rewind or fast forward mode and the alarm sounds. • The AUTO STOP switch is required. Press STOP and proceed...
Operating Instructions
Page 21
... jack properly. m Short beeps are detected while the tape is wound rapidly (in fast forward or rewind mode) and the AUTO STOP function is on the display window in the following situations. To release alarm system First, release the button, then • Insert a cassette. • Insert a new cassette or cover the safety slot. • Rewind the tape. • Insert a new cassette. • Do not press LTR or SEC button more than 9 times...
... jack properly. m Short beeps are detected while the tape is wound rapidly (in fast forward or rewind mode) and the AUTO STOP function is on the display window in the following situations. To release alarm system First, release the button, then • Insert a cassette. • Insert a new cassette or cover the safety slot. • Rewind the tape. • Insert a new cassette. • Do not press LTR or SEC button more than 9 times...
Operating Instructions
Page 22
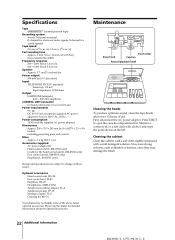
Specifications Tape y (normal position type) Recording system 4-track 2-channel monaural (L channel for electronic index signals, R channel for sound signals) Tape speed 2.4 cm/s (15⁄16 in./s), 1.2 cm/s (15⁄32 in./s) Fast winding time Approx. 1 min. 50 sec. (2.4 cm/s) with Sony microcassette MC-60BM Frequency response 200 - 4,000 Hz (at 1.2 cm/s) 200 - 6,000 Hz (at 10% distortion) Input TELEPHONE PICKUP (minijack) Sensitivity...
Specifications Tape y (normal position type) Recording system 4-track 2-channel monaural (L channel for electronic index signals, R channel for sound signals) Tape speed 2.4 cm/s (15⁄16 in./s), 1.2 cm/s (15⁄32 in./s) Fast winding time Approx. 1 min. 50 sec. (2.4 cm/s) with Sony microcassette MC-60BM Frequency response 200 - 4,000 Hz (at 1.2 cm/s) 200 - 6,000 Hz (at 10% distortion) Input TELEPHONE PICKUP (minijack) Sensitivity...
Operating Instructions
Page 23
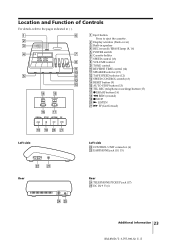
...eject the cassette. 2 Display window (Back cover) 3 Built-in speaker 4 REC (record)/ERASE lamp (8, 16) 7 5 POWER switch 6 Cassette holder 7 SPEED control (13) 8 8 VOLUME control 9 TONE control 9 0 REVERSE TIME control (14) !º !¡ SPEAKER selector (15) !¡ !™ !£ !™ TAPE SPEED selector (12) !£ SPEED CONTROL switch (13) !¢ RESET button (9) !∞ AUTO STOP button (13) !§ TEL REC (telephone recording) button (17) !¶ r ERASE button (16) !• 0 REW (rewind) !ª p STOP @º ( LISTEN @¡ ) FF (fast forwad) Left...
...eject the cassette. 2 Display window (Back cover) 3 Built-in speaker 4 REC (record)/ERASE lamp (8, 16) 7 5 POWER switch 6 Cassette holder 7 SPEED control (13) 8 8 VOLUME control 9 TONE control 9 0 REVERSE TIME control (14) !º !¡ SPEAKER selector (15) !¡ !™ !£ !™ TAPE SPEED selector (12) !£ SPEED CONTROL switch (13) !¢ RESET button (9) !∞ AUTO STOP button (13) !§ TEL REC (telephone recording) button (17) !¶ r ERASE button (16) !• 0 REW (rewind) !ª p STOP @º ( LISTEN @¡ ) FF (fast forwad) Left...
Operating Instructions
Page 24
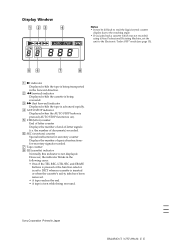
... rewound. Display Window 1 23 4 Notes • It may be difficult to read the liquid crystal counter display due to the watching angle. • If you play back a cassette which was not recorded using a Sony Professional Dictating Machine, set to the Electronic "Index OFF" mode (see page 15). 56 7 8 1 ( indicator Displayed while the tape is being transported in the forward direction. 2 0 (rewind) indicator Displayed while the cassette is not displayed. Sony Corporation...
... rewound. Display Window 1 23 4 Notes • It may be difficult to read the liquid crystal counter display due to the watching angle. • If you play back a cassette which was not recorded using a Sony Professional Dictating Machine, set to the Electronic "Index OFF" mode (see page 15). 56 7 8 1 ( indicator Displayed while the tape is being transported in the forward direction. 2 0 (rewind) indicator Displayed while the cassette is not displayed. Sony Corporation...


