
Operating Instructions
Page 2
... for a Class A digital device, pursuant to correct the interference at his own expense. Table of Contents Introduction About This Manual 3 Features 3 Operation Flow Chart 4 Setting Up Power Connection 6 Setting Up the Unit 6 Operations Dictation 8 Transcription 12 Erasing 16 Telephone Recording 17 Example of Dictation and Transcription ..... 18 Additional Information Troubleshooting Guide 20 Alarm System 21 Specifications 22 Maintenance 22 Location and Function of time. WARNING To prevent...
... for a Class A digital device, pursuant to correct the interference at his own expense. Table of Contents Introduction About This Manual 3 Features 3 Operation Flow Chart 4 Setting Up Power Connection 6 Setting Up the Unit 6 Operations Dictation 8 Transcription 12 Erasing 16 Telephone Recording 17 Example of Dictation and Transcription ..... 18 Additional Information Troubleshooting Guide 20 Alarm System 21 Specifications 22 Maintenance 22 Location and Function of time. WARNING To prevent...

Operating Instructions
Page 3
...; The foot control unit allows you start, please check your hands. • Auto-stop function quickly accesses instructions and documents. • Auto backspace function with the use of telephone calls, listening or in the stop mode. • The REC/ERASE lamp for both dictator and transcriber. Before you to transcribe a cassette which your model does not have, your model works as a transcriber since the BM-850D is resumed. • Two tape speeds (2.4 cm...
...; The foot control unit allows you start, please check your hands. • Auto-stop function quickly accesses instructions and documents. • Auto backspace function with the use of telephone calls, listening or in the stop mode. • The REC/ERASE lamp for both dictator and transcriber. Before you to transcribe a cassette which your model does not have, your model works as a transcriber since the BM-850D is resumed. • Two tape speeds (2.4 cm...
Operating Instructions
Page 4
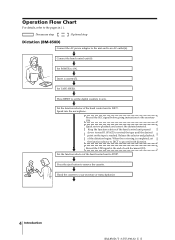
..., set the digital counters to DICT. Insert a cassette (7). . Set the function selector of the hand control unit to remove the cassette. . Quick review playback and correct the dictated material. Release the selector and playback of the hand control unit pressed down toward B. Hand the cassette to the secretary (10). Set TAPE SPEED. . Connect the hand control unit (6). . Operation Flow Chart For details, refer to the pages in ( ). : Necessary step : Optional step Dictation (BM-850D) Connect...
..., set the digital counters to DICT. Insert a cassette (7). . Set the function selector of the hand control unit to remove the cassette. . Quick review playback and correct the dictated material. Release the selector and playback of the hand control unit pressed down toward B. Hand the cassette to the secretary (10). Set TAPE SPEED. . Connect the hand control unit (6). . Operation Flow Chart For details, refer to the pages in ( ). : Necessary step : Optional step Dictation (BM-850D) Connect...
Operating Instructions
Page 5
... foot control unit is connected.) (14) or Set the function selector of REVERSE TIME. (When the foot control unit is used .) (14) or Press STOP. (When LISTEN on the BM-850 is used for operation.) (14) . Set SPEED CONTROL to LISTEN. (When the hand control unit is connected.) (14) or Press LISTEN. (When the BM-850 is pressed to make the AUTO STOP indication disappear (13). . Introduction 5 Connect the foot control unit (6). . Set TAPE SPEED. . Adjust the starting point for playback with the use...
... foot control unit is connected.) (14) or Set the function selector of REVERSE TIME. (When the foot control unit is used .) (14) or Press STOP. (When LISTEN on the BM-850 is used for operation.) (14) . Set SPEED CONTROL to LISTEN. (When the hand control unit is connected.) (14) or Press LISTEN. (When the BM-850 is pressed to make the AUTO STOP indication disappear (13). . Introduction 5 Connect the foot control unit (6). . Set TAPE SPEED. . Adjust the starting point for playback with the use...

Operating Instructions
Page 6
... side 6 Setting Up Connecting the Foot Control Unit (supplied with the BM-850D only) For operation, refer to the left or right side of the plug to a wall outlet to DC IN 9 V AC power adaptor (supplied) Setting Up the Unit Connecting the Hand Control Unit (supplied with the BM-850T only) For operation, refer to "Transcription" on the cradle while not in use any other AC power adaptor...
... side 6 Setting Up Connecting the Foot Control Unit (supplied with the BM-850D only) For operation, refer to the left or right side of the plug to a wall outlet to DC IN 9 V AC power adaptor (supplied) Setting Up the Unit Connecting the Hand Control Unit (supplied with the BM-850T only) For operation, refer to "Transcription" on the cradle while not in use any other AC power adaptor...
Operating Instructions
Page 8
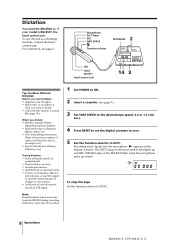
... the BM-850 blinks when the microphone picks up and REC/ERASE lamp on the display window. Dictation You need the BM-850D or, if your mistakes. (Review and redictate, or use the unit as a dictating machine, connect the hand control unit. Recording starts. Otherwise, noise may be recorded. 1 Set POWER to ON. 2 Insert a cassette. (See page 7.) 3 Set TAPE SPEED to the desired tape speed, 2.4 or 1.2 (cm/ sec.). 4 Press RESET to set the digital counters to zero. 5 Set the function selector to STOP. 8 Operations...
... the BM-850 blinks when the microphone picks up and REC/ERASE lamp on the display window. Dictation You need the BM-850D or, if your mistakes. (Review and redictate, or use the unit as a dictating machine, connect the hand control unit. Recording starts. Otherwise, noise may be recorded. 1 Set POWER to ON. 2 Insert a cassette. (See page 7.) 3 Set TAPE SPEED to the desired tape speed, 2.4 or 1.2 (cm/ sec.). 4 Press RESET to set the digital counters to zero. 5 Set the function selector to STOP. 8 Operations...
Operating Instructions
Page 9
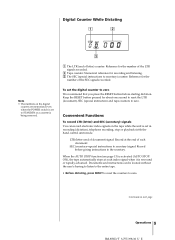
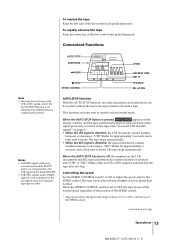
... recording (dictation), telephone recording, stop or playback (with the hand control unit) mode. Convenient Functions To record LTR (letter) and SEC (secretary) signals You can be located without the user's having to listen to the entire tape. • Before dictating, press RESET to reset the counters to zero We recommend that you press the RESET button before giving instructions to zero. SEC (secretary=special instructions to secretary) signal: Record before starting...
... recording (dictation), telephone recording, stop or playback (with the hand control unit) mode. Convenient Functions To record LTR (letter) and SEC (secretary) signals You can be located without the user's having to listen to the entire tape. • Before dictating, press RESET to reset the counters to zero We recommend that you press the RESET button before giving instructions to zero. SEC (secretary=special instructions to secretary) signal: Record before starting...
Operating Instructions
Page 10
...) to EARPHONE VOLUME Adjust VOLUME if required. 10 Operations Earphone (supplied with the intervals of the unit. tape will run at normal tape speed. Monitoring while dictating The recording can be monitored through earphones. To record the SEC signal SEC • Playback sound is pressed while turning on the on the hand control unit. either the LTR or SEC button is Each time the button is pressed, the number pressed...
...) to EARPHONE VOLUME Adjust VOLUME if required. 10 Operations Earphone (supplied with the intervals of the unit. tape will run at normal tape speed. Monitoring while dictating The recording can be monitored through earphones. To record the SEC signal SEC • Playback sound is pressed while turning on the on the hand control unit. either the LTR or SEC button is Each time the button is pressed, the number pressed...

Operating Instructions
Page 11
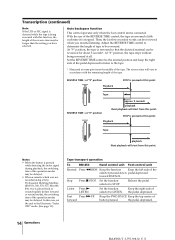
... cassette to B. Quick reviewing (playback)/correcting the dictated material You can easily listen to the dictated material and correct it if required. 1 Keep the function selector of the hand control unit pressed until the desired portion is completed, set the function selector to DICT to rewind the tape. to DICT For fast winding of the tape Keep the FWD SPACE button of the hand control unit...
... cassette to B. Quick reviewing (playback)/correcting the dictated material You can easily listen to the dictated material and correct it if required. 1 Keep the function selector of the hand control unit pressed until the desired portion is completed, set the function selector to DICT to rewind the tape. to DICT For fast winding of the tape Keep the FWD SPACE button of the hand control unit...

Operating Instructions
Page 12
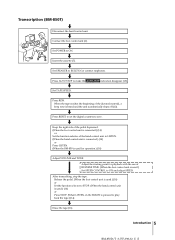
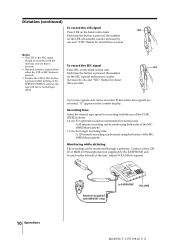
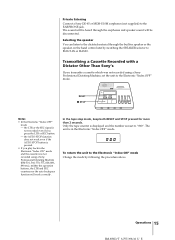
... typing, check the number of LTR and SEC signals recorded on the cassette and review the contents using the AUTO STOP function. • Erase the tape when transcription is finished. 1 Set POWER to ON. 2 Insert a cassette. (See page 7.) 3 Set SPEAKER to BUILT-IN. 4 Set AUTO STOP to make AUTO STOP disappear (AUTO STOP function is off . 7 Press RESET to set the digital counters to zero. 8 Keep the right side of the foot control unit pedal depressed to listen to the tape. 12 Operations 9 Adjust VOLUME...
... typing, check the number of LTR and SEC signals recorded on the cassette and review the contents using the AUTO STOP function. • Erase the tape when transcription is finished. 1 Set POWER to ON. 2 Insert a cassette. (See page 7.) 3 Set SPEAKER to BUILT-IN. 4 Set AUTO STOP to make AUTO STOP disappear (AUTO STOP function is off . 7 Press RESET to set the digital counters to zero. 8 Keep the right side of the foot control unit pedal depressed to listen to the tape. 12 Operations 9 Adjust VOLUME...
Operating Instructions
Page 13
..., AUTO STOP appears on the display window and the tape automatically stops at higher or lower speed than normal. The tape stops automatically. To rewind the tape Keep the left side of the foot control unit pedal depressed. When the AUTO STOP button is heard. The tape can be changed in rewind or fast forward mode. This function activates only in the range of about -10% to +50% with the use of the model BM...
..., AUTO STOP appears on the display window and the tape automatically stops at higher or lower speed than normal. The tape stops automatically. To rewind the tape Keep the left side of the foot control unit pedal depressed. When the AUTO STOP button is heard. The tape can be changed in rewind or fast forward mode. This function activates only in the range of about -10% to +50% with the use of the model BM...
Operating Instructions
Page 14
.... • When a cassette which was not recorded using a Sony Professional Dictating Machine (BM-531, 560, 570, 577, 820, 880, 890, etc.) is stopped. Notes • When the button is pressed while detecting the index signal during playback, the switching time of the operation modes may be reviewed for about 5 seconds*. In this point. Release the pedal. With the use of the REVERSE TIME control, the tape is rewound...
.... • When a cassette which was not recorded using a Sony Professional Dictating Machine (BM-531, 560, 570, 577, 820, 880, 890, etc.) is stopped. Notes • When the button is pressed while detecting the index signal during playback, the switching time of the operation modes may be reviewed for about 5 seconds*. In this point. Release the pedal. With the use of the REVERSE TIME control, the tape is rewound...
Operating Instructions
Page 15
... and speaker sound will work even if the AUTO STOP button is reset to BUILT-IN or HAND. the AUTO STOP function does not work correctly. Only the tape counter is displayed and the number is pressed. • If you play back in the Electronic "Index ON" mode and the cassette was not recorded using a Sony Professional Dictating Machine (BM-531, 560, 570, 577, 820, 880, 890 etc.), neither the operation buttons, the...
... and speaker sound will work even if the AUTO STOP button is reset to BUILT-IN or HAND. the AUTO STOP function does not work correctly. Only the tape counter is displayed and the number is pressed. • If you play back in the Electronic "Index ON" mode and the cassette was not recorded using a Sony Professional Dictating Machine (BM-531, 560, 570, 577, 820, 880, 890 etc.), neither the operation buttons, the...
Operating Instructions
Page 17
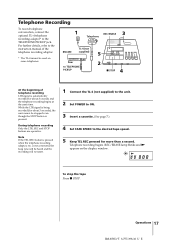
Note If the TEL REC button is not connected, the beep tone will not start. 1 Connect the TL-4 (not supplied) to the unit. 2 Set POWER to ON. 3 Insert a cassette. (See page 7.) 4 Set TAPE SPEED to TELEPHONE PICKUP 5 2 4 p STOP At the beginning of the telephone recording adaptor. * The TL-4 cannot be used on the display window. To stop the tape Press p STOP. REC/ERASE lamp blinks and ( appears on some telephones. 1 REC/ERASE 3 Telephone BM-850 TL-4 (not...
Note If the TEL REC button is not connected, the beep tone will not start. 1 Connect the TL-4 (not supplied) to the unit. 2 Set POWER to ON. 3 Insert a cassette. (See page 7.) 4 Set TAPE SPEED to TELEPHONE PICKUP 5 2 4 p STOP At the beginning of the telephone recording adaptor. * The TL-4 cannot be used on the display window. To stop the tape Press p STOP. REC/ERASE lamp blinks and ( appears on some telephones. 1 REC/ERASE 3 Telephone BM-850 TL-4 (not...

Operating Instructions
Page 18
..., We received your order. Please accept our thanks for your order for approx. 3 seconds and stops blinking. Set AUTO STOP to rewind the tape. Press REW to make AUTO STOP disappear. . Press RESET to set the digital counters to STOP. Shipment can be made within two weeks by express." Smith Sales Manager U.K.G. Ltd." . Tape playback starts. . 18 Operations Set the function selector of the hand control unit to DICT. . Blinks for approx. 3 seconds and stops blinking...
..., We received your order. Please accept our thanks for your order for approx. 3 seconds and stops blinking. Set AUTO STOP to rewind the tape. Press REW to make AUTO STOP disappear. . Press RESET to set the digital counters to STOP. Shipment can be made within two weeks by express." Smith Sales Manager U.K.G. Ltd." . Tape playback starts. . 18 Operations Set the function selector of the hand control unit to DICT. . Blinks for approx. 3 seconds and stops blinking...
Operating Instructions
Page 20
...". The reverse time of the auto backspace function is not correct. • A cassette which was not recorded using a Sony Professional Dictating Machine (BM-531, 560, 570, 577, 820, 880, 890 etc.) is played back in speaker • The SPEAKER selector is set to HAND. • The VOLUME control is set to the CONTROL UNIT connector firmly. • The BM-850 is not connected to STANDBY. Troubleshooting Guide Should any problem occur, conduct the...
...". The reverse time of the auto backspace function is not correct. • A cassette which was not recorded using a Sony Professional Dictating Machine (BM-531, 560, 570, 577, 820, 880, 890 etc.) is played back in speaker • The SPEAKER selector is set to HAND. • The VOLUME control is set to the CONTROL UNIT connector firmly. • The BM-850 is not connected to STANDBY. Troubleshooting Guide Should any problem occur, conduct the...
Operating Instructions
Page 21
... passed. • To stop alarm sound, release the TEL REC button, or put the hand control unit in the stop mode first and then start recording. • Connect it properly. When you press a button. m Short beeps are detected while the tape is wound rapidly (in fast forward or rewind mode) and the AUTO STOP function is on the display window in the dictating mode during the FF, REW, ERASE or TEL REC mode. • When...
... passed. • To stop alarm sound, release the TEL REC button, or put the hand control unit in the stop mode first and then start recording. • Connect it properly. When you press a button. m Short beeps are detected while the tape is wound rapidly (in fast forward or rewind mode) and the AUTO STOP function is on the display window in the dictating mode during the FF, REW, ERASE or TEL REC mode. • When...
Operating Instructions
Page 22
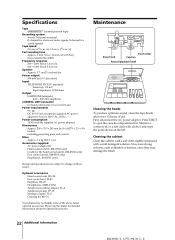
... of use. Specifications Tape y (normal position type) Recording system 4-track 2-channel monaural (L channel for electronic index signals, R channel for sound signals) Tape speed 2.4 cm/s (15⁄16 in./s), 1.2 cm/s (15⁄32 in./s) Fast winding time Approx. 1 min. 50 sec. (2.4 cm/s) with Sony microcassette MC-60BM Frequency response 200 - 4,000 Hz (at 1.2 cm/s) 200 - 6,000 Hz (at 10% distortion) Input TELEPHONE PICKUP (minijack) Sensitivity 0.2 mV Input impedance 10 kilohms Output...
... of use. Specifications Tape y (normal position type) Recording system 4-track 2-channel monaural (L channel for electronic index signals, R channel for sound signals) Tape speed 2.4 cm/s (15⁄16 in./s), 1.2 cm/s (15⁄32 in./s) Fast winding time Approx. 1 min. 50 sec. (2.4 cm/s) with Sony microcassette MC-60BM Frequency response 200 - 4,000 Hz (at 1.2 cm/s) 200 - 6,000 Hz (at 10% distortion) Input TELEPHONE PICKUP (minijack) Sensitivity 0.2 mV Input impedance 10 kilohms Output...
Operating Instructions
Page 23
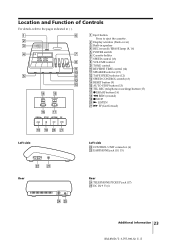
Location and Function of Controls For details, refer to the pages indicated in ( ). 1 2 3 4 5 !¢ !∞ !§ !¶ 6 1 Eject button Press to eject the cassette. 2 Display window (Back cover) 3 Built-in speaker 4 REC (record)/ERASE lamp (8, 16) 7 5 POWER switch 6 Cassette holder 7 SPEED control (13) 8 8 VOLUME control 9 TONE control 9 0 REVERSE TIME control (14) !º !¡ SPEAKER selector (15) !¡ !™ !£ !™ TAPE SPEED selector (12) !£ SPEED CONTROL switch (13) !¢ RESET button (9) !∞ AUTO STOP button (13) !§ TEL REC ...
Location and Function of Controls For details, refer to the pages indicated in ( ). 1 2 3 4 5 !¢ !∞ !§ !¶ 6 1 Eject button Press to eject the cassette. 2 Display window (Back cover) 3 Built-in speaker 4 REC (record)/ERASE lamp (8, 16) 7 5 POWER switch 6 Cassette holder 7 SPEED control (13) 8 8 VOLUME control 9 TONE control 9 0 REVERSE TIME control (14) !º !¡ SPEAKER selector (15) !¡ !™ !£ !™ TAPE SPEED selector (12) !£ SPEED CONTROL switch (13) !¢ RESET button (9) !∞ AUTO STOP button (13) !§ TEL REC ...
Operating Instructions
Page 24
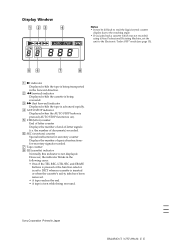
..., set to the Electronic "Index OFF" mode (see page 15). 56 7 8 1 ( indicator Displayed while the tape is being transported in the forward direction. 2 0 (rewind) indicator Displayed while the cassette is being rewound. 3 ) (fast forward) indicator Displayed while the tape is advanced rapidly. 4 AUTO STOP indicator Displayed when the AUTO STOP button is pressed (AUTO STOP function is on). 5 LTR (letter) counter End of letter counter Displays the number of end-of special-instructionsfor-secretary signals recorded. 7 Tape counter 8 † (cassette) indicator...
..., set to the Electronic "Index OFF" mode (see page 15). 56 7 8 1 ( indicator Displayed while the tape is being transported in the forward direction. 2 0 (rewind) indicator Displayed while the cassette is being rewound. 3 ) (fast forward) indicator Displayed while the tape is advanced rapidly. 4 AUTO STOP indicator Displayed when the AUTO STOP button is pressed (AUTO STOP function is on). 5 LTR (letter) counter End of letter counter Displays the number of end-of special-instructionsfor-secretary signals recorded. 7 Tape counter 8 † (cassette) indicator...


