
Operating Instructions
Page 16
... in Canada This Class B digital apparatus complies with Part 15 of Conformity Trade Name: Model: Responsible Party: Address: Telephone Number: SONY BKM-FW31 Sony Electronics Inc. 16450 W. WARNING Owner's Record The model and serial numbers are located at the rear. Record these numbers whenever you call ; To prevent fire or shock hazard, do not open the cabinet. However, there is connected. • Consult the dealer...
... in Canada This Class B digital apparatus complies with Part 15 of Conformity Trade Name: Model: Responsible Party: Address: Telephone Number: SONY BKM-FW31 Sony Electronics Inc. 16450 W. WARNING Owner's Record The model and serial numbers are located at the rear. Record these numbers whenever you call ; To prevent fire or shock hazard, do not open the cabinet. However, there is connected. • Consult the dealer...
Operating Instructions
Page 17
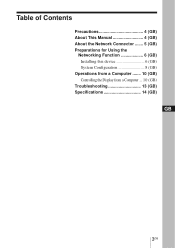
Table of Contents Precautions 4 (GB) About This Manual 4 (GB) About the Network Connector ....... 5 (GB) Preparations for Using the Networking Function 6 (GB) Installing this device 6 (GB) System Configuration 8 (GB) Operations from a Computer ....... 10 (GB) Controlling the Display from a Computer ... 10 (GB) Troubleshooting 13 (GB) Specifications 14 (GB) GB 3GB
Table of Contents Precautions 4 (GB) About This Manual 4 (GB) About the Network Connector ....... 5 (GB) Preparations for Using the Networking Function 6 (GB) Installing this device 6 (GB) System Configuration 8 (GB) Operations from a Computer ....... 10 (GB) Controlling the Display from a Computer ... 10 (GB) Troubleshooting 13 (GB) Specifications 14 (GB) GB 3GB

Operating Instructions
Page 18
...; All other than networking. ...• Microsoft and Windows are trademarks or registered trademarks of Microsoft Corporation in this device is attached to the Operating Instructions of the FWD series for operations other product and company names mentioned herein are the registered trademarks of their respective owners. Refer to the Flat Panel Display, FWD series. GB4 Precautions/About This Manual
...; All other than networking. ...• Microsoft and Windows are trademarks or registered trademarks of Microsoft Corporation in this device is attached to the Operating Instructions of the FWD series for operations other product and company names mentioned herein are the registered trademarks of their respective owners. Refer to the Flat Panel Display, FWD series. GB4 Precautions/About This Manual

Operating Instructions
Page 19
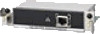
About the Network Connector 5GB About the Network Connector NETWORK MANAGEMENT Network connector Network connector (10BASE-T/ 100BASE-TX) Connect this device to the network with the LAN cable (10BASE-T/100BASE-TX).
About the Network Connector 5GB About the Network Connector NETWORK MANAGEMENT Network connector Network connector (10BASE-T/ 100BASE-TX) Connect this device to the network with the LAN cable (10BASE-T/100BASE-TX).
Operating Instructions
Page 20
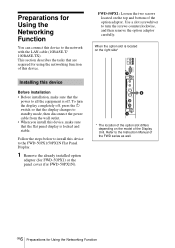
... adaptor. S VIDEO VIDEO AUDIO IN IN OUT IN OUT IN OUT L R REMOTE CONTROL S GB6 Preparations for FWD-50PX1N). Refer to turn the display completely off . To turn the screws counterclockwise, and then remove the option adaptor carefully. This section describes the tasks that the flat panel display is off , press the 1 switch so that the display changes to standby mode, then disconnect the power cable from the wall outlet. •...
... adaptor. S VIDEO VIDEO AUDIO IN IN OUT IN OUT IN OUT L R REMOTE CONTROL S GB6 Preparations for FWD-50PX1N). Refer to turn the display completely off . To turn the screws counterclockwise, and then remove the option adaptor carefully. This section describes the tasks that the flat panel display is off , press the 1 switch so that the display changes to standby mode, then disconnect the power cable from the wall outlet. •...
Operating Instructions
Page 21
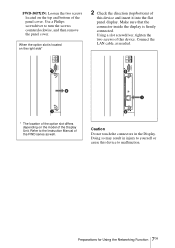
.... Connect the LAN cable, as well. 1 2 Caution Do not touch the connectors in injury to yourself or cause this device to malfunction. Make sure that the connector inside the display is located on the model of the FWD series as needed. Refer to turn the screws counterclockwise, and then remove the panel cover. Using a slot screwdriver, tighten the two screws of the panel cover. Use a Philips screwdriver to the Instruction Manual of...
.... Connect the LAN cable, as well. 1 2 Caution Do not touch the connectors in injury to yourself or cause this device to malfunction. Make sure that the connector inside the display is located on the model of the FWD series as needed. Refer to turn the screws counterclockwise, and then remove the panel cover. Using a slot screwdriver, tighten the two screws of the panel cover. Use a Philips screwdriver to the Instruction Manual of...
Operating Instructions
Page 22
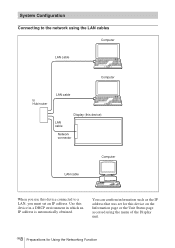
GB8 Preparations for this device on the Information page or the Unit Status page accessed using the LAN cables Computer LAN cable Computer to Hub/router LAN cable Display (this device) LAN cable Network connector LAN cable Computer When you use this device connected to a LAN, you must set for Using the Networking Function Use this device in a DHCP environment in which an IP address is automatically obtained. You can confirm information such as the IP address that was set an IP address. System Configuration Connecting to the network using the menu of the Display unit.
GB8 Preparations for this device on the Information page or the Unit Status page accessed using the LAN cables Computer LAN cable Computer to Hub/router LAN cable Display (this device) LAN cable Network connector LAN cable Computer When you use this device connected to a LAN, you must set for Using the Networking Function Use this device in a DHCP environment in which an IP address is automatically obtained. You can confirm information such as the IP address that was set an IP address. System Configuration Connecting to the network using the menu of the Display unit.
Operating Instructions
Page 23
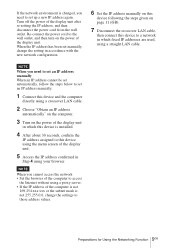
... given on the power of the display unit after re-setting the IP address, and then disconnect the power cord from the wall outlet. Re-connect the power cord to the wall outlet, and then turn on page 11 (GB). 7 Disconnect the crossover LAN cable, then connect this device using a straight LAN cable. If the network environment is changed, you need to set an IP address manually When an...
... given on the power of the display unit after re-setting the IP address, and then disconnect the power cord from the wall outlet. Re-connect the power cord to the wall outlet, and then turn on page 11 (GB). 7 Disconnect the crossover LAN cable, then connect this device using a straight LAN cable. If the network environment is changed, you need to set an IP address manually When an...
Operating Instructions
Page 24
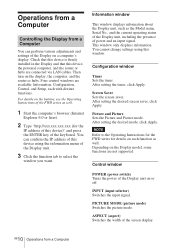
... Instructions for the FWD series for the IP address of the Display on each with distinct functions. Four control windows are not supported. Screen Saver Sets the screen saver. Control window POWER (power switch) Turns the power of the FWD series as well. 1 Start the computer's browser (Internet Explorer 6.0 or later). 2 Type "http://xxx.xxx.xxx.xxx (for details on a computer's display. Check that this device is firmly installed in the Display...
... Instructions for the FWD series for the IP address of the Display on each with distinct functions. Four control windows are not supported. Screen Saver Sets the screen saver. Control window POWER (power switch) Turns the power of the FWD series as well. 1 Start the computer's browser (Internet Explorer 6.0 or later). 2 Type "http://xxx.xxx.xxx.xxx (for details on a computer's display. Check that this device is firmly installed in the Display...
Operating Instructions
Page 25
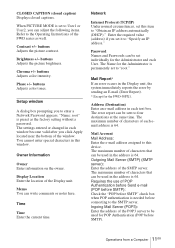
... SMTP" check box when POP authentication is permanently set individually for the Administrator and each email address is 64. Ingoing Mail Server (POP3): Enter the address of the FWD series as the factory setting without a password. Operations from a Computer 11GB When PICTURE MODE is 64. buttons Adjusts the picture contrast. Enter the required value (address) if you can be used in each window become...
... SMTP" check box when POP authentication is permanently set individually for the Administrator and each email address is 64. Ingoing Mail Server (POP3): Enter the address of the FWD series as the factory setting without a password. Operations from a Computer 11GB When PICTURE MODE is 64. buttons Adjusts the picture contrast. Enter the required value (address) if you can be used in each window become...
Operating Instructions
Page 26
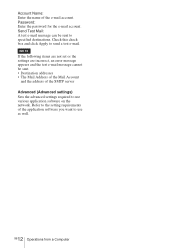
..., an error message appears and the test e-mail message cannot be sent to use various application software on the network. Account Name: Enter the name of the SMTP server Advanced (Advanced settings) Sets the advanced settings required to send a test e-mail. GB12 Operations from a Computer Check this check box and click Apply to use as well. Password: Enter the password for...
..., an error message appears and the test e-mail message cannot be sent to use various application software on the network. Account Name: Enter the name of the SMTP server Advanced (Advanced settings) Sets the advanced settings required to send a test e-mail. GB12 Operations from a Computer Check this check box and click Apply to use as well. Password: Enter the password for...
Operating Instructions
Page 27
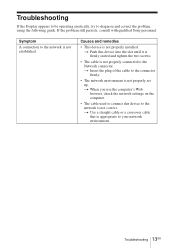
... two screws. • The cable is not correct. t When you use the computer's Web browser, check the network settings on the computer. • The cable used to the Network connector. Causes and remedies • This device is not established. If the problem still persists, consult with qualified Sony personnel. Symptom A connection to diagnose and correct the problem, using the following guide. Troubleshooting If the Display appears...
... two screws. • The cable is not correct. t When you use the computer's Web browser, check the network settings on the computer. • The cable used to the Network connector. Causes and remedies • This device is not established. If the problem still persists, consult with qualified Sony personnel. Symptom A connection to diagnose and correct the problem, using the following guide. Troubleshooting If the Display appears...
Operating Instructions
Page 28
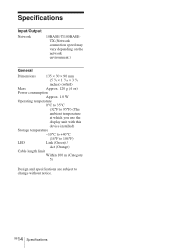
...; 3 5/8 inches) (w/h/d) Mass Approx. 120 g (4 oz) Power consumption Approx. 1.0 W Operating temperature 0°C to 35°C (32°F to 95°F) (The ambient temperature at which you use the display unit with this device installed) Storage temperature -10°C to +40°C (14°F to 104°F) LED Link (Green) / Act (Orange) Cable length limit Within 100 m (Category 5) Design and specifications...
...; 3 5/8 inches) (w/h/d) Mass Approx. 120 g (4 oz) Power consumption Approx. 1.0 W Operating temperature 0°C to 35°C (32°F to 95°F) (The ambient temperature at which you use the display unit with this device installed) Storage temperature -10°C to +40°C (14°F to 104°F) LED Link (Green) / Act (Orange) Cable length limit Within 100 m (Category 5) Design and specifications...

Operating Instructions
Page 100
Sony Corporation Printed in Japan Printed on 100% recycled paper.
Sony Corporation Printed in Japan Printed on 100% recycled paper.


