Operating Instructions
Page 3
... DTS** Digital Surround System. * Manufactured under license from the apparatus. 11) Only use attachments/accessories specified by the manufacturer. 12) Use only with the cart, stand, tripod, bracket, or table specified by Macrovision. Note to CATV system installer: This reminder is subject to qualified service personnel. Notice for long periods of...
... DTS** Digital Surround System. * Manufactured under license from the apparatus. 11) Only use attachments/accessories specified by the manufacturer. 12) Use only with the cart, stand, tripod, bracket, or table specified by Macrovision. Note to CATV system installer: This reminder is subject to qualified service personnel. Notice for long periods of...

Operating Instructions
Page 14
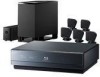
... Started Unpacking BDV-IT1000ES • Front speakers (2) • Foot pads (thick 2, thin 2) • Video cord (1) • Surround speakers (2) • Center speaker (1) • Subwoofer (1) • Desktop stands (4) • Wall mounting brackets (top) (5) • Remote commander (remote) (1) • Wall mounting brackets (bottom) (5) • Bracket covers (10) • Screws (5) • R6 (size AA) batteries...
... Started Unpacking BDV-IT1000ES • Front speakers (2) • Foot pads (thick 2, thin 2) • Video cord (1) • Surround speakers (2) • Center speaker (1) • Subwoofer (1) • Desktop stands (4) • Wall mounting brackets (top) (5) • Remote commander (remote) (1) • Wall mounting brackets (bottom) (5) • Bracket covers (10) • Screws (5) • R6 (size AA) batteries...
Operating Instructions
Page 18
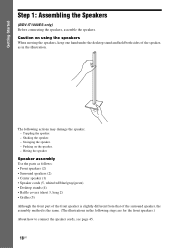
... sides of the speaker, as follows: • Front speakers (2) • Surround speakers (2) • Center speaker (1) • Speaker cords (5, white/red/blue/gray/green) • Desktop stands (4) • Baffle covers (short 3, long 2) • Grilles (5) Although the front part of the front speaker is slightly different from that of the surround speaker, the...
... sides of the speaker, as follows: • Front speakers (2) • Surround speakers (2) • Center speaker (1) • Speaker cords (5, white/red/blue/gray/green) • Desktop stands (4) • Baffle covers (short 3, long 2) • Grilles (5) Although the front part of the front speaker is slightly different from that of the surround speaker, the...

Operating Instructions
Page 19
... (gray) • Center speaker: CENTER (green) Front and surround speakers 1 Thread the speaker cord through the hole in the bottom of the desktop stand Speaker cord 19US In this case, you assemble the speakers. • When assembling, take care not to the speaker. • You can install the ...front, center, and surround speakers on a wall by attaching speaker stands (WS-IT1000F (optional)). How to identify the speakers Check the label on the floor by using the wall mounting bracket (supplied) (page 33). Ex....
... (gray) • Center speaker: CENTER (green) Front and surround speakers 1 Thread the speaker cord through the hole in the bottom of the desktop stand Speaker cord 19US In this case, you assemble the speakers. • When assembling, take care not to the speaker. • You can install the ...front, center, and surround speakers on a wall by attaching speaker stands (WS-IT1000F (optional)). How to identify the speakers Check the label on the floor by using the wall mounting bracket (supplied) (page 33). Ex....

Operating Instructions
Page 20
The removed screw is used when attaching the desktop stand. Screw Front speaker Surround speaker Note • When assembling, take care not to lose the screw. Be sure not to touch the speaker unit. 20US Getting Started 2 Remove the screw from the speaker.
The removed screw is used when attaching the desktop stand. Screw Front speaker Surround speaker Note • When assembling, take care not to lose the screw. Be sure not to touch the speaker unit. 20US Getting Started 2 Remove the screw from the speaker.

Operating Instructions
Page 22
Ex. Secure the speaker with the orientation of the desktop stand and speaker. Speaker cord Bottom of the desktop stand Slot Note • When assembling, take care not to touch the speaker unit. 5 Take up slack in Step 2. Getting Started 4 Attach the speaker to touch .... 22US Be careful with the screw removed in the speaker cord by running it through the slot. Front speaker , Adjust the length of the desktop stand and secure the speaker cord by pulling from the bottom of the cord. Screw Note • When assembling, take care not to the desktop...
Ex. Secure the speaker with the orientation of the desktop stand and speaker. Speaker cord Bottom of the desktop stand Slot Note • When assembling, take care not to touch the speaker unit. 5 Take up slack in Step 2. Getting Started 4 Attach the speaker to touch .... 22US Be careful with the screw removed in the speaker cord by running it through the slot. Front speaker , Adjust the length of the desktop stand and secure the speaker cord by pulling from the bottom of the cord. Screw Note • When assembling, take care not to the desktop...

Operating Instructions
Page 26
... when installed on the attached grille. Getting Started 5 Attach the grille to use the speakers with their grilles attached. • Do not push on a TV stand, etc. Attach the foot pads (thick) to the front of the speaker and the foot pads (thin) to the bottom of the center speaker Side... view Foot pads (thin) Foot pads (thin) Foot pads (thick) 26US Foot pads (thick) Bottom of the speaker. "SONY" mark Grille Note • When assembling, take care not to touch the speaker units. • Be sure to the speaker.
... when installed on the attached grille. Getting Started 5 Attach the grille to use the speakers with their grilles attached. • Do not push on a TV stand, etc. Attach the foot pads (thick) to the front of the speaker and the foot pads (thin) to the bottom of the center speaker Side... view Foot pads (thin) Foot pads (thin) Foot pads (thick) 26US Foot pads (thick) Bottom of the speaker. "SONY" mark Grille Note • When assembling, take care not to touch the speaker units. • Be sure to the speaker.

Operating Instructions
Page 27
Ex. Getting Started Fully-assembled illustration Front left speaker (L): White label Front right speaker (R): Surround left speaker (L): Surround right speaker (R): Red label Blue label Gray label White Red Blue Gray Green Center speaker: Green label Note • When moving the front or surround speaker, hold the desktop stand part (1), not the speaker part (2). Front speaker 27US
Ex. Getting Started Fully-assembled illustration Front left speaker (L): White label Front right speaker (R): Surround left speaker (L): Surround right speaker (R): Red label Blue label Gray label White Red Blue Gray Green Center speaker: Green label Note • When moving the front or surround speaker, hold the desktop stand part (1), not the speaker part (2). Front speaker 27US
Operating Instructions
Page 28
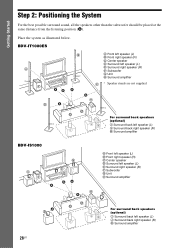
... right speaker (R) F Subwoofer G Unit H Surround amplifier H E A D A A JK I For surround back speakers (optional) I Surround back left speaker (L) E Surround right speaker (R) A F Subwoofer G Unit C H Surround amplifier G F AA A E * Speaker stands are not supplied.
... right speaker (R) F Subwoofer G Unit H Surround amplifier H E A D A A JK I For surround back speakers (optional) I Surround back left speaker (L) E Surround right speaker (R) A F Subwoofer G Unit C H Surround amplifier G F AA A E * Speaker stands are not supplied.

Operating Instructions
Page 29
Very humid - Subject to direct sunlight • Use caution when placing the speakers and/or speaker stands attached to the speakers on a specially treated (waxed, oiled, polished, etc.) floor, as staining or discoloration may result. • Do not use the surround amplifier ... of abrasive pad, scouring powder, or solvent such as alcohol or benzine. • Do not lean or hang on the front part of the speakers, Sony recommends that the speakers are : - Extremely hot or cold - The speakers may fall down. • Do not bend, twist, or fold the speaker grille. (BDV...
Very humid - Subject to direct sunlight • Use caution when placing the speakers and/or speaker stands attached to the speakers on a specially treated (waxed, oiled, polished, etc.) floor, as staining or discoloration may result. • Do not use the surround amplifier ... of abrasive pad, scouring powder, or solvent such as alcohol or benzine. • Do not lean or hang on the front part of the speakers, Sony recommends that the speakers are : - Extremely hot or cold - The speakers may fall down. • Do not bend, twist, or fold the speaker grille. (BDV...
Operating Instructions
Page 123
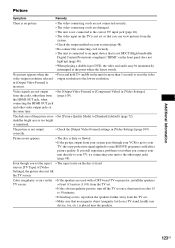
... 48). • Re-connect the connecting cord securely. • The unit is connected to an input device that no magnetic object (magnetic latch on a TV stand, health care device, toy, etc.) is placed near the speakers. 123US Picture noise appears. • The disc is too bright or unnatural. the HDMI OUT...
... 48). • Re-connect the connecting cord securely. • The unit is connected to an input device that no magnetic object (magnetic latch on a TV stand, health care device, toy, etc.) is placed near the speakers. 123US Picture noise appears. • The disc is too bright or unnatural. the HDMI OUT...
Operating Instructions
Page 136
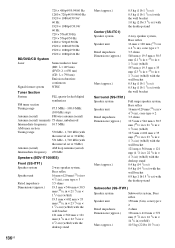
...16 in) (w/h/d) with the wall bracket 121 mm × 560 mm × 121 mm (4 7/8 in × 22 1/8 in × 4 7/8 in) (w/h/d) with the desktop stand Mass (approx.) 0.5 kg (1 lb 1 3/4 oz) 0.5 kg (1 lb 1 3/4 oz) with the wall bracket 1.0 kg (2 lbs 3 1/2 oz) with the desktop...× 121 mm (4 7/8 in × 22 1/8 in × 4 7/8 in) (w/h/d) with the desktop stand 0.4 kg (14 1/4 oz) 0.4 kg (14 1/4 oz) with the wall bracket 0.9 kg (1 lb 15 7/8 oz) with the desktop stand Subwoofer (SS-ITW1) Speaker system Speaker unit Rated impedance Dimensions (approx.) Mass (approx.) Subwoofer system, Bass reflex...
...16 in) (w/h/d) with the wall bracket 121 mm × 560 mm × 121 mm (4 7/8 in × 22 1/8 in × 4 7/8 in) (w/h/d) with the desktop stand Mass (approx.) 0.5 kg (1 lb 1 3/4 oz) 0.5 kg (1 lb 1 3/4 oz) with the wall bracket 1.0 kg (2 lbs 3 1/2 oz) with the desktop...× 121 mm (4 7/8 in × 22 1/8 in × 4 7/8 in) (w/h/d) with the desktop stand 0.4 kg (14 1/4 oz) 0.4 kg (14 1/4 oz) with the wall bracket 0.9 kg (1 lb 15 7/8 oz) with the desktop stand Subwoofer (SS-ITW1) Speaker system Speaker unit Rated impedance Dimensions (approx.) Mass (approx.) Subwoofer system, Bass reflex...


