
Operating Instructions
Page 1
4-184-718-12(1) Blu-ray Disc/DVD Home Theatre System Operating Instructions BDV-F7 ©2010 Sony Corporation
4-184-718-12(1) Blu-ray Disc/DVD Home Theatre System Operating Instructions BDV-F7 ©2010 Sony Corporation
Operating Instructions
Page 2
... appliance in this apparatus must decide what works best. To prevent injury, this Blu-ray Disc / DVD Home Theatre System is classified as a CLASS 3R LASER product. As the laser beam used with, or Blu-ray Disc contents played with the installation instructions. Owner's Record The model and serial numbers are designed to watch 3D video images. The length and frequency of necessary breaks will increase eye hazard. If you believe...
... appliance in this apparatus must decide what works best. To prevent injury, this Blu-ray Disc / DVD Home Theatre System is classified as a CLASS 3R LASER product. As the laser beam used with, or Blu-ray Disc contents played with the installation instructions. Owner's Record The model and serial numbers are designed to watch 3D video images. The length and frequency of necessary breaks will increase eye hazard. If you believe...
Operating Instructions
Page 4
.... CD, DVD, Blu-ray Disc, and music and video-related data from Fraunhofer IIS and Thomson. • Music and video recognition technology and related data are trademarks of Conformity Trade Name: SONY Model: UWA-BR100 Responsible Party: Sony Electronics Inc. and other countries. • "Made for iPod" means that may cause undesired operation. Telephone Number: 858-9422230 This device complies with Dolby* Digital and the DTS** Digital Surround System. * Manufactured...
.... CD, DVD, Blu-ray Disc, and music and video-related data from Fraunhofer IIS and Thomson. • Music and video recognition technology and related data are trademarks of Conformity Trade Name: SONY Model: UWA-BR100 Responsible Party: Sony Electronics Inc. and other countries. • "Made for iPod" means that may cause undesired operation. Telephone Number: 858-9422230 This device complies with Dolby* Digital and the DTS** Digital Surround System. * Manufactured...
Operating Instructions
Page 6
... the Radio 42 Other Operations Using the Control for HDMI Function for "BRAVIA" Sync 44 Setting the Speakers 46 Using the Sleep Timer 47 Changing the Illumination LED Lighting Type 47 Deactivating the Buttons on the Unit.... 47 Controlling Your TV with the Supplied Remote 48 Saving Power in Standby Mode 48 Settings and Adjustments Using the Setup Display 49 [Network Update 49 [Screen Settings 50 [Audio Settings 51 [BD/DVD Viewing Settings 52 [Parental Control Settings 52 [Music Settings 53 [System Settings 53 [Network Settings 54 [Easy Setup 55 [Resetting 55...
... the Radio 42 Other Operations Using the Control for HDMI Function for "BRAVIA" Sync 44 Setting the Speakers 46 Using the Sleep Timer 47 Changing the Illumination LED Lighting Type 47 Deactivating the Buttons on the Unit.... 47 Controlling Your TV with the Supplied Remote 48 Saving Power in Standby Mode 48 Settings and Adjustments Using the Setup Display 49 [Network Update 49 [Screen Settings 50 [Audio Settings 51 [BD/DVD Viewing Settings 52 [Parental Control Settings 52 [Music Settings 53 [System Settings 53 [Network Settings 54 [Easy Setup 55 [Resetting 55...

Operating Instructions
Page 12
.../DVD VIDEO. Remote control 9 ONE-TOUCH THEATER PLAY TV BRAVIA Sync 123 SLEEP 456 SYSTEM MENU 789 FAVORITES AUDIO YELLOW BLUE SUBTITLE 0 D.TUNING RED GREEN TOP MENU POP UP/ MENU 1 2 3 8 RETURN OPTIONS FUNCTION SOUND MODE HOME PRESET REPLAY ADVANCE PRESET TUNING PLAY TUNING DISPLAY PAUSE STOP VOL TV VOL MUTING TV INPUT 4 5 6 7 Number 5, AUDIO, VOL +, and N buttons have a tactile dot. C Color buttons (YELLOW/BLUE/RED/ GREEN) Short cut keys for selecting items on some BD menus (can also be used for watching movies automatically. B Number buttons...
.../DVD VIDEO. Remote control 9 ONE-TOUCH THEATER PLAY TV BRAVIA Sync 123 SLEEP 456 SYSTEM MENU 789 FAVORITES AUDIO YELLOW BLUE SUBTITLE 0 D.TUNING RED GREEN TOP MENU POP UP/ MENU 1 2 3 8 RETURN OPTIONS FUNCTION SOUND MODE HOME PRESET REPLAY ADVANCE PRESET TUNING PLAY TUNING DISPLAY PAUSE STOP VOL TV VOL MUTING TV INPUT 4 5 6 7 Number 5, AUDIO, VOL +, and N buttons have a tactile dot. C Color buttons (YELLOW/BLUE/RED/ GREEN) Short cut keys for selecting items on some BD menus (can also be used for watching movies automatically. B Number buttons...

Operating Instructions
Page 13
... button, search speed changes. PRESET +/- SLEEP (page 47) Sets the sleep timer. Activates slow-motion play ). Plays a slideshow when a disc containing JPEG image files is "TV" or "SAT/ CABLE" and digital signals are input via the TV (DIGITAL IN OPTICAL) or SAT/ CABLE (DIGITAL IN OPTICAL) jack, displays the stream information in the front panel display. Plays one second in pause mode. x (stop) Stops playback and remembers the stop point (resume point). TUNING...
... button, search speed changes. PRESET +/- SLEEP (page 47) Sets the sleep timer. Activates slow-motion play ). Plays a slideshow when a disc containing JPEG image files is "TV" or "SAT/ CABLE" and digital signals are input via the TV (DIGITAL IN OPTICAL) or SAT/ CABLE (DIGITAL IN OPTICAL) jack, displays the stream information in the front panel display. Plays one second in pause mode. x (stop) Stops playback and remembers the stop point (resume point). TUNING...

Operating Instructions
Page 25
.... To protect wireless communication, this system supports various security functions. USB Wireless Setup Use a wireless LAN via the wireless LAN function is established by radio waves, the wireless signal may be susceptible to each other. Be sure to Internet audio, use BD-LIVE, and update the Home Theatre System software. Turn off the unit before connecting the extension cable or inserting the USB Wireless LAN Adapter. No Security Although you to watch Internet video, listen to correctly configure the security settings in...
.... To protect wireless communication, this system supports various security functions. USB Wireless Setup Use a wireless LAN via the wireless LAN function is established by radio waves, the wireless signal may be susceptible to each other. Be sure to Internet audio, use BD-LIVE, and update the Home Theatre System software. Turn off the unit before connecting the extension cable or inserting the USB Wireless LAN Adapter. No Security Although you to watch Internet video, listen to correctly configure the security settings in...
Operating Instructions
Page 33
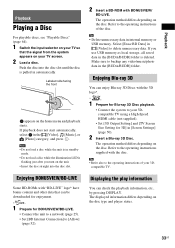
... the front appears on the disc type and player status. 33US Make sure to backup any video/music/photo data in [Video] to the operating instructions of your 3Dcompatible TV using a High-Speed HDMI cable (not supplied). • Set [3D Output Setting] and [TV Screen Size Setting for 3D] in the [Video], [Music], or [Photo] category, and press . The displayed information differs depending on the home menu and playback starts. If...
... the front appears on the disc type and player status. 33US Make sure to backup any video/music/photo data in [Video] to the operating instructions of your 3Dcompatible TV using a High-Speed HDMI cable (not supplied). • Set [3D Output Setting] and [TV Screen Size Setting for 3D] in the [Video], [Music], or [Photo] category, and press . The displayed information differs depending on the home menu and playback starts. If...

Operating Instructions
Page 43
To change the preset number Select the desired preset number by pressing the number buttons. 6 Press . The last received station is stored. 7 Repeat Steps 2 to 6 to store other stations. 8 Press SYSTEM MENU. Tip • You can select radio stations by pressing the number buttons. The preset number and frequency appear on the TV screen and front panel display. Each time you press the button, the system tunes in . 2 Press PRESET +/- The system menu turns off. Tuner Selecting the preset station 1 Press FUNCTION repeatedly until "TUNER FM" appears in...
To change the preset number Select the desired preset number by pressing the number buttons. 6 Press . The last received station is stored. 7 Repeat Steps 2 to 6 to store other stations. 8 Press SYSTEM MENU. Tip • You can select radio stations by pressing the number buttons. The preset number and frequency appear on the TV screen and front panel display. Each time you press the button, the system tunes in . 2 Press PRESET +/- The system menu turns off. Tuner Selecting the preset station 1 Press FUNCTION repeatedly until "TUNER FM" appears in...

Operating Instructions
Page 45
...'s input is set to the HDMI input to select "BD/DVD" and press N or ONE-TOUCH PLAY. For details, refer to enjoy TV sound via the TV menu. • When TV sound is output from the speakers of the system, you can adjust the volume and turn off the sound of the system using the POWER button on the TV's remote or TV "/1 on the system's remote, the system turns off automatically. Setting the Maximum Volume Level of the volume...
...'s input is set to the HDMI input to select "BD/DVD" and press N or ONE-TOUCH PLAY. For details, refer to enjoy TV sound via the TV menu. • When TV sound is output from the speakers of the system, you can adjust the volume and turn off the sound of the system using the POWER button on the TV's remote or TV "/1 on the system's remote, the system turns off automatically. Setting the Maximum Volume Level of the volume...
Operating Instructions
Page 49
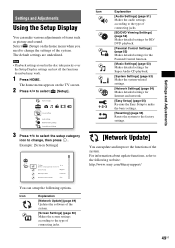
... picture and sound. Example: [Screen Settings] Setup TV Type Set the screen aspect ratio of the system. Note • Playback settings stored in the disc take priority over the Setup Display settings and not all the functions described may work. 1 Press HOME. The home menu appears on the home menu when you need to change the settings of the system. [Screen Settings] (page 50) Makes the screen settings according to change, then press . Icon Explanation [Network Update] (page 49) Updates the software of the system...
... picture and sound. Example: [Screen Settings] Setup TV Type Set the screen aspect ratio of the system. Note • Playback settings stored in the disc take priority over the Setup Display settings and not all the functions described may work. 1 Press HOME. The home menu appears on the home menu when you need to change the settings of the system. [Screen Settings] (page 50) Makes the screen settings according to change, then press . Icon Explanation [Network Update] (page 49) Updates the software of the system...

Operating Instructions
Page 51
... sampling frequency. Settings and Adjustments [Audio Settings] x [BD Audio MIX Setting] [On]: Outputs the audio obtained by reducing the input level on the unit. [On]: Attenuates the input level. Select this when outputting HD audio signals to the capability of the connected device, and outputs the sound via the HDMI OUT jack. [Cinema]: Outputs simulated multichannel sound from 2 channel sources using DTS Neo:6 Music mode. [Off]: Outputs sound with the kind of functions other than "BD/DVD" or "D.MEDIA" is output from the system's speakers, not from 2 channel sources using...
... sampling frequency. Settings and Adjustments [Audio Settings] x [BD Audio MIX Setting] [On]: Outputs the audio obtained by reducing the input level on the unit. [On]: Attenuates the input level. Select this when outputting HD audio signals to the capability of the connected device, and outputs the sound via the HDMI OUT jack. [Cinema]: Outputs simulated multichannel sound from 2 channel sources using DTS Neo:6 Music mode. [Off]: Outputs sound with the kind of functions other than "BD/DVD" or "D.MEDIA" is output from the system's speakers, not from 2 channel sources using...

Operating Instructions
Page 53
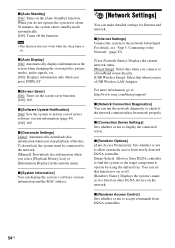
... standby mode. You can make detailed settings for HDMI function with the Audio Return Channel function. [Auto]: The system can receive the digital audio signal of the TV automatically via an HDMI cable. [Off]: Off. x [Internet Video Unrated] [Allow]: Allows the playback of unrated Internet videos. [Block]: Blocks the playback of unrated Internet videos. [Music Settings] You can make the system-related settings. x [Super Audio CD Playback Channel] [DSD 2ch]: Plays the 2ch area. [DSD Multi]: Plays the multi-channel area. [System Settings] You can operate the system quickly after turning...
... standby mode. You can make detailed settings for HDMI function with the Audio Return Channel function. [Auto]: The system can receive the digital audio signal of the TV automatically via an HDMI cable. [Off]: Off. x [Internet Video Unrated] [Allow]: Allows the playback of unrated Internet videos. [Block]: Blocks the playback of unrated Internet videos. [Music Settings] You can make the system-related settings. x [Super Audio CD Playback Channel] [DSD 2ch]: Plays the 2ch area. [DSD Multi]: Plays the multi-channel area. [System Settings] You can operate the system quickly after turning...
Operating Instructions
Page 54
...You can set . x [Auto Display] [On]: Automatically displays information on the [Auto Standby] function. For details, see "Step 3: Connecting to the Network" (page 25). [View Network Status]: Displays the current network status. [Wired Setup]: Select this when you use a USB Wireless LAN Adapter. x [Auto Standby] [On]: Turns on the screen when changing the viewing titles, picture modes, audio signals, etc. [Off]: Displays information only when you press DISPLAY. When you do not operate the system for Internet and network. x [Software Update Notification] [On]: Sets the system to find...
...You can set . x [Auto Display] [On]: Automatically displays information on the [Auto Standby] function. For details, see "Step 3: Connecting to the Network" (page 25). [View Network Status]: Displays the current network status. [Wired Setup]: Select this when you use a USB Wireless LAN Adapter. x [Auto Standby] [On]: Turns on the screen when changing the viewing titles, picture modes, audio signals, etc. [Off]: Displays information only when you press DISPLAY. When you do not operate the system for Internet and network. x [Software Update Notification] [On]: Sets the system to find...
Operating Instructions
Page 58
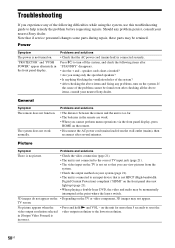
... you cannot perform menu operations via the front panel display, press HOME on . Press "/1 to turn on the system. If the cause of the problem cannot be found even after several minutes. The system does not work normally. Troubleshooting If you using the system, use this troubleshooting guide to help remedy the problem before requesting repairs. TV screen. Power Symptom The power is connected securely. General Symptom The remote does not function. Problems and solutions •...
... you cannot perform menu operations via the front panel display, press HOME on . Press "/1 to turn on the system. If the cause of the problem cannot be found even after several minutes. The system does not work normally. Troubleshooting If you using the system, use this troubleshooting guide to help remedy the problem before requesting repairs. TV screen. Power Symptom The power is connected securely. General Symptom The remote does not function. Problems and solutions •...

Operating Instructions
Page 60
... the connecting cords are disabled. • The effects of the input stream is connected securely. to [On] the HDMI OUT jack when using (page 53). off. • Select "AUTO" for about half an hour. • The system cannot play a disc with the Audio Return Channel function. • The sampling frequency of SOUND MODE and "SUR.SETTING" may be played by pressing AUDIO (page 40). Press OPTIONS and select [Play from the beginning. The surround...
... the connecting cords are disabled. • The effects of the input stream is connected securely. to [On] the HDMI OUT jack when using (page 53). off. • Select "AUTO" for about half an hour. • The system cannot play a disc with the Audio Return Channel function. • The sampling frequency of SOUND MODE and "SUR.SETTING" may be played by pressing AUDIO (page 40). Press OPTIONS and select [Play from the beginning. The surround...

Operating Instructions
Page 62
...; Picture/sound quality may be improved by changing the connection speed. The desired wireless router is small. • Press X to the previous screen, and try [Scan] again. network. Move the unit away from such devices, or turn off . 2 Remove and reconnect the USB device. 3 Turn the system on. • Make sure that use the WiFi Protected Setup function before adjusting the settings of at least 2.5 Mbps for high-definition video...
...; Picture/sound quality may be improved by changing the connection speed. The desired wireless router is small. • Press X to the previous screen, and try [Scan] again. network. Move the unit away from such devices, or turn off . 2 Remove and reconnect the USB device. 3 Turn the system on. • Make sure that use the WiFi Protected Setup function before adjusting the settings of at least 2.5 Mbps for high-definition video...

Operating Instructions
Page 64
... source, connected output jack, and selected audio settings. 2)BD-RE: Ver.2.1 BD-R: Ver.1.1, 1.2, 1.3 including organic pigment type BD-R (LTH type) BD-Rs recorded on a PC cannot be playable depending on the rear of the unit and will not play a BD-ROM/ DVD VIDEO (playback only) labeled with identical region codes or . DualDiscs and some discs may be momentarily interrupted when the layers switch. Region code (BD-ROM/DVD VIDEO...
... source, connected output jack, and selected audio settings. 2)BD-RE: Ver.2.1 BD-R: Ver.1.1, 1.2, 1.3 including organic pigment type BD-R (LTH type) BD-Rs recorded on a PC cannot be playable depending on the rear of the unit and will not play a BD-ROM/ DVD VIDEO (playback only) labeled with identical region codes or . DualDiscs and some discs may be momentarily interrupted when the layers switch. Region code (BD-ROM/DVD VIDEO...

Operating Instructions
Page 72
... sound 41 Music Settings 53 N Network Connection Diagnostics 54 Network Settings 54 Network Update 49 O OSD 53 Output Video Format 50 P Parental Control 71 Parental Control Area Code 52 Parental Control Settings 52 Party 36 Party Auto Start 55 Password 52 Pause Mode 50 PhotoTV HD 71 Play information 33 Playable discs 64 Progressive format 71 Q Quick Start Mode 53 R Region code 64 Registered BD Remote Devices 55 Remote control 12 Renderer Access Control 54 Renderer Options 54 Reset to Factory Default Settings 55 Resetting 55 S Screen Format...
... sound 41 Music Settings 53 N Network Connection Diagnostics 54 Network Settings 54 Network Update 49 O OSD 53 Output Video Format 50 P Parental Control 71 Parental Control Area Code 52 Parental Control Settings 52 Party 36 Party Auto Start 55 Password 52 Pause Mode 50 PhotoTV HD 71 Play information 33 Playable discs 64 Progressive format 71 Q Quick Start Mode 53 R Region code 64 Registered BD Remote Devices 55 Remote control 12 Renderer Access Control 54 Renderer Options 54 Reset to Factory Default Settings 55 Resetting 55 S Screen Format...
Quick Setup Guide
Page 1
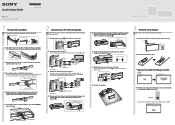
... use a set -top box. Bring together the cables, thread them around the rear support (). OHUDTMI 7. Quick Setup Guide BDV-F7 ©2010 Sony Corporation Printed in "Easy Setup" using an HDMI cable. Hold the panel cover at (), then slide it around the rear support (). Connect the video to the side. 2. Audio cord* LAN(100) ANTENNA VIDEO OUT CFOMA7X5IAL AUDIO L IN R HODUMTI CASBALTE/ TV D(OIGPITTIACLAILN) *Not supplied AUDIO L IN R SAT/ CABLE TV DIGITAL IN (OPTICAL) Or Digital optical cord* OUTPUT AUDIO OUT L OUTPUT DIGITAL...
... use a set -top box. Bring together the cables, thread them around the rear support (). OHUDTMI 7. Quick Setup Guide BDV-F7 ©2010 Sony Corporation Printed in "Easy Setup" using an HDMI cable. Hold the panel cover at (), then slide it around the rear support (). Connect the video to the side. 2. Audio cord* LAN(100) ANTENNA VIDEO OUT CFOMA7X5IAL AUDIO L IN R HODUMTI CASBALTE/ TV D(OIGPITTIACLAILN) *Not supplied AUDIO L IN R SAT/ CABLE TV DIGITAL IN (OPTICAL) Or Digital optical cord* OUTPUT AUDIO OUT L OUTPUT DIGITAL...


