
Operating Instructions
Page 6
...to Parts and Control 10 Getting Started Step 1: Installing the System .......15 Step 2: Connecting the System ...22 Step 3: Performing the Easy Setup 28 Step 4: Selecting the Source .......29 Step 5: Enjoying Surround Sound 30 Playback Playing a Disc 32 Playing from a USB Device 33 Enjoying an iPod ... 56 [Parental Control Settings 57 [Music Settings 57 [System Settings 57 [Network Settings 59 [Easy Setup 59 [Resetting 59 Additional Information Precautions 60 Notes about the Discs 61 Troubleshooting 62 Playable Discs 69 Playable Types of Files 70 Supported Audio Formats 71...
...to Parts and Control 10 Getting Started Step 1: Installing the System .......15 Step 2: Connecting the System ...22 Step 3: Performing the Easy Setup 28 Step 4: Selecting the Source .......29 Step 5: Enjoying Surround Sound 30 Playback Playing a Disc 32 Playing from a USB Device 33 Enjoying an iPod ... 56 [Parental Control Settings 57 [Music Settings 57 [System Settings 57 [Network Settings 59 [Easy Setup 59 [Resetting 59 Additional Information Precautions 60 Notes about the Discs 61 Troubleshooting 62 Playable Discs 69 Playable Types of Files 70 Supported Audio Formats 71...

Operating Instructions
Page 7
Unpacking BDV-E870 • Front speakers (2) • Subwoofer (1) • R6 (size AA) batteries (2) • Surround speakers (2) • Center speaker (1) • Calibration mic (1) • FM wire antenna (aerial) (1) or • Bases (2) • Speaker cords (3, blue/gray/ • Screws (6) green) • Speaker-bottom covers (2) • Video cord (1) • Remote commander (remote) (1) • Operating Instructions • Speaker Installation Guide • Quick Setup Guide • End user license agreement • Easy Setup Disc (DVD) 7US
Unpacking BDV-E870 • Front speakers (2) • Subwoofer (1) • R6 (size AA) batteries (2) • Surround speakers (2) • Center speaker (1) • Calibration mic (1) • FM wire antenna (aerial) (1) or • Bases (2) • Speaker cords (3, blue/gray/ • Screws (6) green) • Speaker-bottom covers (2) • Video cord (1) • Remote commander (remote) (1) • Operating Instructions • Speaker Installation Guide • Quick Setup Guide • End user license agreement • Easy Setup Disc (DVD) 7US
Operating Instructions
Page 8
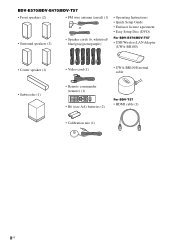
... antenna (aerial) (1) or • Surround speakers (2) • Speaker cords (6, white/red/ blue/gray/green/purple) • Operating Instructions • Quick Setup Guide • End user license agreement • Easy Setup Disc (DVD) For BDV-E570/BDV-T57 • USB Wireless LAN Adapter (UWA-BR100) • Center speaker (1) • Subwoofer (1) • Video cord (1) • UWA-BR100 External...
... antenna (aerial) (1) or • Surround speakers (2) • Speaker cords (6, white/red/ blue/gray/green/purple) • Operating Instructions • Quick Setup Guide • End user license agreement • Easy Setup Disc (DVD) For BDV-E570/BDV-T57 • USB Wireless LAN Adapter (UWA-BR100) • Center speaker (1) • Subwoofer (1) • Video cord (1) • UWA-BR100 External...

Operating Instructions
Page 9
and Canadian models • Easy Setup Disc (DVD) For BDV-E370 (Latin American models only)/BDVT37 • HDMI cable (1) • Subwoofer (1) • R6 (size AA) batteries (2) • Calibration mic (1) • FM wire antenna (aerial) (1) ... Preparing the remote Insert two R6 (size AA) batteries (supplied) by matching the 3 and # ends on the batteries to the markings inside the compartment. 9US BDV-E370/BDV-T37 • Front speakers (2) • Surround speakers (2) • Center speaker (1) • Speaker cords (5, white/red/ blue/gray/green) • Video cord (1) • Remote...
and Canadian models • Easy Setup Disc (DVD) For BDV-E370 (Latin American models only)/BDVT37 • HDMI cable (1) • Subwoofer (1) • R6 (size AA) batteries (2) • Calibration mic (1) • FM wire antenna (aerial) (1) ... Preparing the remote Insert two R6 (size AA) batteries (supplied) by matching the 3 and # ends on the batteries to the markings inside the compartment. 9US BDV-E370/BDV-T37 • Front speakers (2) • Surround speakers (2) • Center speaker (1) • Speaker cords (5, white/red/ blue/gray/green) • Video cord (1) • Remote...
Operating Instructions
Page 16
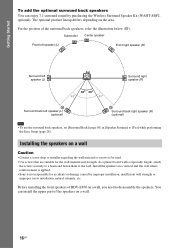
...position of the surround back speakers, refer the illustration below (C). Before installing the front speakers of BDV-E870 on a vertical and flat wall where reinforcement is applied. • Sony is especially fragile, attach the screws securely to a beam and fasten them to the wall. Subwoofer... • To use the surround back speakers, set [Surround Back] (page 50) in [Speaker Settings] to [Yes] while performing the Easy Setup (page 28). Install the speakers on a wall, you need to disassemble the speakers. You can enjoy 7.1 surround sound by improper installation, insufficient...
...position of the surround back speakers, refer the illustration below (C). Before installing the front speakers of BDV-E870 on a vertical and flat wall where reinforcement is applied. • Sony is especially fragile, attach the screws securely to a beam and fasten them to the wall. Subwoofer... • To use the surround back speakers, set [Surround Back] (page 50) in [Speaker Settings] to [Yes] while performing the Easy Setup (page 28). Install the speakers on a wall, you need to disassemble the speakers. You can enjoy 7.1 surround sound by improper installation, insufficient...

Operating Instructions
Page 27
..., even without any sophisticated tools. To protect wireless communication, this system supports various security functions. Be sure to correctly configure the security settings in accordance with BDV-E570 and BDV-T57). Keep in some regions/countries. * As of data....setup. After inserting the USB Wireless LAN Adapter to the base of WEP. To set the network settings For details, see [Network Settings] (page 59) and follow the on again. WEP WEP applies security to communications to interception. About wireless LAN security Since communication via the USB Wireless LAN Adapter (Sony...
..., even without any sophisticated tools. To protect wireless communication, this system supports various security functions. Be sure to correctly configure the security settings in accordance with BDV-E570 and BDV-T57). Keep in some regions/countries. * As of data....setup. After inserting the USB Wireless LAN Adapter to the base of WEP. To set the network settings For details, see [Network Settings] (page 59) and follow the on again. WEP WEP applies security to communications to interception. About wireless LAN security Since communication via the USB Wireless LAN Adapter (Sony...
Operating Instructions
Page 28
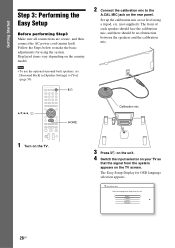
... Easy Setup - Note • To use the optional surround back speakers, set [Surround Back] in [Speaker Settings] to [Yes] (page 50). 123 456 789 0 "/1 C/X/x/c, HOME 2 Connect the calibration mic to the A.CAL MIC jack on the country model. Set up the calibration mic at ear level using the system. The...mic 1 Turn on the TV. 3 Press [/1 on the unit. 4 Switch the input selector on your TV so that the signal from the system appears on the TV screen. OSD Select the language to make the basic adjustments for OSD language selection appears. Getting Started Step 3: Performing the Easy...
... Easy Setup - Note • To use the optional surround back speakers, set [Surround Back] in [Speaker Settings] to [Yes] (page 50). 123 456 789 0 "/1 C/X/x/c, HOME 2 Connect the calibration mic to the A.CAL MIC jack on the country model. Set up the calibration mic at ear level using the system. The...mic 1 Turn on the TV. 3 Press [/1 on the unit. 4 Switch the input selector on your TV so that the signal from the system appears on the TV screen. OSD Select the language to make the basic adjustments for OSD language selection appears. Getting Started Step 3: Performing the Easy...
Operating Instructions
Page 29
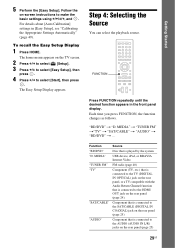
To recall the Easy Setup Display 1 Press HOME. MEDIA" "TUNER FM" "TV" "SAT/CABLE" "AUDIO" Source Disc that is played by the system USB device, iPod, or BRAVIA Internet Video FM radio (page 40) Component (TV, etc.) that is connected to the TV (DIGITAL IN OPTICAL...) jack on the rear panel (page 25) Component that is connected to the HDMI OUT jack on the TV screen. 2 Press C/c to select [Setup]. 3 Press X/x to select [Easy Setup], then press . 4 Press C/c to make the basic settings using C/X/x/c, and . MEDIA" t "TUNER FM" t"TV" t "SAT/CABLE" t "AUDIO" t "BD/DVD" t ... Function "BD/...
To recall the Easy Setup Display 1 Press HOME. MEDIA" "TUNER FM" "TV" "SAT/CABLE" "AUDIO" Source Disc that is played by the system USB device, iPod, or BRAVIA Internet Video FM radio (page 40) Component (TV, etc.) that is connected to the TV (DIGITAL IN OPTICAL...) jack on the rear panel (page 25) Component that is connected to the HDMI OUT jack on the TV screen. 2 Press C/c to select [Setup]. 3 Press X/x to select [Easy Setup], then press . 4 Press C/c to make the basic settings using C/X/x/c, and . MEDIA" t "TUNER FM" t"TV" t "SAT/CABLE" t "AUDIO" t "BD/DVD" t ... Function "BD/...
Operating Instructions
Page 43
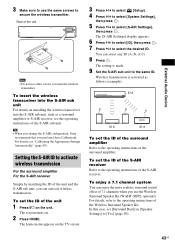
Tip • When you change the S-AIR configuration, Sony recommends that you use the Wireless Surround Speaker Kit (WAHT-SBP2, optional). The [S-AIR Settings] display appears. 6 Press X/x to select [ID], then press . 7 Press X/x to ... . 2 Press HOME. You can activate wireless transmission. Wireless transmission is made. 9 Set the S-AIR sub unit to select the desired ID. External Audio Device 3 Make sure to use the same screws to the operating instructions of the Wireless Surround Speaker Kit. The system turns on the TV screen. 3 Press C/c to select [Setup]. 4 Press...
Tip • When you change the S-AIR configuration, Sony recommends that you use the Wireless Surround Speaker Kit (WAHT-SBP2, optional). The [S-AIR Settings] display appears. 6 Press X/x to select [ID], then press . 7 Press X/x to ... . 2 Press HOME. You can activate wireless transmission. Wireless transmission is made. 9 Set the S-AIR sub unit to select the desired ID. External Audio Device 3 Make sure to use the same screws to the operating instructions of the Wireless Surround Speaker Kit. The system turns on the TV screen. 3 Press C/c to select [Setup]. 4 Press...
Operating Instructions
Page 44
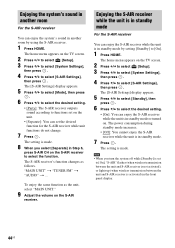
...using the S-AIR receiver. 1 Press HOME. To enjoy the same function as follows. The S-AIR receiver's function changes as the unit, select "MAIN UNIT." 9 Adjust the volume on the TV screen. 2 Press C/c to select [Setup]. 3 Press X/x to select [System Settings], then press . 4 Press X/x...8226; When you select [Separate] in standby mode or turned on the TV screen. 2 Press C/c to select [Setup]. 3 Press X/x to select [System Settings], then press . 4 Press X/x to [On]. 1 Press HOME. The [S-AIR Settings] display appears. 5 Press X/x to select [Standby], then press . 6 Press X/x to ...
...using the S-AIR receiver. 1 Press HOME. To enjoy the same function as follows. The S-AIR receiver's function changes as the unit, select "MAIN UNIT." 9 Adjust the volume on the TV screen. 2 Press C/c to select [Setup]. 3 Press X/x to select [System Settings], then press . 4 Press X/x...8226; When you select [Separate] in standby mode or turned on the TV screen. 2 Press C/c to select [Setup]. 3 Press X/x to select [System Settings], then press . 4 Press X/x to [On]. 1 Press HOME. The [S-AIR Settings] display appears. 5 Press X/x to select [Standby], then press . 6 Press X/x to ...

Operating Instructions
Page 45
...perform pairing, wireless transmission is activated, the PAIRING indicator of the surround amplifier turns on the TV screen. 4 Press C/c to select [Setup]. 5 Press X/x to select [System Settings], then press . 6 Press X/x to the operating instructions of the S-AIR sub unit. To cancel pairing, select [Cancel]. ...To continue pairing, select [OK] and press , then start again from neighbors. The PAIRING indicator of the S-AIR receiver. 3 Press HOME. If wireless transmission is unstable For the surround amplifier For the S-AIR receiver If you do not, [Pairing failed. To prevent this ...
...perform pairing, wireless transmission is activated, the PAIRING indicator of the surround amplifier turns on the TV screen. 4 Press C/c to select [Setup]. 5 Press X/x to select [System Settings], then press . 6 Press X/x to the operating instructions of the S-AIR sub unit. To cancel pairing, select [Cancel]. ...To continue pairing, select [OK] and press , then start again from neighbors. The PAIRING indicator of the S-AIR receiver. 3 Press HOME. If wireless transmission is unstable For the surround amplifier For the S-AIR receiver If you do not, [Pairing failed. To prevent this ...
Operating Instructions
Page 47
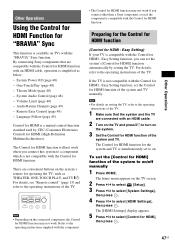
... function, you connect other than a Sony component, even if the component is simultaneously set the system's [Control for operating the TV, such as below: - The home menu appears on the system. 3 Set the Control for HDMI function of the TV. ONE-TOUCH THEATER PLAY TV BRAVIA Sync 123 Note ...2 Turn on the TV and press [/1 to turn on the TV screen. 2 Press C/c to select [Setup]. 3 Press X/x to select [System Settings], then press . 4 Press X/x to the operating instructions of the TV. System Power Off (page 48) - For details, see "Remote control" (page 13) and refer to the...
... function, you connect other than a Sony component, even if the component is simultaneously set the system's [Control for operating the TV, such as below: - The home menu appears on the system. 3 Set the Control for HDMI function of the TV. ONE-TOUCH THEATER PLAY TV BRAVIA Sync 123 Note ...2 Turn on the TV and press [/1 to turn on the TV screen. 2 Press C/c to select [Setup]. 3 Press X/x to select [System Settings], then press . 4 Press X/x to the operating instructions of the TV. System Power Off (page 48) - For details, see "Remote control" (page 13) and refer to the...
Operating Instructions
Page 49
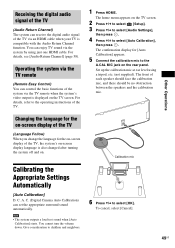
...the basic functions of the system via an HDMI cable when your TV is displayed on the TV screen. 2 Press C/c to select [Setup]. 3 Press X/x to select [Audio Settings], then press . 4 Press X/x to select [OK]. The front of the TV. 1 Press HOME. AE.CCMAL-AMCI2C Calibration ...mic Calibrating the Appropriate Settings Automatically [Auto Calibration] D. The home menu appears on the TV screen. To ...
...the basic functions of the system via an HDMI cable when your TV is displayed on the TV screen. 2 Press C/c to select [Setup]. 3 Press X/x to select [Audio Settings], then press . 4 Press X/x to select [OK]. The front of the TV. 1 Press HOME. AE.CCMAL-AMCI2C Calibration ...mic Calibrating the Appropriate Settings Automatically [Auto Calibration] D. The home menu appears on the TV screen. To ...
Operating Instructions
Page 50
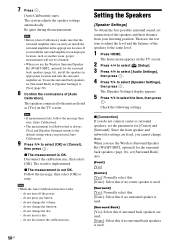
...Calibration]. 9 Press X/x to the same level. 1 Press HOME. Since the front speaker and subwoofer settings are listed as another...[Speaker Settings] display appears. 5 Press X/x to retry. The system adjusts the speaker settings automatically. Note • Before [Auto Calibration], ... that the surround amplifier turns on the TV screen. 2 Press C/c to select [Setup]. 3 Press X/x to select [Audio Settings], then press . 4 Press X/x to... Calibration]. x The measurement is OK. x [Connection] If you cannot change the disc. - 7 Press . [Auto Calibration] starts. To use the test tone to ...
...Calibration]. 9 Press X/x to the same level. 1 Press HOME. Since the front speaker and subwoofer settings are listed as another...[Speaker Settings] display appears. 5 Press X/x to retry. The system adjusts the speaker settings automatically. Note • Before [Auto Calibration], ... that the surround amplifier turns on the TV screen. 2 Press C/c to select [Setup]. 3 Press X/x to select [Audio Settings], then press . 4 Press X/x to... Calibration]. x The measurement is OK. x [Connection] If you cannot change the disc. - 7 Press . [Auto Calibration] starts. To use the test tone to ...

Operating Instructions
Page 54
...Playback settings stored in the disc take priority over the Setup Display settings and not all the functions described may work. 1 Press HOME. The home menu appears on the home menu when you need to change the settings of the system. Example: [Screen Settings] Setup TV Type Set the screen ...aspect ratio of your TV. Settings and Adjustments Using the Setup Display You can setup the following website: http://www.sony.com/...
...Playback settings stored in the disc take priority over the Setup Display settings and not all the functions described may work. 1 Press HOME. The home menu appears on the home menu when you need to change the settings of the system. Example: [Screen Settings] Setup TV Type Set the screen ...aspect ratio of your TV. Settings and Adjustments Using the Setup Display You can setup the following website: http://www.sony.com/...

Operating Instructions
Page 59
...[Manual]: Downloads disc information when you select [Playback History List] or [Information Display] in the system. 59US models) You can make the basic settings. x [System Information] You can display the system's software version information...Setup to the previous display. For more information, go to http://www.divx.com on -screen instructions. [Resetting] x [Reset to Factory Default Settings] You can run the network diagnostic to http://www.sony.com/bluraysupport/ x [Network Connection Diagnostics] (Except for U.S. Follow the on the Internet. x [DivX® VOD] (Except for BDV...
...[Manual]: Downloads disc information when you select [Playback History List] or [Information Display] in the system. 59US models) You can make the basic settings. x [System Information] You can display the system's software version information...Setup to the previous display. For more information, go to http://www.divx.com on -screen instructions. [Resetting] x [Reset to Factory Default Settings] You can run the network diagnostic to http://www.sony.com/bluraysupport/ x [Network Connection Diagnostics] (Except for U.S. Follow the on the Internet. x [DivX® VOD] (Except for BDV...

Operating Instructions
Page 65
...the TV screen in the language you want. • In the Setup Display, select the desired language for the on the unit for about half an hour. • The system cannot play has been selected. Additional Information 65US A disc does not start from the • The resume point may be ... formats may be displayed differently. • Depending on the writing software used, the input characters may be ejected and • Contact your Sony dealer or local authorized Sony service facility. Symptom Problems and solutions The disc does not play. • You are attempting to play...
...the TV screen in the language you want. • In the Setup Display, select the desired language for the on the unit for about half an hour. • The system cannot play has been selected. Additional Information 65US A disc does not start from the • The resume point may be ... formats may be displayed differently. • Depending on the writing software used, the input characters may be ejected and • Contact your Sony dealer or local authorized Sony service facility. Symptom Problems and solutions The disc does not play. • You are attempting to play...

Operating Instructions
Page 67
... digital cordless device, may be poor depending on the network. The message [A new software version has been found on Internet content providers. Sony recommends a connection speed of • Picture/sound quality may be improved by changing the connection speed. In this case, change the wireless...if the wireless LAN router is on. • Depending on . • See [Network Update] (page 54) to update the system to the Internet after [Wi-Fi Protected Setup (WPS)] is unstable" (page 45). • Change the S-AIR ID settings of the router. registration]. Problems and solutions &#...
... digital cordless device, may be poor depending on the network. The message [A new software version has been found on Internet content providers. Sony recommends a connection speed of • Picture/sound quality may be improved by changing the connection speed. In this case, change the wireless...if the wireless LAN router is on. • Depending on . • See [Network Update] (page 54) to update the system to the Internet after [Wi-Fi Protected Setup (WPS)] is unstable" (page 45). • Change the S-AIR ID settings of the router. registration]. Problems and solutions &#...

Operating Instructions
Page 70
This is recommended to play high bit rate video files using a DATA DVD. 70US To watch AVCHD-format files, the disc with AVCHD-format files on -Demand (VOD) content. up to convert your files into DivX video. It is an official DivX Certified device that ... in order to USB memory or other devices, turn the system off before connecting or removing USB memory or other devices. • The system may not work with this system. • The system can recognize the following files or folders in the device setup menu. Playable Types of Files Video File format Extensions MPEG...
This is recommended to play high bit rate video files using a DATA DVD. 70US To watch AVCHD-format files, the disc with AVCHD-format files on -Demand (VOD) content. up to convert your files into DivX video. It is an official DivX Certified device that ... in order to USB memory or other devices, turn the system off before connecting or removing USB memory or other devices. • The system may not work with this system. • The system can recognize the following files or folders in the device setup menu. Playable Types of Files Video File format Extensions MPEG...
Operating Instructions
Page 78
.../DVD Viewing Settings 56 BD/DVD-ROM 1080/24p Output 55 BD-LIVE 32 BD-R 75 BD-RE 75 Blu-ray Disc 75 BONUSVIEW 32 BRAVIA Internet Video 34 C CD 69 Child Lock 52 Cinema Conversion Mode 55 Control for HDMI...TrueHD 76 DTS 37, 76 DTS-HD 76 DVD 69 DVD Aspect Ratio 55 DVD Parental Control 57 E Easy Setup 28, 59 F FM MODE 40 Front panel 10 Front panel display 11 G Gracenote Settings 58 H HDMI YCbCr...Area Code 57 Parental Control Settings 57 Password 57 Pause Mode 55 PhotoTV HD 76 Play information 32 Playable discs 69 Progressive format 77 Q Quick Start Mode 58 R Rear panel 12 Region code 69 Registered BD ...
.../DVD Viewing Settings 56 BD/DVD-ROM 1080/24p Output 55 BD-LIVE 32 BD-R 75 BD-RE 75 Blu-ray Disc 75 BONUSVIEW 32 BRAVIA Internet Video 34 C CD 69 Child Lock 52 Cinema Conversion Mode 55 Control for HDMI...TrueHD 76 DTS 37, 76 DTS-HD 76 DVD 69 DVD Aspect Ratio 55 DVD Parental Control 57 E Easy Setup 28, 59 F FM MODE 40 Front panel 10 Front panel display 11 G Gracenote Settings 58 H HDMI YCbCr...Area Code 57 Parental Control Settings 57 Password 57 Pause Mode 55 PhotoTV HD 76 Play information 32 Playable discs 69 Progressive format 77 Q Quick Start Mode 58 R Rear panel 12 Region code 69 Registered BD ...

