
Child Safety: It Makes A Difference Where Your TV Stands
Page 1
... about television safety. Thank you have more than one television. As a result, TV sets may cause unnecessary injury. The home theater entertainment experience is a growing trend, and larger televisions are popular purchases and are improperly secured or inappropriately situated on this hidden hazard ...allow children to climb on or play with furniture and television sets. 5 Avoid placing any items on top of TVs such as VCRs and remotes that may pique the children's curiosity. 6 Remember that children can become excited while watching a program and can potentially push or pull a...
... about television safety. Thank you have more than one television. As a result, TV sets may cause unnecessary injury. The home theater entertainment experience is a growing trend, and larger televisions are popular purchases and are improperly secured or inappropriately situated on this hidden hazard ...allow children to climb on or play with furniture and television sets. 5 Avoid placing any items on top of TVs such as VCRs and remotes that may pique the children's curiosity. 6 Remember that children can become excited while watching a program and can potentially push or pull a...

Marketing Specifications
Page 2
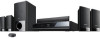
...Sync™ or Theatre Sync™ labeled home audio/video products when connected via HDMI ...: HD 24Hz to change without written permission is a trademark of Digital Theater Systems, L.P. Surround Speaker: 4. 1/4" x 8 7/8" x 3 3/8" (...Blu-ray Disc™ media or DVD playback. © 2009 Sony Electronics Inc. The unit will support the following players: iPod® touch, iPod® classic, iPod® Nano 1st, 2nd & 3rd generation, iPod® 4th& 5th generation & iPod® Mini. Signal and sound quality may limit/prevent Blu-ray Disc™ media or DVD playback. BDV-E300...
...Sync™ or Theatre Sync™ labeled home audio/video products when connected via HDMI ...: HD 24Hz to change without written permission is a trademark of Digital Theater Systems, L.P. Surround Speaker: 4. 1/4" x 8 7/8" x 3 3/8" (...Blu-ray Disc™ media or DVD playback. © 2009 Sony Electronics Inc. The unit will support the following players: iPod® touch, iPod® classic, iPod® Nano 1st, 2nd & 3rd generation, iPod® 4th& 5th generation & iPod® Mini. Signal and sound quality may limit/prevent Blu-ray Disc™ media or DVD playback. BDV-E300...
Operating Instructions
Page 4
T10, BDV-T11, and BDV-E300. and Sony Corporation. • "S-AIR" and its logo are trademarks of disc can also use the controls on the unit if they have the same or similar names as those on the remote. BDV-T10 is used as , listed at the top of each explanation indicate what kind of Sony Corporation. • , "XMB...
T10, BDV-T11, and BDV-E300. and Sony Corporation. • "S-AIR" and its logo are trademarks of disc can also use the controls on the unit if they have the same or similar names as those on the remote. BDV-T10 is used as , listed at the top of each explanation indicate what kind of Sony Corporation. • , "XMB...
Operating Instructions
Page 6
...Function for "BRAVIA" Sync 63 Calibrating the Appropriate Settings Automatically 66 Setting the Speakers 67 Controlling Your TV with the Supplied Remote 69 Using the Sleep Timer 71 Changing the Brightness of the Front Panel Display 71 Deactivating the Buttons on the Unit ......Settings 80 [Photo Settings 82 [HDMI Settings 82 [System Settings 83 [Network Settings 84 [Easy Setup 85 [Resetting 86 Additional Information Precautions 87 Notes about the Discs 88 Troubleshooting 89 Self-diagnosis Function 95 Playable Discs 96 Supported Audio Formats 98 Video Output Resolution 99 ...
...Function for "BRAVIA" Sync 63 Calibrating the Appropriate Settings Automatically 66 Setting the Speakers 67 Controlling Your TV with the Supplied Remote 69 Using the Sleep Timer 71 Changing the Brightness of the Front Panel Display 71 Deactivating the Buttons on the Unit ......Settings 80 [Photo Settings 82 [HDMI Settings 82 [System Settings 83 [Network Settings 84 [Easy Setup 85 [Resetting 86 Additional Information Precautions 87 Notes about the Discs 88 Troubleshooting 89 Self-diagnosis Function 95 Playable Discs 96 Supported Audio Formats 98 Video Output Resolution 99 ...
Operating Instructions
Page 7
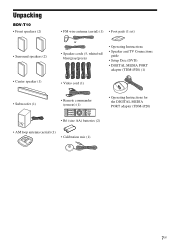
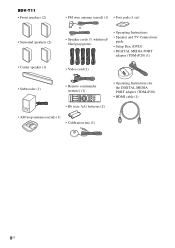
...BDV-T10 • Front speakers (2) • Surround speakers (2) • Center speaker (1) • FM wire antenna (aerial) (1) • Foot pads (1 set) or • Speaker cords (5, white/red/ blue/gray/green) • Operating Instructions • Speaker and TV Connections guide • Setup Disc... (DVD) • DIGITAL MEDIA PORT adapter (TDM-iP20) (1) • Video cord (1) • Subwoofer (1) • Remote commander (remote) (1) • Operating Instructions for the DIGITAL MEDIA PORT adapter (...
...BDV-T10 • Front speakers (2) • Surround speakers (2) • Center speaker (1) • FM wire antenna (aerial) (1) • Foot pads (1 set) or • Speaker cords (5, white/red/ blue/gray/green) • Operating Instructions • Speaker and TV Connections guide • Setup Disc... (DVD) • DIGITAL MEDIA PORT adapter (TDM-iP20) (1) • Video cord (1) • Subwoofer (1) • Remote commander (remote) (1) • Operating Instructions for the DIGITAL MEDIA PORT adapter (...
Operating Instructions
Page 8
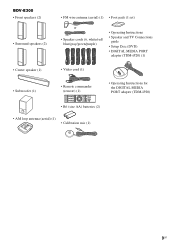
BDV-T11 • Front speakers (2) • Surround speakers (2) • Center speaker (1) • FM wire antenna (aerial) (1) • Foot pads (1 set) or • Speaker cords (5, white/red/ blue/gray/green) • Operating Instructions • Speaker and TV Connections guide • Setup Disc... (DVD) • DIGITAL MEDIA PORT adapter (TDM-iP20) (1) • Video cord (1) • Subwoofer (1) • Remote commander (remote) (1) • R6 (size AA) batteries (2) • Operating Instructions...
BDV-T11 • Front speakers (2) • Surround speakers (2) • Center speaker (1) • FM wire antenna (aerial) (1) • Foot pads (1 set) or • Speaker cords (5, white/red/ blue/gray/green) • Operating Instructions • Speaker and TV Connections guide • Setup Disc... (DVD) • DIGITAL MEDIA PORT adapter (TDM-iP20) (1) • Video cord (1) • Subwoofer (1) • Remote commander (remote) (1) • R6 (size AA) batteries (2) • Operating Instructions...
Operating Instructions
Page 9
BDV-E300 • Front speakers (2) • Surround speakers (2) • Center speaker (1) • Subwoofer (1) • FM wire antenna (aerial) (1) • Foot pads (1 set) or • Speaker cords (6, white/red/ blue/gray/green/purple) • Operating Instructions • Speaker and TV Connections guide • Setup Disc... (DVD) • DIGITAL MEDIA PORT adapter (TDM-iP20) (1) • Video cord (1) • Remote commander (remote) (1) • Operating Instructions for the DIGITAL MEDIA PORT adapter...
BDV-E300 • Front speakers (2) • Surround speakers (2) • Center speaker (1) • Subwoofer (1) • FM wire antenna (aerial) (1) • Foot pads (1 set) or • Speaker cords (6, white/red/ blue/gray/green/purple) • Operating Instructions • Speaker and TV Connections guide • Setup Disc... (DVD) • DIGITAL MEDIA PORT adapter (TDM-iP20) (1) • Video cord (1) • Remote commander (remote) (1) • Operating Instructions for the DIGITAL MEDIA PORT adapter...

Operating Instructions
Page 10
...the batteries. • If you do not intend to use a new battery with an old one. • Do not drop any foreign object into the remote Insert two R6 (size AA) batteries (supplied) by matching the 3 and # ends on the batteries to the markings inside the compartment. Attaching the foot pads... subwoofer and prevent it from slipping. , Remove the foot pads from battery leakage and corrosion. Note • Do not leave the remote in an extremely hot or humid place. • Do not use the remote for an extended period of the subwoofer to avoid possible damage from the protective cover. 10US
...the batteries. • If you do not intend to use a new battery with an old one. • Do not drop any foreign object into the remote Insert two R6 (size AA) batteries (supplied) by matching the 3 and # ends on the batteries to the markings inside the compartment. Attaching the foot pads... subwoofer and prevent it from slipping. , Remove the foot pads from battery leakage and corrosion. Note • Do not leave the remote in an extremely hot or humid place. • Do not use the remote for an extended period of the subwoofer to avoid possible damage from the protective cover. 10US
Operating Instructions
Page 11
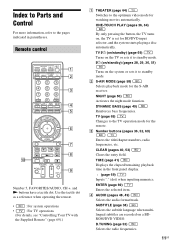
...the optimum video mode for BD/DVD input selector, and the system starts playing a disc automatically. C Number buttons (pages 36, 52, 69) ...operating the remote. • : For system operations • : For TV operations (For details, see "Controlling Your TV with the Supplied Remote" (page 69).) A THEATER (page ...THEATER PLAY TV BRAVIA Sync S-AIR DYNAMIC MODE NIGHT BASS TV 123 456 789 ENTER CLEAR 0 TIME FAVORITES CC WIDE SYSTEM AUDIO SUBTITLE ANGLE MENU D.TUNING RED GREEN BLUE YELLOW DISPLAY U P 1 2 3 4 5 6 GUIDE MEN OP UP/MENU RETURN TOOOPLTISONS 0 FUNCTION HOME...
...the optimum video mode for BD/DVD input selector, and the system starts playing a disc automatically. C Number buttons (pages 36, 52, 69) ...operating the remote. • : For system operations • : For TV operations (For details, see "Controlling Your TV with the Supplied Remote" (page 69).) A THEATER (page ...THEATER PLAY TV BRAVIA Sync S-AIR DYNAMIC MODE NIGHT BASS TV 123 456 789 ENTER CLEAR 0 TIME FAVORITES CC WIDE SYSTEM AUDIO SUBTITLE ANGLE MENU D.TUNING RED GREEN BLUE YELLOW DISPLAY U P 1 2 3 4 5 6 GUIDE MEN OP UP/MENU RETURN TOOOPLTISONS 0 FUNCTION HOME...
Operating Instructions
Page 13
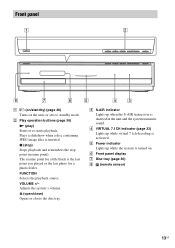
Front panel FUNCTION VOLUME A "/1 (on/standby) (page 36) Turns on . Adjusts the system's volume. Z (open/close) Opens or closes the disc tray. C S-AIR indicator Lights up when the S-AIR transceiver is turned on the unit, or sets to standby mode. E Power indicator Lights...up while virtual 7.1ch decoding is the last point you played or the last photo for a title/track is activated. F Front panel display G Disc tray (page 36) H (remote sensor) 13US The resume point for a photo folder. FUNCTION Selects the playback source. B Play operation buttons (page 36) N (play) Starts or...
Front panel FUNCTION VOLUME A "/1 (on/standby) (page 36) Turns on . Adjusts the system's volume. Z (open/close) Opens or closes the disc tray. C S-AIR indicator Lights up when the S-AIR transceiver is turned on the unit, or sets to standby mode. E Power indicator Lights...up while virtual 7.1ch decoding is the last point you played or the last photo for a title/track is activated. F Front panel display G Disc tray (page 36) H (remote sensor) 13US The resume point for a photo folder. FUNCTION Selects the playback source. B Play operation buttons (page 36) N (play) Starts or...
Operating Instructions
Page 28
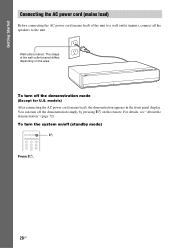
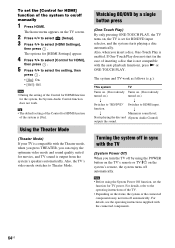
For details, see "About the demonstration" (page 72). To turn the system on/off the demonstration mode (Except for U.S. To turn off the demonstration simply by pressing "/1 on the remote. models) After connecting the AC power cord (mains lead), the demonstration appears in the front panel display. You can turn off (standby mode...
For details, see "About the demonstration" (page 72). To turn the system on/off the demonstration mode (Except for U.S. To turn off the demonstration simply by pressing "/1 on the remote. models) After connecting the AC power cord (mains lead), the demonstration appears in the front panel display. You can turn off (standby mode...
Operating Instructions
Page 52
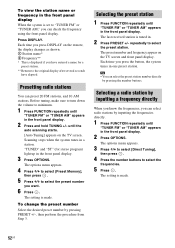
.... repeatedly to select the frequencies. 5 Press . Selecting a radio station by inputting a frequency directly When you know the frequencies, you press DISPLAY on the remote, the display changes as shown. 1 Station name* 2 Frequency** * This is made . The setting is tuned in. 2 Press PRESET +/- The options menu...FM stations, and 10 AM stations. Each time you can check the frequency using the front panel display. Scanning stops when the system tunes in the front panel display. 3 Press OPTIONS. The setting is displayed if you can select radio stations by pressing PRESET...
.... repeatedly to select the frequencies. 5 Press . Selecting a radio station by inputting a frequency directly When you know the frequencies, you press DISPLAY on the remote, the display changes as shown. 1 Station name* 2 Frequency** * This is made . The setting is tuned in. 2 Press PRESET +/- The options menu...FM stations, and 10 AM stations. Each time you can check the frequency using the front panel display. Scanning stops when the system tunes in the front panel display. 3 Press OPTIONS. The setting is displayed if you can select radio stations by pressing PRESET...
Operating Instructions
Page 55
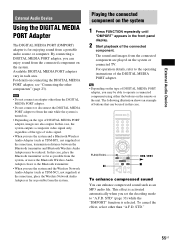
...8226; Do not connect or disconnect the DIGITAL MEDIA PORT adapter to operate a connected component using either the buttons on the remote or the unit. In this case, the system outputs a composite video signal only, regardless of the type of video signal. • When you use the... activated automatically when you can enhance compressed sound such as possible from the connected component are also output. Playing the connected component on the system 1 Press FUNCTION repeatedly until "DMPORT" appears in each area. This effect is selected. By connecting a DIGITAL MEDIA PORT adapter, you...
...8226; Do not connect or disconnect the DIGITAL MEDIA PORT adapter to operate a connected component using either the buttons on the remote or the unit. In this case, the system outputs a composite video signal only, regardless of the type of video signal. • When you use the... activated automatically when you can enhance compressed sound such as possible from the connected component are also output. Playing the connected component on the system 1 Press FUNCTION repeatedly until "DMPORT" appears in each area. This effect is selected. By connecting a DIGITAL MEDIA PORT adapter, you...
Operating Instructions
Page 59
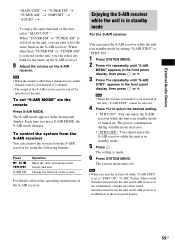
...; When the wireless transmitter is in the unit, "S-AIR STBY" cannot be cut off by using the following buttons. Note • When you turn the system off . External Audio Device "MAIN UNIT" t "TUNER FM" t "TUNER AM" t "DMPORT" t "AUDIO" t ... When "TUNER FM" or "TUNER AM" is selected on the unit, you...• The sound of the unit. To set to select the desired setting. • "STBY ON": You can only select the same band on the remote and unit. Press N, X, x, ./> S-AIR CH Operation Share the same operations on the S-AIR receiver. The setting is set "S-AIR MODE" via the...
...; When the wireless transmitter is in the unit, "S-AIR STBY" cannot be cut off by using the following buttons. Note • When you turn the system off . External Audio Device "MAIN UNIT" t "TUNER FM" t "TUNER AM" t "DMPORT" t "AUDIO" t ... When "TUNER FM" or "TUNER AM" is selected on the unit, you...• The sound of the unit. To set to select the desired setting. • "STBY ON": You can only select the same band on the remote and unit. Press N, X, x, ./> S-AIR CH Operation Share the same operations on the S-AIR receiver. The setting is set "S-AIR MODE" via the...
Operating Instructions
Page 63
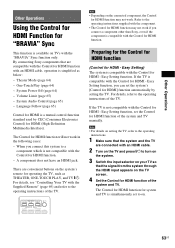
...the TV is simplified as THEATER, ONE-TOUCH PLAY, and TV "/1. Easy Setting function, you can set the system's [Control for HDMI] function automatically by CEC (Consumer Electronics Control) for HDMI (High-Definition Multimedia Interface). When you connect a component other than Sony, even if the component ... supplied with the component. • The Control for HDMI - If the TV is not compatible with the Supplied Remote" (page 69) and refer to on the system's remote for HDMI - Easy Setting function, set to the operating instructions of the TV. Note • For details on...
...the TV is simplified as THEATER, ONE-TOUCH PLAY, and TV "/1. Easy Setting function, you can set the system's [Control for HDMI] function automatically by CEC (Consumer Electronics Control) for HDMI (High-Definition Multimedia Interface). When you connect a component other than Sony, even if the component ... supplied with the component. • The Control for HDMI - If the TV is not compatible with the Supplied Remote" (page 69) and refer to on the system's remote for HDMI - Easy Setting function, set to the operating instructions of the TV. Note • For details on...
Operating Instructions
Page 64
... to on/off manually 1 Press HOME. The options for [HDMI Settings] appear. 4 Press X/x to select [Control for HDMI], then press . 5 Press X/x to Theater Mode. Note • Before using the POWER button on the TV's remote or TV "/1 on the system's remote, the system turns off automatically. Also, the ... System Power Off function, set for BD/DVD input selector, and the system starts playing a disc automatically. If One-Touch Play does not start (in sync with the Theater mode, when you press THEATER, you insert a disc, One-Touch Play is enabled. Starts playing the disc and (System Audio...
... to on/off manually 1 Press HOME. The options for [HDMI Settings] appear. 4 Press X/x to select [Control for HDMI], then press . 5 Press X/x to Theater Mode. Note • Before using the POWER button on the TV's remote or TV "/1 on the system's remote, the system turns off automatically. Also, the ... System Power Off function, set for BD/DVD input selector, and the system starts playing a disc automatically. If One-Touch Play does not start (in sync with the Theater mode, when you press THEATER, you insert a disc, One-Touch Play is enabled. Starts playing the disc and (System Audio...

Operating Instructions
Page 65
... for the on-screen display of the TV, the system's on-screen display language is in this system by pressing THEATER, loud sound may be output from the speakers of the system. • When TV sound is output from the speakers of the system, you change the output method of the TV to...level of the volume. Note • While the TV is also changed after turning the system off the sound of the system using the TV remote. For details, see [Volume Limit] (page 82). 65US To use the System Audio Control function as follows: • You can adjust the volume and turn off and...
... for the on-screen display of the TV, the system's on-screen display language is in this system by pressing THEATER, loud sound may be output from the speakers of the system. • When TV sound is output from the speakers of the system, you change the output method of the TV to...level of the volume. Note • While the TV is also changed after turning the system off the sound of the system using the TV remote. For details, see [Volume Limit] (page 82). 65US To use the System Audio Control function as follows: • You can adjust the volume and turn off and...
Operating Instructions
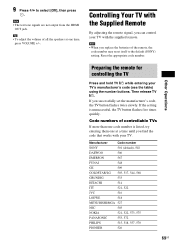
Page 69
..., the TV button flashes five times quickly. Code numbers of controllable TVs If more than one time, press VOLUME +/-. 9 Press X/x to the default (SONY) setting. Note • The test tone signals are not output from the HDMI OUT jack. Note • When you replace the batteries of all the... at a time until you successfully set the manufacturer's code, the TV button flashes twice slowly. Tip • To adjust the volume of the remote, the code number may reset itself to select [Off], then press . Reset the appropriate code number. Then release TV [/1. Manufacturer Code number...
..., the TV button flashes five times quickly. Code numbers of controllable TVs If more than one time, press VOLUME +/-. 9 Press X/x to the default (SONY) setting. Note • The test tone signals are not output from the HDMI OUT jack. Note • When you replace the batteries of all the... at a time until you successfully set the manufacturer's code, the TV button flashes twice slowly. Tip • To adjust the volume of the remote, the code number may reset itself to select [Off], then press . Reset the appropriate code number. Then release TV [/1. Manufacturer Code number...

Operating Instructions
Page 70
...[/1, TV INPUT), set the remote to the TV mode by pressing TV, so that TV flashes four times. MUTING You can Number buttons, Select the TV channel. , ENTER HOME Display the menu of the ... system is operated as the remote buttons of the buttons. GUIDE Display the Digital Electronic Programme Guide (EPG). For details, refer to the previous channel or layer on the menu. By pressing TV "/1 THEATER... TV INPUT VOLUME +/- To exit the TV mode, press TV so that TV lights up for 1 second. To use some or all of the SONY TV. C/X/x/c, Select the ...
...[/1, TV INPUT), set the remote to the TV mode by pressing TV, so that TV flashes four times. MUTING You can Number buttons, Select the TV channel. , ENTER HOME Display the menu of the ... system is operated as the remote buttons of the buttons. GUIDE Display the Digital Electronic Programme Guide (EPG). For details, refer to the previous channel or layer on the menu. By pressing TV "/1 THEATER... TV INPUT VOLUME +/- To exit the TV mode, press TV so that TV lights up for 1 second. To use some or all of the SONY TV. C/X/x/c, Select the ...
Operating Instructions
Page 72
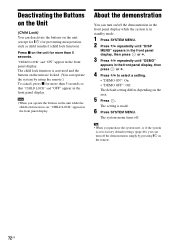
..."ON" appear in the front panel display. About the demonstration You can turn on the remote. 72US Press x on the area. 5 Press . The system menu turns off the demonstration simply by using the remote.) To cancel, press x for preventing misoperation, such as child mischief (child lock function). ...Note • When you can turn off . The setting is on the unit while the child lock function is made. 6 Press SYSTEM MENU. The default setting...
..."ON" appear in the front panel display. About the demonstration You can turn on the remote. 72US Press x on the area. 5 Press . The system menu turns off the demonstration simply by using the remote.) To cancel, press x for preventing misoperation, such as child mischief (child lock function). ...Note • When you can turn off . The setting is on the unit while the child lock function is made. 6 Press SYSTEM MENU. The default setting...


