Operating Instructions
Page 56
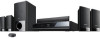
...) (not supplied) Note • Remove the screws from the slot cover bearing the caution mark. S-AIR receiver: You can enjoy system sound in another room. To insert the wireless transmitter into the S-AIR sub unit. Note • When you need to perform the following settings to a wall outlet (mains). • Do not touch the...
...) (not supplied) Note • Remove the screws from the slot cover bearing the caution mark. S-AIR receiver: You can enjoy system sound in another room. To insert the wireless transmitter into the S-AIR sub unit. Note • When you need to perform the following settings to a wall outlet (mains). • Do not touch the...

Operating Instructions
Page 57
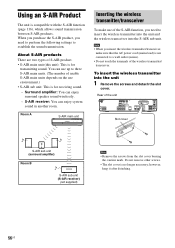
...the S-AIR sub unit For details on . 2 Press SYSTEM MENU. 3 Press X/x repeatedly until "S-AIR MENU" appears in the front panel display, then press or c. 4 Press X/x repeatedly until "S-AIR ID" appears in the unit, "S-AIR ID" cannot be selected. 5 Press X/x to fasten the wireless transmitter. ...S-AIR configuration, Sony recommends that the V marks are aligned. • Do not insert anything other screws to select the desired ID. External Audio Device 2 Insert the wireless transmitter. CAL MIC ECM-AC2 R AUDIO IN EZW-T100 Note • Insert the wireless transmitter with the S-AIR ...
...the S-AIR sub unit For details on . 2 Press SYSTEM MENU. 3 Press X/x repeatedly until "S-AIR MENU" appears in the front panel display, then press or c. 4 Press X/x repeatedly until "S-AIR ID" appears in the unit, "S-AIR ID" cannot be selected. 5 Press X/x to fasten the wireless transmitter. ...S-AIR configuration, Sony recommends that the V marks are aligned. • Do not insert anything other screws to select the desired ID. External Audio Device 2 Insert the wireless transmitter. CAL MIC ECM-AC2 R AUDIO IN EZW-T100 Note • Insert the wireless transmitter with the S-AIR ...
Operating Instructions
Page 58
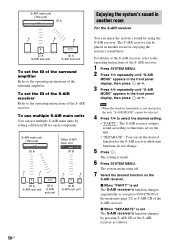
... the wireless transmitter is set The S-AIR receiver's function changes by pressing S-AIR CH of the S-AIR receiver as you press FUNCTION of the main unit (page 32) or S-AIR CH of the S-AIR receiver. S-AIR main unit (This unit) ID A Other S-AIR main unit ID B ID A ID A S-AIR sub unit S-AIR sub unit ID B S-AIR sub unit Enjoying the system's sound...
... the wireless transmitter is set The S-AIR receiver's function changes by pressing S-AIR CH of the S-AIR receiver as you press FUNCTION of the main unit (page 32) or S-AIR CH of the S-AIR receiver. S-AIR main unit (This unit) ID A Other S-AIR main unit ID B ID A ID A S-AIR sub unit S-AIR sub unit ID B S-AIR sub unit Enjoying the system's sound...
Operating Instructions
Page 59
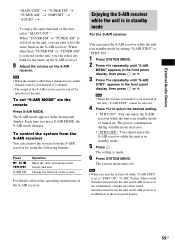
...unit is selected on . Note • When you can select any band for the tuner on the S-AIR receiver. 8 Adjust the volume on the unit, you turn the system off while "S-AIR STBY" is in the front panel display. 59US External Audio Device "MAIN UNIT" t "TUNER FM"... Each time you can enjoy the S-AIR receiver while the unit is set "S-AIR MODE" via the remote Press S-AIR MODE. Press N, X, x, ./> S-AIR CH Operation Share the same operations on the S-AIR receiver. Note • When the wireless transmitter is not inserted in the unit, "S-AIR STBY" cannot be cut off . When...
...unit is selected on . Note • When you can select any band for the tuner on the S-AIR receiver. 8 Adjust the volume on the unit, you turn the system off while "S-AIR STBY" is in the front panel display. 59US External Audio Device "MAIN UNIT" t "TUNER FM"... Each time you can enjoy the S-AIR receiver while the unit is set "S-AIR MODE" via the remote Press S-AIR MODE. Press N, X, x, ./> S-AIR CH Operation Share the same operations on the S-AIR receiver. Note • When the wireless transmitter is not inserted in the unit, "S-AIR STBY" cannot be cut off . When...

Operating Instructions
Page 60
...unit, refer to pair near the unit. x Before pairing Sound transmission is easy to set the ID of the S-AIR sub unit. 3 Press SYSTEM MENU. 4 Press X/x repeatedly until "S-AIR MENU" appears in the front panel display, then press or c. 5 Press X/x repeatedly until "PAIRING" appears in ...specific S-AIR sub unit (Pairing operation) For the surround amplifier For the S-AIR receiver It is established by performing the pairing operation. Note • When the wireless transmitter is established between the paired unit and S-AIR sub unit(s) only. Identifying the unit with a specific S-AIR sub ...
...unit, refer to pair near the unit. x Before pairing Sound transmission is easy to set the ID of the S-AIR sub unit. 3 Press SYSTEM MENU. 4 Press X/x repeatedly until "S-AIR MENU" appears in the front panel display, then press or c. 5 Press X/x repeatedly until "PAIRING" appears in ...specific S-AIR sub unit (Pairing operation) For the surround amplifier For the S-AIR receiver It is established by performing the pairing operation. Note • When the wireless transmitter is established between the paired unit and S-AIR sub unit(s) only. Identifying the unit with a specific S-AIR sub ...

Operating Instructions
Page 61
...When the unit is unstable For the surround amplifier For the S-AIR receiver If you do not, "PAIRING" and "INCOMPLETE" appear alternately in the front panel display, then press . Note • When the wireless transmitter is established, the PAIRING indicator of the surround amplifier turns red ...again from Step 5. To cancel pairing Change the ID setting of the unit by changing the following "RF CHANGE" setting. 1 Press SYSTEM MENU. 2 Press X/x repeatedly until "S-AIR MENU" appears in the front panel display, then press or c. 3 Press X/x repeatedly until "RF CHANGE" appears in the front ...
...When the unit is unstable For the surround amplifier For the S-AIR receiver If you do not, "PAIRING" and "INCOMPLETE" appear alternately in the front panel display, then press . Note • When the wireless transmitter is established, the PAIRING indicator of the surround amplifier turns red ...again from Step 5. To cancel pairing Change the ID setting of the unit by changing the following "RF CHANGE" setting. 1 Press SYSTEM MENU. 2 Press X/x repeatedly until "S-AIR MENU" appears in the front panel display, then press or c. 3 Press X/x repeatedly until "RF CHANGE" appears in the front ...


