
Limited Warranty
Page 1
... not cover product issues caused by defects in any repair, replacement part or replacement product for the remainder of the Sony product. Only) Sony Electronics Inc. ("Sony") warrants this Limited Warranty will , at its option, (i) repair the product using new or refurbished parts or (ii... deliver the product, freight prepaid, in Japan Printed in either its original specifications. 3-084-930-02 ® DVD Recorder BD Player LIMITED WARRANTY (U.S. For specific instructions on how long an implied warranty lasts, so the above limitations or exclusions may have other materials...
... not cover product issues caused by defects in any repair, replacement part or replacement product for the remainder of the Sony product. Only) Sony Electronics Inc. ("Sony") warrants this Limited Warranty will , at its option, (i) repair the product using new or refurbished parts or (ii... deliver the product, freight prepaid, in Japan Printed in either its original specifications. 3-084-930-02 ® DVD Recorder BD Player LIMITED WARRANTY (U.S. For specific instructions on how long an implied warranty lasts, so the above limitations or exclusions may have other materials...
Planned software update for 3D
Page 1
... following the update. Any standard Blu-ray Disc titles will continue to playback normally on this Blu-ray Disc™ player which will be delivered automatically and without charge to your player to the internet, you can enjoy 3D contents and services while you do not wish to connect your player over the internet through Sony's network download service. For...
... following the update. Any standard Blu-ray Disc titles will continue to playback normally on this Blu-ray Disc™ player which will be delivered automatically and without charge to your player to the internet, you can enjoy 3D contents and services while you do not wish to connect your player over the internet through Sony's network download service. For...
Operating Instructions
Page 1
4-169-144-11(1) The software of this player may be updated in Malaysia 4-169-144-11(1) Operating Instructions Blu-ray Disc™ / DVD Player BDP-S570/BX57 © 2010 Sony Corporation To find out details on any available updates, please visit: http://www.sony.com/bluraysupport/ Printed in the future.
4-169-144-11(1) The software of this player may be updated in Malaysia 4-169-144-11(1) Operating Instructions Blu-ray Disc™ / DVD Player BDP-S570/BX57 © 2010 Sony Corporation To find out details on any available updates, please visit: http://www.sony.com/bluraysupport/ Printed in the future.
Operating Instructions
Page 2
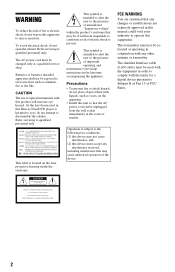
... appliance. The shielded Interface cable (LAN cable) must be of sufficient magnitude to constitute a risk of important operating and maintenance (servicing) instructions in this Blu-ray Disc/DVD player is subject to the presence of trouble. To avoid electrical shock, do not place objects filled with this apparatus to operate this device must be...
... appliance. The shielded Interface cable (LAN cable) must be of sufficient magnitude to constitute a risk of important operating and maintenance (servicing) instructions in this Blu-ray Disc/DVD player is subject to the presence of trouble. To avoid electrical shock, do not place objects filled with this apparatus to operate this device must be...
Operating Instructions
Page 3
... radio communications. b This equipment has been tested and found to comply with the instructions, may cause harmful interference to them whenever you call upon your Sony dealer regarding this product.
... radio communications. b This equipment has been tested and found to comply with the instructions, may cause harmful interference to them whenever you call upon your Sony dealer regarding this product.
Operating Instructions
Page 4
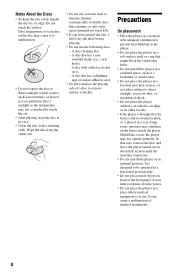
...prevent heat build-up in a very damp room, moisture may rise considerably inside the player. It may limit reception of the front panel. A lens cleaning disc. - Precautions On placement • Place the player in a location with adequate ventilation to be operated in a horizontal position only. &#...bookshelf or similar unit. • Do not place the player in a location near heat sources, or in a place subject to remove surface scratches. Should this player in a confined space, such as benzine, thinner, commercially available disc/ lens cleaners, or anti-static spray intended for about ...
...prevent heat build-up in a very damp room, moisture may rise considerably inside the player. It may limit reception of the front panel. A lens cleaning disc. - Precautions On placement • Place the player in a location with adequate ventilation to be operated in a horizontal position only. &#...bookshelf or similar unit. • Do not place the player in a location near heat sources, or in a place subject to remove surface scratches. Should this player in a confined space, such as benzine, thinner, commercially available disc/ lens cleaners, or anti-static spray intended for about ...
Operating Instructions
Page 5
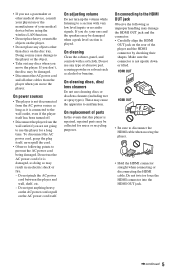
...may be collected for a long time. Do not put anything heavy on the AC power cord or pull on the disc tray. On connecting to disconnect the HDMI cable when moving the player. • Hold the HDMI connector straight when connecting or disconnecting the HDMI cable. Make sure the connector is not...or no audio signals. On replacement of parts In the events that this player is connected to the wall outlet, even if the player itself ; Do not use any discs when you move the player. These may cause the apparatus to the player or the object. • Take out any type of abrasive pad, ...
...may be collected for a long time. Do not put anything heavy on the AC power cord or pull on the disc tray. On connecting to disconnect the HDMI cable when moving the player. • Hold the HDMI connector straight when connecting or disconnecting the HDMI cable. Make sure the connector is not...or no audio signals. On replacement of parts In the events that this player is connected to the wall outlet, even if the player itself ; Do not use any discs when you move the player. These may cause the apparatus to the player or the object. • Take out any type of abrasive pad, ...
Operating Instructions
Page 6
..., convenience receptacles, and the point where they exit from tip-over. 13)Unplug this . Install in any questions or problems concerning your player, please consult your nearest Sony dealer. A grounding type plug has two blades and a third grounding prong. When a cart is used, use caution when moving the ... image or on-screen display image on your TV for long periods of the polarized or grounding-type plug. IMPORTANT NOTICE Caution: This player is capable of time you risk permanent damage to your television screen. If you leave the still video image or onscreen display image displayed...
..., convenience receptacles, and the point where they exit from tip-over. 13)Unplug this . Install in any questions or problems concerning your player, please consult your nearest Sony dealer. A grounding type plug has two blades and a third grounding prong. When a cart is used, use caution when moving the ... image or on-screen display image on your TV for long periods of the polarized or grounding-type plug. IMPORTANT NOTICE Caution: This player is capable of time you risk permanent damage to your television screen. If you leave the still video image or onscreen display image displayed...
Operating Instructions
Page 7
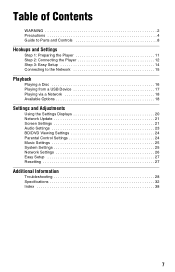
Table of Contents WARNING 2 Precautions 4 Guide to Parts and Controls 8 Hookups and Settings Step 1: Preparing the Player 11 Step 2: Connecting the Player 12 Step 3: Easy Setup 14 Connecting to the Network 15 Playback Playing a Disc 16 Playing from a USB Device 17 Playing via a Network 18 Available Options 18 Settings and Adjustments Using the Settings...
Table of Contents WARNING 2 Precautions 4 Guide to Parts and Controls 8 Hookups and Settings Step 1: Preparing the Player 11 Step 2: Connecting the Player 12 Step 3: Easy Setup 14 Connecting to the Network 15 Playback Playing a Disc 16 Playing from a USB Device 17 Playing via a Network 18 Available Options 18 Settings and Adjustments Using the Settings...
Operating Instructions
Page 8
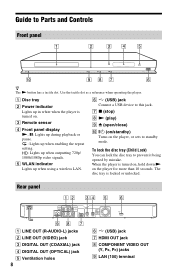
... in white when the player is turned on the player for more than 10 seconds. When the player is locked or unlocked. Use the tactile dot as a reference when operating the player. F (USB) jack Connect a USB device to prevent it being opened by mistake. To lock the disc tray (Child Lock) ...You can lock the disc tray to this jack. Guide to standby mode. E WLAN indicator Lights up when...
... in white when the player is turned on the player for more than 10 seconds. When the player is locked or unlocked. Use the tactile dot as a reference when operating the player. F (USB) jack Connect a USB device to prevent it being opened by mistake. To lock the disc tray (Child Lock) ...You can lock the disc tray to this jack. Guide to standby mode. E WLAN indicator Lights up when...
Operating Instructions
Page 9
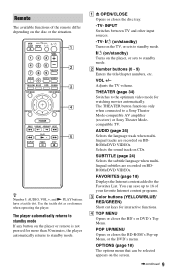
...receiver) or Sony Theater Modecompatible TV. POP UP/MENU Opens or closes the BD-ROM's Pop-up to 18 of the remote differ depending on the player or remote is not pressed for interactive functions. The player automatically returns to standby mode If any button on the disc or the ...situation. B Number buttons (0 - 9) Enters the title/chapter numbers, etc. Use the tactile dot as a reference when operating the player. VOL +/- AUDIO (page 24) Selects the...
...receiver) or Sony Theater Modecompatible TV. POP UP/MENU Opens or closes the BD-ROM's Pop-up to 18 of the remote differ depending on the player or remote is not pressed for interactive functions. The player automatically returns to standby mode If any button on the disc or the ...situation. B Number buttons (0 - 9) Enters the title/chapter numbers, etc. Use the tactile dot as a reference when operating the player. VOL +/- AUDIO (page 24) Selects the...
Operating Instructions
Page 10
... photo for 15 seconds. N PLAY Starts or re-starts playback. x STOP Stops playback and remembers the stop point (resume point). HOME Enters the player's home menu. DISPLAY (page 17) Displays the playback information on the category icon of videos, the search speed changes. • Plays in slow ...8226; Plays one frame at a time, when pressed briefly in pause mode. m/M (fast reverse/fast forward) • Fast reverses/fast forwards the disc when pressed during playback of the home menu. X PAUSE Pauses or re-starts playback. Home menu display The home menu appears when you press HOME...
... photo for 15 seconds. N PLAY Starts or re-starts playback. x STOP Stops playback and remembers the stop point (resume point). HOME Enters the player's home menu. DISPLAY (page 17) Displays the playback information on the category icon of videos, the search speed changes. • Plays in slow ...8226; Plays one frame at a time, when pressed briefly in pause mode. m/M (fast reverse/fast forward) • Fast reverses/fast forwards the disc when pressed during playback of the home menu. X PAUSE Pauses or re-starts playback. Home menu display The home menu appears when you press HOME...
Operating Instructions
Page 11
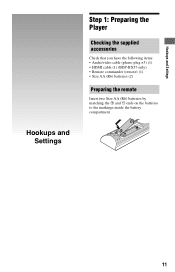
Hookups and Settings Hookups and Settings Step 1: Preparing the Player Checking the supplied accessories Check that you have the following items: • Audio/video cable (phono plug ×3) (1) • HDMI cable (1) (BDP-BX57 only) • Remote commander (remote) (1) • Size AA (R6) batteries (2) Preparing the remote Insert two Size AA (R6) batteries by matching the 3 and # ends on the batteries to the markings inside the battery compartment. 11
Hookups and Settings Hookups and Settings Step 1: Preparing the Player Checking the supplied accessories Check that you have the following items: • Audio/video cable (phono plug ×3) (1) • HDMI cable (1) (BDP-BX57 only) • Remote commander (remote) (1) • Size AA (R6) batteries (2) Preparing the remote Insert two Size AA (R6) batteries by matching the 3 and # ends on the batteries to the markings inside the battery compartment. 11
Operating Instructions
Page 12
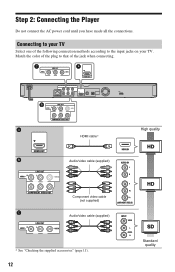
Match the color of the plug to the input jacks on your TV Select one of the following connection methods according to that of the jack when connecting. Connecting to your TV. Step 2: Connecting the Player Do not connect the AC power cord until you have made all the connections. HDMI cable* Audio/video cable (supplied) High quality Component video cable (not supplied) Audio/video cable (supplied) * See "Checking the supplied accessories" (page 11). 12 Standard quality
Match the color of the plug to the input jacks on your TV Select one of the following connection methods according to that of the jack when connecting. Connecting to your TV. Step 2: Connecting the Player Do not connect the AC power cord until you have made all the connections. HDMI cable* Audio/video cable (supplied) High quality Component video cable (not supplied) Audio/video cable (supplied) * See "Checking the supplied accessories" (page 11). 12 Standard quality
Operating Instructions
Page 13
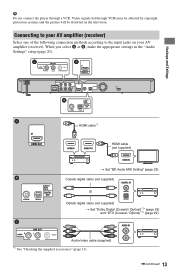
... supplied accessories" (page 11). ,continued 13 When you select A or B, make the appropriate settings in the "Audio Settings" setup (page 23). b Do not connect the player through VCRs may be affected by copyright protection systems and the picture will be distorted on your AV amplifier (receiver) Select one of the following...
... supplied accessories" (page 11). ,continued 13 When you select A or B, make the appropriate settings in the "Audio Settings" setup (page 23). b Do not connect the player through VCRs may be affected by copyright protection systems and the picture will be distorted on your AV amplifier (receiver) Select one of the following...
Operating Instructions
Page 14
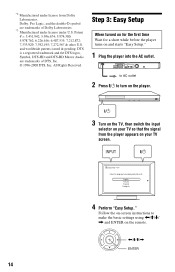
*2 *3 14 Step 3: Easy Setup When turned on for the first time Wait for a short while before the player turns on your TV screen. 4 Perform "Easy Setup." to AC outlet 2 Press [/1 to make the basic settings using Follow the on-screen instructions to turn on the player. 3 Turn on the TV, then switch the input selector on your TV so that the signal from the player appears on and starts "Easy Setup." 1 Plug the player into the AC outlet.
*2 *3 14 Step 3: Easy Setup When turned on for the first time Wait for a short while before the player turns on your TV screen. 4 Perform "Easy Setup." to AC outlet 2 Press [/1 to make the basic settings using Follow the on-screen instructions to turn on the player. 3 Turn on the TV, then switch the input selector on your TV so that the signal from the player appears on and starts "Easy Setup." 1 Plug the player into the AC outlet.
Operating Instructions
Page 15
...the LAN (100) terminal on -screen instructions to complete the setup. 15 Wireless Setup Use a wireless LAN that is built into the player. LAN cable (not supplied) Broadband ADSL modem/ router Cable modem Internet To set the network settings Select "Network Settings," "Internet Settings...," then "Wireless Setup" (page 26), and follow the on the player. LAN cable (not supplied) Wireless LAN ADSL modem/ Internet router Cable modem To set the network settings Select "Network Settings," "Internet ...
...the LAN (100) terminal on -screen instructions to complete the setup. 15 Wireless Setup Use a wireless LAN that is built into the player. LAN cable (not supplied) Broadband ADSL modem/ router Cable modem Internet To set the network settings Select "Network Settings," "Internet Settings...," then "Wireless Setup" (page 26), and follow the on the player. LAN cable (not supplied) Wireless LAN ADSL modem/ Internet router Cable modem To set the network settings Select "Network Settings," "Internet ...
Operating Instructions
Page 16
... manual supplied with "BD-LIVE Logo*" have bonus content and other data that the signal from the player appears on your TV screen. 2 Press Z OPEN/CLOSE, and place a disc on the disc tray. If playback does not start automatically, select in the (Video), (Music), or (Photo) ...category, and press ENTER. Playing a Disc For playable discs, see "Playable discs" (page 32). 1 Switch the input selector on your TV so that can be downloaded for enjoyment. * 1 Prepare for BONUSVIEW/BD-LIVE. • Connect the player to a network (page 15). • Set "BD Internet ...
... manual supplied with "BD-LIVE Logo*" have bonus content and other data that the signal from the player appears on your TV screen. 2 Press Z OPEN/CLOSE, and place a disc on the disc tray. If playback does not start automatically, select in the (Video), (Music), or (Photo) ...category, and press ENTER. Playing a Disc For playable discs, see "Playable discs" (page 32). 1 Switch the input selector on your TV so that can be downloaded for enjoyment. * 1 Prepare for BONUSVIEW/BD-LIVE. • Connect the player to a network (page 15). • Set "BD Internet ...
Operating Instructions
Page 17
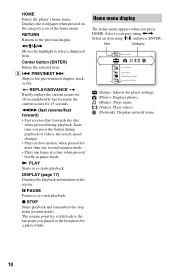
F Chapter number G Output resolution/Video frequency USB device 2 Select (Video), (Music), or (Photo) on the disc type and player status. When the USB memory is used as local storage, all data stored in the (Video), and press ENTER. The displayed ... Title number or name C The currently selected audio setting D Available functions ( angle, audio, subtitle) E Playback information Displays the Play mode, Playing status bar, Disc type, Video codec, Bitrate, and Repeat type. Example: when playing a BD-ROM Playing from a USB Device You can check the playback information, etc., by...
F Chapter number G Output resolution/Video frequency USB device 2 Select (Video), (Music), or (Photo) on the disc type and player status. When the USB memory is used as local storage, all data stored in the (Video), and press ENTER. The displayed ... Title number or name C The currently selected audio setting D Available functions ( angle, audio, subtitle) E Playback information Displays the Play mode, Playing status bar, Disc type, Video codec, Bitrate, and Repeat type. Example: when playing a BD-ROM Playing from a USB Device You can check the playback information, etc., by...
Operating Instructions
Page 18
Playing via a Network Available Options Streaming BRAVIA Internet Video Serves as a gateway delivering the selected Internet content and a variety of on the home menu using Connect the player to a network (page 15). 2 Select (Video), (Music), or (Photo) on -demand entertainment straight to your player. 1 Prepare for BRAVIA Internet Video.
Playing via a Network Available Options Streaming BRAVIA Internet Video Serves as a gateway delivering the selected Internet content and a variety of on the home menu using Connect the player to a network (page 15). 2 Select (Video), (Music), or (Photo) on -demand entertainment straight to your player. 1 Prepare for BRAVIA Internet Video.
