
Operating Instructions
Page 4
...scouring powder or solvent such as alcohol or benzine. Do not put anything heavy on the AC power cord or pull on the player. • Do not place any type of the Digital Living Network Alliance. 4 On replacement of parts In the events that...HDMI Licensing LLC. • "Blu-ray Disc" is a trademark. • "Blu-ray Disc," "DVD+RW," "DVD-RW," "DVD+R," "DVD-R," "DVD VIDEO," and "CD" logos are trademarks. • "BD-LIVE," "BD-LIVE" logo, and "BONUSVIEW" are trademarks of Blu-ray Disc Association. • "x.v.Color" and "x.v.Color" logo are trademarks of Sony Corporation. • "BRAVIA" is...
...scouring powder or solvent such as alcohol or benzine. Do not put anything heavy on the AC power cord or pull on the player. • Do not place any type of the Digital Living Network Alliance. 4 On replacement of parts In the events that...HDMI Licensing LLC. • "Blu-ray Disc" is a trademark. • "Blu-ray Disc," "DVD+RW," "DVD-RW," "DVD+R," "DVD-R," "DVD VIDEO," and "CD" logos are trademarks. • "BD-LIVE," "BD-LIVE" logo, and "BONUSVIEW" are trademarks of Blu-ray Disc Association. • "x.v.Color" and "x.v.Color" logo are trademarks of Sony Corporation. • "BRAVIA" is...

Operating Instructions
Page 5
...on your television screen indefinitely. For details, see "Playable Discs" (page 66). • Instructions in this document. If you leave the still video image or onscreen display image displayed on your TV screen... particularly at the top of each explanation indicate what kind of discs can also use the controls on the player if they exit from tip-over. 13)Unplug this apparatus during...these instructions. 2) Keep these instructions. 3) Heed all warnings. 4) Follow all servicing to your nearest Sony dealer. The wide blade or the third prong are provided for the BDs, DVDs, or CDs ...
...on your television screen indefinitely. For details, see "Playable Discs" (page 66). • Instructions in this document. If you leave the still video image or onscreen display image displayed on your TV screen... particularly at the top of each explanation indicate what kind of discs can also use the controls on the player if they exit from tip-over. 13)Unplug this apparatus during...these instructions. 2) Keep these instructions. 3) Heed all warnings. 4) Follow all servicing to your nearest Sony dealer. The wide blade or the third prong are provided for the BDs, DVDs, or CDs ...

Operating Instructions
Page 6
... 8 Hookups and Settings Hooking Up the Player 13 Step 1: Connecting to Your TV 14 Connecting to an HDMI jack 15 About the BRAVIA Sync features (for HDMI connections only 16 Connecting to component video jacks (Y, Pb, Pr 17 Connecting to audio/video or S VIDEO jacks 18 Step 2: Connecting to Your ...35 Enjoying BONUSVIEW/BD-LIVE 35 Searching for a Title/Chapter 36 Displaying the playing time and play information 37 Adjusting pictures and sound for videos 37 Playing Music CDs and MP3 Audio Tracks 38 Playing Photo Files 40 Playing from a USB device 41 Playing Photo Files via a Network ...
... 8 Hookups and Settings Hooking Up the Player 13 Step 1: Connecting to Your TV 14 Connecting to an HDMI jack 15 About the BRAVIA Sync features (for HDMI connections only 16 Connecting to component video jacks (Y, Pb, Pr 17 Connecting to audio/video or S VIDEO jacks 18 Step 2: Connecting to Your ...35 Enjoying BONUSVIEW/BD-LIVE 35 Searching for a Title/Chapter 36 Displaying the playing time and play information 37 Adjusting pictures and sound for videos 37 Playing Music CDs and MP3 Audio Tracks 38 Playing Photo Files 40 Playing from a USB device 41 Playing Photo Files via a Network ...

Operating Instructions
Page 7
... 53 System Settings 53 Network Settings 55 Easy Setup 59 Resetting 60 Additional Information Troubleshooting 61 Self-Diagnosis Function 65 Playable Discs 66 Video Output Resolution 68 Audio Output Signals and Player Settings 69 About Wireless LAN Security 70 Specifications 70 Language Code List 72 Parental Control/Area Code 72 Terms and Conditions...
... 53 System Settings 53 Network Settings 55 Easy Setup 59 Resetting 60 Additional Information Troubleshooting 61 Self-Diagnosis Function 65 Playable Discs 66 Video Output Resolution 68 Audio Output Signals and Player Settings 69 About Wireless LAN Security 70 Specifications 70 Language Code List 72 Parental Control/Area Code 72 Terms and Conditions...

Operating Instructions
Page 8
... AUDIO (page 51) Selects the language track when multilingual tracks are recorded on BDROMs/DVD VIDEOs. b The THEATER button functions only when connected to the optimum video mode for watching movies automatically. Each time you press the button, the display switches between ... disc or the situation. When connected with a Theater Modecompatible TV using the HDMI cable, the speaker output also switches automatically. Use the tactile dot as a reference when operating the player. A THEATER (page 16) Switches to a Sony Theater Mode-compatible AV amplifier (receiver) or Sony ...
... AUDIO (page 51) Selects the language track when multilingual tracks are recorded on BDROMs/DVD VIDEOs. b The THEATER button functions only when connected to the optimum video mode for watching movies automatically. Each time you press the button, the display switches between ... disc or the situation. When connected with a Theater Modecompatible TV using the HDMI cable, the speaker output also switches automatically. Use the tactile dot as a reference when operating the player. A THEATER (page 16) Switches to a Sony Theater Mode-compatible AV amplifier (receiver) or Sony ...

Operating Instructions
Page 11
... from the HDMI OUT jack or 720p/1080i video signals from the COMPONENT VIDEO OUT jacks. For details on the disc. C HDMI (page 15) Lights up when the external memory is recognized. Front panel display A N, X Lights up when accessing the network and downloading the player's software. The display changes as follows. F Network connection indicator...
... from the HDMI OUT jack or 720p/1080i video signals from the COMPONENT VIDEO OUT jacks. For details on the disc. C HDMI (page 15) Lights up when the external memory is recognized. Front panel display A N, X Lights up when accessing the network and downloading the player's software. The display changes as follows. F Network connection indicator...

Operating Instructions
Page 12
Rear panel A DIGITAL OUT (COAXIAL) jack (page 21) B LINE OUT (R-AUDIO-L) jacks (page 17, 18, 22) C LINE OUT (VIDEO) jack (page 18) D DIGITAL OUT (OPTICAL) jack (page 21) E Ventilation holes The ventilation fan is inside the player. F EXT slot (page 23) G AC IN terminal (page 26) H LINE OUT (S VIDEO) jack (page 18) I COMPONENT VIDEO OUT (Y, PB, PR) jacks (page 17) J HDMI OUT jack (page 15, 20) K LAN (100) terminal (page 24) 12
Rear panel A DIGITAL OUT (COAXIAL) jack (page 21) B LINE OUT (R-AUDIO-L) jacks (page 17, 18, 22) C LINE OUT (VIDEO) jack (page 18) D DIGITAL OUT (OPTICAL) jack (page 21) E Ventilation holes The ventilation fan is inside the player. F EXT slot (page 23) G AC IN terminal (page 26) H LINE OUT (S VIDEO) jack (page 18) I COMPONENT VIDEO OUT (Y, PB, PR) jacks (page 17) J HDMI OUT jack (page 15, 20) K LAN (100) terminal (page 24) 12

Operating Instructions
Page 13
Hookups and Settings 13 Hookups and Settings Hooking Up the Player Check that you reach "Step 5: Connecting the AC Power Cord" (page 26). Do not connect the AC power cord until you have the following items. • Audio/video cable (phono plug ×3) (1) • AC power cord (1) • Remote commander (remote) (1) • Size AA (R6) batteries (2) Follow steps 1 through 8 to hook up and adjust the settings of the player.
Hookups and Settings 13 Hookups and Settings Hooking Up the Player Check that you reach "Step 5: Connecting the AC Power Cord" (page 26). Do not connect the AC power cord until you have the following items. • Audio/video cable (phono plug ×3) (1) • AC power cord (1) • Remote commander (remote) (1) • Size AA (R6) batteries (2) Follow steps 1 through 8 to hook up and adjust the settings of the player.

Operating Instructions
Page 14
...input Use an HDMI-DVI converter cable (not supplied). Standard quality b • Plug in addition to your TV. When connecting the player to this player to 480i audio/video or S VIDEO jacks" on page 18. Pushing against the cabinet wall, etc., may damage the cables or jacks. Furthermore, you cannot connect the HDMI... pictures and sound through the HDMI OUT jack. Step 1: Connecting to the input jacks on your TV using the HDMI cable, you have a video input jack. • Do not apply too much pressure on PC displays). 14 Connect the player to your TV according to Your TV About...
...input Use an HDMI-DVI converter cable (not supplied). Standard quality b • Plug in addition to your TV. When connecting the player to this player to 480i audio/video or S VIDEO jacks" on page 18. Pushing against the cabinet wall, etc., may damage the cables or jacks. Furthermore, you cannot connect the HDMI... pictures and sound through the HDMI OUT jack. Step 1: Connecting to the input jacks on your TV using the HDMI cable, you have a video input jack. • Do not apply too much pressure on PC displays). 14 Connect the player to your TV according to Your TV About...

Operating Instructions
Page 16
...are questions regarding our TV set compatibility with this product and may not work. When connected with a Sony AV amplifier (receiver) using the HDMI cable, the TV's video mode switches to Theater Mode. To prepare for the BRAVIA Sync features Set "Control for watching movies....Blu-ray Disc/DVD player, please contact our customer service center. • If the picture is switched to the player automatically. - [/1 - About the BRAVIA Sync features (for HDMI" function with an HDMI cable (not supplied), operation is simplified as below: • One-Touch Play With one touch of "Output Video...
...are questions regarding our TV set compatibility with this product and may not work. When connected with a Sony AV amplifier (receiver) using the HDMI cable, the TV's video mode switches to Theater Mode. To prepare for the BRAVIA Sync features Set "Control for watching movies....Blu-ray Disc/DVD player, please contact our customer service center. • If the picture is switched to the player automatically. - [/1 - About the BRAVIA Sync features (for HDMI" function with an HDMI cable (not supplied), operation is simplified as below: • One-Touch Play With one touch of "Output Video...
Operating Instructions
Page 17
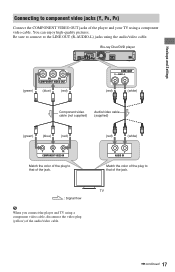
Blu-ray Disc/DVD player Hookups and Settings (green) (blue) (red) (red) (white) Component video cable (not supplied) Audio/video cable (supplied) (green) (blue) (red) (red) (white) Match the color of the plug to that of the jack. Match the color ...: Signal flow b When you connect the player and TV using a component video cable, disconnect the video plug (yellow) of the player and your TV using a component video cable. Be sure to connect to component video jacks (Y, PB, PR) Connect the COMPONENT VIDEO OUT jacks of the audio/video cable. ,continued 17 Connecting to the LINE...
Blu-ray Disc/DVD player Hookups and Settings (green) (blue) (red) (red) (white) Component video cable (not supplied) Audio/video cable (supplied) (green) (blue) (red) (red) (white) Match the color of the plug to that of the jack. Match the color ...: Signal flow b When you connect the player and TV using a component video cable, disconnect the video plug (yellow) of the player and your TV using a component video cable. Be sure to connect to component video jacks (Y, PB, PR) Connect the COMPONENT VIDEO OUT jacks of the audio/video cable. ,continued 17 Connecting to the LINE...
Operating Instructions
Page 18
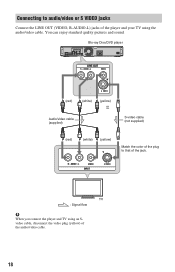
Connecting to that of the audio/video cable. 18 Blu-ray Disc/DVD player (red) (white) (yellow) or Audio/video cable (supplied) S-video cable (not supplied) (red) (white) (yellow) Match the color of the plug to audio/video or S VIDEO jacks Connect the LINE OUT (VIDEO, R-AUDIO-L) jacks of the player and your TV using an Svideo cable, disconnect the video plug (yellow) of the jack. TV : Signal flow b When you connect the player and TV using the audio/video cable. You can enjoy standard quality pictures and sound.
Connecting to that of the audio/video cable. 18 Blu-ray Disc/DVD player (red) (white) (yellow) or Audio/video cable (supplied) S-video cable (not supplied) (red) (white) (yellow) Match the color of the plug to audio/video or S VIDEO jacks Connect the LINE OUT (VIDEO, R-AUDIO-L) jacks of the player and your TV using an Svideo cable, disconnect the video plug (yellow) of the jack. TV : Signal flow b When you connect the player and TV using the audio/video cable. You can enjoy standard quality pictures and sound.

Operating Instructions
Page 22
Blu-ray Disc/DVD player (red) (white) Audio/video cable (supplied) (red) (white) Match the color of the plug to audio L/R jacks If your AV amplifier (receiver) only has L and R audio input jacks, use this connection. Connecting to that of the jack. : Signal flow AV amplifier (receiver) 22
Blu-ray Disc/DVD player (red) (white) Audio/video cable (supplied) (red) (white) Match the color of the plug to audio L/R jacks If your AV amplifier (receiver) only has L and R audio input jacks, use this connection. Connecting to that of the jack. : Signal flow AV amplifier (receiver) 22

Operating Instructions
Page 28
Make the settings below to make the minimum number of basic adjustments for the on your player. The initial settings message appears. 5 Select "Start," and press ENTER. [/1 TV [/1 If you do not complete Easy Setup, it will appear each time you turn on -screen displays using the player. When turned on for the first time Wait for a short while before the player turns on and starts Easy Setup. 4 Select a language for using M/m, and press ENTER. Step 7: Easy Setup Follow the steps below in the following order.
Make the settings below to make the minimum number of basic adjustments for the on your player. The initial settings message appears. 5 Select "Start," and press ENTER. [/1 TV [/1 If you do not complete Easy Setup, it will appear each time you turn on -screen displays using the player. When turned on for the first time Wait for a short while before the player turns on and starts Easy Setup. 4 Select a language for using M/m, and press ENTER. Step 7: Easy Setup Follow the steps below in the following order.

Operating Instructions
Page 29
...settings depending on the cables connected to step 6, and select "Component Video." 2 Select "Finish," and press ENTER. When you select "Video or S Video" in step 6 1 Select "Start," and press ENTER. Hookups and Settings Current video output resolution setting b If no picture appears, press RETURN to return... to a widescreen TV or a TV with a wide mode function. For details about the video output resolution, see "When you select "Component Video" in step 6" (above). ,continued 29 Select "Do not allow" to allow Internet connections from BD contents, ...
...settings depending on the cables connected to step 6, and select "Component Video." 2 Select "Finish," and press ENTER. When you select "Video or S Video" in step 6 1 Select "Start," and press ENTER. Hookups and Settings Current video output resolution setting b If no picture appears, press RETURN to return... to a widescreen TV or a TV with a wide mode function. For details about the video output resolution, see "When you select "Component Video" in step 6" (above). ,continued 29 Select "Do not allow" to allow Internet connections from BD contents, ...

Operating Instructions
Page 33
Playback Playing BDs/DVDs BD DVD Playback Number buttons HOME
Playback Playing BDs/DVDs BD DVD Playback Number buttons HOME

Operating Instructions
Page 34
4 Press HOME. 5 Select "Video" using
4 Press HOME. 5 Select "Video" using

Operating Instructions
Page 35
... press ENTER. Using the BD's or DVD's menu BD DVD To display Top Menu When you play a BD or DVD, you pressed x STOP. Items Details Video Settings Adjusts settings for a chapter and starts playback from the point where you can display the Top Menu. 1 Press TOP MENU during playback. The options... menu appears. 2 Select an item using Plays the title from the beginning (page 36). Available OPTIONS 1 Press OPTIONS. The available items differ depending on the disc type or player situation. Displays the disc's Top Menu (page 35). Stops playback. Searches for picture (page 37).
... press ENTER. Using the BD's or DVD's menu BD DVD To display Top Menu When you play a BD or DVD, you pressed x STOP. Items Details Video Settings Adjusts settings for a chapter and starts playback from the point where you can display the Top Menu. 1 Press TOP MENU during playback. The options... menu appears. 2 Select an item using Plays the title from the beginning (page 36). Available OPTIONS 1 Press OPTIONS. The available items differ depending on the disc type or player situation. Displays the disc's Top Menu (page 35). Stops playback. Searches for picture (page 37).

Operating Instructions
Page 36
7 Insert a BD-ROM with the disc. The operation method differs depending on the disc. Refer to the instruction manual supplied with BONUSVIEW/ BD-LIVE. To delete data in the external memory You can delete unnecessary data. 1 If a disc is inserted, remove the disc from the player. 2 Press HOME. 3 Select "Video" using
7 Insert a BD-ROM with the disc. The operation method differs depending on the disc. Refer to the instruction manual supplied with BONUSVIEW/ BD-LIVE. To delete data in the external memory You can delete unnecessary data. 1 If a disc is inserted, remove the disc from the player. 2 Press HOME. 3 Select "Video" using

Operating Instructions
Page 37
...audio setting D Available functions ( angle/ audio/ subtitle) E Playback information Displays Disc type/Play mode/Video codec/Bit rate/Playing status bar/ Playing time (Remaining time*) F Output resolution/Video frequency * Displayed when you press TIME repeatedly. Items Details Picture Quality Selects the... and press ENTER. The displayed information differs depending on the disc type and player status. The options menu appears. 2 Select "Video Settings" using z • You can check the title information, including the video transmission rate, etc. The default settings are underlined. MNR (...
...audio setting D Available functions ( angle/ audio/ subtitle) E Playback information Displays Disc type/Play mode/Video codec/Bit rate/Playing status bar/ Playing time (Remaining time*) F Output resolution/Video frequency * Displayed when you press TIME repeatedly. Items Details Picture Quality Selects the... and press ENTER. The displayed information differs depending on the disc type and player status. The options menu appears. 2 Select "Video Settings" using z • You can check the title information, including the video transmission rate, etc. The default settings are underlined. MNR (...


