
Operating Instructions
Page 6
Table of Contents WARNING 2 Precautions 3 Guide to Parts and Controls 8 Hookups and Settings Hooking Up the Player 13 Step 1: Connecting to Your TV 14 Connecting to an HDMI jack 15 About the BRAVIA Sync features (for HDMI connections only 16 Connecting to ... 32 Enjoying BonusView 32 Searching for a scene quickly (Scene Search 33 Searching for a Title/Chapter 33 Displaying the playing time and play information 34 Adjusting pictures and sound for videos 34 Playing CDs 36 Playing Photo Files 37 Settings and Adjustments Using the Settings Displays 39 Network Update 40 Video Settings...
Table of Contents WARNING 2 Precautions 3 Guide to Parts and Controls 8 Hookups and Settings Hooking Up the Player 13 Step 1: Connecting to Your TV 14 Connecting to an HDMI jack 15 About the BRAVIA Sync features (for HDMI connections only 16 Connecting to ... 32 Enjoying BonusView 32 Searching for a scene quickly (Scene Search 33 Searching for a Title/Chapter 33 Displaying the playing time and play information 34 Adjusting pictures and sound for videos 34 Playing CDs 36 Playing Photo Files 37 Settings and Adjustments Using the Settings Displays 39 Network Update 40 Video Settings...
Operating Instructions
Page 14
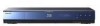
Connect the player to your TV according to an 480i audio/video or S VIDEO jack" (page 18). Standard Definition: See "Connecting to the input jack on your TV using the HDMI cable, you can enjoy high quality digital pictures and sound through the HDMI OUT jack. Pushing against the ... Hookup High Definition: 1080/24p, 1080p, 1080i, 720p Standard Definition: 480p, 480i See "Connecting to Your TV About video/HDMI OUT jacks The player has the following video jacks. Standard quality b • Plug in addition to a TV with the components to be connected. • You cannot...
Connect the player to your TV according to an 480i audio/video or S VIDEO jack" (page 18). Standard Definition: See "Connecting to the input jack on your TV using the HDMI cable, you can enjoy high quality digital pictures and sound through the HDMI OUT jack. Pushing against the ... Hookup High Definition: 1080/24p, 1080p, 1080i, 720p Standard Definition: 480p, 480i See "Connecting to Your TV About video/HDMI OUT jacks The player has the following video jacks. Standard quality b • Plug in addition to a TV with the components to be connected. • You cannot...
Operating Instructions
Page 15
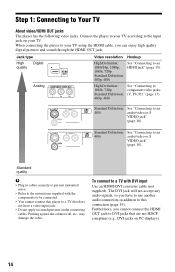
... quality digital pictures and sound through the HDMI OUT jack. or 1080p-compatible TV, use a High Speed HDMI cable. Hookups and Settings Connecting to an HDMI jack Connect the player and your TV using an HDMI cable to the cabinet wall. If you place the player on a cabinet with the TV. Blu-ray Disc/DVD player HDMI... connecting to the operating instructions supplied with the HDMI cable connected, do not screw in or rotate the HDMI connector. ,continued 15 If you connect a Sony TV that is not upside down or tilted. • Be sure to disconnect the HDMI cable when moving the...
... quality digital pictures and sound through the HDMI OUT jack. or 1080p-compatible TV, use a High Speed HDMI cable. Hookups and Settings Connecting to an HDMI jack Connect the player and your TV using an HDMI cable to the cabinet wall. If you place the player on a cabinet with the TV. Blu-ray Disc/DVD player HDMI... connecting to the operating instructions supplied with the HDMI cable connected, do not screw in or rotate the HDMI connector. ,continued 15 If you connect a Sony TV that is not upside down or tilted. • Be sure to disconnect the HDMI cable when moving the...
Operating Instructions
Page 16
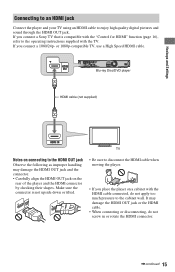
... "Control for HDMI" setting on . Refer to the operating instructions supplied with the TV. • When connecting the Sony TV that is also changed after turning the player off automatically. • Theater When you change the video output resolution in step 3 of "Output Video Format" under ...-compatible TV using the HDMI cable, you can control the basic functions of the player with this model 480p/ 720p/1080i/1080p Blu-ray Disc/DVD player, please contact our customer service center. • If the picture is not clear, not natural or not to your satisfaction, change the language for...
... "Control for HDMI" setting on . Refer to the operating instructions supplied with the TV. • When connecting the Sony TV that is also changed after turning the player off automatically. • Theater When you change the video output resolution in step 3 of "Output Video Format" under ...-compatible TV using the HDMI cable, you can control the basic functions of the player with this model 480p/ 720p/1080i/1080p Blu-ray Disc/DVD player, please contact our customer service center. • If the picture is not clear, not natural or not to your satisfaction, change the language for...
Operating Instructions
Page 17
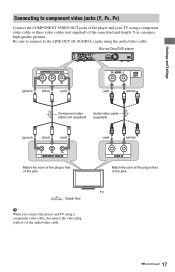
... your TV using a component video cable or three video cables (not supplied) of the jack. You can enjoy high-quality pictures. Blu-ray Disc/DVD player Hookups and Settings (green) (blue) (red) (red) (white) Component video cable (not supplied) Audio/video cable (supplied) (green) (blue) (red) (red) (white) Match the color ... to the LINE OUT (R-AUDIO-L) jacks using a component video cable, disconnect the video plug (yellow) of the jack. TV : Signal flow b When you connect the player and TV using the audio/video cable.
... your TV using a component video cable or three video cables (not supplied) of the jack. You can enjoy high-quality pictures. Blu-ray Disc/DVD player Hookups and Settings (green) (blue) (red) (red) (white) Component video cable (not supplied) Audio/video cable (supplied) (green) (blue) (red) (red) (white) Match the color ... to the LINE OUT (R-AUDIO-L) jacks using a component video cable, disconnect the video plug (yellow) of the jack. TV : Signal flow b When you connect the player and TV using the audio/video cable.
Operating Instructions
Page 18
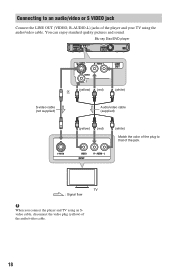
Blu-ray Disc/DVD player or (yellow) (red) (white) S-video cable (not supplied) Audio/video cable (supplied) (yellow) (red) (white) Match the color of the plug to an audio/video or S VIDEO jack Connect the LINE OUT (VIDEO, R-AUDIO-L) jacks of the player and your TV using an Svideo cable, disconnect the video plug (yellow) of the jack. TV : Signal flow b When you connect the player and TV using the audio/video cable. You can enjoy standard quality pictures and sound. Connecting to that of the audio/video cable. 18
Blu-ray Disc/DVD player or (yellow) (red) (white) S-video cable (not supplied) Audio/video cable (supplied) (yellow) (red) (white) Match the color of the plug to an audio/video or S VIDEO jack Connect the LINE OUT (VIDEO, R-AUDIO-L) jacks of the player and your TV using an Svideo cable, disconnect the video plug (yellow) of the jack. TV : Signal flow b When you connect the player and TV using the audio/video cable. You can enjoy standard quality pictures and sound. Connecting to that of the audio/video cable. 18

Operating Instructions
Page 28
...," or "1080i." Select "Component Video" when connecting your TV using the HDMI cable, and go to step 6 and change the video output resolution, a picture is selected. When you select "Component Video" in step 6 The initial settings message appears. 5 Select "Start," and press ENTER. 6 Select the cable... type used to connect the player and your TV using the component video cable, and go to step 7. Select "Video or S Video" when connecting your TV, and press ENTER...
...," or "1080i." Select "Component Video" when connecting your TV using the HDMI cable, and go to step 6 and change the video output resolution, a picture is selected. When you select "Component Video" in step 6 The initial settings message appears. 5 Select "Start," and press ENTER. 6 Select the cable... type used to connect the player and your TV using the component video cable, and go to step 7. Select "Video or S Video" when connecting your TV, and press ENTER...
Operating Instructions
Page 29
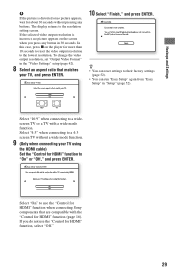
...Select "On" to use the "Control for HDMI" function to a widescreen TV or a TV with the "Control for HDMI" function when connecting Sony components that matches your TV using the HDMI cable) Set the "Control for HDMI" function, select "Off." 29 If you press any buttons. Select... "4:3" when connecting to the lowest resolution. If the selected video output resolution is distorted or no picture appears on the player for about 30 seconds without a wide mode function. 9 (Only when connecting your TV, and press ENTER. 10 Select "Finish," and ...
...Select "On" to use the "Control for HDMI" function to a widescreen TV or a TV with the "Control for HDMI" function when connecting Sony components that matches your TV using the HDMI cable) Set the "Control for HDMI" function, select "Off." 29 If you press any buttons. Select... "4:3" when connecting to the lowest resolution. If the selected video output resolution is distorted or no picture appears on the player for about 30 seconds without a wide mode function. 9 (Only when connecting your TV, and press ENTER. 10 Select "Finish," and ...
Operating Instructions
Page 31
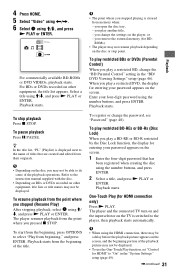
4 Press HOME. 5 Select "Video" using
4 Press HOME. 5 Select "Video" using
Operating Instructions
Page 32
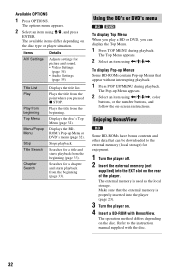
... Plays the title from the point where you can display the Top Menu. 1 Press TOP MENU during playback. Items A/V Settings Details Adjusts settings for picture and sound. • Video Settings (page 34) • Audio Settings (page 35) Title List Play Play from the beginning (page 33). Displays the... disc's Top Menu (page 32). Displays the BDROM's Pop-up Menu or DVD's menu (page 32). The Top Menu appears. 2 Select an item using M/m,...
... Plays the title from the point where you can display the Top Menu. 1 Press TOP MENU during playback. Items A/V Settings Details Adjusts settings for picture and sound. • Video Settings (page 34) • Audio Settings (page 35) Title List Play Play from the beginning (page 33). Displays the... disc's Top Menu (page 32). Displays the BDROM's Pop-up Menu or DVD's menu (page 32). The Top Menu appears. 2 Select an item using M/m,...
Operating Instructions
Page 34
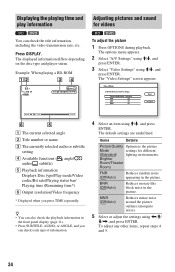
... Items Details Picture Quality Optimizes the picture Mode settings for videos BD DVD To adjust the picture 1 Press OPTIONS during playback. Example: When playing a BD-ROM Adjusting pictures and sound ... picture. A The current selected angle B Title number or name C The currently selected audio or subtitle setting D Available functions ( angle/ audio/ subtitle) E Playback information Displays Disc .... 3 Select "Video Settings" using MNR (Off/Auto) Reduces minor noise around the picture outlines (mosquito noise). 5 Select or adjust the settings using M/m, and press ENTER. ...
... Items Details Picture Quality Optimizes the picture Mode settings for videos BD DVD To adjust the picture 1 Press OPTIONS during playback. Example: When playing a BD-ROM Adjusting pictures and sound ... picture. A The current selected angle B Title number or name C The currently selected audio or subtitle setting D Available functions ( angle/ audio/ subtitle) E Playback information Displays Disc .... 3 Select "Video Settings" using MNR (Off/Auto) Reduces minor noise around the picture outlines (mosquito noise). 5 Select or adjust the settings using M/m, and press ENTER. ...
Operating Instructions
Page 35
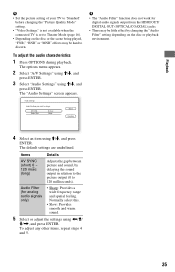
... of your TV to 'Standard' before changing the "Picture Quality Mode" setting. • "Video Settings" is not available when the connected TV is set to Theater Mode (page 16). • Depending on the disc or playback environment. Normally select this. • Slow: Provides smooth and warm sound... feeling. The "Audio Settings" screen appears. Items Details AV SYNC (short) 0 ~ 120 msec (long) Adjusts the gap between picture and sound, by changing the "Audio Filter" setting depending on the disc or the scene being played, "FNR," "BNR" or "MNR" effects may be hard to 120 milliseconds).
... of your TV to 'Standard' before changing the "Picture Quality Mode" setting. • "Video Settings" is not available when the connected TV is set to Theater Mode (page 16). • Depending on the disc or playback environment. Normally select this. • Slow: Provides smooth and warm sound... feeling. The "Audio Settings" screen appears. Items Details AV SYNC (short) 0 ~ 120 msec (long) Adjusts the gap between picture and sound, by changing the "Audio Filter" setting depending on the disc or the scene being played, "FNR," "BNR" or "MNR" effects may be hard to 120 milliseconds).
Operating Instructions
Page 41
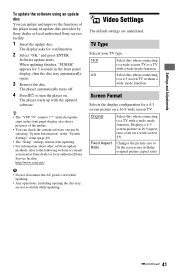
... the current software version by Sony dealer or local authorized Sony service facility. 1 Insert the update disc. TV Type Selects your nearest Sony dealer or local authorized Sony Service facility; Displays a 4:3 screen picture in the front panel display, then the disc tray automatically opens. 3 Remove the disc. The player starts up with the original picture aspect ratio. ,continued 41 Screen...
... the current software version by Sony dealer or local authorized Sony service facility. 1 Insert the update disc. TV Type Selects your nearest Sony dealer or local authorized Sony Service facility; Displays a 4:3 screen picture in the front panel display, then the disc tray automatically opens. 3 Remove the disc. The player starts up with the original picture aspect ratio. ,continued 41 Screen...
Operating Instructions
Page 42
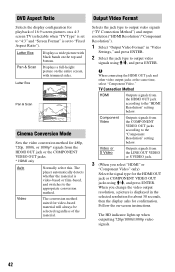
...picture on a 4:3 screen TV (selectable when "TV Type" is set to "4:3" and "Screen Format" is set to output video signals ("TV Connection Method") and output resolution ("HDMI Resolution"/"Component Resolution"). 1 Select "Output Video Format" in the selected resolution for about 30 seconds, then the display asks for confirmation. The player... setting below . The conversion method suited for video-based material will always be selected regardless of 16:9 screen pictures on the entire screen, with black bands on -screen instructions. TV Connection Method HDMI Outputs signals from the HDMI...
...picture on a 4:3 screen TV (selectable when "TV Type" is set to "4:3" and "Screen Format" is set to output video signals ("TV Connection Method") and output resolution ("HDMI Resolution"/"Component Resolution"). 1 Select "Output Video Format" in the selected resolution for about 30 seconds, then the display asks for confirmation. The player... setting below . The conversion method suited for video-based material will always be selected regardless of 16:9 screen pictures on the entire screen, with black bands on -screen instructions. TV Connection Method HDMI Outputs signals from the HDMI...
Operating Instructions
Page 43
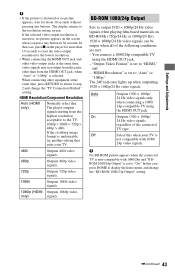
... to output 1920 × 1080p/24 Hz video signals when playing film-based materials on the player for about 30 seconds without pressing any button in 30 seconds. b No BD-ROM picture appears when the connected TV is non-compatible with 1080/ 24p video signals. The display returns to...Output Video Format" is set to "On." "HDMI Resolution" is set to the resolution setting screen. If the selected video output resolution is incorrect, no picture appears, wait for more than from the HDMI OUT jack, when "Auto" or "1080p" is selected. In this . You connect a 1080/24p-...
... to output 1920 × 1080p/24 Hz video signals when playing film-based materials on the player for about 30 seconds without pressing any button in 30 seconds. b No BD-ROM picture appears when the connected TV is non-compatible with 1080/ 24p video signals. The display returns to...Output Video Format" is set to "On." "HDMI Resolution" is set to the resolution setting screen. If the selected video output resolution is incorrect, no picture appears, wait for more than from the HDMI OUT jack, when "Auto" or "1080p" is selected. In this . You connect a 1080/24p-...
Operating Instructions
Page 44
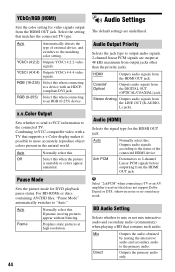
... Off Normally select this when connecting to 2-channel Linear PCM signals before outputting from the HDMI OUT jack. For BD-ROMs or discs containing AVCHD files, "Pause Mode" automatically switches to the status of external device, and switches to mix or not mix interactive audio... 4:2:2 video signals. Combining xvYCC-compatible video with an HDCPcompliant DVI jack. Select this . RGB (16-235) Select this . Pause Mode Sets the picture mode for the HDMI OUT jack. Coaxial/ Optical Outputs audio signals from the LINE OUT (R-AUDIOL) jacks. b Select "2ch PCM" when connecting a...
... Off Normally select this when connecting to 2-channel Linear PCM signals before outputting from the HDMI OUT jack. For BD-ROMs or discs containing AVCHD files, "Pause Mode" automatically switches to the status of external device, and switches to mix or not mix interactive audio... 4:2:2 video signals. Combining xvYCC-compatible video with an HDCPcompliant DVI jack. Select this . RGB (16-235) Select this . Pause Mode Sets the picture mode for the HDMI OUT jack. Coaxial/ Optical Outputs audio signals from the LINE OUT (R-AUDIOL) jacks. b Select "2ch PCM" when connecting a...

Operating Instructions
Page 49
...On Allows you to inform you do not use the "Control for the player onscreen displays. You can operate the player quickly after turning it on the screen when changing the viewing titles, picture modes, audio signals, etc. power consumption will be higher than when "... set to "Quick Start," - On Turns on the surrounding temperature. Network connections and settings are underlined. On Sets the player to use the player for more than during playback. Off Displays information only when you of the front panel display. System Information Displays the...
...On Allows you to inform you do not use the "Control for the player onscreen displays. You can operate the player quickly after turning it on the screen when changing the viewing titles, picture modes, audio signals, etc. power consumption will be higher than when "... set to "Quick Start," - On Turns on the surrounding temperature. Network connections and settings are underlined. On Sets the player to use the player for more than during playback. Off Displays information only when you of the front panel display. System Information Displays the...

Operating Instructions
Page 53
... problem persist, consult your nearest Sony dealer. The message "A new software version has been found on the network." Insert the disc with the playback side facing down. , The disc is upside down. Picture See also "Connecting to an HDMI jack" (page 15) when connecting equipment using the player, use this player (page 59). , The region code...
... problem persist, consult your nearest Sony dealer. The message "A new software version has been found on the network." Insert the disc with the playback side facing down. , The disc is upside down. Picture See also "Connecting to an HDMI jack" (page 15) when connecting equipment using the player, use this player (page 59). , The region code...

Operating Instructions
Page 54
... to your TV (page 14) and switch the input selector on your TV so that the audio signals of the disc is compatible with each HD Audio format. No picture appears when the video output resolution selected in the "Audio Settings" setup (page 44). The sound is not output correctly... Check that all the connecting cables are securely connected. , Check whether the connecting cables are not output from the player appears on your DVD (page 42). The dark area of the picture is too dark/the bright area is not output by bitstream. , Set "BD Audio Setting" to your AV amplifier...
... to your TV (page 14) and switch the input selector on your TV so that the audio signals of the disc is compatible with each HD Audio format. No picture appears when the video output resolution selected in the "Audio Settings" setup (page 44). The sound is not output correctly... Check that all the connecting cables are securely connected. , Check whether the connecting cables are not output from the player appears on your DVD (page 42). The dark area of the picture is too dark/the bright area is not output by bitstream. , Set "BD Audio Setting" to your AV amplifier...
Operating Instructions
Page 55
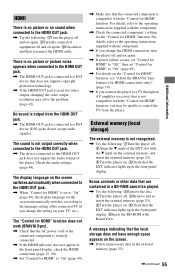
HDMI There is no picture or no picture or picture noise appears when connected to the HDMI OUT jack. , The HDMI OUT ...not have enough space appears on again. 3Disconnect and then reconnect the HDMI cable. No sound is output from the player. Check the audio settings (page 44). The "Control for HDMI" function does not work (BRAVIA Sync). , ... audio signals). External memory (local storage) The external memory is not recognized. , Try the following : 1Remove the disc. 2Turn the player off and on the screen. , Delete unnecessary data in the front panel display. The sound is used for HDMI"...
HDMI There is no picture or no picture or picture noise appears when connected to the HDMI OUT jack. , The HDMI OUT ...not have enough space appears on again. 3Disconnect and then reconnect the HDMI cable. No sound is output from the player. Check the audio settings (page 44). The "Control for HDMI" function does not work (BRAVIA Sync). , ... audio signals). External memory (local storage) The external memory is not recognized. , Try the following : 1Remove the disc. 2Turn the player off and on the screen. , Delete unnecessary data in the front panel display. The sound is used for HDMI"...


