
Operating Instructions
Page 1
3-198-141-11 (1) Video Projector Operating Instructions VPL-AW15 VPL-AW10 © 2007 Sony Corporation
3-198-141-11 (1) Video Projector Operating Instructions VPL-AW15 VPL-AW10 © 2007 Sony Corporation
Operating Instructions
Page 5
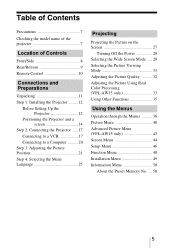
...Side 8 Rear/Bottom 9 Remote Control 10 Connections and Preparations Unpacking 11 Step 1: Installing the Projector .........12 Before Setting Up the Projector 12 Positioning the Projector and a screen 14 Step 2: Connecting the Projector .....17 Connecting to a VCR 17 Connecting to a Computer ..........20 Step 3: Adjusting the Picture...Picture Viewing Mode 31 Adjusting the Picture Quality .......... 32 Adjusting the Picture Using Real Color Processing (VPL-AW15 only 33 Using Other Functions 35 Using the Menus Operation through the Menus .......... 36 Picture Menu 40 Advanced Picture ...
...Side 8 Rear/Bottom 9 Remote Control 10 Connections and Preparations Unpacking 11 Step 1: Installing the Projector .........12 Before Setting Up the Projector 12 Positioning the Projector and a screen 14 Step 2: Connecting the Projector .....17 Connecting to a VCR 17 Connecting to a Computer ..........20 Step 3: Adjusting the Picture...Picture Viewing Mode 31 Adjusting the Picture Quality .......... 32 Adjusting the Picture Using Real Color Processing (VPL-AW15 only 33 Using Other Functions 35 Using the Menus Operation through the Menus .......... 36 Picture Menu 40 Advanced Picture ...
Operating Instructions
Page 7
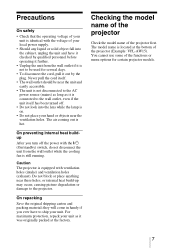
... the unit and have to the wall outlet, even if the unit itself . • The wall outlet should be used for certain projector models. 7 You cannot use some of the projector first. On preventing internal heat buildup After you ever have it checked by the plug. Checking the model name of the.... • The unit is not disconnected to the AC power source (mains) as long as it was originally packed at the bottom of the projector (Example: VPL-AW15). Do not block or place anything near these holes, or internal heat build-up may occur, causing picture degradation or damage to be near...
... the unit and have to the wall outlet, even if the unit itself . • The wall outlet should be used for certain projector models. 7 You cannot use some of the projector first. On preventing internal heat buildup After you ever have it checked by the plug. Checking the model name of the.... • The unit is not disconnected to the AC power source (mains) as long as it was originally packed at the bottom of the projector (Example: VPL-AW15). Do not block or place anything near these holes, or internal heat build-up may occur, causing picture degradation or damage to be near...
Operating Instructions
Page 8
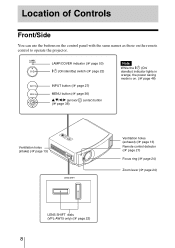
... holes (intake) (1 page 13) Ventilation holes (exhaust) (1 page 13) Remote control detector (1 page 21) Focus ring (1 page 24) Zoom lever (1 page 24) LENS SHIFT dials (VPL-AW15 only) (1 page 22) 8 LAMP/COVER indicator (1 page 53) ?/1 (On/standby) switch (1 page 22) INPUT button (1 page 27) MENU button (1 page 36) v/V/b/B (arrow)/ (enter) button...
... holes (intake) (1 page 13) Ventilation holes (exhaust) (1 page 13) Remote control detector (1 page 21) Focus ring (1 page 24) Zoom lever (1 page 24) LENS SHIFT dials (VPL-AW15 only) (1 page 22) 8 LAMP/COVER indicator (1 page 53) ?/1 (On/standby) switch (1 page 22) INPUT button (1 page 27) MENU button (1 page 36) v/V/b/B (arrow)/ (enter) button...
Operating Instructions
Page 14
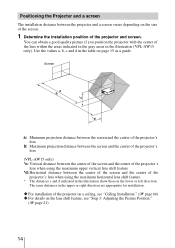
.... 1 Determine the installation position of the projector and screen. Screen a: Minimum projection distance between the screen and the center of the projector's lens b: Maximum projection distance between the screen and the center of the projector's lens (VPL-AW15 only) *c: Vertical distance between the ...installation of the lens within the areas indicated in the gray areas in the illustration (VPL-AW15 only). You can obtain a good quality picture if you position the projector with the center of the projector on a ceiling, see "Ceiling Installation." (1 page 66) ‹ For details ...
.... 1 Determine the installation position of the projector and screen. Screen a: Minimum projection distance between the screen and the center of the projector's lens b: Maximum projection distance between the screen and the center of the projector's lens (VPL-AW15 only) *c: Vertical distance between the ...installation of the lens within the areas indicated in the gray areas in the illustration (VPL-AW15 only). You can obtain a good quality picture if you position the projector with the center of the projector on a ceiling, see "Ceiling Installation." (1 page 66) ‹ For details ...
Operating Instructions
Page 21
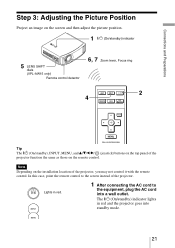
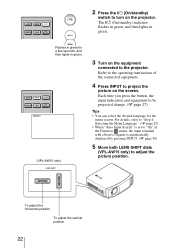
... wall outlet. The ?/1 (On/standby) indicator lights in red. 1 After connecting the AC cord to the screen instead of the projector, you may not control it with the remote control. Connections and Preparations Step 3: Adjusting the Picture Position Project an image on the ...screen and then adjust the picture position. 1 ?/1 (On/standby) indicator 5 LENS SHIFT dials (VPL-AW15 only) Remote control detector 6, 7 Zoom lever, Focus ring 2 4 Tip The ?/1 (On/standby), INPUT, MENU, and v/V/b/B/ (joystick) buttons on the top...
... wall outlet. The ?/1 (On/standby) indicator lights in red. 1 After connecting the AC cord to the screen instead of the projector, you may not control it with the remote control. Connections and Preparations Step 3: Adjusting the Picture Position Project an image on the ...screen and then adjust the picture position. 1 ?/1 (On/standby) indicator 5 LENS SHIFT dials (VPL-AW15 only) Remote control detector 6, 7 Zoom lever, Focus ring 2 4 Tip The ?/1 (On/standby), INPUT, MENU, and v/V/b/B/ (joystick) buttons on the top...
Operating Instructions
Page 22
To adjust the horizontal position To adjust the vertical position 22 Flashes in green. (VPL-AW15 only) 3 Turn on the equipment connected to the projector. For details, refer to "Step 4: Selecting the Menu Language". (1 page 25) • When "Auto Input Search" is automatically ...displayed by pressing INPUT. (1 page 48) 5 Move both LENS SHIFT dials (VPL-AW15 only) to adjust the picture position. ...
To adjust the horizontal position To adjust the vertical position 22 Flashes in green. (VPL-AW15 only) 3 Turn on the equipment connected to the projector. For details, refer to "Step 4: Selecting the Menu Language". (1 page 25) • When "Auto Input Search" is automatically ...displayed by pressing INPUT. (1 page 48) 5 Move both LENS SHIFT dials (VPL-AW15 only) to adjust the picture position. ...
Operating Instructions
Page 28
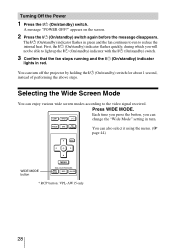
... Wide Screen Mode You can also select it using the menu. (1 page 44) WIDE MODE button * RCP button: VPL-AW15 only 28 You can change the "Wide Mode" setting in turn off the projector by holding the ?/1 (On/standby) switch for about 1 second, instead of performing the above steps. appears on the...
... Wide Screen Mode You can also select it using the menu. (1 page 44) WIDE MODE button * RCP button: VPL-AW15 only 28 You can change the "Wide Mode" setting in turn off the projector by holding the ?/1 (On/standby) switch for about 1 second, instead of performing the above steps. appears on the...
Operating Instructions
Page 31
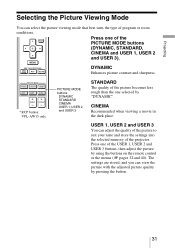
... the picture by pressing the button. 31 STANDARD The quality of the PICTURE MODE buttons (DYNAMIC, STANDARD, CINEMA and USER 1, USER 2 and USER 3). * RCP button: VPL-AW15 only PICTURE MODE buttons DYNAMIC STANDARD CINEMA USER 1, USER 2 and USER 3 DYNAMIC Enhances picture contrast and sharpness. Projecting Selecting the Picture Viewing Mode You...
... the picture by pressing the button. 31 STANDARD The quality of the PICTURE MODE buttons (DYNAMIC, STANDARD, CINEMA and USER 1, USER 2 and USER 3). * RCP button: VPL-AW15 only PICTURE MODE buttons DYNAMIC STANDARD CINEMA USER 1, USER 2 and USER 3 DYNAMIC Enhances picture contrast and sharpness. Projecting Selecting the Picture Viewing Mode You...
Operating Instructions
Page 50
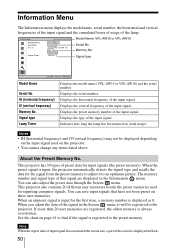
... of the signal in the Screen menu, it to the projector. Signal type Lamp Timer Displays the model name (VPL-AW15 or VPL-AW10) and the serial number. Displays the vertical frequency of the input signal. This projector has 39 types of the input signal. Note When the ... number. When an unpreset signal is input for inputting computer signals. Model Name: VPL-AW15 or VPL-AW10 Serial No. The memory number and signal type of the screen is displayed as 0. This projector also contains 20 different user memories beside the preset memories used on (total usage)....
... of the signal in the Screen menu, it to the projector. Signal type Lamp Timer Displays the model name (VPL-AW15 or VPL-AW10) and the serial number. Displays the vertical frequency of the input signal. This projector has 39 types of the input signal. Note When the ... number. When an unpreset signal is input for inputting computer signals. Model Name: VPL-AW15 or VPL-AW10 Serial No. The memory number and signal type of the screen is displayed as 0. This projector also contains 20 different user memories beside the preset memories used on (total usage)....
Operating Instructions
Page 60
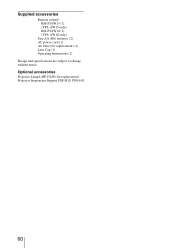
Supplied accessories Remote control RM-PJAW15 (1) (VPL-AW15 only) RM-PJAW10 (1) (VPL-AW10 only) Size AA (R6) batteries (2) AC power cord (1) Air filter (for replacement) Projector Suspension Support PSS-H10, PSS-610 60 Optional accessories Projector Lamp LMP-H160 (for replacement) (1) Lens Cap (1) Operating Instructions (1) Design and specifications are subject to change without notice.
Supplied accessories Remote control RM-PJAW15 (1) (VPL-AW15 only) RM-PJAW10 (1) (VPL-AW10 only) Size AA (R6) batteries (2) AC power cord (1) Air filter (for replacement) Projector Suspension Support PSS-H10, PSS-610 60 Optional accessories Projector Lamp LMP-H160 (for replacement) (1) Lens Cap (1) Operating Instructions (1) Design and specifications are subject to change without notice.
Operating Instructions
Page 66
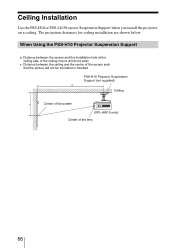
When Using the PSS-H10 Projector Suspension Support a: Distance between the screen and the installation hole at the ceiling side of the ceiling mount unit (front side) x: Distance between the ceiling and the center of the screen such that the picture will not be truncated or blocked PSS-H10 Projector Suspension Support (not supplied) Ceiling Center of the screen (VPL-AW15 only) Center of the lens 66 Ceiling Installation Use the PSS-H10 or PSS-610 Projector Suspension Support when you install the projector on a ceiling. The projection distances for ceiling installation are shown below.
When Using the PSS-H10 Projector Suspension Support a: Distance between the screen and the installation hole at the ceiling side of the ceiling mount unit (front side) x: Distance between the ceiling and the center of the screen such that the picture will not be truncated or blocked PSS-H10 Projector Suspension Support (not supplied) Ceiling Center of the screen (VPL-AW15 only) Center of the lens 66 Ceiling Installation Use the PSS-H10 or PSS-610 Projector Suspension Support when you install the projector on a ceiling. The projection distances for ceiling installation are shown below.
Operating Instructions
Page 70
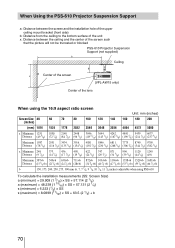
When Using the PSS-610 Projector Suspension Support a: Distance between the screen and the installation hole of the upper ceiling mount bracket (front side) b: Distance from the ceiling to the bottom ... between the ceiling and the center of the screen such that the picture will not be truncated or blocked PSS-610 Projector Suspension Support (not supplied) Ceiling Center of the screen (VPL-AW15 only) Center of the lens When using the 16:9 aspect ratio screen Unit: mm (inches) Screen Size 40 60...
When Using the PSS-610 Projector Suspension Support a: Distance between the screen and the installation hole of the upper ceiling mount bracket (front side) b: Distance from the ceiling to the bottom ... between the ceiling and the center of the screen such that the picture will not be truncated or blocked PSS-610 Projector Suspension Support (not supplied) Ceiling Center of the screen (VPL-AW15 only) Center of the lens When using the 16:9 aspect ratio screen Unit: mm (inches) Screen Size 40 60...


