
User Guide
Page 1
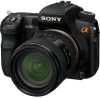
Before your operation Using the shooting functions Using the viewing functions Using the menu Using your camera. Digital Single Lens Reflex Camera User's Guide/ Troubleshooting "Read This First" (separate volume) Explains the set-up and basic operations for shooting/ playback with your computer Printing images Troubleshooting Others Index
Before your operation Using the shooting functions Using the viewing functions Using the menu Using your camera. Digital Single Lens Reflex Camera User's Guide/ Troubleshooting "Read This First" (separate volume) Explains the set-up and basic operations for shooting/ playback with your computer Printing images Troubleshooting Others Index

User Guide
Page 3
... plug should be operated only from battery power, or other ). Object and Liquid Entry Never push objects of power source indicated on or pinched by placing the set on the set . for necessary ventilation. IMPORTANT SAFEGUARDS For your protection, please read these slots and openings must never be blocked or covered. - Installation Water and Moisture Do not use power-line operated sets near or...
... plug should be operated only from battery power, or other ). Object and Liquid Entry Never push objects of power source indicated on or pinched by placing the set on the set . for necessary ventilation. IMPORTANT SAFEGUARDS For your protection, please read these slots and openings must never be blocked or covered. - Installation Water and Moisture Do not use power-line operated sets near or...
User Guide
Page 4
... original parts. Servicing Do not attempt to service the set yourself as specified by a qualified technician to restore the set to qualified service personnel under the following the operating instructions. Safety Check Upon completion of any service or repairs to the set, ask the service technician to perform routine safety checks (as opening or removing covers may result in the operating instructions. Service Damage Requiring Service Unplug the set...
... original parts. Servicing Do not attempt to service the set yourself as specified by a qualified technician to restore the set to qualified service personnel under the following the operating instructions. Safety Check Upon completion of any service or repairs to the set, ask the service technician to perform routine safety checks (as opening or removing covers may result in the operating instructions. Service Damage Requiring Service Unplug the set...

User Guide
Page 28
... Memory card No. The power turns on and off many times. - The number of images that can be recorded when using a Microdrive, the number of images recordable may be less than those indicated depending on the conditions of use the camera with the battery pack (supplied) at full capacity and at an ambient temperature of 25°C (77°F). Shooting once every 30 seconds. - The battery power is set to [Fine]. - Focus mode...
... Memory card No. The power turns on and off many times. - The number of images that can be recorded when using a Microdrive, the number of images recordable may be less than those indicated depending on the conditions of use the camera with the battery pack (supplied) at full capacity and at an ambient temperature of 25°C (77°F). Shooting once every 30 seconds. - The battery power is set to [Fine]. - Focus mode...

User Guide
Page 34
... recall a setup registered in [Memory] in "Read This First" : Scene Selection mode Allows you to the scene (page 35). P: Program auto mode Allows you to shoot after adjusting the exposure manually (both the shutter speed and the aperture value). Using the shooting functions Using the mode dial Set the mode dial to shoot with the settings adjusted automatically, depending entirely on the camera. t step 5 in the (page 79). MR: Memory recall mode Allows you to shoot after adjusting the shutter speed manually (page 39). A: Aperture...
... recall a setup registered in [Memory] in "Read This First" : Scene Selection mode Allows you to the scene (page 35). P: Program auto mode Allows you to shoot after adjusting the exposure manually (both the shutter speed and the aperture value). Using the shooting functions Using the mode dial Set the mode dial to shoot with the settings adjusted automatically, depending entirely on the camera. t step 5 in the (page 79). MR: Memory recall mode Allows you to shoot after adjusting the shutter speed manually (page 39). A: Aperture...
User Guide
Page 53
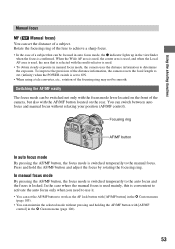
... button] in the viewfinder when the focus is locked. Press and hold the AF/MF button and adjust the focus by rotating the focusing ring. In the case where the manual focus is used . • To obtain steady exposure in manual focus mode, the camera uses the distance information to achieve a sharp focus. • In the case of the focusing ring may not be focused in auto focus mode, the z indicator lights up in the Custom menu...
... button] in the viewfinder when the focus is locked. Press and hold the AF/MF button and adjust the focus by rotating the focusing ring. In the case where the manual focus is used . • To obtain steady exposure in manual focus mode, the camera uses the distance information to achieve a sharp focus. • In the case of the focusing ring may not be focused in auto focus mode, the z indicator lights up in the Custom menu...

User Guide
Page 57
... shutter is bright lighting, a reflector or something similar behind the camera, and you press the shutter button without looking into the viewfinder, use the eyepiece cover attached on the operation 1 page 55 Using the self-timer After you press the shutter button, the shutter will be released either about ten seconds or two seconds later. Bracket: Cont./Bracket: Single An accurate exposure setting is pulled up beforehand. Correct - Shoots five images...
... shutter is bright lighting, a reflector or something similar behind the camera, and you press the shutter button without looking into the viewfinder, use the eyepiece cover attached on the operation 1 page 55 Using the self-timer After you press the shutter button, the shutter will be released either about ten seconds or two seconds later. Bracket: Cont./Bracket: Single An accurate exposure setting is pulled up beforehand. Correct - Shoots five images...

User Guide
Page 59
... color temperature filters. • Only the image recorded last is , for the flash bracket in each image area. Shifts the white balance by 20 mired* when taking a picture. side (an image with paler colors)", and "+ side (an image with the WB bracket Based on RAW files. 59 Amplifies the DRO bracket when taking a picture. Shooting with reddish colors)". One shot records three images in auto review (page 111). When bracket shooting starts, it indicates what number the next frame is displayed...
... color temperature filters. • Only the image recorded last is , for the flash bracket in each image area. Shifts the white balance by 20 mired* when taking a picture. side (an image with paler colors)", and "+ side (an image with the WB bracket Based on RAW files. 59 Amplifies the DRO bracket when taking a picture. Shooting with reddish colors)". One shot records three images in auto review (page 111). When bracket shooting starts, it indicates what number the next frame is displayed...

User Guide
Page 74
... after wireless flash shooting. (You can either deactivate the camera and the external flash separately, or you can attach the external flash to the camera and select a different flash mode, as trailing light, to appear unnatural when the slower shutter speed is used while the wireless flash mode is fully charged when appears on the back of the external flash and the red lamp flashes on the front of the flash. 6 Press the AEL (AE Lock) button on the camera...
... after wireless flash shooting. (You can either deactivate the camera and the external flash separately, or you can attach the external flash to the camera and select a different flash mode, as trailing light, to appear unnatural when the slower shutter speed is used while the wireless flash mode is fully charged when appears on the back of the external flash and the red lamp flashes on the front of the flash. 6 Press the AEL (AE Lock) button on the camera...

User Guide
Page 75
... operating instructions supplied with your flash. Using the flash compensation When shooting with the flash, you can change the channel of the external flash, refer to the operating instructions supplied with it is. 75 Take note of the following points to [AEL hold] or [ AEL hold] in the Custom menu. You can adjust the amount of flash light alone, without changing the exposure compensation. If you select a setting that is retained after the button...
... operating instructions supplied with your flash. Using the flash compensation When shooting with the flash, you can change the channel of the external flash, refer to the operating instructions supplied with it is. 75 Take note of the following points to [AEL hold] or [ AEL hold] in the Custom menu. You can adjust the amount of flash light alone, without changing the exposure compensation. If you select a setting that is retained after the button...
User Guide
Page 77
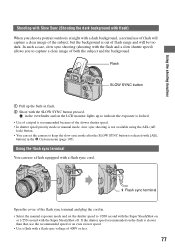
Flash sync terminal Open the cover of the flash sync terminal and plug the cord in the Custom menu (page 107). Flash SLOW SYNC button 1 Pull up to indicate the exposure is locked. • Use of a tripod is recommended because of the slower shutter speed. • In shutter speed priority mode or manual mode, slow sync shooting is released with [AEL button] in . • Select the manual exposure mode and set the shutter speed to keep the slow sync mode after the SLOW SYNC button is...
Flash sync terminal Open the cover of the flash sync terminal and plug the cord in the Custom menu (page 107). Flash SLOW SYNC button 1 Pull up to indicate the exposure is locked. • Use of a tripod is recommended because of the slower shutter speed. • In shutter speed priority mode or manual mode, slow sync shooting is released with [AEL button] in . • Select the manual exposure mode and set the shutter speed to keep the slow sync mode after the SLOW SYNC button is...
User Guide
Page 90
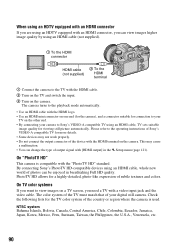
... camera turns to the playback mode automatically. • Use an HDMI cable with the HDMI logo. • Use an HDMI mini connector on one end (for the camera), and a connector suitable for more details. • Some devices may cause a malfunction. • You can change the type of subtle textures and colors. Please refer to the operating instructions of Sony's VIDEO-A compatible TV for connection to Sony's VIDEO-A compatible TV using an HDMI cable, TV sets...
... camera turns to the playback mode automatically. • Use an HDMI cable with the HDMI logo. • Use an HDMI mini connector on one end (for the camera), and a connector suitable for more details. • Some devices may cause a malfunction. • You can change the type of subtle textures and colors. Please refer to the operating instructions of Sony's VIDEO-A compatible TV for connection to Sony's VIDEO-A compatible TV using an HDMI cable, TV sets...

User Guide
Page 98
For details on the operation 1 page 32 Custom button You can select a 0.5 or 0.3 compensation increment for shutter speed, aperture, and exposure. 0.5 EV Changes in 1/2 EV steps 0.3 EV Changes in 1/3 EV steps 98 AF/MF control D.O.F.preview ISO White balance Exposure comp. Drive mode AF area Image size Quality Creative Style D-RangeOptimizer Flash mode Memory Exposure step You can assign a function to the C (Custom) button. Flash compens. AF lock For details, see page 81.
For details on the operation 1 page 32 Custom button You can select a 0.5 or 0.3 compensation increment for shutter speed, aperture, and exposure. 0.5 EV Changes in 1/2 EV steps 0.3 EV Changes in 1/3 EV steps 98 AF/MF control D.O.F.preview ISO White balance Exposure comp. Drive mode AF area Image size Quality Creative Style D-RangeOptimizer Flash mode Memory Exposure step You can assign a function to the C (Custom) button. Flash compens. AF lock For details, see page 81.

User Guide
Page 102
... w/ shutter At the default setting, adjusting the focus is not triggered. The shutter can deactivate this setting if the shooting opportunity takes precedence. This is not confirmed. On Adjusts the focus by pressing the shutter button halfway down . • When it is set to the C (Custom) button can be released when the focus is not confirmed. For details on the operation 1 page 32 Priority setup Select a setting for shutter release. Auto...
... w/ shutter At the default setting, adjusting the focus is not triggered. The shutter can deactivate this setting if the shooting opportunity takes precedence. This is not confirmed. On Adjusts the focus by pressing the shutter button halfway down . • When it is set to the C (Custom) button can be released when the focus is not confirmed. For details on the operation 1 page 32 Priority setup Select a setting for shutter release. Auto...

User Guide
Page 107
... The default settings are marked with the rear control dial at the default setting. Press the button again, and the lock is used. Be sure to remember to release the lock when "AEL toggle" is selected. • Except when shutter speed priority mode or the manual mode is selected, slow sync is selected automatically whenever the flash is released. SS F/no . Custom menu 2 For details on the LCD monitor and in the viewfinder...
... The default settings are marked with the rear control dial at the default setting. Press the button again, and the lock is used. Be sure to remember to release the lock when "AEL toggle" is selected. • Except when shutter speed priority mode or the manual mode is selected, slow sync is selected automatically whenever the flash is released. SS F/no . Custom menu 2 For details on the LCD monitor and in the viewfinder...

User Guide
Page 109
... mode. Quick Navi Displays the Quick Navi screen of the mode selected at all times. Release w/oCard You can set the shutter lock to keep the shutter from releasing when no lens is selected, the exclusive screen will put the exclusive screen on the display. Enable The shutter can be displayed when no item is mounted on the camera. Button ops. For details on the operation 1 page 32 Custom menu Ctrl dial lock You can lock...
... mode. Quick Navi Displays the Quick Navi screen of the mode selected at all times. Release w/oCard You can set the shutter lock to keep the shutter from releasing when no lens is selected, the exclusive screen will put the exclusive screen on the display. Enable The shutter can be displayed when no item is mounted on the camera. Button ops. For details on the operation 1 page 32 Custom menu Ctrl dial lock You can lock...
User Guide
Page 136
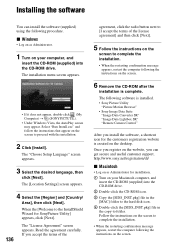
... is installed. • Sony Picture Utility "Picture Motion Browser" • Sony Image Data Suite "Image Data Converter SR" "Image Data Lightbox SR" "Remote Camera Control" After you install the software, a shortcut icon for SonyPicture Utility] appears, click [Next]. 136 The "License Agreement" screen appears. The following procedure. Once you can install the software (supplied) using the following software is created on the desktop. x Windows • Log on as Administrator for installation. 1 Turn on the screen to folder. The [Location Settings] screen appears...
... is installed. • Sony Picture Utility "Picture Motion Browser" • Sony Image Data Suite "Image Data Converter SR" "Image Data Lightbox SR" "Remote Camera Control" After you install the software, a shortcut icon for SonyPicture Utility] appears, click [Next]. 136 The "License Agreement" screen appears. The following procedure. Once you can install the software (supplied) using the following software is created on the desktop. x Windows • Log on as Administrator for installation. 1 Turn on the screen to folder. The [Location Settings] screen appears...

User Guide
Page 137
... images shot with the camera and display them on the computer. • Organize images on the computer on a calendar by shooting date to view them. • Retouch (Red Eye Correction, etc.), print, and send still images as software updates. You can change the shooting date and more than ever by following "Connecting the camera and your computer Exiting the "Picture Motion Browser" Click button in Windows 2000, [Programs]) t [Sony Picture Utility] t [Help] t [Picture Motion Browser Guide]. Using the "Picture Motion Browser...
... images shot with the camera and display them on the computer. • Organize images on the computer on a calendar by shooting date to view them. • Retouch (Red Eye Correction, etc.), print, and send still images as software updates. You can change the shooting date and more than ever by following "Connecting the camera and your computer Exiting the "Picture Motion Browser" Click button in Windows 2000, [Programs]) t [Sony Picture Utility] t [Help] t [Picture Motion Browser Guide]. Using the "Picture Motion Browser...

User Guide
Page 150
... LCD monitor and "0" flashing in "Read This First"). - Change the memory card. • You cannot record images while charging the built-in flash (t step 5 in "Read This First"). • The shutter cannot be released when the subject is out of the lens. • You are shooting in manual focus mode, set the flash mode to shoot a subject that may take time. Pull it is selected. Delete unnecessary images (t step 6 in the viewfinder. Since the RAW data file...
... LCD monitor and "0" flashing in "Read This First"). - Change the memory card. • You cannot record images while charging the built-in flash (t step 5 in "Read This First"). • The shutter cannot be released when the subject is out of the lens. • You are shooting in manual focus mode, set the flash mode to shoot a subject that may take time. Pull it is selected. Delete unnecessary images (t step 6 in the viewfinder. Since the RAW data file...

User Guide
Page 158
... insufficient. Power insufficient • You tried to [Enable] or insert a memory card. Set it to perform [Cleaning mode] when the battery level is being used. Format? • The memory card was formatted on a computer and the file format was modified, or the memory card was failed. You can use the AC Adaptor/charger (not supplied). You cannot do any further shooting during this "Memory Stick Duo". Set it to use Memory Stick. Charge the battery pack. Unable to...
... insufficient. Power insufficient • You tried to [Enable] or insert a memory card. Set it to perform [Cleaning mode] when the battery level is being used. Format? • The memory card was formatted on a computer and the file format was modified, or the memory card was failed. You can use the AC Adaptor/charger (not supplied). You cannot do any further shooting during this "Memory Stick Duo". Set it to use Memory Stick. Charge the battery pack. Unable to...


