User Guide
Page 1
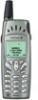
...Menus 19 Moving through the Menus ........ 19 Instructions 19 Display Text 20 Help Texts 21 Menu Language 21 My Shortcuts 21 Personalizing Your Phone 23 Sounds 23 Pictures 27 Display 28 Time and Date 30 Master Reset 31 Entering Letters 32 Input Languages 32 Multitap Text Input 32... T9® Text Input 34 Phone Book 36 Saving Contacts 36 Calling a Contact 37 Editing the Phone Book 38 Copy to and from the SIM Card . 39 Business Cards 40 Groups 41 Touch Tone Services...
...Menus 19 Moving through the Menus ........ 19 Instructions 19 Display Text 20 Help Texts 21 Menu Language 21 My Shortcuts 21 Personalizing Your Phone 23 Sounds 23 Pictures 27 Display 28 Time and Date 30 Master Reset 31 Entering Letters 32 Input Languages 32 Multitap Text Input 32... T9® Text Input 34 Phone Book 36 Saving Contacts 36 Calling a Contact 37 Editing the Phone Book 38 Copy to and from the SIM Card . 39 Business Cards 40 Groups 41 Touch Tone Services...

User Guide
Page 2
... 102 Minute Minder 102 Networks 103 Searching for Networks 103 Preferred Networks 104 Search Modes 105 Security 106 Locking the SIM Card 106 Locking the Phone 107 Locking the Keypad 107 Restricting Calls 108 Fixed Dialling 109 Closed User Groups 109 Accepting Calls 110 Code Memo 111 Checkword and Security ...........111...
... 102 Minute Minder 102 Networks 103 Searching for Networks 103 Preferred Networks 104 Search Modes 105 Security 106 Locking the SIM Card 106 Locking the Phone 107 Locking the Keypad 107 Restricting Calls 108 Fixed Dialling 109 Closed User Groups 109 Accepting Calls 110 Code Memo 111 Checkword and Security ...........111...
User Guide
Page 4
...GB; Improvements and changes to this User's Guide necessitated by typographical errors, inaccuracies of this User's Guide are not supported by Ericsson under one or more of the following: U.S. T9 is licensed under license. Euro. T9 is a registered trademark of Singapore... Such services are in the left margin. The BLUETOOTH trademarks are pending worldwide. 4 Please contact your mobile phone. United Kingdom Pat. EricssonNoMtofboilreCCoommmmerucniiaclatUisoens AB Ericsson R520 Third edition (April 2001) This User's Guide is published by Bluetooth SIG Inc., U.S.A. Such changes...
...GB; Improvements and changes to this User's Guide necessitated by typographical errors, inaccuracies of this User's Guide are not supported by Ericsson under one or more of the following: U.S. T9 is licensed under license. Euro. T9 is a registered trademark of Singapore... Such services are in the left margin. The BLUETOOTH trademarks are pending worldwide. 4 Please contact your mobile phone. United Kingdom Pat. EricssonNoMtofboilreCCoommmmerucniiaclatUisoens AB Ericsson R520 Third edition (April 2001) This User's Guide is published by Bluetooth SIG Inc., U.S.A. Such changes...
User Guide
Page 5
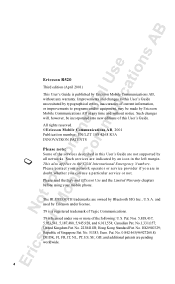
...handsfree alternative. ideal when using the Magic word. For example, you write text messages quickly which is a Triple Band mobile phone operating on GSM 900/1800/1900 networks. The Speakerphone is further enhanced by its High Speed Data functionality. R520 supports GPRS... Input lets you can be enhanced with other Bluetooth devices such as a headset, PC, PDA or printer. Contacts in the phone book lets you connect with both music and pictures. EricssonNoMtofboilreCCoommmmerucniiaclatUisoens AB R520 R520 is designed to use. Advanced wireless connectivity is guaranteed...
...handsfree alternative. ideal when using the Magic word. For example, you write text messages quickly which is a Triple Band mobile phone operating on GSM 900/1800/1900 networks. The Speakerphone is further enhanced by its High Speed Data functionality. R520 supports GPRS... Input lets you can be enhanced with other Bluetooth devices such as a headset, PC, PDA or printer. Contacts in the phone book lets you connect with both music and pictures. EricssonNoMtofboilreCCoommmmerucniiaclatUisoens AB R520 R520 is designed to use. Advanced wireless connectivity is guaranteed...
User Guide
Page 6
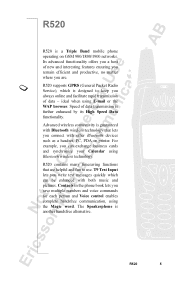
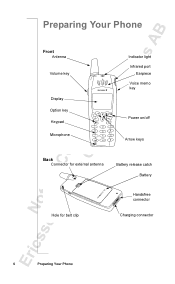
EricssonNoMtofboilreCCoommmmerucniiaclatUisoens AB Preparing Your Phone Front Antenna Volume key Display Option key Keypad Microphone Indicator light Infrared port Earpiece Voice memo key Power on/off Arrow keys Back Connector for external antenna Battery release catch Battery Hole for belt clip Handsfree connector Charging connector 6 Preparing Your Phone
EricssonNoMtofboilreCCoommmmerucniiaclatUisoens AB Preparing Your Phone Front Antenna Volume key Display Option key Keypad Microphone Indicator light Infrared port Earpiece Voice memo key Power on/off Arrow keys Back Connector for external antenna Battery release catch Battery Hole for belt clip Handsfree connector Charging connector 6 Preparing Your Phone
User Guide
Page 7
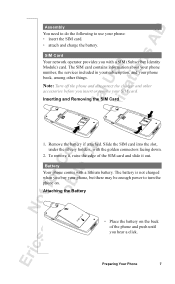
..., with a SIM (Subscriber Identity Module) card. Preparing Your Phone 7 SIM Card Your network operator provides you with the golden connectors facing down. 2. Remove the battery if attached. Battery Your phone comes with a lithium battery. EricssonNoMtofboilreCCoommmmerucniiaclatUisoens AB Assembly You need to... and other things. Inserting and Removing the SIM Card 1. The SIM card contains information about your phone number, the services included in your subscription, and your phone: • insert the SIM card. • attach and charge the battery. Attaching the Battery ...
..., with a SIM (Subscriber Identity Module) card. Preparing Your Phone 7 SIM Card Your network operator provides you with the golden connectors facing down. 2. Remove the battery if attached. Battery Your phone comes with a lithium battery. EricssonNoMtofboilreCCoommmmerucniiaclatUisoens AB Assembly You need to... and other things. Inserting and Removing the SIM Card 1. The SIM card contains information about your phone number, the services included in your subscription, and your phone: • insert the SIM card. • attach and charge the battery. Attaching the Battery ...
User Guide
Page 8
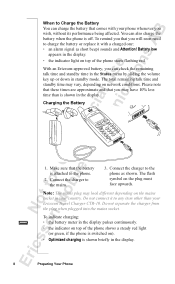
... ). • Optimized charging is off. To indicate charging: • the battery meter in the display. 8 Preparing Your Phone With an Ericsson-approved battery, you wish, without its performance being affected. Connect the charger to the phone as shown. Do not separate the charger from the plug when plugged into the mains socket. The...
... ). • Optimized charging is off. To indicate charging: • the battery meter in the display. 8 Preparing Your Phone With an Ericsson-approved battery, you wish, without its performance being affected. Connect the charger to the phone as shown. Do not separate the charger from the plug when plugged into the mains socket. The...
User Guide
Page 9
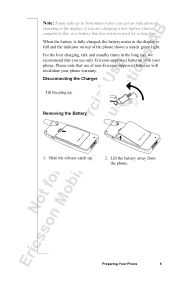
... the display is completely flat, or a battery that use only Ericsson-approved batteries with your phone warranty. Disconnecting the Charger Tilt the plug up . 2. Please note that has not been used for a long time. Preparing Your Phone 9 For the best charging, talk and standby times in the ... recommend that you are charging a new battery that is full and the indicator on top of the phone shows a steady green light. Lift the battery away from the phone. EricssonNoMtofboilreCCoommmmerucniiaclatUisoens AB Note: It may take up to 30 minutes before you get an indication of charging ...
... the display is completely flat, or a battery that use only Ericsson-approved batteries with your phone warranty. Disconnecting the Charger Tilt the plug up . 2. Please note that has not been used for a long time. Preparing Your Phone 9 For the best charging, talk and standby times in the ... recommend that you are charging a new battery that is full and the indicator on top of the phone shows a steady green light. Lift the battery away from the phone. EricssonNoMtofboilreCCoommmmerucniiaclatUisoens AB Note: It may take up to 30 minutes before you get an indication of charging ...
User Guide
Page 10
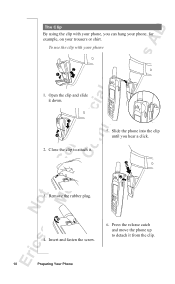
Close the clip to detach it from the clip. 10 Preparing Your Phone Open the clip and slide it . 5. Press the release catch and move the phone up to attach it down. 2. Remove the rubber plug. 4. Insert and fasten the screw. 6. Slide the phone into the clip until you can hang your phone, for example, on your phone 1. EricssonNoMtofboilreCCoommmmerucniiaclatUisoens AB The Clip By using the clip with your trousers or shirt. To use the clip with your phone, you hear a click. 3.
Close the clip to detach it from the clip. 10 Preparing Your Phone Open the clip and slide it . 5. Press the release catch and move the phone up to attach it down. 2. Remove the rubber plug. 4. Insert and fasten the screw. 6. Slide the phone into the clip until you can hang your phone, for example, on your phone 1. EricssonNoMtofboilreCCoommmmerucniiaclatUisoens AB The Clip By using the clip with your trousers or shirt. To use the clip with your phone, you hear a click. 3.
User Guide
Page 11
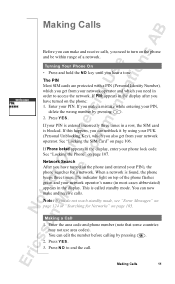
...cases abbreviated) appears in the display, enter your PIN. When a network is called standby mode. This is found, the phone beeps three times. Enter the area code and phone number (note that some countries may not use area codes). Press Y E S . Making Calls EricssonNoMtofboilreCCoommmmerucniiaclatUisoens AB Before you... a PIN (Personal Identity Number), which you get from your network operator and which you have turned on the phone and be within range of the phone flashes green and your PIN is blocked. If PIN: appears in a row, the SIM card is entered incorrectly...
...cases abbreviated) appears in the display, enter your PIN. When a network is called standby mode. This is found, the phone beeps three times. Enter the area code and phone number (note that some countries may not use area codes). Press Y E S . Making Calls EricssonNoMtofboilreCCoommmmerucniiaclatUisoens AB Before you... a PIN (Personal Identity Number), which you get from your network operator and which you have turned on the phone and be within range of the phone flashes green and your PIN is blocked. If PIN: appears in a row, the SIM card is entered incorrectly...
User Guide
Page 12
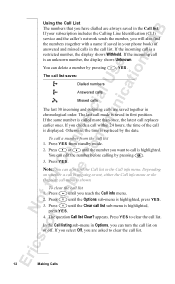
... incoming call is saved in the call a number from standby mode. 2. Note: You can also find the numbers (together with a name if saved in your phone book) of the call is shown.
... incoming call is saved in the call a number from standby mode. 2. Note: You can also find the numbers (together with a name if saved in your phone book) of the call is shown.
User Guide
Page 13
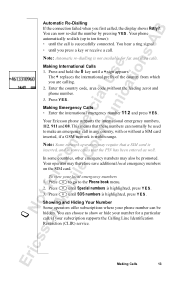
... (CLIR) service. Making Calls 13 Note: Automatic re-dialling is inserted, and in any country, with or without the leading zero) and phone number. 3. Press and hold the 0 key until the call . The + replaces the international prefix of the country from which you first called..., the display shows Retry?. Your Ericsson phone supports the international emergency numbers, 112, 911 and 08. Press until you press a key or receive a call is within range. You hear a...
... (CLIR) service. Making Calls 13 Note: Automatic re-dialling is inserted, and in any country, with or without the leading zero) and phone number. 3. Press and hold the 0 key until the call . The + replaces the international prefix of the country from which you first called..., the display shows Retry?. Your Ericsson phone supports the international emergency numbers, 112, 911 and 08. Press until you press a key or receive a call is within range. You hear a...
User Guide
Page 14
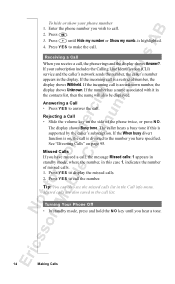
... info menu. If the number has a name associated with it in this is diverted to call . Press Y E S to answer the call the number. Turning Your Phone Off • In standby mode, press and hold the N O key until Hide my number or Show my numb. The caller hears a busy tone if this... case 1, indicates the number of the phone twice, or press N O . Missed calls are also saved in the call . Press . 3. Press Y E S to the number you have missed a call is supported by the caller...
... info menu. If the number has a name associated with it in this is diverted to call . Press Y E S to answer the call the number. Turning Your Phone Off • In standby mode, press and hold the N O key until Hide my number or Show my numb. The caller hears a busy tone if this... case 1, indicates the number of the phone twice, or press N O . Missed calls are also saved in the call . Press . 3. Press Y E S to the number you have missed a call is supported by the caller...
User Guide
Page 15
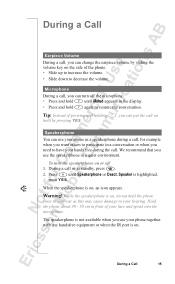
... During a Call Earpiece Volume During a call, you can change the earpiece volume by pressing YE S . , you can put the call on , do not hold the phone close to your ear as a speakerphone during the call. During a Call 15 To turn off 1. We recommend that you use your... not available when you use your hearing. During a call or in a quiet environment. Hold the phone about 30 - 50 cm in front of the phone. • Slide up to increase the volume. • Slide down to your phone as this may cause damage to decrease the volume. The speakerphone is on or off...
... During a Call Earpiece Volume During a call, you can change the earpiece volume by pressing YE S . , you can put the call on , do not hold the phone close to your ear as a speakerphone during the call. During a Call 15 To turn off 1. We recommend that you use your... not available when you use your hearing. During a call or in a quiet environment. Hold the phone about 30 - 50 cm in front of the phone. • Slide up to increase the volume. • Slide down to your phone as this may cause damage to decrease the volume. The speakerphone is on or off...
User Guide
Page 16
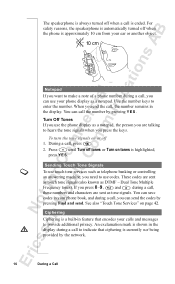
...always turned off when a call is approximately 10 cm from your ear or another object. During a call , you are talking to make a note of a phone number during a call , press . 2. Ciphering Ciphering is currently not being provided by pressing Y E S . You can send the codes by pressing Find ...and send. Use the number keys to indicate that encodes your phone display as telephone banking or controlling an answering machine, you can call , the number remains in the display during a call to enter the number...
...always turned off when a call is approximately 10 cm from your ear or another object. During a call , you are talking to make a note of a phone number during a call , press . 2. Ciphering Ciphering is currently not being provided by pressing Y E S . You can send the codes by pressing Find ...and send. Use the number keys to indicate that encodes your phone display as telephone banking or controlling an answering machine, you can call , the number remains in the display during a call to enter the number...
User Guide
Page 17
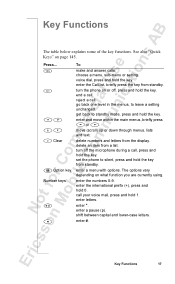
...the key. Key Functions 17 Clear Option key Number keys To make and answer calls. move within the main menus, briefly press or . turn the phone on or off the microphone during a call . Press... turn off , press and hold the key from a list. enter the numbers 0-9. enter ... functions. enter a menu with options. enter the Call list, briefly press the key from the display. delete an item from standby. set the phone to leave a setting unchanged. enter *. See also "Quick Keys" on what function you are currently using. reject a call your voice mail, ...
...the key. Key Functions 17 Clear Option key Number keys To make and answer calls. move within the main menus, briefly press or . turn the phone on or off the microphone during a call . Press... turn off , press and hold the key from a list. enter the numbers 0-9. enter ... functions. enter a menu with options. enter the Call list, briefly press the key from the display. delete an item from standby. set the phone to leave a setting unchanged. enter *. See also "Quick Keys" on what function you are currently using. reject a call your voice mail, ...
User Guide
Page 19
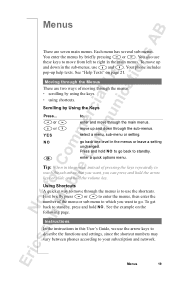
.... go back one level in the sub-menus, use the arrow keys to describe the functions and settings, since the shortcut numbers may vary between phones according to standby, press and hold NO . Instructions In the instructions in this User's Guide, we use and . You also use the shortcuts....of moving through the menus: • scrolling by briefly pressing or . Each menu has several sub-menus. To move through the sub-menus. Your phone includes pop-up and down in the menus or leave a setting unchanged. See "Help Texts" on the following page. Scrolling by Using the Keys ...
.... go back one level in the sub-menus, use the arrow keys to describe the functions and settings, since the shortcut numbers may vary between phones according to standby, press and hold NO . Instructions In the instructions in this User's Guide, we use and . You also use the shortcuts....of moving through the menus: • scrolling by briefly pressing or . Each menu has several sub-menus. To move through the sub-menus. Your phone includes pop-up and down in the menus or leave a setting unchanged. See "Help Texts" on the following page. Scrolling by Using the Keys ...
User Guide
Page 21
..., Y E S , Menus, Y E S . 2. Select or clear a setting from standby to it in this is not the case, the pre-set the menu language to save your phone, the menu My shortcuts contains a few settings which you can place them there by scrolling to reach the shortcut saved in the first position in.... To turn the help , Y E S . 2. Menu Language Most modern SIM cards automatically set language is English. EricssonNoMtofboilreCCoommmmerucniiaclatUisoens AB Help Texts Your phone includes pop-up help texts that you wish. If this menu. Press Y E S to the language of Edit shortcuts.
..., Y E S , Menus, Y E S . 2. Select or clear a setting from standby to it in this is not the case, the pre-set the menu language to save your phone, the menu My shortcuts contains a few settings which you can place them there by scrolling to reach the shortcut saved in the first position in.... To turn the help , Y E S . 2. Menu Language Most modern SIM cards automatically set language is English. EricssonNoMtofboilreCCoommmmerucniiaclatUisoens AB Help Texts Your phone includes pop-up help texts that you wish. If this menu. Press Y E S to the language of Edit shortcuts.
User Guide
Page 22
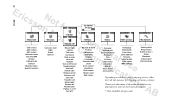
... part* Release all* Release part* Parties in conf* Call info* Sounds & alerts Profiles Call options Networks Display Language Time and date Locks Voice control Handsfree Phone name Master reset Data comm. 22 Ericss Not NETWORK o f 04:22pm Menus n MoboirleComm Callcontact C e Add contact o r Edit contact c Business cards m i Call from SIM a Groups m l Calling...
... part* Release all* Release part* Parties in conf* Call info* Sounds & alerts Profiles Call options Networks Display Language Time and date Locks Voice control Handsfree Phone name Master reset Data comm. 22 Ericss Not NETWORK o f 04:22pm Menus n MoboirleComm Callcontact C e Add contact o r Edit contact c Business cards m i Call from SIM a Groups m l Calling...

User Guide
Page 23
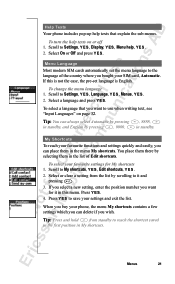
.... Scroll to your preferences. An icon appears when in standby mode. An icon then appears when in standby mode. To set the phone to another phone. Use or to silent so that only two clicks are currently using is calling by the ring signal. Silent You can also compose ...ring signal off silent. To cancel, repeat step 1 and press Y E S at Turn off (0). From standby, press . 2. Select Turn on page 82. Personalizing Your Phone 23 Tip: Use the volume key to change a setting which is included in a profile, the profile you are heard when you change the volume silently.
.... Scroll to your preferences. An icon appears when in standby mode. An icon then appears when in standby mode. To set the phone to another phone. Use or to silent so that only two clicks are currently using is calling by the ring signal. Silent You can also compose ...ring signal off silent. To cancel, repeat step 1 and press Y E S at Turn off (0). From standby, press . 2. Select Turn on page 82. Personalizing Your Phone 23 Tip: Use the volume key to change a setting which is included in a profile, the profile you are heard when you change the volume silently.


