
Instruction Manual 2
Page 2
...) or 15 watts (220-240V area). Do not operate where aerosol spray products are being used by the manufacturer as threading needle, changing needle, threading bobbin, or changing presser foot, and the like. 10. The sound pressure level under normal operating conditions is not operating properly. 18. If the supply cord...
...) or 15 watts (220-240V area). Do not operate where aerosol spray products are being used by the manufacturer as threading needle, changing needle, threading bobbin, or changing presser foot, and the like. 10. The sound pressure level under normal operating conditions is not operating properly. 18. If the supply cord...
Instruction Manual 2
Page 6
... Machine...2/4 Connecting Machine to Power Source ...6 Two Step Presser Foot Lifter ...8 Accessories ...9 Threading the Machine Winding the Bobbin...11 Inserting the Bobbin ...13 Threading the Upper Thread ...15 Automatic Needle Threader ...17 Raising the Bobbin Thread ...19 Thread Tension...21 Sewing How to Choose Your Pattern ...23 Stitch Width Dial & Stitch Length Dial...
... Machine...2/4 Connecting Machine to Power Source ...6 Two Step Presser Foot Lifter ...8 Accessories ...9 Threading the Machine Winding the Bobbin...11 Inserting the Bobbin ...13 Threading the Upper Thread ...15 Automatic Needle Threader ...17 Raising the Bobbin Thread ...19 Thread Tension...21 Sewing How to Choose Your Pattern ...23 Stitch Width Dial & Stitch Length Dial...
Instruction Manual 2
Page 9
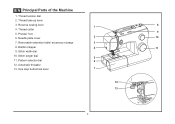
Presser foot 6. Bobbin stopper 4 11 9. Thread take-up lever 3. Needle plate cover 2 10 7. Stitch width dial 10. EN Principal Parts of the Machine 1. Reverse sewing lever 1 8 4. Thread tension dial 2. Removable extension table/ accessory storage 3 8. Thread cutter 9 5. Stitch length dial 5 11. Pattern selector dial 6 12. Automatic threader 13. One step buttonhole lever 7 12 13 2
Presser foot 6. Bobbin stopper 4 11 9. Thread take-up lever 3. Needle plate cover 2 10 7. Stitch width dial 10. EN Principal Parts of the Machine 1. Reverse sewing lever 1 8 4. Thread tension dial 2. Removable extension table/ accessory storage 3 8. Thread cutter 9 5. Stitch length dial 5 11. Pattern selector dial 6 12. Automatic threader 13. One step buttonhole lever 7 12 13 2
Instruction Manual 2
Page 11
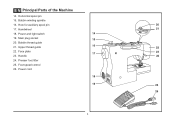
Handwheel 21 18. Power and light switch 14 19. Foot speed control 26. Power cord 18 19 25 26 4 EN Principal Parts of the Machine 14. Presser foot lifter 25. Upper thread guide 16 22 22. Main plug socket 15 20. Horizontal spool pin 15. Hole for auxiliary spool pin 20 17. Handle 17 23 24 24. Bobbin winding spindle 16. Face plate 23. Bobbin thread guide 21.
Handwheel 21 18. Power and light switch 14 19. Foot speed control 26. Power cord 18 19 25 26 4 EN Principal Parts of the Machine 14. Presser foot lifter 25. Upper thread guide 16 22 22. Main plug socket 15 20. Horizontal spool pin 15. Hole for auxiliary spool pin 20 17. Handle 17 23 24 24. Bobbin winding spindle 16. Face plate 23. Bobbin thread guide 21.
Instruction Manual 2
Page 16
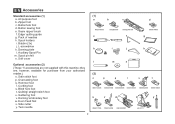
Pack of needles h. Bobbin (3x) j. Spool pin felt n. Satin stitch foot p. Blind hem foot t. Even Feed foot x. Hemmer foot r. Gathering foot v. Edge/ quilting guide g. Twin needle (1) a b c 006918008 e 006905008 006Q6A0150 f d ...
Pack of needles h. Bobbin (3x) j. Spool pin felt n. Satin stitch foot p. Blind hem foot t. Even Feed foot x. Hemmer foot r. Gathering foot v. Edge/ quilting guide g. Twin needle (1) a b c 006918008 e 006905008 006Q6A0150 f d ...

Instruction Manual 2
Page 18
... (10) and remove. Cut thread. (9) 2 - To start sewing, push the bobbin winder spindle to right. (6) - Thread bobbin as illustrated and place on to left (sewing position). 4 3 5 6 7 8 9 10 11 Push bobbin spindle to spool pin. (1/2) - Please Note: When the bobbin winder spindle is in "bobbin winding" position, the machine will not sew and the hand wheel...
... (10) and remove. Cut thread. (9) 2 - To start sewing, push the bobbin winder spindle to right. (6) - Thread bobbin as illustrated and place on to left (sewing position). 4 3 5 6 7 8 9 10 11 Push bobbin spindle to spool pin. (1/2) - Please Note: When the bobbin winder spindle is in "bobbin winding" position, the machine will not sew and the hand wheel...
Instruction Manual 2
Page 20
Pull the thread through the slit (A). 3. Draw the thread clockwise until it slips into the notch (B). 4. Pull out about 15 cm (6 inches) of thread and attach the bobbin cover plate (C). Insert the bobbin in the bobbin case with the thread running counterclockwise direction (arrow). 2. Attention: 1 Turn power switch to off ("O") before inserting or removing the bobbin. B 3 13 A 2 C 4 EN Inserting the Bobbin When inserting or removing the bobbin, the needle must be fully raised. 1.
Pull the thread through the slit (A). 3. Draw the thread clockwise until it slips into the notch (B). 4. Pull out about 15 cm (6 inches) of thread and attach the bobbin cover plate (C). Insert the bobbin in the bobbin case with the thread running counterclockwise direction (arrow). 2. Attention: 1 Turn power switch to off ("O") before inserting or removing the bobbin. B 3 13 A 2 C 4 EN Inserting the Bobbin When inserting or removing the bobbin, the needle must be fully raised. 1.

Instruction Manual 2
Page 26
Note: If it is difficult to raise the bobbin thread, check to make sure the thread is not trapped by the hinged cover or the Removable Extension Table. 1 Gently pull on the upper thread to bring the bobbin thread up through the needle plate hole. (2) Lay both threads to the back under the presser foot. (3) 2 3 19 EN Raising the Bobbin Thread Hold the upper thread with the left hand. Turn the handwheel (1) towards you (counterclockwise) lowering, then raising needle.
Note: If it is difficult to raise the bobbin thread, check to make sure the thread is not trapped by the hinged cover or the Removable Extension Table. 1 Gently pull on the upper thread to bring the bobbin thread up through the needle plate hole. (2) Lay both threads to the back under the presser foot. (3) 2 3 19 EN Raising the Bobbin Thread Hold the upper thread with the left hand. Turn the handwheel (1) towards you (counterclockwise) lowering, then raising needle.

Instruction Manual 2
Page 28
... all stitch functions, thread or fabric. - There is usually only desirable for straight stitch sewing. C D 21 Turn dial to higher number. Lower thread tension The bobbin tension has been set correctly at the factory, so you will be less than for zig zag and decorative sewing. Proper setting of tension is...
... all stitch functions, thread or fabric. - There is usually only desirable for straight stitch sewing. C D 21 Turn dial to higher number. Lower thread tension The bobbin tension has been set correctly at the factory, so you will be less than for zig zag and decorative sewing. Proper setting of tension is...
Instruction Manual 2
Page 50
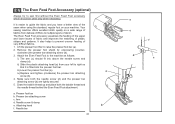
... attaching screw (b). 3. Needle screw & clamp e. Needle bar 43 a b e c f d c Remove the presser foot shank by unscrewing (counter- Make sure both the bobbin thread and the needle thread behind the Even Feed Foot attachment. iii) Lower the presser foot bar (a). Arm d. a. Attach the Even Feed Foot to sew... first without the Even Feed Foot accessory which should fit into the presser foot bar. Draw the bobbin thread up and place both the needle screw (d) and the presser bar attaching screw (b) are tightly secured. 5. It is fitted into above...
... attaching screw (b). 3. Needle screw & clamp e. Needle bar 43 a b e c f d c Remove the presser foot shank by unscrewing (counter- Make sure both the bobbin thread and the needle thread behind the Even Feed Foot attachment. iii) Lower the presser foot bar (a). Arm d. a. Attach the Even Feed Foot to sew... first without the Even Feed Foot accessory which should fit into the presser foot bar. Draw the bobbin thread up and place both the needle screw (d) and the presser bar attaching screw (b) are tightly secured. 5. It is fitted into above...
Instruction Manual 2
Page 67
...tension. 1. Lubricate as described. 1. The wrong size or type of needle has been used. 4. Wrong needle size for the fabric. 2. The bobbin case is damaged. The thread tension is not inserted correctly. 5. Select a larger needle. 4. Remove and reinsert the needle. (flat side towards the... is not inserted correctly. 2. Poor quality thread. 2. Choose a needle to suit the thread and fabric. 4. Thread tension wrong. 1. The bobbin case is not threaded correctly. 2. Choose a needle to suit the thread and fabric. 4. Readjust the stitch length. 3. The foot is wound...
...tension. 1. Lubricate as described. 1. The wrong size or type of needle has been used. 4. Wrong needle size for the fabric. 2. The bobbin case is damaged. The thread tension is not inserted correctly. 5. Select a larger needle. 4. Remove and reinsert the needle. (flat side towards the... is not inserted correctly. 2. Poor quality thread. 2. Choose a needle to suit the thread and fabric. 4. Thread tension wrong. 1. The bobbin case is not threaded correctly. 2. Choose a needle to suit the thread and fabric. 4. Readjust the stitch length. 3. The foot is wound...
3323 Stitch Applications Guide
Page 4
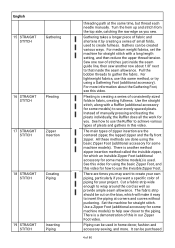
Gathers can be purchased 4 of this in fabric, creating fullness. Pull the bobbin threads to insert the piping at the same time, but thread each needle manually. Pleating is another row about the Gathering Foot, see this video ...
Gathers can be purchased 4 of this in fabric, creating fullness. Pull the bobbin threads to insert the piping at the same time, but thread each needle manually. Pleating is another row about the Gathering Foot, see this video ...

3323 Stitch Applications Guide
Page 17
...rows, or even in combination with other decorative stitches. The stitch will "fill up" the holes. Use lightweight thread in the needle and bobbin, as organza, organdy and batiste. Experiment with adjustable stitch length and/or stitch width, try various stitch length and/ 17 of stretch ...reinforce seams of 80 More information about needles on stretch fabrics. This stitch can be used to help prevent skipped stitches on the SINGER website. For machine models with various types of thread you are using, and stabilizer to create a delicate heirloom look you want ...
...rows, or even in combination with other decorative stitches. The stitch will "fill up" the holes. Use lightweight thread in the needle and bobbin, as organza, organdy and batiste. Experiment with adjustable stitch length and/or stitch width, try various stitch length and/ 17 of stretch ...reinforce seams of 80 More information about needles on stretch fabrics. This stitch can be used to help prevent skipped stitches on the SINGER website. For machine models with various types of thread you are using, and stabilizer to create a delicate heirloom look you want ...


