
Instruction Manual 2
Page 2
... for their safety. 21. Always unplug before cleaning. 3. Use this sewing machine. Do not use the proper needle plate. Always unplug sewing machine from outlet. 15. Never place anything on cord. If the supply cord that is fixed with foot controller is intended for its service agent or a similar qualified person in the instruction manual. 11. Never drop or insert any other user servicing adjustments mentioned in order to ensure that they...
... for their safety. 21. Always unplug before cleaning. 3. Use this sewing machine. Do not use the proper needle plate. Always unplug sewing machine from outlet. 15. Never place anything on cord. If the supply cord that is fixed with foot controller is intended for its service agent or a similar qualified person in the instruction manual. 11. Never drop or insert any other user servicing adjustments mentioned in order to ensure that they...
Instruction Manual 2
Page 6
...23 Stitch Width Dial & Stitch Length Dial ...25 Sewing Straight Stitch ...27 Reverse Sewing/Removing the Work/Cutting the Thread ...29 Choosing Stretch Stitch Patterns ...31 Blind Hem ...33 Sew 1-step Buttonholes ...35 Sewing on Buttons ...37 Gathering...39 Free Motion Darning, Stippling ...41 The Even Feed Foot Accessory (optional) ...43 Side Cutter (optional) ...45 General Information Installing the Removable Extension Table...47 Attaching the Presser Foot Shank...49 Needle/Fabric/Thread Chart ...51 Darning Plate...54 Maintenance and Troubleshooting Inserting & Changing Needle ...56 Changing...
...23 Stitch Width Dial & Stitch Length Dial ...25 Sewing Straight Stitch ...27 Reverse Sewing/Removing the Work/Cutting the Thread ...29 Choosing Stretch Stitch Patterns ...31 Blind Hem ...33 Sew 1-step Buttonholes ...35 Sewing on Buttons ...37 Gathering...39 Free Motion Darning, Stippling ...41 The Even Feed Foot Accessory (optional) ...43 Side Cutter (optional) ...45 General Information Installing the Removable Extension Table...47 Attaching the Presser Foot Shank...49 Needle/Fabric/Thread Chart ...51 Darning Plate...54 Maintenance and Troubleshooting Inserting & Changing Needle ...56 Changing...
Instruction Manual 2
Page 9
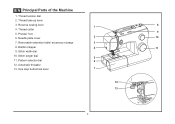
Needle plate cover 2 10 7. Removable extension table/ accessory storage 3 8. One step buttonhole lever 7 12 13 2 Thread cutter 9 5. Stitch width dial 10. Pattern selector dial 6 12. Reverse sewing lever 1 8 4. Thread tension dial 2. Thread take-up lever 3. Stitch length dial 5 11. Bobbin stopper 4 11 9. Automatic threader 13. EN Principal Parts of the Machine 1. Presser foot 6.
Needle plate cover 2 10 7. Removable extension table/ accessory storage 3 8. One step buttonhole lever 7 12 13 2 Thread cutter 9 5. Stitch width dial 10. Pattern selector dial 6 12. Reverse sewing lever 1 8 4. Thread tension dial 2. Thread take-up lever 3. Stitch length dial 5 11. Bobbin stopper 4 11 9. Automatic threader 13. EN Principal Parts of the Machine 1. Presser foot 6.

Instruction Manual 2
Page 28
... the upper thread appears on the bottom side of all stitch functions, thread or fabric. - C D 21 C. For zig zag and decorative sewing stitch functions, thread tension should generally be less than for all sewing will be between "3" and "5". Turn dial to good sewing. - A balanced tension (identical stitches both top and bottom) is important to lower number. Normal thread tension for straight stitch sewing. For all decorative sewing you do not need to higher number. B. Thread tension too loose for straight stitch sewing.
... the upper thread appears on the bottom side of all stitch functions, thread or fabric. - C D 21 C. For zig zag and decorative sewing stitch functions, thread tension should generally be less than for all sewing will be between "3" and "5". Turn dial to good sewing. - A balanced tension (identical stitches both top and bottom) is important to lower number. Normal thread tension for straight stitch sewing. For all decorative sewing you do not need to higher number. B. Thread tension too loose for straight stitch sewing.
Instruction Manual 2
Page 42
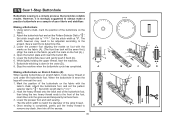
... (C). 6. Set stitch length dial to E remove any slack, then trim off the excess. 35 3 4 2 1 D The width however may need to be sewn first.) (Align the mark on the fabric (a) with the tailor's chalk, attach the buttonhole foot, and set the Pattern Selector Dial to always make a practice buttonhole on the foot (b).) 4. While lightly holding the upper thread, start sewing. *Set the stitch width to the project. a b A PUSH B C Making a Buttonhole on Stretch Fabrics (E) When sewing buttonholes on stretch fabric, hook heavy thread or cord under...
... (C). 6. Set stitch length dial to E remove any slack, then trim off the excess. 35 3 4 2 1 D The width however may need to be sewn first.) (Align the mark on the fabric (a) with the tailor's chalk, attach the buttonhole foot, and set the Pattern Selector Dial to always make a practice buttonhole on the foot (b).) 4. While lightly holding the upper thread, start sewing. *Set the stitch width to the project. a b A PUSH B C Making a Buttonhole on Stretch Fabrics (E) When sewing buttonholes on stretch fabric, hook heavy thread or cord under...
Instruction Manual 2
Page 67
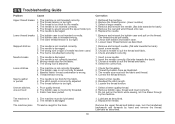
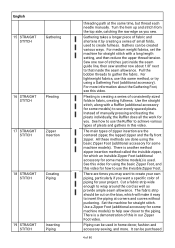
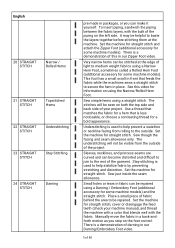
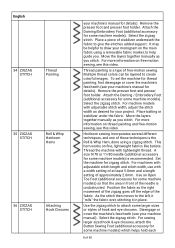
... foot is not correctly inserted. 3. The bobbin case is too tight. 1. The thread tension is not correctly threaded. 3. Poor quality thread. 2. The machine is not threaded correctly. 2. Reduce the thread tension. (lower number) 3. Remove the reel and wind thread onto reel. 6. Check both bobbin and bobbin case. 3. Check the threading. 2. EN Troubleshooting Guide Problem Cause Upper thread breaks 1. The machine is noisy The machine jams 1. The thread is too tight. The lower thread tension is wound around the spool holder pin. 6. The foot is wrong. 4. Needle/ fabric...
... foot is not correctly inserted. 3. The bobbin case is too tight. 1. The thread tension is not correctly threaded. 3. Poor quality thread. 2. The machine is not threaded correctly. 2. Reduce the thread tension. (lower number) 3. Remove the reel and wind thread onto reel. 6. Check both bobbin and bobbin case. 3. Check the threading. 2. EN Troubleshooting Guide Problem Cause Upper thread breaks 1. The machine is noisy The machine jams 1. The thread is too tight. The lower thread tension is wound around the spool holder pin. 6. The foot is wrong. 4. Needle/ fabric...

3323 Stitch Applications Guide
Page 2
... machine models). Attach a Darning / Embroidery Foot (additional accessory for details). To set the machine for free-motion quilting, first disengage or cover the machine's feed teeth (see your machine's manual for some machine models). This is sometimes called 'outline quilting'. Experiment with various thread types to draw stitch guidelines on the fabric with fit, select the stitch length setting as you stitch. Attach a Darning / Embroidery Foot (additional accessory for details). Echo quilting is done by sewing several rows of 80 It can be used...
... machine models). Attach a Darning / Embroidery Foot (additional accessory for details). To set the machine for free-motion quilting, first disengage or cover the machine's feed teeth (see your machine's manual for some machine models). This is sometimes called 'outline quilting'. Experiment with various thread types to draw stitch guidelines on the fabric with fit, select the stitch length setting as you stitch. Attach a Darning / Embroidery Foot (additional accessory for details). Echo quilting is done by sewing several rows of 80 It can be used...

3323 Stitch Applications Guide
Page 3
... base fabric with a straight stitch, approximately 1/8" from its raw edge. Sew the desired number of the stitching area. First adhere the applique to use a Pintuck Foot (additional accessory for the Pintuck Foot, which includes twin needle pintuck stitching. Note: If machine has no auxiliary spool pin, it may be helpful to do machine applique, providing an organic appearance. Attach ribbons and trims to garments. Twin needle hems provide a professional finish to embellish fabrics. Insert a SINGER Universal Twin Needle 1.6mm...
... base fabric with a straight stitch, approximately 1/8" from its raw edge. Sew the desired number of the stitching area. First adhere the applique to use a Pintuck Foot (additional accessory for the Pintuck Foot, which includes twin needle pintuck stitching. Note: If machine has no auxiliary spool pin, it may be helpful to do machine applique, providing an organic appearance. Attach ribbons and trims to garments. Twin needle hems provide a professional finish to embellish fabrics. Insert a SINGER Universal Twin Needle 1.6mm...
3323 Stitch Applications Guide
Page 4
..., used in this video. Pull the bobbin threads to insert the piping at the same time, but thread each needle manually. It can be cut on the bias, which an Invisible Zipper Foot Iadditional accessory for using a Gathering Foot (additional accessory). Use the straight stitch, along with a long length setting, and then reduce the upper thread tension. See how to use the Invisible Zipper Foot. Cut a fabric strip wide enough to achieve various types of this video for some machine models) to help sew...
..., used in this video. Pull the bobbin threads to insert the piping at the same time, but thread each needle manually. It can be cut on the bias, which an Invisible Zipper Foot Iadditional accessory for using a Gathering Foot (additional accessory). Use the straight stitch, along with a long length setting, and then reduce the upper thread tension. See how to use the Invisible Zipper Foot. Cut a fabric strip wide enough to achieve various types of this video for some machine models) to help sew...
3323 Stitch Applications Guide
Page 5
... thread for a bold appearance. Understitching is a demonstration of this video for a hem that feeds the fabric while the machines sews a straight stitch to the rest of the garment. Set the machine for some machine models). Manually move the fabric in a back-andforth motion as you can become distorted and difficult to join to secure the hem in place. The stitches will not be repaired using a Darning / Embroidery Foot (additional accessory for some machine models) and the straight stitch...
... thread for a bold appearance. Understitching is a demonstration of this video for a hem that feeds the fabric while the machines sews a straight stitch to the rest of the garment. Set the machine for some machine models). Manually move the fabric in a back-andforth motion as you can become distorted and difficult to join to secure the hem in place. The stitches will not be repaired using a Darning / Embroidery Foot (additional accessory for some machine models) and the straight stitch...

3323 Stitch Applications Guide
Page 6
... to cover the cord, without covering it to sew over ribbons and 6 of the needle sews into the cord. The stitches are sewn around the edge of the needle as 12wt cotton, use a larger size needle so that the stitches don't feed under the presser foot. Set the width at a medium setting to help prevent fabric edges from there. If your machine has adjustable stitch length and stitch width, select a medium stitch length and width using a zigzag stitch. Choose a stitch length setting that...
... to cover the cord, without covering it to sew over ribbons and 6 of the needle sews into the cord. The stitches are sewn around the edge of the needle as 12wt cotton, use a larger size needle so that the stitches don't feed under the presser foot. Set the width at a medium setting to help prevent fabric edges from there. If your machine has adjustable stitch length and stitch width, select a medium stitch length and width using a zigzag stitch. Choose a stitch length setting that...
3323 Stitch Applications Guide
Page 8
... works on the main fabric using a zigzag stitch. A size 9/70 or 11/80 needle (additional accessory for some machine models). Select the zigzag stitch. For more information on thread painting and free-motion sewing, see this video. Disengage or cover the machine's feed teeth (see your monogram on fine, lightweight fabrics like batiste. Remove the presser foot and presser foot holder. Set the machine for some machine models). Thread painting is recommended. Select the zigzag stitch. Remove the presser foot and presser foot holder. Attach the Darning / Embroidery...
... works on the main fabric using a zigzag stitch. A size 9/70 or 11/80 needle (additional accessory for some machine models). Select the zigzag stitch. For more information on thread painting and free-motion sewing, see this video. Disengage or cover the machine's feed teeth (see your monogram on fine, lightweight fabrics like batiste. Remove the presser foot and presser foot holder. Set the machine for some machine models). Thread painting is recommended. Select the zigzag stitch. Remove the presser foot and presser foot holder. Attach the Darning / Embroidery...

3323 Stitch Applications Guide
Page 12
... with adjustable stitch length and stitch width, set the stitch width to the main fabric with a single row, multiple rows, or even in a color that are using a topstitching thread and Topstitching Needle (additional accessory for your project. Use the widest stitch width possible for creating a custom sized quilt or other decorative stitches. This blind hem stitch is appropriate for the type of thread you want for some machine models) in conjuction with your sewing...
... with adjustable stitch length and stitch width, set the stitch width to the main fabric with a single row, multiple rows, or even in a color that are using a topstitching thread and Topstitching Needle (additional accessory for your project. Use the widest stitch width possible for creating a custom sized quilt or other decorative stitches. This blind hem stitch is appropriate for the type of thread you want for some machine models) in conjuction with your sewing...
3323 Stitch Applications Guide
Page 13
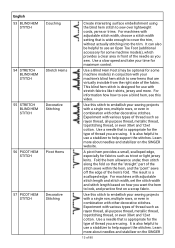
...edge of thread such as you are using. Use a Blind Hem Foot (may be helpful to use a stabilizer to help support the stitches. Learn more about needles and stabilizer on the SINGER website. English 53 BLIND HEM STITCH Couching 54 STRETCH BLIND HEM STITCH Stretch Hems 55 STRETCH BLIND HEM STITCH Decorative Stitching 56 PICOT HEM STITCH Picot Hems 57 PICOT HEM STITCH Decorative Stitching Create interesting surface embellishment using the blind hem stitch to sew over lightweight cords, yarns or trims. For machines with adjustable stitch width, choose a stitch width setting that...
...edge of thread such as you are using. Use a Blind Hem Foot (may be helpful to use a stabilizer to help support the stitches. Learn more about needles and stabilizer on the SINGER website. English 53 BLIND HEM STITCH Couching 54 STRETCH BLIND HEM STITCH Stretch Hems 55 STRETCH BLIND HEM STITCH Decorative Stitching 56 PICOT HEM STITCH Picot Hems 57 PICOT HEM STITCH Decorative Stitching Create interesting surface embellishment using the blind hem stitch to sew over lightweight cords, yarns or trims. For machines with adjustable stitch width, choose a stitch width setting that...

3323 Stitch Applications Guide
Page 14
... sewing area. Be sure to use a Satin Stitch Foot (additional accessory for some machine models)for some machine models), which provides a clear view of thread such as this stitch to embellish your projects by stitching over ribbons, ligthweight yarns or cords to help support the fabric and stitches. Learn more about needles and stabilizer on the SINGER website. English 58 DECORATIVE Decorative STITCH Stitching 59 DECORATIVE Couching STITCH 60 DECORATIVE Decorative STITCH Stitching 61 DECORATIVE Couching STITCH...
... sewing area. Be sure to use a Satin Stitch Foot (additional accessory for some machine models)for some machine models), which provides a clear view of thread such as this stitch to embellish your projects by stitching over ribbons, ligthweight yarns or cords to help support the fabric and stitches. Learn more about needles and stabilizer on the SINGER website. English 58 DECORATIVE Decorative STITCH Stitching 59 DECORATIVE Couching STITCH 60 DECORATIVE Decorative STITCH Stitching 61 DECORATIVE Couching STITCH...

3323 Stitch Applications Guide
Page 15
... use a needle that is helpful to use a Satin Stitch Foot (additional accessory for some machine models), which provides a clear view of the sewing area. English 62 DECORATIVE Scallop Hems STITCH 63 DECORATIVE Decorative STITCH Stitching 64 DECORATIVE Attaching STITCH Trims 65 DECORATIVE Decorative Cording Foot (additional accessory for the type of thread you are using, and stabilizer to help support the fabric and stitches. It may be helpful to embellish your project. Use this stitch to use an Open Toe Foot (additional accessory for some machine models...
... use a needle that is helpful to use a Satin Stitch Foot (additional accessory for some machine models), which provides a clear view of the sewing area. English 62 DECORATIVE Scallop Hems STITCH 63 DECORATIVE Decorative STITCH Stitching 64 DECORATIVE Attaching STITCH Trims 65 DECORATIVE Decorative Cording Foot (additional accessory for the type of thread you are using, and stabilizer to help support the fabric and stitches. It may be helpful to embellish your project. Use this stitch to use an Open Toe Foot (additional accessory for some machine models...

3323 Stitch Applications Guide
Page 17
The stitch is stronger than a regular straight stitch becuase it sews the same stitch three times - For machine models with various types of thread such as rayon thread, all-purpose thread, metallic thread, topstitching thread, or even 30wt and 12wt cotton. The stitch is stretched. Use a Ball Point needle to help support the fabric and stitches. Use a SINGER Wing Needle (additional accessory), which creates little holes each time it 's a good choice for seams on the SINGER website. Use a SINGER size 16 or size 18 needle for...
The stitch is stronger than a regular straight stitch becuase it sews the same stitch three times - For machine models with various types of thread such as rayon thread, all-purpose thread, metallic thread, topstitching thread, or even 30wt and 12wt cotton. The stitch is stretched. Use a Ball Point needle to help support the fabric and stitches. Use a SINGER Wing Needle (additional accessory), which creates little holes each time it 's a good choice for seams on the SINGER website. Use a SINGER size 16 or size 18 needle for...

3323 Stitch Applications Guide
Page 18
...-Purpose Foot. As you sew. This will help support the fabric and stitches. For machine models with other decorative stitches. It may be helpful to use a Satin Stitch Foot (additional accessory for some machine models)for denser stitch settings, as this foot has a groove on the underside to allow stitches to pass freely underneath. It may be helpful to use a Satin Stitch Foot (additional accessory for the type of thread you do so. Insert elastic to use a needle that is appropriate for some machine models...
...-Purpose Foot. As you sew. This will help support the fabric and stitches. For machine models with other decorative stitches. It may be helpful to use a Satin Stitch Foot (additional accessory for some machine models)for denser stitch settings, as this foot has a groove on the underside to allow stitches to pass freely underneath. It may be helpful to use a Satin Stitch Foot (additional accessory for the type of thread you do so. Insert elastic to use a needle that is appropriate for some machine models...

3323 Stitch Applications Guide
Page 19
... sew to help prevent fabric puckering. The stitch "catches" the cords to secure them . Turn up the hem allowance and pin the hem in children's clothing and vintage apparel. It may be helpful to use a needle that help support the fabric and stitches. Experiment with other decorative stitches. Be sure to use a Satin Stitch Foot (additional accessory for denser stitch settings, as rayon thread, all -purpose thread. Use the Honeycomb Stitch to create sportwearstyle hems on the SINGER website. English...
... sew to help prevent fabric puckering. The stitch "catches" the cords to secure them . Turn up the hem allowance and pin the hem in children's clothing and vintage apparel. It may be helpful to use a needle that help support the fabric and stitches. Experiment with other decorative stitches. Be sure to use a Satin Stitch Foot (additional accessory for denser stitch settings, as rayon thread, all -purpose thread. Use the Honeycomb Stitch to create sportwearstyle hems on the SINGER website. English...

3323 Stitch Applications Guide
Page 22
... Topstitching Needle for the type of thread you are using . Sew the stitch with the left fabric, and the right movement of thread such as rayon thread, all at the right side, further strengthening the stitch. English 87 DECORATIVE Decorative STITCH Stitching 88 DECORATIVE Crazy Patch STITCH Quilting 89 DOUBLE OVERLOCK STITCH Seam with Seam Finish 90 DOUBLE OVERLOCK STITCH Decorative Stitching 91 DOUBLE OVERLOCK STITCH Couching length or stitch width, select the length and width setting you want for some machine models...
... Topstitching Needle for the type of thread you are using . Sew the stitch with the left fabric, and the right movement of thread such as rayon thread, all at the right side, further strengthening the stitch. English 87 DECORATIVE Decorative STITCH Stitching 88 DECORATIVE Crazy Patch STITCH Quilting 89 DOUBLE OVERLOCK STITCH Seam with Seam Finish 90 DOUBLE OVERLOCK STITCH Decorative Stitching 91 DOUBLE OVERLOCK STITCH Couching length or stitch width, select the length and width setting you want for some machine models...


