Instruction Manual
Page 1
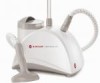
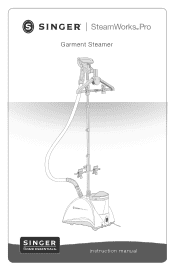
SteamWorks Pro Garment Steamer ON OFF instruction manual
SteamWorks Pro Garment Steamer ON OFF instruction manual
Instruction Manual
Page 2
...emptying the water tank. 5. Do not leave this appliance unattended while it is in fire, electric shock, or injury. 16. Do not operate the steamer without filling the water reservoir. Keep the hose and steam head elevated above the tank. 18. Turn off the unit, cool completely, drain the ... coming into the water tank or it cannot be used near an open flame, cooking or other heating appliance. 23. Move the appliance by SINGER Home Essentials may cause fire or electrical shock. 3. Do not direct steam at least 30 minutes and drain the water tank and water reservoir...
...emptying the water tank. 5. Do not leave this appliance unattended while it is in fire, electric shock, or injury. 16. Do not operate the steamer without filling the water reservoir. Keep the hose and steam head elevated above the tank. 18. Turn off the unit, cool completely, drain the ... coming into the water tank or it cannot be used near an open flame, cooking or other heating appliance. 23. Move the appliance by SINGER Home Essentials may cause fire or electrical shock. 3. Do not direct steam at least 30 minutes and drain the water tank and water reservoir...
Instruction Manual
Page 3
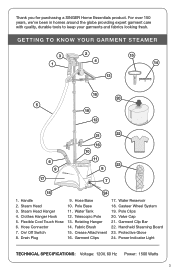
... Head Hanger 4. On/ Off Switch 8. Drain Plug 9. Hose Base 10. Crease Attachment 16. Casteer Wheel System 19. Pole Clips 20. getting to keep your garment steamer 3 1 2 4 15 14 13 16 20 5 19 12 6 9 17 21 22 16 10 11 23 8 7 18 24 1. Steam Head 3. Pole Base 11. Rotating Hanger 14. Garment... Hanger Hook 5. Hose Connector 7. Protective Glove 24. Handheld Steaming Board 23. Fabric Brush 15. Water Tank 12. Garment Clip Bar 22. Thank you for purchasing a SINGER Home Essentials product.
... Head Hanger 4. On/ Off Switch 8. Drain Plug 9. Hose Base 10. Crease Attachment 16. Casteer Wheel System 19. Pole Clips 20. getting to keep your garment steamer 3 1 2 4 15 14 13 16 20 5 19 12 6 9 17 21 22 16 10 11 23 8 7 18 24 1. Steam Head 3. Pole Base 11. Rotating Hanger 14. Garment... Hanger Hook 5. Hose Connector 7. Protective Glove 24. Handheld Steaming Board 23. Fabric Brush 15. Water Tank 12. Garment Clip Bar 22. Thank you for purchasing a SINGER Home Essentials product.
Instruction Manual
Page 4
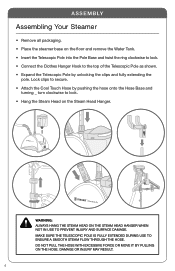
... sure the Telescopic Pole is fully extended during use to ensure a smooth steam flow through the hose. A ssem b ly Assembling Your Steamer • Remove all packaging. • Place the steamer base on the Steam Head Hanger. Lock clips to secure. • Attach the Cool Touch Hose by pushing the hose onto the...
... sure the Telescopic Pole is fully extended during use to ensure a smooth steam flow through the hose. A ssem b ly Assembling Your Steamer • Remove all packaging. • Place the steamer base on the Steam Head Hanger. Lock clips to secure. • Attach the Cool Touch Hose by pushing the hose onto the...
Instruction Manual
Page 5
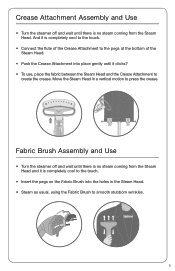
Crease Attachment Assembly and Use • Turn the steamer off and wait until there is no steam coming from the Steam Head and it is no steam coming from the Steam Head. And it ... Steam Head. • Push the Crease Attachment into the holes in a vertical motion to smooth stubborn wrinkles. 5 Fabric Brush Assembly and Use • Turn the steamer off and wait until it clicks? • To use, place the fabric between the Steam Head and the Crease Attachment to create the crease. Move...
Crease Attachment Assembly and Use • Turn the steamer off and wait until there is no steam coming from the Steam Head and it is no steam coming from the Steam Head. And it ... Steam Head. • Push the Crease Attachment into the holes in a vertical motion to smooth stubborn wrinkles. 5 Fabric Brush Assembly and Use • Turn the steamer off and wait until it clicks? • To use, place the fabric between the Steam Head and the Crease Attachment to create the crease. Move...
Instruction Manual
Page 6
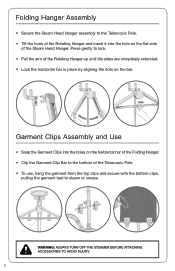
... the garment from the top clips and secure with the bottom clips, pulling the garment taut to steam or crease. WARNING: Always turn off the steamer before attaching accessories to lock. • Pull the arm of the Steam Head Hanger. Press gently to avoid injury. 6
... the garment from the top clips and secure with the bottom clips, pulling the garment taut to steam or crease. WARNING: Always turn off the steamer before attaching accessories to lock. • Pull the arm of the Steam Head Hanger. Press gently to avoid injury. 6
Instruction Manual
Page 7
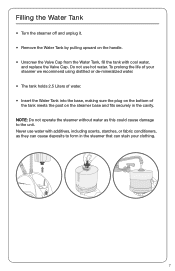
... Liters of water. • Insert the Water Tank into the base, making sure the plug on the steamer base and fits securely in the cavity. Do not use water with cool water, and replace the Valve Cap.... Never use hot water. Filling the Water Tank • Turn the steamer off and unplug it. • Remove the Water Tank by pulling upward on the handle. • Unscrew... including scents, starches, or fabric conditioners, as this could cause damage to form in the steamer that can cause deposits to the unit. To prolong the life of the tank meets the post on ...
... Liters of water. • Insert the Water Tank into the base, making sure the plug on the steamer base and fits securely in the cavity. Do not use water with cool water, and replace the Valve Cap.... Never use hot water. Filling the Water Tank • Turn the steamer off and unplug it. • Remove the Water Tank by pulling upward on the handle. • Unscrew... including scents, starches, or fabric conditioners, as this could cause damage to form in the steamer that can cause deposits to the unit. To prolong the life of the tank meets the post on ...
Instruction Manual
Page 8
...; Steam will be ready to remove wrinkles. Continue to a grounded electrical outlet and turn on the power at the On/Off Switch. • Unplug the steamer. • Hang the Steam Head on the Rotating Hanger. Lock clips to secure. • Plug in use a clean, rust- ON OFF 8
...; Steam will be ready to remove wrinkles. Continue to a grounded electrical outlet and turn on the power at the On/Off Switch. • Unplug the steamer. • Hang the Steam Head on the Rotating Hanger. Lock clips to secure. • Plug in use a clean, rust- ON OFF 8
Instruction Manual
Page 9
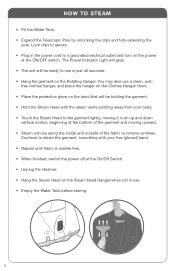
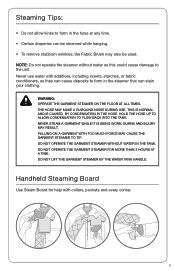
... condensation in the tank. The hose may make a gurgling noise during use water with too much force may cause the garment steamer to tip. This is normal and is being worn. Steaming Tips: • Do not allow condensation to flow back into the tank. Hold the hose ...up to allow kinks to form in the hose at a time. Pulling on the floor at all times. Do not operate the garment steamer without water as they can cause deposits to the unit. Handheld Steaming Board Use Steam Board for more than 3 hours at any time. • Certain...
... condensation in the tank. The hose may make a gurgling noise during use water with too much force may cause the garment steamer to tip. This is normal and is being worn. Steaming Tips: • Do not allow condensation to flow back into the tank. Hold the hose ...up to allow kinks to form in the hose at a time. Pulling on the floor at all times. Do not operate the garment steamer without water as they can cause deposits to the unit. Handheld Steaming Board Use Steam Board for more than 3 hours at any time. • Certain...
Instruction Manual
Page 10
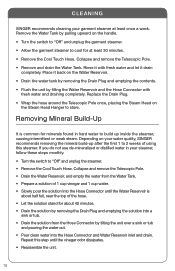
... using this step until the Water Reservoir is common for at least once a week. Repeat this steamer. Place it drain completely. Replace the Drain Plug. • Wrap the hose around the Telescopic ... Slowly pour the solution into the Hose Connector and Water Reservoir inlet and drain. C l eanin g SINGER recommends cleaning your garment steamer at least 30 minutes. • Remove the Cool Touch Hose. Depending on the handle. • ... water in your water quality, SINGER recommends removing the mineral build-up inside the steamer, causing intermittent or weak steam.
... using this step until the Water Reservoir is common for at least once a week. Repeat this steamer. Place it drain completely. Replace the Drain Plug. • Wrap the hose around the Telescopic ... Slowly pour the solution into the Hose Connector and Water Reservoir inlet and drain. C l eanin g SINGER recommends cleaning your garment steamer at least 30 minutes. • Remove the Cool Touch Hose. Depending on the handle. • ... water in your water quality, SINGER recommends removing the mineral build-up inside the steamer, causing intermittent or weak steam.

Instruction Manual
Page 11
... not be steamed. • Heavier fabrics may require more steam. 11 Conveniently folds for easy storage. Delivers 60 minutes of water. Safety feature switches the steamer off automatically if the tank runs out of continuous steam. Deluxe 4-Castor Wheel System Adds stability and mobility, rolls for easy storage. Accessories and Features...
... not be steamed. • Heavier fabrics may require more steam. 11 Conveniently folds for easy storage. Delivers 60 minutes of water. Safety feature switches the steamer off automatically if the tank runs out of continuous steam. Deluxe 4-Castor Wheel System Adds stability and mobility, rolls for easy storage. Accessories and Features...
Instruction Manual
Page 12
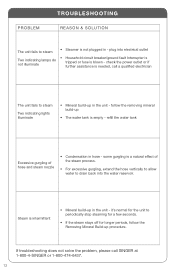
...fuse is intermittent • Mineral build-up in - If troubleshooting does not solve the problem, please call a qualified electrician The unit fails to steam • Steamer is empty - some gurgling is a natural effect of hose and steam nozzle • Condensation in hose - it's normal for longer periods, follow the removing mineral... Mineral Build-up • The water tank is not plugged in the unit - check the power outlet or if further assistance is needed, call SINGER at 1-800-4-SINGER or 1-800-474-6437. 12 plug into the water reservoir. Steam is blown -
...fuse is intermittent • Mineral build-up in - If troubleshooting does not solve the problem, please call a qualified electrician The unit fails to steam • Steamer is empty - some gurgling is a natural effect of hose and steam nozzle • Condensation in hose - it's normal for longer periods, follow the removing mineral... Mineral Build-up • The water tank is not plugged in the unit - check the power outlet or if further assistance is needed, call SINGER at 1-800-4-SINGER or 1-800-474-6437. 12 plug into the water reservoir. Steam is blown -
Instruction Manual
Page 13
... of maintenance or other instructions for all other than SINGER parts and SINGER approved service in material and workmanship. This warranty may only be used by abuse, lack of the GARMENT STEAMER. 13 The SINGER SteamWorks Pro Garment Steamer is warranted only for normal household (noncommercial) use ...of other parts of the GARMENT STEAMER is for a period of ninety (90) days from the date of purchase...
... of maintenance or other instructions for all other than SINGER parts and SINGER approved service in material and workmanship. This warranty may only be used by abuse, lack of the GARMENT STEAMER. 13 The SINGER SteamWorks Pro Garment Steamer is warranted only for normal household (noncommercial) use ...of other parts of the GARMENT STEAMER is for a period of ninety (90) days from the date of purchase...
Instruction Manual
Page 14
...Warranty? If you . Service under the warranty may not apply to you have any questions regarding these warranties, please contact us: SINGER Sewing Company 1-800-4-SINGER E-mail: [email protected] ATTN: Consumer Affairs (1-800-474-6437) 1224 Heil Quaker Boulevard LaVergne, TN 37068 or through the ...not allow the exclusion or limitation of incidental or consequential damages, so the above limitation or exclusion may be obtained by returning the GARMENT STEAMER with: 1. Does State Law Affect My Rights? • This warranty gives you specific legal rights, and you may also have other...
...Warranty? If you . Service under the warranty may not apply to you have any questions regarding these warranties, please contact us: SINGER Sewing Company 1-800-4-SINGER E-mail: [email protected] ATTN: Consumer Affairs (1-800-474-6437) 1224 Heil Quaker Boulevard LaVergne, TN 37068 or through the ...not allow the exclusion or limitation of incidental or consequential damages, so the above limitation or exclusion may be obtained by returning the GARMENT STEAMER with: 1. Does State Law Affect My Rights? • This warranty gives you specific legal rights, and you may also have other...


