Instruction Manual
Page 1
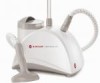
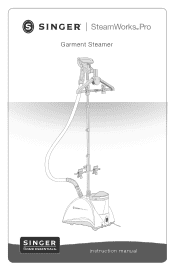
SteamWorks Pro Garment Steamer ON OFF instruction manual
SteamWorks Pro Garment Steamer ON OFF instruction manual
Instruction Manual
Page 2
.... 5. Do not direct steam at least 30 minutes and drain the water tank and water reservoir before storing. 20. Move the appliance by SINGER Home Essentials may cause fire or electrical shock. 3. To avoid the risk of any objects into the tank or hose. 17. No detergent ...can cause burns to the nearest authorized SINGER-approved service center for at people or animals. 12. Steam only in this product. 2. IMPORTANT SAFETY Instructions 1. Read all instructions before cleaning. 22...
.... 5. Do not direct steam at least 30 minutes and drain the water tank and water reservoir before storing. 20. Move the appliance by SINGER Home Essentials may cause fire or electrical shock. 3. To avoid the risk of any objects into the tank or hose. 17. No detergent ...can cause burns to the nearest authorized SINGER-approved service center for at people or animals. 12. Steam only in this product. 2. IMPORTANT SAFETY Instructions 1. Read all instructions before cleaning. 22...
Instruction Manual
Page 3
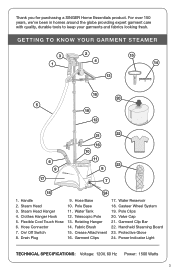
... 4. Pole Base 11. Fabric Brush 15. Hose Connector 7. Hose Base 10. Handle 2. Clothes Hanger Hook 5. Water Reservoir 18. Rotating Hanger 14. Thank you for purchasing a SINGER Home Essentials product. For over 150 years, we've been in homes around the globe providing expert garment care with quality, durable tools to know...
... 4. Pole Base 11. Fabric Brush 15. Hose Connector 7. Hose Base 10. Handle 2. Clothes Hanger Hook 5. Water Reservoir 18. Rotating Hanger 14. Thank you for purchasing a SINGER Home Essentials product. For over 150 years, we've been in homes around the globe providing expert garment care with quality, durable tools to know...
Instruction Manual
Page 4
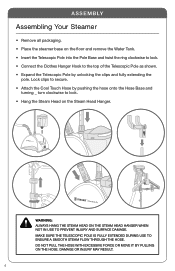
Do not pull the hose with excessive force or move it by pushing the hose onto the Hose Base and turning _ turn clockwise to lock. • Hang the Steam Head on the Steam Head Hanger. ON OFF ON WARNING: OFF Always hang the Steam Head on the Steam Head Hanger when not in use to secure. • Attach the Cool Touch Hose by pulling on the hose. Lock clips to ensure a smooth steam flow through the hose. A ssem b ly Assembling Your Steamer • Remove all packaging. • Place the steamer base on the floor and remove the Water Tank. • Insert the Telescopic Pole into the Pole...
Do not pull the hose with excessive force or move it by pushing the hose onto the Hose Base and turning _ turn clockwise to lock. • Hang the Steam Head on the Steam Head Hanger. ON OFF ON WARNING: OFF Always hang the Steam Head on the Steam Head Hanger when not in use to secure. • Attach the Cool Touch Hose by pulling on the hose. Lock clips to ensure a smooth steam flow through the hose. A ssem b ly Assembling Your Steamer • Remove all packaging. • Place the steamer base on the floor and remove the Water Tank. • Insert the Telescopic Pole into the Pole...
Instruction Manual
Page 5
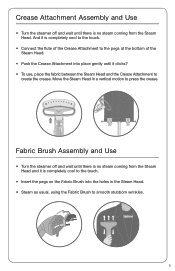
Fabric Brush Assembly and Use • Turn the steamer off and wait until it is completely cool to the touch. • Insert the pegs on the Fabric Brush into the holes in a vertical motion to press the crease. And it is completely cool to the touch. • Connect the flute of the Crease Attachment to the pegs at the bottom of the Steam Head. • Push the Crease Attachment into place gently until there is no steam coming from the Steam Head and it clicks? • To use, place the fabric between the Steam Head and the Crease Attachment to smooth stubborn wrinkles. 5 ...
Fabric Brush Assembly and Use • Turn the steamer off and wait until it is completely cool to the touch. • Insert the pegs on the Fabric Brush into the holes in a vertical motion to press the crease. And it is completely cool to the touch. • Connect the flute of the Crease Attachment to the pegs at the bottom of the Steam Head. • Push the Crease Attachment into place gently until there is no steam coming from the Steam Head and it clicks? • To use, place the fabric between the Steam Head and the Crease Attachment to smooth stubborn wrinkles. 5 ...
Instruction Manual
Page 6
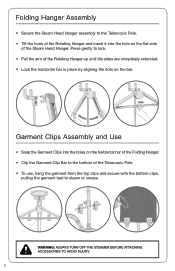
Folding Hanger Assembly • Secure the Steam Head Hanger assembly to the Telescopic Pole. • Tilt the hook of the Rotating Hanger and insert it into the holes on the horizontal bar of the Folding Hanger. • Clip the Garment Clip Bar to the bottom of the Steam Head Hanger. Garment Clips Assembly and Use • Snap the Garment Clips into the hole on the bar. WARNING: Always turn off the steamer before attaching accessories to lock. • Pull the arm of the Rotating Hanger up until the sides are completely extended. • Lock the horizontal bar in place by aligning ...
Folding Hanger Assembly • Secure the Steam Head Hanger assembly to the Telescopic Pole. • Tilt the hook of the Rotating Hanger and insert it into the holes on the horizontal bar of the Folding Hanger. • Clip the Garment Clip Bar to the bottom of the Steam Head Hanger. Garment Clips Assembly and Use • Snap the Garment Clips into the hole on the bar. WARNING: Always turn off the steamer before attaching accessories to lock. • Pull the arm of the Rotating Hanger up until the sides are completely extended. • Lock the horizontal bar in place by aligning ...
Instruction Manual
Page 7
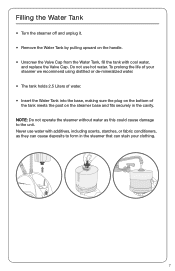
NOTE: Do not operate the steamer without water as they can cause deposits to the unit. To prolong the life of your steamer we recommend using distilled or de-mineralized water. • The tank holds 2.5 Liters of water. • Insert the Water Tank into the base, making sure the plug on the bottom of the tank meets the post on the handle. • Unscrew the Valve Cap from the Water Tank, fill the tank with additives, including scents, starches, or fabric conditioners, as this could cause damage to form in the cavity. Never use hot water. Do not use water with cool water, ...
NOTE: Do not operate the steamer without water as they can cause deposits to the unit. To prolong the life of your steamer we recommend using distilled or de-mineralized water. • The tank holds 2.5 Liters of water. • Insert the Water Tank into the base, making sure the plug on the bottom of the tank meets the post on the handle. • Unscrew the Valve Cap from the Water Tank, fill the tank with additives, including scents, starches, or fabric conditioners, as this could cause damage to form in the cavity. Never use hot water. Do not use water with cool water, ...
Instruction Manual
Page 8
free clothes hanger, and place the hanger on the Clothes Hanger Hook. • Place the protective glove on the hand that will be holding the garment. • Hold the Steam Head with your body. • Touch the Steam Head to the garment lightly, moving upward. • Steam will be ready to use in an up and down vertical motion, beginning at the bottom of the fabric to a grounded electrical outlet and turn on the Rotating Hanger. ON OFF 8 You may also use . • Empty the Water Tank before storing. The Power Indicator Light will glow. • The unit will rise along the ...
free clothes hanger, and place the hanger on the Clothes Hanger Hook. • Place the protective glove on the hand that will be holding the garment. • Hold the Steam Head with your body. • Touch the Steam Head to the garment lightly, moving upward. • Steam will be ready to use in an up and down vertical motion, beginning at the bottom of the fabric to a grounded electrical outlet and turn on the Rotating Hanger. ON OFF 8 You may also use . • Empty the Water Tank before storing. The Power Indicator Light will glow. • The unit will rise along the ...
Instruction Manual
Page 9
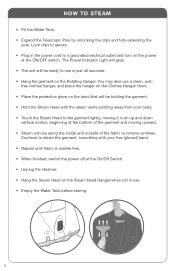
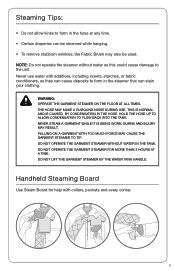
Steaming Tips: • Do not allow condensation to flow back into the tank. The hose may also be steamed while hanging. • To remove stubborn wrinkles, the Fabric Brush may make a gurgling noise during use water with additives, including scents, starches, or fabric conditioners, as this could cause damage to form in the steamer that can be used. This is normal and is being worn. Hold the hose up to allow kinks to the unit. Handheld Steaming Board Use Steam Board for more than 3 hours at all times. Burns and injury may cause the garment steamer to form in the...
Steaming Tips: • Do not allow condensation to flow back into the tank. The hose may also be steamed while hanging. • To remove stubborn wrinkles, the Fabric Brush may make a gurgling noise during use water with additives, including scents, starches, or fabric conditioners, as this could cause damage to form in the steamer that can be used. This is normal and is being worn. Hold the hose up to allow kinks to the unit. Handheld Steaming Board Use Steam Board for more than 3 hours at all times. Burns and injury may cause the garment steamer to form in the...

Instruction Manual
Page 10
C l eanin g SINGER recommends cleaning your steamer, follow these steps monthly. • Turn the switch to "Off" and unplug the steamer. • Remove the Cool Touch Hose. Collapse ... full, near the top of using this step until the vinegar odor dissipates. • Reassemble the unit. 10 Place it back on your water quality, SINGER recommends removing the mineral build-up inside the steamer, causing intermittent or weak steam. Depending on the Water Reservoir. • Drain the water tank by...
C l eanin g SINGER recommends cleaning your steamer, follow these steps monthly. • Turn the switch to "Off" and unplug the steamer. • Remove the Cool Touch Hose. Collapse ... full, near the top of using this step until the vinegar odor dissipates. • Reassemble the unit. 10 Place it back on your water quality, SINGER recommends removing the mineral build-up inside the steamer, causing intermittent or weak steam. Depending on the Water Reservoir. • Drain the water tank by...

Instruction Manual
Page 11
The symbol indicates that the garment can be steamed, and the symbol indicates that the garment should not be steamed. • Heavier fabrics may require more steam. 11 Durable and flexible, stays cool while in an inconspicuous place (like an inside seam) before steaming the entire garment. • Always consult the garment care label on delicate fabrics, test the heat setting in use. Delivers 60 minutes of water. Deluxe 4-Castor Wheel System Adds stability and mobility, rolls for easy storage. Handy Tips: • Do not touch the Steam Head to steam in just 45 seconds. ...
The symbol indicates that the garment can be steamed, and the symbol indicates that the garment should not be steamed. • Heavier fabrics may require more steam. 11 Durable and flexible, stays cool while in an inconspicuous place (like an inside seam) before steaming the entire garment. • Always consult the garment care label on delicate fabrics, test the heat setting in use. Delivers 60 minutes of water. Deluxe 4-Castor Wheel System Adds stability and mobility, rolls for easy storage. Handy Tips: • Do not touch the Steam Head to steam in just 45 seconds. ...
Instruction Manual
Page 12
it's normal for longer periods, follow the removing mineral build-up in hose - check the power outlet or if further assistance is needed, call SINGER at 1-800-4-SINGER or 1-800-474-6437. 12 Steam is intermittent • Mineral build-up • The water tank is not plugged in the unit - plug into the...
it's normal for longer periods, follow the removing mineral build-up in hose - check the power outlet or if further assistance is needed, call SINGER at 1-800-4-SINGER or 1-800-474-6437. 12 Steam is intermittent • Mineral build-up • The water tank is not plugged in the unit - plug into the...
Instruction Manual
Page 13
...GARMENT STEAMER is warranted to follow the care, cleaning or other than SINGER parts and SINGER approved service in material and workmanship. How Long Is This Limited Warranty? What Will SINGER Do? The SINGER SteamWorks Pro Garment Steamer is warranted only for a period of two (2) years from... WRITTEN WARRANTY. If SINGER sends a replacement GARMENT STEAMER, it any of purchase. What Are The Other Exclusions or Limitations? • Service under this warranty may not be free from the use . SINGER® SEWING COMPANY LIMITED WARRANTY STEAMWORKS PRO GARMENT STEAMER IMPORTANT: ...
...GARMENT STEAMER is warranted to follow the care, cleaning or other than SINGER parts and SINGER approved service in material and workmanship. How Long Is This Limited Warranty? What Will SINGER Do? The SINGER SteamWorks Pro Garment Steamer is warranted only for a period of two (2) years from... WRITTEN WARRANTY. If SINGER sends a replacement GARMENT STEAMER, it any of purchase. What Are The Other Exclusions or Limitations? • Service under this warranty may not be free from the use . SINGER® SEWING COMPANY LIMITED WARRANTY STEAMWORKS PRO GARMENT STEAMER IMPORTANT: ...
Instruction Manual
Page 14
...you. • Some states do not allow limitations on how long an implied warranty lasts, so the above limitation may not apply to : SINGER Sewing Company ATTN: Service Department 1224 Heil Quaker Boulevard LaVergne, TN 37068 What If I Get Service Under The Warranty? If you . How Do... • This warranty gives you specific legal rights, and you may also have any questions regarding these warranties, please contact us: SINGER Sewing Company 1-800-4-SINGER E-mail: [email protected] ATTN: Consumer Affairs (1-800-474-6437) 1224 Heil Quaker Boulevard LaVergne, TN 37068 or through the Customer...
...you. • Some states do not allow limitations on how long an implied warranty lasts, so the above limitation may not apply to : SINGER Sewing Company ATTN: Service Department 1224 Heil Quaker Boulevard LaVergne, TN 37068 What If I Get Service Under The Warranty? If you . How Do... • This warranty gives you specific legal rights, and you may also have any questions regarding these warranties, please contact us: SINGER Sewing Company 1-800-4-SINGER E-mail: [email protected] ATTN: Consumer Affairs (1-800-474-6437) 1224 Heil Quaker Boulevard LaVergne, TN 37068 or through the Customer...
