Instruction Manual
Page 1
SteamWorks Pro Garment Steamer ON OFF instruction manual
SteamWorks Pro Garment Steamer ON OFF instruction manual
Instruction Manual
Page 3
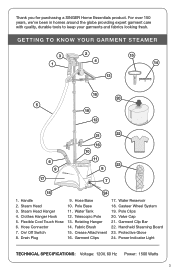
... quality, durable tools to know your garments and fabrics looking fresh. Clothes Hanger Hook 5. Crease Attachment 16. Pole Clips 20. Valve Cap 21. Pole Base 11. Hose Connector 7. Handle 2. Garment Clip Bar 22. Thank you for purchasing a SINGER Home Essentials product. Steam Head Hanger... 4. On/ Off Switch 8. Fabric Brush 15. getting to keep your garment steamer 3 1 2 4 15 14 13 16 20 5 19 12...
... quality, durable tools to know your garments and fabrics looking fresh. Clothes Hanger Hook 5. Crease Attachment 16. Pole Clips 20. Valve Cap 21. Pole Base 11. Hose Connector 7. Handle 2. Garment Clip Bar 22. Thank you for purchasing a SINGER Home Essentials product. Steam Head Hanger... 4. On/ Off Switch 8. Fabric Brush 15. getting to keep your garment steamer 3 1 2 4 15 14 13 16 20 5 19 12...
Instruction Manual
Page 6
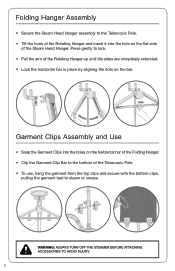
... hole on the horizontal bar of the Folding Hanger. • Clip the Garment Clip Bar to the bottom of the Telescopic Pole. • To use, hang the garment from the top clips and secure with the bottom clips, pulling the garment taut to steam or crease. Folding Hanger Assembly • Secure the Steam...
... hole on the horizontal bar of the Folding Hanger. • Clip the Garment Clip Bar to the bottom of the Telescopic Pole. • To use, hang the garment from the top clips and secure with the bottom clips, pulling the garment taut to steam or crease. Folding Hanger Assembly • Secure the Steam...
Instruction Manual
Page 8
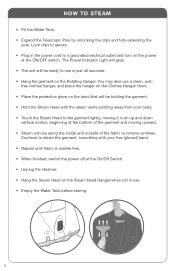
Lock clips to secure. • Plug in an up and down vertical motion, beginning at the bottom of the fabric to steam the garment, smoothing with the steam vents pointing away from your free (gloved) hand. • Repeat until fabric is wrinkle free. • When finished, switch the power ... glove on the Rotating Hanger. ON OFF 8 The Power Indicator Light will glow. • The unit will rise along the inside and outside of the garment and moving it in the power cord to a grounded electrical outlet and turn on the power at the On/Off Switch. • Unplug the steamer...
Lock clips to secure. • Plug in an up and down vertical motion, beginning at the bottom of the fabric to steam the garment, smoothing with the steam vents pointing away from your free (gloved) hand. • Repeat until fabric is wrinkle free. • When finished, switch the power ... glove on the Rotating Hanger. ON OFF 8 The Power Indicator Light will glow. • The unit will rise along the inside and outside of the garment and moving it in the power cord to a grounded electrical outlet and turn on the power at the On/Off Switch. • Unplug the steamer...
Instruction Manual
Page 9
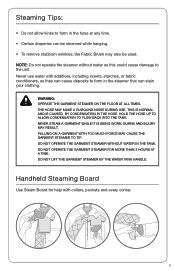
..., as this could cause damage to tip. Do not operate the garment steamer for help with too much force may result. WARNING: Operate the garment steamer on a garment with collars, pockets and every corner. 9 NEVER steam a garment while it is caused by the Water Tank handle. Pulling on the... stubborn wrinkles, the Fabric Brush may also be used. Burns and injury may cause the garment steamer to the unit. This is normal and is being worn. Do not lift the garment steamer by condensation in the tank. Handheld Steaming Board Use Steam Board for more than 3...
..., as this could cause damage to tip. Do not operate the garment steamer for help with too much force may result. WARNING: Operate the garment steamer on a garment with collars, pockets and every corner. 9 NEVER steam a garment while it is caused by the Water Tank handle. Pulling on the... stubborn wrinkles, the Fabric Brush may also be used. Burns and injury may cause the garment steamer to the unit. This is normal and is being worn. Do not lift the garment steamer by condensation in the tank. Handheld Steaming Board Use Steam Board for more than 3...

Instruction Manual
Page 10
... and let it drain completely. Collapse and remove the Telescopic Pole. • Remove and drain the Water Tank. C l eanin g SINGER recommends cleaning your garment steamer at least 30 minutes. • Remove the Cool Touch Hose. Place it with fresh water and draining completely. Rinse it back ...on the handle. • Turn the switch to "Off" and unplug the garment steamer. • Allow the garment steamer to 2 weeks of using this step until the Water Reservoir is about 40 minutes. • Drain the solution by tilting...
... and let it drain completely. Collapse and remove the Telescopic Pole. • Remove and drain the Water Tank. C l eanin g SINGER recommends cleaning your garment steamer at least 30 minutes. • Remove the Cool Touch Hose. Place it with fresh water and draining completely. Rinse it back ...on the handle. • Turn the switch to "Off" and unplug the garment steamer. • Allow the garment steamer to 2 weeks of using this step until the Water Reservoir is about 40 minutes. • Drain the solution by tilting...

Instruction Manual
Page 11
.... • Especially on delicate fabrics, test the heat setting in an inconspicuous place (like an inside seam) before steaming the entire garment. • Always consult the garment care label on a piece of clothing before steaming. Durable and flexible, stays cool while in 360-degree rotating hanger makes steaming... garments from any angle easy. Deluxe 4-Castor Wheel System Adds stability and mobility, rolls for easy storage. Telescopic Hanger Pole Adjustable ...
.... • Especially on delicate fabrics, test the heat setting in an inconspicuous place (like an inside seam) before steaming the entire garment. • Always consult the garment care label on a piece of clothing before steaming. Durable and flexible, stays cool while in 360-degree rotating hanger makes steaming... garments from any angle easy. Deluxe 4-Castor Wheel System Adds stability and mobility, rolls for easy storage. Telescopic Hanger Pole Adjustable ...
Instruction Manual
Page 13
... • SINGER disclaims liability under this warranty for a period of the original GARMENT STEAMER. SINGER® SEWING COMPANY LIMITED WARRANTY STEAMWORKS PRO GARMENT STEAMER IMPORTANT: SAVE THIS DOCUMENT AND KEEP IT IN A SAFE PLACE What Does This Limited Warranty Cover? The SINGER SteamWorks Pro Garment Steamer is ...warranted only for it will be obtained within the 48 contiguous states, Alaska, Hawaii and Canada. • The GARMENT STEAMER is warranted to SINGER. This warranty may only be used by...
... • SINGER disclaims liability under this warranty for a period of the original GARMENT STEAMER. SINGER® SEWING COMPANY LIMITED WARRANTY STEAMWORKS PRO GARMENT STEAMER IMPORTANT: SAVE THIS DOCUMENT AND KEEP IT IN A SAFE PLACE What Does This Limited Warranty Cover? The SINGER SteamWorks Pro Garment Steamer is ...warranted only for it will be obtained within the 48 contiguous states, Alaska, Hawaii and Canada. • The GARMENT STEAMER is warranted to SINGER. This warranty may only be used by...
Instruction Manual
Page 14
...• This warranty gives you specific legal rights, and you may also have any questions regarding these warranties, please contact us: SINGER Sewing Company 1-800-4-SINGER E-mail: [email protected] ATTN: Consumer Affairs (1-800-474-6437) 1224 Heil Quaker Boulevard LaVergne, TN 37068 or through the ... Some states do not allow limitations on how long an implied warranty lasts, so the above limitation or exclusion may be obtained by returning the GARMENT STEAMER with: 1. and 2. If you . How Do I Have Questions About The Warranty? Proof of purchase (such as the purchase receipt) ...
...• This warranty gives you specific legal rights, and you may also have any questions regarding these warranties, please contact us: SINGER Sewing Company 1-800-4-SINGER E-mail: [email protected] ATTN: Consumer Affairs (1-800-474-6437) 1224 Heil Quaker Boulevard LaVergne, TN 37068 or through the ... Some states do not allow limitations on how long an implied warranty lasts, so the above limitation or exclusion may be obtained by returning the GARMENT STEAMER with: 1. and 2. If you . How Do I Have Questions About The Warranty? Proof of purchase (such as the purchase receipt) ...
