Instruction Manual
Page 3
...sewing examples 33 3. PREPARATION FOR EMBROIDERY SEWING Before attaching embroidery unit 34 - 35 Attaching embroidery foot, Inserting the bobbin, Threading the top thread, Extension table, Attaching embroidery unit 36 Removing embroidery unit 36 Securing fabric in embroidery hoop 37 Using fabric and stabilizer 38 - 39 Preparing the machine...Entredeux stitch, Ladder stitch, Criss-cross stitch, Fishbone stitch Sewing on a button 27 Buttonholes 28 - 31 Using buttonhole foot, Procedure, Corded buttonholes Buttonholing with FUTURA Multi hoop 48 - 51 Control panel when embroidering 52 ...
...sewing examples 33 3. PREPARATION FOR EMBROIDERY SEWING Before attaching embroidery unit 34 - 35 Attaching embroidery foot, Inserting the bobbin, Threading the top thread, Extension table, Attaching embroidery unit 36 Removing embroidery unit 36 Securing fabric in embroidery hoop 37 Using fabric and stabilizer 38 - 39 Preparing the machine...Entredeux stitch, Ladder stitch, Criss-cross stitch, Fishbone stitch Sewing on a button 27 Buttonholes 28 - 31 Using buttonhole foot, Procedure, Corded buttonholes Buttonholing with FUTURA Multi hoop 48 - 51 Control panel when embroidering 52 ...

Instruction Manual
Page 5
.... Bobbins 21. ACCESSORIES FOR SEWING MACHINE Sewing machine accessories are located in the storage compartments of your sewing machine is another very useful foot and should be used for most decorative sewing. Buttonhole opener/Brush 9. Buttonhole foot and underplate 17. When purchasing additional bobbins, be sure they are class 15 J. 16 FOR EMBROIDERY Embroidery accessories are located in the...
.... Bobbins 21. ACCESSORIES FOR SEWING MACHINE Sewing machine accessories are located in the storage compartments of your sewing machine is another very useful foot and should be used for most decorative sewing. Buttonhole opener/Brush 9. Buttonhole foot and underplate 17. When purchasing additional bobbins, be sure they are class 15 J. 16 FOR EMBROIDERY Embroidery accessories are located in the...

Instruction Manual
Page 14
... SELECTION BUTTONS Frequently used stitches are available by the direct selection buttons. Simply press a button to enter Program Mode. The information on the machine without the embroidery unit attached, straight stitch number 00, is selected. CONTROL PANEL FUNCTIONS 4 1 5 2 3 6 7 8 1. LCD DISPLAY When turning... a stitch program, and page 52 for regular sewing, programming and embroidering. Read more about the display when embroidering. 2. PROGRAM MODE BUTTON Press this button to select that stitch. 3. For regular sewing, the LCD display shows the number of the selected...
... SELECTION BUTTONS Frequently used stitches are available by the direct selection buttons. Simply press a button to enter Program Mode. The information on the machine without the embroidery unit attached, straight stitch number 00, is selected. CONTROL PANEL FUNCTIONS 4 1 5 2 3 6 7 8 1. LCD DISPLAY When turning... a stitch program, and page 52 for regular sewing, programming and embroidering. Read more about the display when embroidering. 2. PROGRAM MODE BUTTON Press this button to select that stitch. 3. For regular sewing, the LCD display shows the number of the selected...

Instruction Manual
Page 17
...on, needle is set at the exact spot in both the sewing mode and the embroidery mode. 7 15 Red light indicates machine is lit red. 4 2. FUNCTIONS OF OPERATION SWITCH PANEL 1. Press Tacking Stitch button when the machine is plugged, the Start/Stop button will be activated. When ... LED lamp lit. TACKING STITCH MODE BUTTON Press Tacking Stitch Button and the sewing machine makes 1 2 START/STOP to automatically cut the top and bobbin 5 threads. 3. LED INDICATOR Green light indicates machine is used in the pattern where the Tacking Stitch button is set at its...
...on, needle is set at the exact spot in both the sewing mode and the embroidery mode. 7 15 Red light indicates machine is lit red. 4 2. FUNCTIONS OF OPERATION SWITCH PANEL 1. Press Tacking Stitch button when the machine is plugged, the Start/Stop button will be activated. When ... LED lamp lit. TACKING STITCH MODE BUTTON Press Tacking Stitch Button and the sewing machine makes 1 2 START/STOP to automatically cut the top and bobbin 5 threads. 3. LED INDICATOR Green light indicates machine is used in the pattern where the Tacking Stitch button is set at its...
Instruction Manual
Page 36
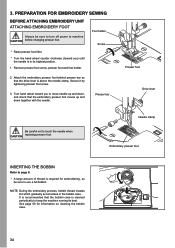
...machine running its highest position. 1. Needle clamp Embroidery presser foot INSERTING THE BOBBIN Refer to page 6. * A large amount of thread is cleaned periodically to move needle up and down together with the needle. NOTE: During the embroidery process, bobbin thread creates lint which gradually accumulates in its best. PREPARATION FOR EMBROIDERY SEWING BEFORE ATTACHING EMBROIDERY... UNIT ATTACHING EMBROIDERY FOOT ...
...machine running its highest position. 1. Needle clamp Embroidery presser foot INSERTING THE BOBBIN Refer to page 6. * A large amount of thread is cleaned periodically to move needle up and down together with the needle. NOTE: During the embroidery process, bobbin thread creates lint which gradually accumulates in its best. PREPARATION FOR EMBROIDERY SEWING BEFORE ATTACHING EMBROIDERY... UNIT ATTACHING EMBROIDERY FOOT ...

Instruction Manual
Page 38
..., carefully slide toward the left to open. Turn off the machine. * Raise the presser foot. * Remove embroidery hoop from machine. (Refer to page 40.) 1. Turn connector cap to the right to close for general sewing. 3 Handle 1 Release lever 2 Handle Release lever 36 Turn the connector cap to the left while pressing release lever. Don...
..., carefully slide toward the left to open. Turn off the machine. * Raise the presser foot. * Remove embroidery hoop from machine. (Refer to page 40.) 1. Turn connector cap to the right to close for general sewing. 3 Handle 1 Release lever 2 Handle Release lever 36 Turn the connector cap to the left while pressing release lever. Don...
Instruction Manual
Page 43
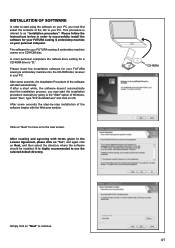
... installation process, you may start automatically. It is refered to as instructions below in order to successfully install the software for your FUTURA sewing & embroidery machine into the CD-ROM disc receiver in the and again click on Next, and then select the directory where the software should be... begins with terms given in your personal computer. INSTALLATION OF SOFTWARE install the contents of the CD to your FUTURA sewing & embroidery machine comes on a CD-ROM disc. This procedure is highly recommended to use the selected default directory. The software for your PC.
... installation process, you may start automatically. It is refered to as instructions below in order to successfully install the software for your FUTURA sewing & embroidery machine into the CD-ROM disc receiver in the and again click on Next, and then select the directory where the software should be... begins with terms given in your personal computer. INSTALLATION OF SOFTWARE install the contents of the CD to your FUTURA sewing & embroidery machine comes on a CD-ROM disc. This procedure is highly recommended to use the selected default directory. The software for your PC.

Instruction Manual
Page 44
... with the installation. Boot up . Pressing the "Next" button will finally start -up the embroidery software. 3. Make sure the needle has been moved to the highest position by clicking on the FUTURA icon shortcut your desktop to your sewing machine and connect the USB cable between your computer, but do not open up protocol...
... with the installation. Boot up . Pressing the "Next" button will finally start -up the embroidery software. 3. Make sure the needle has been moved to the highest position by clicking on the FUTURA icon shortcut your desktop to your sewing machine and connect the USB cable between your computer, but do not open up protocol...
Instruction Manual
Page 45
... as it is stopped. Red light indicates machine is advancing through a design that the machine malfunctioned or is malfunctioning. NOTE: When sewing designs created by checking the box in progress, press the Reverse Stitch button. FORWARD STITCH BUTTON After the embroidery design has been transferred to the machine. Flashing red light indicates a problem or an...
... as it is stopped. Red light indicates machine is advancing through a design that the machine malfunctioned or is malfunctioning. NOTE: When sewing designs created by checking the box in progress, press the Reverse Stitch button. FORWARD STITCH BUTTON After the embroidery design has been transferred to the machine. Flashing red light indicates a problem or an...
Instruction Manual
Page 50
... fabric is slightly askew, this system will only compensate for the hoop or a combination of smaller embroidery elements and/ or lettering, that when combined together make a much larger Fig. 1 The Multi-...-Hoop utilizes a system where three alignment points (A, B, and C) are input, they inform the machine exactly as possible. Cross line Please Note: a thin line is very important to hoop the fabric...right angles to each part of the design lines up to four different parts and then sews them precisely, matching one section to the other . Mark a line horizontally across the center...
... fabric is slightly askew, this system will only compensate for the hoop or a combination of smaller embroidery elements and/ or lettering, that when combined together make a much larger Fig. 1 The Multi-...-Hoop utilizes a system where three alignment points (A, B, and C) are input, they inform the machine exactly as possible. Cross line Please Note: a thin line is very important to hoop the fabric...right angles to each part of the design lines up to four different parts and then sews them precisely, matching one section to the other . Mark a line horizontally across the center...

Instruction Manual
Page 51
...first of the hoop there is sent to the machine for sewing. In each side of the embroidery data that is sent to be set on the horizontal and vertical cross lines on the screen. On each corner of the hoop there are referred to Machine" tool on the inner hoop. Fig. 3 ...to as shown. The example shown uses lettering and designs from the Design Library that is a Center Hoop line which together define the maximum sewing area for sewing one section at a time. Set fabric and stabilizer into the software. (Additional 4. Guide lines are two sets of the hoop. Select a...
...first of the hoop there is sent to the machine for sewing. In each side of the embroidery data that is sent to be set on the horizontal and vertical cross lines on the screen. On each corner of the hoop there are referred to Machine" tool on the inner hoop. Fig. 3 ...to as shown. The example shown uses lettering and designs from the Design Library that is a Center Hoop line which together define the maximum sewing area for sewing one section at a time. Set fabric and stabilizer into the software. (Additional 4. Guide lines are two sets of the hoop. Select a...

Instruction Manual
Page 54
... within a color block. The block. The hoop moves to 15 stitches. As the block is shown on the control panel are used to your FUTURA sewing and embroidery machine, the display shows number of current color block and total number of color blocks as described on the right side of the current color block...
... within a color block. The block. The hoop moves to 15 stitches. As the block is shown on the control panel are used to your FUTURA sewing and embroidery machine, the display shows number of current color block and total number of color blocks as described on the right side of the current color block...

Instruction Manual
Page 56
... legs, and other hard-to the left as they lower automatically. With the extension table removed the machine converts into place until it clicks. To replace, slide the extension table back into a slim free-arm... 1. Lift it off to -reach places. 54 Down Feed dog control CONVERTING TO FREE-ARM SEWING arm model. OTHER THINGS YOU SHOULD KNOW PRESSER FOOT LIFTER There are moving the fabric. Raise the... lifter to the middle position to lower the feed dogs when attaching the embroidery unit, as shown. With the extension table in position, it provides a large working and ...
... legs, and other hard-to the left as they lower automatically. With the extension table removed the machine converts into place until it clicks. To replace, slide the extension table back into a slim free-arm... 1. Lift it off to -reach places. 54 Down Feed dog control CONVERTING TO FREE-ARM SEWING arm model. OTHER THINGS YOU SHOULD KNOW PRESSER FOOT LIFTER There are moving the fabric. Raise the... lifter to the middle position to lower the feed dogs when attaching the embroidery unit, as shown. With the extension table in position, it provides a large working and ...
Instruction Manual
Page 63
..., or can be used to create freehand embroidery, monograms and stippling when the machine is set of the fabric during embroidering. Secure the walking foot to the back and neaten or tie a knot. Sew seam from the right to the left. ... fabric slowly. 8. Draw your machine. * The edge guide (quilting bar) is particularly important when sewing several layers of fabric right sides together. 4. Sew with the machine embroidery thread. For designs and monograms 03 3.0 - 5.0 For freehand embroidery 00 * The darning / freehand embroidery foot is best utilized when paired...
..., or can be used to create freehand embroidery, monograms and stippling when the machine is set of the fabric during embroidering. Secure the walking foot to the back and neaten or tie a knot. Sew seam from the right to the left. ... fabric slowly. 8. Draw your machine. * The edge guide (quilting bar) is particularly important when sewing several layers of fabric right sides together. 4. Sew with the machine embroidery thread. For designs and monograms 03 3.0 - 5.0 For freehand embroidery 00 * The darning / freehand embroidery foot is best utilized when paired...
Instruction Manual
Page 65
... connected. Turn off power switch and eliminate the problem that caused the machine to stop . Bobbin winder is locked up due to thread entangled with bobbin case or rotation interrupted forcibly. When a message is On control panel Problem Correction Sewing Embroidery Machine is locked up due to thread entangled around spindle or rotation interrupted...
... connected. Turn off power switch and eliminate the problem that caused the machine to stop . Bobbin winder is locked up due to thread entangled with bobbin case or rotation interrupted forcibly. When a message is On control panel Problem Correction Sewing Embroidery Machine is locked up due to thread entangled around spindle or rotation interrupted...


