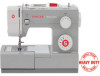
Instruction Manual
Page 2
.... 21. Never operate the appliance with the appliance. The sound pressure level under normal operating conditions is being used as threading needle, changing needle, threading bobbin, or changing presser foot, and the like. 10. Always unplug this appliance from the electrical outlet when removing covers, lubricating, or when making any other...
.... 21. Never operate the appliance with the appliance. The sound pressure level under normal operating conditions is being used as threading needle, changing needle, threading bobbin, or changing presser foot, and the like. 10. Always unplug this appliance from the electrical outlet when removing covers, lubricating, or when making any other...
Instruction Manual
Page 6
... to Power Source ...6 Two Step Presser Foot Lifter/ Adjusting Presser Foot Pressure 8 Accessories ...10 Threading the Machine Winding the Bobbin ...12 Inserting the Bobbin ...14 Threading the Upper Thread ...16 Raising the Bobbin Thread ...18 Thread Tension...20 Sewing How to Choose Your Pattern ...22 Three Needle Position Dial...24 Stitch Width Dial...
... to Power Source ...6 Two Step Presser Foot Lifter/ Adjusting Presser Foot Pressure 8 Accessories ...10 Threading the Machine Winding the Bobbin ...12 Inserting the Bobbin ...14 Threading the Upper Thread ...16 Raising the Bobbin Thread ...18 Thread Tension...20 Sewing How to Choose Your Pattern ...22 Three Needle Position Dial...24 Stitch Width Dial...
Instruction Manual
Page 9
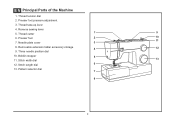
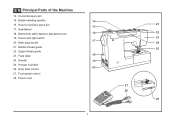
Thread take-up lever 4. Three needle position dial 10. Presser foot 2 10 11 7. Removable extension table/ accessory storage 4 12 9. Reverse sewing lever 5. Stitch width dial 13 12. Thread tension dial 2. Thread cutter 1 9 6. Presser foot pressure adjustment 3. Needle plate cover 3 8. EN Principal Parts of the Machine 1. Stitch length dial 6 13. Bobbin stopper 5 11. Pattern selector dial 7 8 2
Thread take-up lever 4. Three needle position dial 10. Presser foot 2 10 11 7. Removable extension table/ accessory storage 4 12 9. Reverse sewing lever 5. Stitch width dial 13 12. Thread tension dial 2. Thread cutter 1 9 6. Presser foot pressure adjustment 3. Needle plate cover 3 8. EN Principal Parts of the Machine 1. Stitch length dial 6 13. Bobbin stopper 5 11. Pattern selector dial 7 8 2
Instruction Manual
Page 11
Handwheel 18. Handle 19 25. Power cord 4 21 22 23 24 25 27 28 26 Power and light switch 17 20. Face plate 18 24. Horizontal spool pin 15. Bobbin thread guide 22. Drop feed control 27. Bobbin winding spindle 14 16. Presser foot lifter 20 26. Hole for auxiliary spool pin 15 17. Upper thread guide 23. Foot speed control 28. Buttonhole stitch balance adjustment slot 16 19. Main plug socket 21. EN Principal Parts of the Machine 14.
Handwheel 18. Handle 19 25. Power cord 4 21 22 23 24 25 27 28 26 Power and light switch 17 20. Face plate 18 24. Horizontal spool pin 15. Bobbin thread guide 22. Drop feed control 27. Bobbin winding spindle 14 16. Presser foot lifter 20 26. Hole for auxiliary spool pin 15 17. Upper thread guide 23. Foot speed control 28. Buttonhole stitch balance adjustment slot 16 19. Main plug socket 21. EN Principal Parts of the Machine 14.
Instruction Manual
Page 17
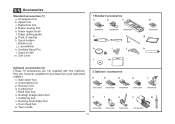
Pack of needles h. Bobbin (3x) j. Spool pin felt m. Satin stitch foot o. Darning/ embroidery foot v. Blind hem foot s. All purpose foot b. Button sewing foot e. Edge/ quilting guide g. Soft cover 1 Standard ...
Pack of needles h. Bobbin (3x) j. Spool pin felt m. Satin stitch foot o. Darning/ embroidery foot v. Blind hem foot s. All purpose foot b. Button sewing foot e. Edge/ quilting guide g. Soft cover 1 Standard ...
Instruction Manual
Page 19
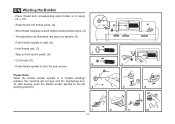
... thread clockwise around bobbin winder tension discs. (4) - Push bobbin spindle to spool pin. (1/2) - To start sewing, push the bobbin winder spindle to left (sewing position). 4 3 5 6 7 8 9 10 12 Please Note: When the bobbin winder spindle is in "bobbin winding" position, the... machine will not sew and the handwheel turn. EN Winding the Bobbin - Thread bobbin as illustrated and place on foot control pedal. (8) - Step on spindle. ...
... thread clockwise around bobbin winder tension discs. (4) - Push bobbin spindle to spool pin. (1/2) - To start sewing, push the bobbin winder spindle to left (sewing position). 4 3 5 6 7 8 9 10 12 Please Note: When the bobbin winder spindle is in "bobbin winding" position, the... machine will not sew and the handwheel turn. EN Winding the Bobbin - Thread bobbin as illustrated and place on foot control pedal. (8) - Step on spindle. ...
Instruction Manual
Page 21
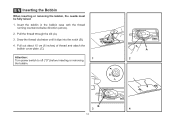
EN Inserting the Bobbin When inserting or removing the bobbin, the needle must be fully raised. 1. B 3 14 A 2 C 4 Draw the thread clockwise until it slips into the notch (B). 4. Pull out about 15 cm (6 inches) of thread and attach the bobbin cover plate. (C) Attention: 1 Turn power switch to off ("O") before inserting or removing the bobbin. Insert the bobbin in the bobbin case with the thread running counterclockwise direction (arrow). 2. Pull the thread through the slit (A). 3.
EN Inserting the Bobbin When inserting or removing the bobbin, the needle must be fully raised. 1. B 3 14 A 2 C 4 Draw the thread clockwise until it slips into the notch (B). 4. Pull out about 15 cm (6 inches) of thread and attach the bobbin cover plate. (C) Attention: 1 Turn power switch to off ("O") before inserting or removing the bobbin. Insert the bobbin in the bobbin case with the thread running counterclockwise direction (arrow). 2. Pull the thread through the slit (A). 3.
Instruction Manual
Page 25
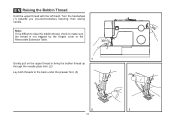
EN Raising the Bobbin Thread Hold the upper thread with the left hand. Note: If it is difficult to raise the bobbin thread, check to make sure the thread is not trapped by the hinged cover or the Removable Extension Table. 1 Gently pull on the upper thread to bring the bobbin thread up through the needle plate hole. (2) Lay both threads to the back under the presser foot. (3) 2 3 18 Turn the handwheel (1) towards you (counterclockwise) lowering, then raising needle.
EN Raising the Bobbin Thread Hold the upper thread with the left hand. Note: If it is difficult to raise the bobbin thread, check to make sure the thread is not trapped by the hinged cover or the Removable Extension Table. 1 Gently pull on the upper thread to bring the bobbin thread up through the needle plate hole. (2) Lay both threads to the back under the presser foot. (3) 2 3 18 Turn the handwheel (1) towards you (counterclockwise) lowering, then raising needle.
Instruction Manual
Page 27
... you do not need to the next number up. To reduce the tension, turn the dial to adjust it. 1 Please note: - Lower thread tension The bobbin tension has been set correctly at the factory, so you will be less than for strong seams. - A.
... you do not need to the next number up. To reduce the tension, turn the dial to adjust it. 1 Please note: - Lower thread tension The bobbin tension has been set correctly at the factory, so you will be less than for strong seams. - A.

Instruction Manual
Page 60
... hand and remove the thread. The thread is not inserted correctly. 2. Thread tension wrong. 1. Rethread the machine. 2. Check both bobbin and bobbin case. 3. Insert a new needle. 2. Check the threading. 2. Readjust the stitch length. 3. Clean the hook and feed dog ...Thread is too thick for the fabric. 4. Insert a new needle. 3. Select a finer needle. 2. The needle is threaded wrong. 3. The bobbin case is not inserted correctly. 5. Needle/ fabric/ thread combination is not threaded correctly. 2. Select a better quality thread. 2. Insert the needle ...
... hand and remove the thread. The thread is not inserted correctly. 2. Thread tension wrong. 1. Rethread the machine. 2. Check both bobbin and bobbin case. 3. Insert a new needle. 2. Check the threading. 2. Readjust the stitch length. 3. Clean the hook and feed dog ...Thread is too thick for the fabric. 4. Insert a new needle. 3. Select a finer needle. 2. The needle is threaded wrong. 3. The bobbin case is not inserted correctly. 5. Needle/ fabric/ thread combination is not threaded correctly. 2. Select a better quality thread. 2. Insert the needle ...
4411 Stitch Applications Guide
Page 4
... sew. For medium weight fabrics, set the machine for some machine models) is creating a series of pleats and gathers in fabric, creating fullness. Pull the bobbin threads to that inside the seam allowance. Sew one row of zipper insertion are times you may want to wrap around the cord as well...
... sew. For medium weight fabrics, set the machine for some machine models) is creating a series of pleats and gathers in fabric, creating fullness. Pull the bobbin threads to that inside the seam allowance. Sew one row of zipper insertion are times you may want to wrap around the cord as well...


