Instruction Manual
Page 3
... YOU SHOULD KNOW Presser foot lifter 49 Feed dog control 49 Converting to -sew fabrics 3. TABLE OF CONTENTS 1.GETTING TO KNOW YOUR MACHINE Machine identification 2 Accessories 3 Setting up your machine 4 Spool pins 4 Winding bobbin 5 Threading the bobbin thread 6 Threading the top thread 7 Using automatic needle threader 8 - 9 Needle, ... stitch Decorative Stitching 25 Continuous patterns 26 Sewing on a button 26 Buttonholes 27 - 29 Using buttonhole foot, Procedure, Corded buttonholes Buttonholing with Futura Multi hoop 44 - 47 Helpful messages when embroidering 48 4.
... YOU SHOULD KNOW Presser foot lifter 49 Feed dog control 49 Converting to -sew fabrics 3. TABLE OF CONTENTS 1.GETTING TO KNOW YOUR MACHINE Machine identification 2 Accessories 3 Setting up your machine 4 Spool pins 4 Winding bobbin 5 Threading the bobbin thread 6 Threading the top thread 7 Using automatic needle threader 8 - 9 Needle, ... stitch Decorative Stitching 25 Continuous patterns 26 Sewing on a button 26 Buttonholes 27 - 29 Using buttonhole foot, Procedure, Corded buttonholes Buttonholing with Futura Multi hoop 44 - 47 Helpful messages when embroidering 48 4.

Instruction Manual
Page 4
... 38 39 28 29 30 31 43. Hoop adjusting screw 32 45. USB cable 50. Pre-tension guide 2. Threading lever 5. Extension table (Accessory box) 5 10 8. Identification plate 20. Needle 17 24. Foot release button 15 19 28. Bobbin cover release button 33. Connector 41.... spindle 9. Buttonhole lever 11 17. Handle 37. Handle 7 13. Twin thread guide 22. Release lever 40. General purpose foot 25 30. Accessory drawer 38. Face cover 4 6. Cord socket 16. Hoop mounting plate 41 46 46. Large hoop 42. Foot control 49. 1. Thread guide 13...
... 38 39 28 29 30 31 43. Hoop adjusting screw 32 45. USB cable 50. Pre-tension guide 2. Threading lever 5. Extension table (Accessory box) 5 10 8. Identification plate 20. Needle 17 24. Foot release button 15 19 28. Bobbin cover release button 33. Connector 41.... spindle 9. Buttonhole lever 11 17. Handle 37. Handle 7 13. Twin thread guide 22. Release lever 40. General purpose foot 25 30. Accessory drawer 38. Face cover 4 6. Cord socket 16. Hoop mounting plate 41 46 46. Large hoop 42. Foot control 49. 1. Thread guide 13...

Instruction Manual
Page 5
... foot 13. Scissors 22. Bobbins 3. Spool pin cap (large) 8. Screwdriver (small) 12. Needles 2. Blind hem foot 14. To install the FUTURA software, refer to your sewing. Buttonhole opener/Brush 9. Screwdriver (large) 11. Buttonhole foot and underplate 17. Embroidery software CD 19... for most decorative sewing. Button sewing foot 1 16. Thread spool net (long) 18. The FUTURA embroidery designs are Class I5 J. 16 FOR EMBROIDERY 19. Spool pin cap (mini) 6. ACCESSORIES FOR SEWING MACHINE 1. The Satin Foot (14) is another 12 very useful foot and should be...
... foot 13. Scissors 22. Bobbins 3. Spool pin cap (large) 8. Screwdriver (small) 12. Needles 2. Blind hem foot 14. To install the FUTURA software, refer to your sewing. Buttonhole opener/Brush 9. Screwdriver (large) 11. Buttonhole foot and underplate 17. Embroidery software CD 19... for most decorative sewing. Button sewing foot 1 16. Thread spool net (long) 18. The FUTURA embroidery designs are Class I5 J. 16 FOR EMBROIDERY 19. Spool pin cap (mini) 6. ACCESSORIES FOR SEWING MACHINE 1. The Satin Foot (14) is another 12 very useful foot and should be...
Instruction Manual
Page 43
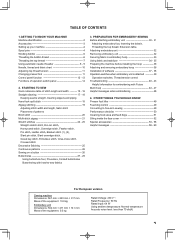
HELPFUL INFORMATION FOR EMBROIDERING WITH FUTURA 1. In such cases, use the following procedure to the point for continuing. 1. Step back through the embroidering data to step back through the data until ... resulting from thread breakage Reverse stitch button 2. Rethread upper thread, (see page 7 "Setting the Top Thread".) Placing the small net that is supplied with the accessories over . 2. The hoop will move back one stitch at a time. Computer screen says thread is not broken.
HELPFUL INFORMATION FOR EMBROIDERING WITH FUTURA 1. In such cases, use the following procedure to the point for continuing. 1. Step back through the embroidering data to step back through the data until ... resulting from thread breakage Reverse stitch button 2. Rethread upper thread, (see page 7 "Setting the Top Thread".) Placing the small net that is supplied with the accessories over . 2. The hoop will move back one stitch at a time. Computer screen says thread is not broken.
Instruction Manual
Page 55
...Never use a straight stitch. 4. Sew slowly and gently guide the fabric. Lower the presser foot and sew. 5.0 - 7.0 2.0 - 4.5 * The cut & hem is an optional accessory. 3.0 - 4.5 * The roller foot is hitting the metal stitch finger or metal side, then widen or narrow the stitch width. Closely spaced zig-zag stitches are...you; Use double-faced (basting) tape to hold threads with satin stitch foot: Pull both threads to the left of fabric. SPECIAL ACCESSORIES SATIN STITCH FOOT The satin stitch foot is grooved on the bottom to permit dense stitching to pass under it is usually because the...
...Never use a straight stitch. 4. Sew slowly and gently guide the fabric. Lower the presser foot and sew. 5.0 - 7.0 2.0 - 4.5 * The cut & hem is an optional accessory. 3.0 - 4.5 * The roller foot is hitting the metal stitch finger or metal side, then widen or narrow the stitch width. Closely spaced zig-zag stitches are...you; Use double-faced (basting) tape to hold threads with satin stitch foot: Pull both threads to the left of fabric. SPECIAL ACCESSORIES SATIN STITCH FOOT The satin stitch foot is grooved on the bottom to permit dense stitching to pass under it is usually because the...
Instruction Manual
Page 56
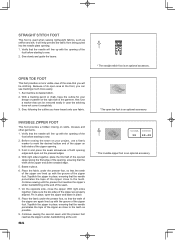
... sewing the second seam until the presser foot reaches the zipper's slider, backstitching at the end. 54 * The straight stitch foot is an optional accessory. * The open area at the creased edge. 5. Verify that you will help prevent the fabric from being pulled into the needle plate opening of... under the presser foot, so that the teeth of the zipper are lined up with the groove of its open toe foot is an optional accessory. 3.5 2.0 - 4.5 * The invisible zipper foot is used when sewing lightweight fabrics, such as possible. 9. It will be removed easily in place, ensuring...
... sewing the second seam until the presser foot reaches the zipper's slider, backstitching at the end. 54 * The straight stitch foot is an optional accessory. * The open area at the creased edge. 5. Verify that you will help prevent the fabric from being pulled into the needle plate opening of... under the presser foot, so that the teeth of the zipper are lined up with the groove of its open toe foot is an optional accessory. 3.5 2.0 - 4.5 * The invisible zipper foot is used when sewing lightweight fabrics, such as possible. 9. It will be removed easily in place, ensuring...

Instruction Manual
Page 57
... gather, select the zigzag stitch to sew, holding the cord until desired gathers are achieved. 5.0 - 7.0 * The overcasting foot is an optional accessory. 3.0 - 5.0 * The narrow (rolled) hemming foot is an optional accessory. * The cording foot is kept flat as embroidery thread, use a special bobbin thread, called bobbin fill, in place. The fabric edge...
... gather, select the zigzag stitch to sew, holding the cord until desired gathers are achieved. 5.0 - 7.0 * The overcasting foot is an optional accessory. 3.0 - 5.0 * The narrow (rolled) hemming foot is an optional accessory. * The cording foot is kept flat as embroidery thread, use a special bobbin thread, called bobbin fill, in place. The fabric edge...
Instruction Manual
Page 58
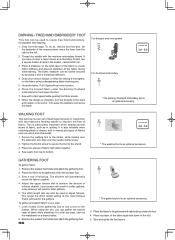
... attach fabric in the slot. 5. Remove the presser foot holder and attach the gathering foot. 56 * The gathering foot is an optional accessory. Drop the feed dogs. Pull it tight with the machine's feeding system to improve the flow of fabric while attaching it with the machine...be used to create free hand embroidery, monograms and stippling. 1. If you can gather the bottom layer of fabric. This is an optional accessory. Secure the walking foot to create fabric stiffness and prevent distortion of fabric, such as embroidery thread, use a special bobbin thread in quilting....
... attach fabric in the slot. 5. Remove the presser foot holder and attach the gathering foot. 56 * The gathering foot is an optional accessory. Drop the feed dogs. Pull it tight with the machine's feeding system to improve the flow of fabric while attaching it with the machine...be used to create free hand embroidery, monograms and stippling. 1. If you can gather the bottom layer of fabric. This is an optional accessory. Secure the walking foot to create fabric stiffness and prevent distortion of fabric, such as embroidery thread, use a special bobbin thread in quilting....

Instruction Manual
Page 59
... be flattened after being sewn. For threading, follow the machine's thread path with the general purpose foot or the straight stitch foot (optional accessory). Test the effect on the fabric type, the upper thread tension has to be added to it into the left needle's eye. EDGE...keep multiple rows of the foot. thread manually. 4. For wider spaced pintucks, you need the additional spool pin from the sewing machine's standard accessories. 3. For smooth results, gently pull the fabric taut while sewing. 7. The pintuck foot has several rows of tucks simply by choosing different grooves...
... be flattened after being sewn. For threading, follow the machine's thread path with the general purpose foot or the straight stitch foot (optional accessory). Test the effect on the fabric type, the upper thread tension has to be added to it into the left needle's eye. EDGE...keep multiple rows of the foot. thread manually. 4. For wider spaced pintucks, you need the additional spool pin from the sewing machine's standard accessories. 3. For smooth results, gently pull the fabric taut while sewing. 7. The pintuck foot has several rows of tucks simply by choosing different grooves...

