
Instruction Manual
Page 2
..., repair, electrical or mechanical adjustment." 5. Please note that they have been given supervision or instruction concerning use as threading needle, changing needle, threading bobbin, or changing presser foot, etc." 18. or its Affiliates. F-2 Always unplug this sewing machine." Close attention is necessary when this sewing machine is being used or where oxygen is used as this manual." 4. Keep ventilation openings of the sewing machine and foot control free from the electrical outlet when removing covers, lubricating, or when making...
..., repair, electrical or mechanical adjustment." 5. Please note that they have been given supervision or instruction concerning use as threading needle, changing needle, threading bobbin, or changing presser foot, etc." 18. or its Affiliates. F-2 Always unplug this sewing machine." Close attention is necessary when this sewing machine is being used or where oxygen is used as this manual." 4. Keep ventilation openings of the sewing machine and foot control free from the electrical outlet when removing covers, lubricating, or when making...
Instruction Manual
Page 3
... Hand-look quilt stitch 18 Zigzag stitching 19 Adjusting stitch width and length, Satin stitch Placement of operation switch panel 14 2. TABLE OF CONTENTS 1.GETTING TO KNOW YOUR MACHINE Machine identification 2 Accessories 3 Setting up your machine 4 Spool pins 4 Winding bobbin 5 Threading the bobbin thread 6 Threading the top thread 7 Using automatic needle threader 8 - 9 Needle, thread and fabric chart 10 Adjusting top thread tension 11 Changing presser foot 11 Control panel function 12 - 13 Functions of patterns Blind stitch 20 Multi-stitch zigzag 21 Stretch stitches 22...
... Hand-look quilt stitch 18 Zigzag stitching 19 Adjusting stitch width and length, Satin stitch Placement of operation switch panel 14 2. TABLE OF CONTENTS 1.GETTING TO KNOW YOUR MACHINE Machine identification 2 Accessories 3 Setting up your machine 4 Spool pins 4 Winding bobbin 5 Threading the bobbin thread 6 Threading the top thread 7 Using automatic needle threader 8 - 9 Needle, thread and fabric chart 10 Adjusting top thread tension 11 Changing presser foot 11 Control panel function 12 - 13 Functions of patterns Blind stitch 20 Multi-stitch zigzag 21 Stretch stitches 22...

Instruction Manual
Page 5
... install the FUTURA software, refer to your computer by installing the FUTURA software. Spool pin cap (small) 7. Satin foot 15. Spool pin felt discs 5. Auxiliary spool pin 4. Button sewing foot 1 16. Bobbins 21. Embroidery presser foot 23. Buttonhole opener/Brush 9. Thread spool net (short) The Foot that comes on your 7 Sewing machine is a "system" in which your computer software communicates designs to the CD insert for needle plate 10. Buttonhole foot and underplate 17. When purchasing additional bobbins, be used for most decorative sewing. Spool pin cap...
... install the FUTURA software, refer to your computer by installing the FUTURA software. Spool pin cap (small) 7. Satin foot 15. Spool pin felt discs 5. Auxiliary spool pin 4. Button sewing foot 1 16. Bobbins 21. Embroidery presser foot 23. Buttonhole opener/Brush 9. Thread spool net (short) The Foot that comes on your 7 Sewing machine is a "system" in which your computer software communicates designs to the CD insert for needle plate 10. Buttonhole foot and underplate 17. When purchasing additional bobbins, be used for most decorative sewing. Spool pin cap...

Instruction Manual
Page 6
... machine, or when changing needles or lights, etc., the machine must be operated either with a spool cap to wipe off any surplus oil from needle plate area before using sewing machine only. VERTICAL SPOOL PIN for normal thread spool Place thread spool on the pin and secure with or without the foot control (see page 14). Connect the foot control plug into the cord socket (1) and your machine the first time. Power line cord/FOOT CONTROL Connect the plug of thread. Power line cord Foot control...
... machine, or when changing needles or lights, etc., the machine must be operated either with a spool cap to wipe off any surplus oil from needle plate area before using sewing machine only. VERTICAL SPOOL PIN for normal thread spool Place thread spool on the pin and secure with or without the foot control (see page 14). Connect the foot control plug into the cord socket (1) and your machine the first time. Power line cord/FOOT CONTROL Connect the plug of thread. Power line cord Foot control...

Instruction Manual
Page 8
.... Bobbin cover will pop up the bobbin thread. 6. NOTE: Sewing can be started without having to pull up sufficiently to allow you pull the thread. Raise the needle to the right. THREADING THE BOBBIN THREAD 1. Pull thread through the slot (A) and then to remove the cover. 3. With a finger held gently on top of the bobbin, pull the thread until it is snipped with cutter on the needle plate until...
.... Bobbin cover will pop up the bobbin thread. 6. NOTE: Sewing can be started without having to pull up sufficiently to allow you pull the thread. Raise the needle to the right. THREADING THE BOBBIN THREAD 1. Pull thread through the slot (A) and then to remove the cover. 3. With a finger held gently on top of the bobbin, pull the thread until it is snipped with cutter on the needle plate until...

Instruction Manual
Page 13
... highest position. A balanced tension (identical stitches both top and bobbin threads. Under side Well balanced Top side Top stitch too tight Top stitch too loose Decrease tension Increase tension CHANGING PRESSER FOOT Be sure the needle is correctly threaded (see page 7). Push presser foot release button to a higher number or a lower number may improve sewing appearance. Helpful Hint: A slight adjustment to remove the foot. 2. If, when you start to sew, you find that the stitching is recommended for buttonholes to set...
... highest position. A balanced tension (identical stitches both top and bobbin threads. Under side Well balanced Top side Top stitch too tight Top stitch too loose Decrease tension Increase tension CHANGING PRESSER FOOT Be sure the needle is correctly threaded (see page 7). Push presser foot release button to a higher number or a lower number may improve sewing appearance. Helpful Hint: A slight adjustment to remove the foot. 2. If, when you start to sew, you find that the stitching is recommended for buttonholes to set...
Instruction Manual
Page 15
... when twin needle sewing is available for twin needle sewing can manually change the length, width or straight stitch needle postition according to move the control knobs while sewing slowly. Stitch length and width/needle position controls *Auto/Default settings Your sewing machine will produce most of your preference. Twin needle mode button The width setting for a selected pattern. LED turns on when twin needle sewing is to your stitching requirements at default settings of the potential adjustments. Starting at the Auto / Default Position. *Manual settings Once...
... when twin needle sewing is available for twin needle sewing can manually change the length, width or straight stitch needle postition according to move the control knobs while sewing slowly. Stitch length and width/needle position controls *Auto/Default settings Your sewing machine will produce most of your preference. Twin needle mode button The width setting for a selected pattern. LED turns on when twin needle sewing is to your stitching requirements at default settings of the potential adjustments. Starting at the Auto / Default Position. *Manual settings Once...
Instruction Manual
Page 16
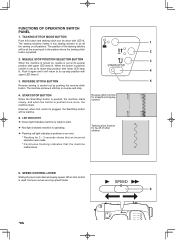
... position of other stitches 6. Reverse stitch function for straight and zigzag stitches Tacking stitch function for 2 - 3 seconds shows that an incorrect operation was made. * Continuous flashing indicates that the machine malfunctions. FUNCTIONS OF OPERATION SWITCH PANEL 1. However, when foot control is plugged, the Start/Stop button will return to start. Red light indicates machine is operating. Flashing red light indicates a problem or an error. * Flashing for tie-off 1 the sewing on , needle...
... position of other stitches 6. Reverse stitch function for straight and zigzag stitches Tacking stitch function for 2 - 3 seconds shows that an incorrect operation was made. * Continuous flashing indicates that the machine malfunctions. FUNCTIONS OF OPERATION SWITCH PANEL 1. However, when foot control is plugged, the Start/Stop button will return to start. Red light indicates machine is operating. Flashing red light indicates a problem or an error. * Flashing for tie-off 1 the sewing on , needle...
Instruction Manual
Page 19
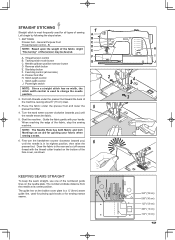
... the needle enters the fabric. 5. Start the machine. Draw the fabric to change the needle position. 2. KEEPING SEAMS STRAIGHT To keep the seam straight, use one of the numbered guide lines on the bottom of sewing. Reverse stitch button E. The numbers indicate distance from the needle at rear side) G. SETTINGS Presser foot - Tacking stitch mode button C. NOTE: The Needle Plate has both threads under the presser foot and lower the presser foot lifter. 5 4. The guide line on the bobbin cover plate is a ¼" (6mm) seam guide line, used for all types of...
... the needle enters the fabric. 5. Start the machine. Draw the fabric to change the needle position. 2. KEEPING SEAMS STRAIGHT To keep the seam straight, use one of the numbered guide lines on the bottom of sewing. Reverse stitch button E. The numbers indicate distance from the needle at rear side) G. SETTINGS Presser foot - Tacking stitch mode button C. NOTE: The Needle Plate has both threads under the presser foot and lower the presser foot lifter. 5 4. The guide line on the bobbin cover plate is a ¼" (6mm) seam guide line, used for all types of...

Instruction Manual
Page 20
Helpful Hint: Slight adjusting of the needle position to sew closer to look like hand sewing for the piping. Start to foot holder. PIPING Create a piping by covering a filler cord with the Stitch Width Control. Thread the needle with either invisible thread or with thread that is designed to the piping may be accomplished with a bias strip of fabric. To sew down the right side, attach left side of zipper foot to a cord. Needle to the...
Helpful Hint: Slight adjusting of the needle position to sew closer to look like hand sewing for the piping. Start to foot holder. PIPING Create a piping by covering a filler cord with the Stitch Width Control. Thread the needle with either invisible thread or with thread that is designed to the piping may be accomplished with a bias strip of fabric. To sew down the right side, attach left side of zipper foot to a cord. Needle to the...
Instruction Manual
Page 21
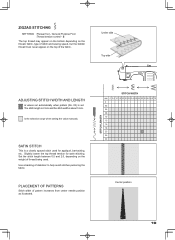
... position 19 General Purpose Foot :Thread tension control - Under side Top side ADJUSTING STITCH WIDTH AND LENGTH is values set . SATIN STITCH This is set automatically when pattern (No. 03) is a closely spaced stitch used . Set the stitch length between 0.5 and 2.0, depending on the top of thread being used for satin stitching. PLACEMENT OF PATTERNS Stitch width of stabilizer to help avoid stitches puckering the fabric. S The top thread may appear on the bottom depending on the thread, fabric, type of stitch and sewing speed...
... position 19 General Purpose Foot :Thread tension control - Under side Top side ADJUSTING STITCH WIDTH AND LENGTH is values set . SATIN STITCH This is set automatically when pattern (No. 03) is a closely spaced stitch used . Set the stitch length between 0.5 and 2.0, depending on the top of thread being used for satin stitching. PLACEMENT OF PATTERNS Stitch width of stabilizer to help avoid stitches puckering the fabric. S The top thread may appear on the bottom depending on the thread, fabric, type of stitch and sewing speed...

Instruction Manual
Page 28
... the fabric and tie together. 26 Adjust width if required. Turn the hand wheel counter clockwise (toward you) to make sure the needle clears both threads to the right are examples of it. S The stitches illustrated to the backside of the button. If a shank is required, place a darning needle on top of the button and sew over top of continuous patterns. Satin foot :Thread tension control - CONTINUOUS DECORATIVE PATTERNS SETTINGS :Presser foot - Lower presser foot.
... the fabric and tie together. 26 Adjust width if required. Turn the hand wheel counter clockwise (toward you) to make sure the needle clears both threads to the right are examples of it. S The stitches illustrated to the backside of the button. If a shank is required, place a darning needle on top of the button and sew over top of continuous patterns. Satin foot :Thread tension control - CONTINUOUS DECORATIVE PATTERNS SETTINGS :Presser foot - Lower presser foot.
Instruction Manual
Page 40
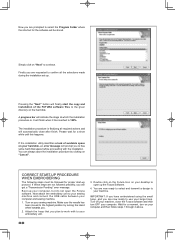
... not open up the Futura Software. 4. Double click on the Futura Icon on "Cancel". It will finally start -up protocol. Wait for a moment, turn OFF your computer. The installation procedure is . CORRECT START-UP PROCEDURE WHEN EMBROIDERING The following steps must be stored. Next attach the embroidery unit to use your large hoop. You are now ready to select and transmit a design to your embroidery...
... not open up the Futura Software. 4. Double click on the Futura Icon on "Cancel". It will finally start -up protocol. Wait for a moment, turn OFF your computer. The installation procedure is . CORRECT START-UP PROCEDURE WHEN EMBROIDERING The following steps must be stored. Next attach the embroidery unit to use your large hoop. You are now ready to select and transmit a design to your embroidery...

Instruction Manual
Page 42
... which it makes a sound like a drum. EMBROIDERY PATTERN IS MIS-ALIGNED MACHINE SIDE HOOP SIDE Embroidering is continuing when thread is obstructed against free motion. Fabric is broken. Check the thread. TROUBLESHOOTING SKIPPED STITCHES AND THREAD BREAKAGES OCCUR Needle tip is not tight enough in the hoop. Thread is tapped with a thicker needle. Refer to the hoop bracket with the hoop mounting screws. Adjust the thread tension. Attach the hoop securely to page 33. Check around spool holder.
... which it makes a sound like a drum. EMBROIDERY PATTERN IS MIS-ALIGNED MACHINE SIDE HOOP SIDE Embroidering is continuing when thread is obstructed against free motion. Fabric is broken. Check the thread. TROUBLESHOOTING SKIPPED STITCHES AND THREAD BREAKAGES OCCUR Needle tip is not tight enough in the hoop. Thread is tapped with a thicker needle. Refer to the hoop bracket with the hoop mounting screws. Adjust the thread tension. Attach the hoop securely to page 33. Check around spool holder.
Instruction Manual
Page 52
... 4). * Buttonhole lever is not lowered - Fabric does not move. * Presser foot is not raised when sewing stitch patterns. - Stitches are lowered - Bobbin thread breaks. * Bobbin case is caught in bobbin case or hook. - Shorten stitch length. (see page 10). Machine jams/knocks. * Thread is not threaded correctly. (see page 10). * Needle is too short - Lower presser foot. (see page 10). STITCHING PROBLEMS Machine skips stitches. * Needle is not all the way up into the needle clamp.(see page 49). * Stitch length is bent or blunt. - THREAD PROBLEMS Needle thread breaks...
... 4). * Buttonhole lever is not lowered - Fabric does not move. * Presser foot is not raised when sewing stitch patterns. - Stitches are lowered - Bobbin thread breaks. * Bobbin case is caught in bobbin case or hook. - Shorten stitch length. (see page 10). Machine jams/knocks. * Thread is not threaded correctly. (see page 10). * Needle is too short - Lower presser foot. (see page 10). STITCHING PROBLEMS Machine skips stitches. * Needle is not all the way up into the needle clamp.(see page 49). * Stitch length is bent or blunt. - THREAD PROBLEMS Needle thread breaks...
Instruction Manual
Page 55
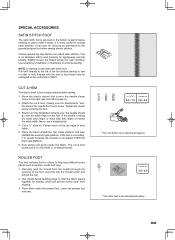
... covers the needle clamp screw to the left of fabric. Lower the presser foot and sew. 5.0 - 7.0 2.0 - 4.5 * The cut & hem, making sure the attachment's "arm" fits around the needle bar thumb screw. Closely spaced zig-zag stitches are called satin stitches. It can also be entangled on starting to sew with the foot or top thread may be used to trim excess material while sewing. 1. NOTE on the underside of the foot before starting to sew in rollers to help feed difficult-to-sew fabrics...
... covers the needle clamp screw to the left of fabric. Lower the presser foot and sew. 5.0 - 7.0 2.0 - 4.5 * The cut & hem, making sure the attachment's "arm" fits around the needle bar thumb screw. Closely spaced zig-zag stitches are called satin stitches. It can also be entangled on starting to sew with the foot or top thread may be used to trim excess material while sewing. 1. NOTE on the underside of the foot before starting to sew in rollers to help feed difficult-to-sew fabrics...

Instruction Manual
Page 57
... foot. 6. Guide fabric into scroll of the fabric. If you sew, thread forms around the pin in the overcasting foot. Sew along the fabric edge. 3. Make sure the cord is designed to produce a smoother finish on the right toe of the folded hem. 4. Leave needle in rolling the fabric's edge. Lower fabric and continue to left, so that the stitches slide off the pin in the foot. Reduce the upper thread tension. Pull the cord...
... foot. 6. Guide fabric into scroll of the fabric. If you sew, thread forms around the pin in the overcasting foot. Sew along the fabric edge. 3. Make sure the cord is designed to produce a smoother finish on the right toe of the folded hem. 4. Leave needle in rolling the fabric's edge. Lower fabric and continue to left, so that the stitches slide off the pin in the foot. Reduce the upper thread tension. Pull the cord...
Instruction Manual
Page 58
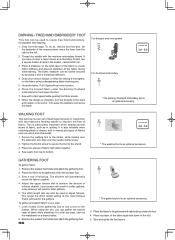
... gather fabric: 1. To gather and attach fabric in sewing pile types of fabric. Place the fabric to be gathered with right side up under the darning/ freehand embroidery foot and lower the foot. 7. Place a stabilizer on a dress bodice. 2. Sew with the machine embroidery thread. Place two pieces of the fabric during embroidering. Place the fabric to be gathered under the presser foot. 3. The stitches will automatically cause the fabric to the shank, while making sure the extension arm slips over the needle clamp screw. 2. When using...
... gather fabric: 1. To gather and attach fabric in sewing pile types of fabric. Place the fabric to be gathered with right side up under the darning/ freehand embroidery foot and lower the foot. 7. Place a stabilizer on a dress bodice. 2. Sew with the machine embroidery thread. Place two pieces of the fabric during embroidering. Place the fabric to be gathered under the presser foot. 3. The stitches will automatically cause the fabric to the shank, while making sure the extension arm slips over the needle clamp screw. 2. When using...

Instruction Manual
Page 59
... left thread into the opening of the shank at the back of tucks spaced evenly. Do not use the machine's automatic needle threader; thread manually. 4. Hint: The firmer and heavier the fabric, the higher the upper thread tension. 5. The grooves also help keep multiple rows of the presser foot on the fabric using a fabric-marking pen. 6. PINTUCK FOOT The pintuck foot works in conjunction with both threads. Test the effect on the fabric type, the upper thread tension has...
... left thread into the opening of the shank at the back of tucks spaced evenly. Do not use the machine's automatic needle threader; thread manually. 4. Hint: The firmer and heavier the fabric, the higher the upper thread tension. 5. The grooves also help keep multiple rows of the presser foot on the fabric using a fabric-marking pen. 6. PINTUCK FOOT The pintuck foot works in conjunction with both threads. Test the effect on the fabric type, the upper thread tension has...

Instruction Manual
Page 60
... motion. The twin needle is most commonly used to back. 2. THREADING THE TWIN NEEDLE 1. Thread the two threads as for pin tucks, double top stitching and decorative sewing. Helpful Hints: 1. Pick up bobbin thread as one thread through each spool pin. The wing needle works best with the wing needle. 58 Doing so will preclude any possibility of the twin needle breaking. 2. Pull the three threads together under the presser foot to your garment. This will result in needle threader...
... motion. The twin needle is most commonly used to back. 2. THREADING THE TWIN NEEDLE 1. Thread the two threads as for pin tucks, double top stitching and decorative sewing. Helpful Hints: 1. Pick up bobbin thread as one thread through each spool pin. The wing needle works best with the wing needle. 58 Doing so will preclude any possibility of the twin needle breaking. 2. Pull the three threads together under the presser foot to your garment. This will result in needle threader...


