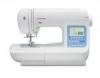
Instruction Manual
Page 2
.... 8. Use only the handle to place anything on cord. SAVE THESE INSTRUCTIONS Servicing should always be performed by or near children. 2. SINGER is used as threading needle, changing needle, threading bobbin, or changing presser foot. 15. Never operate this sewing machine is the exclusive trademark of the sewing machine and foot controller...
.... 8. Use only the handle to place anything on cord. SAVE THESE INSTRUCTIONS Servicing should always be performed by or near children. 2. SINGER is used as threading needle, changing needle, threading bobbin, or changing presser foot. 15. Never operate this sewing machine is the exclusive trademark of the sewing machine and foot controller...
Instruction Manual
Page 3
...PRESSER FOOT LIFTER 10 F. UTILITY STITCH BUTTON 12 F. FUNCTION BUTTONS 12 H. CURSOR BUTTONS 13 L. TACK BUTTON 13 M. WINDING THE BOBBIN 14 D. SETTING SPOOL OF THREAD ON SPOOL PIN 16 C. SELECTING OTHER UTILITY STITCH PATTERNS 22 C. ELONGATION 23 E. DARNING 42 ...STITCH 22 D. ATTACHING THE EVEN-FEED FOOT 41 B. FREE-HAND EMBROIDERY 42 D. TO DELETE PATTERN 51 F. CONTENTS IMPORTANT SAFETY INSTRUCTIONS 2 MODEL 9970 4 FOR EUROPEAN AND SIMILAR TERRITORIES: ...... 4 MAIN PARTS 5 ACCESSORIES 6 DUST COVER 6 REMOVABLE EXTENSION TABLE 7 A. CHANGING THE PRESSER FOOT 7...
...PRESSER FOOT LIFTER 10 F. UTILITY STITCH BUTTON 12 F. FUNCTION BUTTONS 12 H. CURSOR BUTTONS 13 L. TACK BUTTON 13 M. WINDING THE BOBBIN 14 D. SETTING SPOOL OF THREAD ON SPOOL PIN 16 C. SELECTING OTHER UTILITY STITCH PATTERNS 22 C. ELONGATION 23 E. DARNING 42 ...STITCH 22 D. ATTACHING THE EVEN-FEED FOOT 41 B. FREE-HAND EMBROIDERY 42 D. TO DELETE PATTERN 51 F. CONTENTS IMPORTANT SAFETY INSTRUCTIONS 2 MODEL 9970 4 FOR EUROPEAN AND SIMILAR TERRITORIES: ...... 4 MAIN PARTS 5 ACCESSORIES 6 DUST COVER 6 REMOVABLE EXTENSION TABLE 7 A. CHANGING THE PRESSER FOOT 7...
Instruction Manual
Page 5
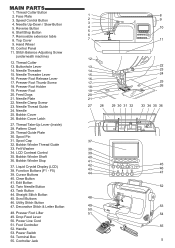
...25. Presser Foot Lifter 49. Drop Feed Lever 50. Start/Stop Button 7. Top Cover 9. Needle Threader 15. Feed Dogs 21. Needle Clamp Screw 23. Bobbin Cover Latch 27. Thread Take-Up Lever (Inside) 28. Felt Washer 34. Liquid Crystal Display (LCD) 38. Cursor Buttons 40. Control Panel 11.... Bobbin Winder Shaft 36. Scroll Buttons 46. Utility Stitch Button 47. Terminal Box 55. Face Plate 3. Spool Cap 32. LCD Contrast Control 35. F5) ...
...25. Presser Foot Lifter 49. Drop Feed Lever 50. Start/Stop Button 7. Top Cover 9. Needle Threader 15. Feed Dogs 21. Needle Clamp Screw 23. Bobbin Cover Latch 27. Thread Take-Up Lever (Inside) 28. Felt Washer 34. Liquid Crystal Display (LCD) 38. Cursor Buttons 40. Control Panel 11.... Bobbin Winder Shaft 36. Scroll Buttons 46. Utility Stitch Button 47. Terminal Box 55. Face Plate 3. Spool Cap 32. LCD Contrast Control 35. F5) ...
Instruction Manual
Page 6
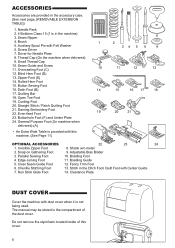
Needle Pack 2. 4 Bobbins Class 15 (1 is in the Ditch Foot/ Quilt Foot with Center Guide 7. Seam Ripper 8 4. Driver for Needle Plate 8. Overcasting Foot (C) 10 11 12 13 12. ...
Needle Pack 2. 4 Bobbins Class 15 (1 is in the Ditch Foot/ Quilt Foot with Center Guide 7. Seam Ripper 8 4. Driver for Needle Plate 8. Overcasting Foot (C) 10 11 12 13 12. ...
Instruction Manual
Page 10
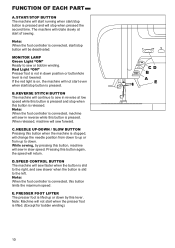
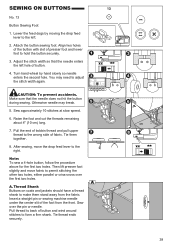
... controller is stopped, will change the needle position from down to up or from up or down position or buttonhole lever is lifted. (Except for bobbin winding) 10 MONITOR LAMP Green Light "ON" Ready to sew in slow speed. NEEDLE UP-DOWN / SLOW BUTTON Pressing this button when the machine is...: Machine will return. Red Light "ON" Presser foot is not in reverse while this lever. REVERSE STITCH BUTTON The machine will continue to sew or bobbin winding.
... controller is stopped, will change the needle position from down to up or from up or down position or buttonhole lever is lifted. (Except for bobbin winding) 10 MONITOR LAMP Green Light "ON" Ready to sew in slow speed. NEEDLE UP-DOWN / SLOW BUTTON Pressing this button when the machine is...: Machine will return. Red Light "ON" Presser foot is not in reverse while this lever. REVERSE STITCH BUTTON The machine will continue to sew or bobbin winding.
Instruction Manual
Page 11
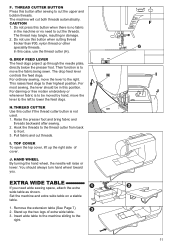
... the feed dogs. For ordinary sewing, move the fabric being sewn. HAND WHEEL By turning the hand wheel, the needle will cut the upper and bobbin threads. This raises feed dogs to the right. I. You should be moved by hand, move the lever to the left to move the lever to...
... the feed dogs. For ordinary sewing, move the fabric being sewn. HAND WHEEL By turning the hand wheel, the needle will cut the upper and bobbin threads. This raises feed dogs to the right. I. You should be moved by hand, move the lever to the left to move the lever to...
Instruction Manual
Page 14
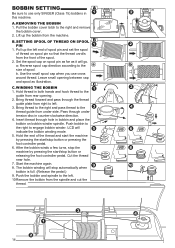
...Cut the thread near hole. 7. A. Use the small spool cap when you use only SINGER (Class 15) bobbins in counter-clockwise direction. 4. C. LCD will stop button or pressing the foot controller pedal. 6. After the bobbin winds a few turns, stop the machine by pressing the start /stop button or releasing...PIN 1. Insert thread through hole in both hands and hook thread to the size of thread on bobbin winder spindle. Push the bobbin and spindle to engage bobbin winder. Pull the bobbin cover latch to use cross wound thread. Bring thread forward and pass through under side. WINDING THE...
...Cut the thread near hole. 7. A. Use the small spool cap when you use only SINGER (Class 15) bobbins in counter-clockwise direction. 4. C. LCD will stop button or pressing the foot controller pedal. 6. After the bobbin winds a few turns, stop the machine by pressing the start /stop button or releasing...PIN 1. Insert thread through hole in both hands and hook thread to the size of thread on bobbin winder spindle. Push the bobbin and spindle to engage bobbin winder. Pull the bobbin cover latch to use cross wound thread. Bring thread forward and pass through under side. WINDING THE...

Instruction Manual
Page 15
... it slips into notch (c) making sure that thread does not slip out of bobbin cover down until it clicks into the hole in this machine. 15 NOTE: Be sure to use only SINGER (Class 15) bobbins in needle plate and push the right side of notch (a). 4. INSERTING THE... BOBBIN 1. Pull thread toward the left tab into place. Place bobbin into notch (a) while holding the bobbin. 3. Replace the bobbin cover. Pull thread out about 10 cm (4 inches...
... it slips into notch (c) making sure that thread does not slip out of bobbin cover down until it clicks into the hole in this machine. 15 NOTE: Be sure to use only SINGER (Class 15) bobbins in needle plate and push the right side of notch (a). 4. INSERTING THE... BOBBIN 1. Pull thread toward the left tab into place. Place bobbin into notch (a) while holding the bobbin. 3. Replace the bobbin cover. Pull thread out about 10 cm (4 inches...
Instruction Manual
Page 17
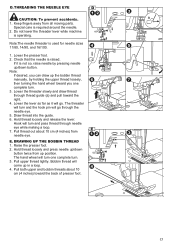
... through thread guide (a) and pull toward the right. 4. Lower the threader slowly and draw thread through needle eye while making a loop. 7. DRAWING UP THE BOBBIN THREAD 1. Hold thread loosely and press needle up/down button twice from up /down button. Lower the presser foot. 2. Lower the lever as far as... back of presser foot. 17 Pull upper thread lightly. D. Note: If desired, you one complete turn and the hook pin will come up the bobbin thread manually, by pressing needle up position. The hand wheel will go through the needle eye. 5. Pull both upper and...
... through thread guide (a) and pull toward the right. 4. Lower the threader slowly and draw thread through needle eye while making a loop. 7. DRAWING UP THE BOBBIN THREAD 1. Hold thread loosely and press needle up/down button twice from up /down button. Lower the presser foot. 2. Lower the lever as far as... back of presser foot. 17 Pull upper thread lightly. D. Note: If desired, you one complete turn and the hook pin will come up the bobbin thread manually, by pressing needle up position. The hand wheel will go through the needle eye. 5. Pull both upper and...
Instruction Manual
Page 18
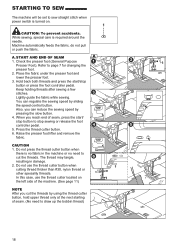
... push the fabric. Keep holding threads after sewing a few stitches. The thread may tangle, resulting in the machine or no need to draw up the bobbin thread) 18 In this case, use the thread cutter button when cutting thread thicker than #30, nylon thread or other speciality threads. START AND END...
... push the fabric. Keep holding threads after sewing a few stitches. The thread may tangle, resulting in the machine or no need to draw up the bobbin thread) 18 In this case, use the thread cutter button when cutting thread thicker than #30, nylon thread or other speciality threads. START AND END...
Instruction Manual
Page 21
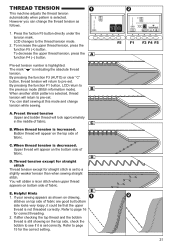
...page 16 for straight stitch is set . By pressing the function F1 button, LCD return to pre-set correctly. Preset thread tension Upper and bobbin thread will obtain a nicer stitch when upper thread appears on the bottom side of fabric. C. If your sewing appears as follows. 1. ... information mode). You can change tension while sewing. B. When thread tension is highlighted. D. E. If after checking the top thread and the bobbin thread is still showing on top side of fabric are good but bottom side looks very loopy, it is set to a slightly weaker tension than...
...page 16 for straight stitch is set . By pressing the function F1 button, LCD return to pre-set correctly. Preset thread tension Upper and bobbin thread will obtain a nicer stitch when upper thread appears on the bottom side of fabric. C. If your sewing appears as follows. 1. ... information mode). You can change tension while sewing. B. When thread tension is highlighted. D. E. If after checking the top thread and the bobbin thread is still showing on top side of fabric are good but bottom side looks very loopy, it is set to a slightly weaker tension than...
Instruction Manual
Page 25
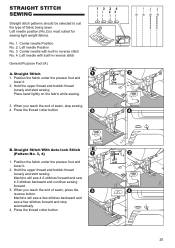
Center needle Position No. 2. Position the fabric under the presser foot and lower it . 2. Hold the upper thread and bobbin thread loosely and start sewing. Machine will sew 4-5 stitches forward and sew 4-5 stitches backward and continue sewing forward. 3. Left needle Position No. ...3. B. Left needle position (No.2) is most suited for sewing light weight fabrics. Hold the upper thread and bobbin thread loosely and start sewing. Press the thread cutter button. Press the thread cutter button. 25 Left needle with built-in reverse stitch General ...
Center needle Position No. 2. Position the fabric under the presser foot and lower it . 2. Hold the upper thread and bobbin thread loosely and start sewing. Machine will sew 4-5 stitches forward and sew 4-5 stitches backward and continue sewing forward. 3. Left needle Position No. ...3. B. Left needle position (No.2) is most suited for sewing light weight fabrics. Hold the upper thread and bobbin thread loosely and start sewing. Press the thread cutter button. Press the thread cutter button. 25 Left needle with built-in reverse stitch General ...
Instruction Manual
Page 26
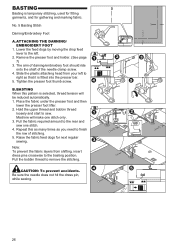
.... 1. Pull the fabric required amount to the basting position. Raise the fabric feed dogs for gathering and marking fabric. Pull the bobbin thread to sew. Hold the upper thread and bobbin thread loosely and start to remove the stitching. Be sure the needle does not hit the dress pin, while sewing. 26...
.... 1. Pull the fabric required amount to the basting position. Raise the fabric feed dogs for gathering and marking fabric. Pull the bobbin thread to sew. Hold the upper thread and bobbin thread loosely and start to remove the stitching. Be sure the needle does not hit the dress pin, while sewing. 26...
Instruction Manual
Page 27
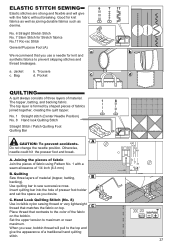
...the pieces of fabric Join the pieces of fabric using Pattern No. 1 with the fabric without breaking. Place thread that matches the fabric on the bobbin. Do not change the needle position. Insert quilting bar into the hole of presser foot holder and set the space as denims. No. 6 ... layer is formed by shaped pieces of a traditional hand quilting stitch. 27 Use quilting bar to maximum or near maximum. C. When you sew, bobbin thread will give the appearance of fabrics joined together, creating the quilt topper. Good for knit fabrics as well as joining durable fabrics such as...
...the pieces of fabric Join the pieces of fabric using Pattern No. 1 with the fabric without breaking. Place thread that matches the fabric on the bobbin. Do not change the needle position. Insert quilting bar into the hole of presser foot holder and set the space as denims. No. 6 ... layer is formed by shaped pieces of a traditional hand quilting stitch. 27 Use quilting bar to maximum or near maximum. C. When you sew, bobbin thread will give the appearance of fabrics joined together, creating the quilt topper. Good for knit fabrics as well as joining durable fabrics such as...

Instruction Manual
Page 34
.... Round Ended Buttonhole (Narrow) for light to medium weight fabrics 105. Stretch Buttonhole 115. Mark position and length of buttonhole foot and bring upper and bobbin threads to diameter of button plus thickness of the fabric. 5. This machine can sew 13 types of the buttonhole foot. Tapered Keyhole Buttonhole 109. Set...
.... Round Ended Buttonhole (Narrow) for light to medium weight fabrics 105. Stretch Buttonhole 115. Mark position and length of buttonhole foot and bring upper and bobbin threads to diameter of button plus thickness of the fabric. 5. This machine can sew 13 types of the buttonhole foot. Tapered Keyhole Buttonhole 109. Set...

Instruction Manual
Page 38
...-tack or darning stitch as pocket corners. Note: Machine will stop automatically when the pattern is on edge of buttonhole foot and bring upper and bobbin threads to remove the fabric. 1 2 3 4 1 2 38 Sewing bar-tack on the thick area. Pass upper thread through the hole of thick fabric such as pocket...
...-tack or darning stitch as pocket corners. Note: Machine will stop automatically when the pattern is on edge of buttonhole foot and bring upper and bobbin threads to remove the fabric. 1 2 3 4 1 2 38 Sewing bar-tack on the thick area. Pass upper thread through the hole of thick fabric such as pocket...
Instruction Manual
Page 39
... needle enters the left . 2. Pull the end of fabric. Then lift presser foot slightly and move the drop feed lever to the wrong side of bobbin thread and pull upper thread to the right. Sew over the first two holes. Tie thread ends securely. 39 Lower the feed dogs by hand...
... needle enters the left . 2. Pull the end of fabric. Then lift presser foot slightly and move the drop feed lever to the wrong side of bobbin thread and pull upper thread to the right. Sew over the first two holes. Tie thread ends securely. 39 Lower the feed dogs by hand...

Instruction Manual
Page 43
... is an optional accessory. Insert the bias tape from the outside of the bracket, into the groove on the left side of the machine and bobbin with bias tapes. Tighten the presser foot thumbscrew. Thread the top of the bracket. 6. Use the screw on top, in width. 1. Adjustable Bias Binder, Braiding...
... is an optional accessory. Insert the bias tape from the outside of the bracket, into the groove on the left side of the machine and bobbin with bias tapes. Tighten the presser foot thumbscrew. Thread the top of the bracket. 6. Use the screw on top, in width. 1. Adjustable Bias Binder, Braiding...

Instruction Manual
Page 44
...be embellished under the foot. 3. Braiding Guide : This is an optional accessory. Prepare a minimum of three layers of the machine and bobbin with hair dryer. 44 Thread the top of chenille strips, 5/8" (16 mm), for decorative embellishment. 1. Alternative method: Spray with water,... Stitch. 6. If desired, you can also use Tear Away Stabilizer underneath the foundation fabric. 7. Place straight end of the machine and bobbin with chenille effects. 1. Chenille Stitching Foot : This is an optional accessory. As you want to have the chenille effect. Machine wash on...
...be embellished under the foot. 3. Braiding Guide : This is an optional accessory. Prepare a minimum of three layers of the machine and bobbin with hair dryer. 44 Thread the top of chenille strips, 5/8" (16 mm), for decorative embellishment. 1. Alternative method: Spray with water,... Stitch. 6. If desired, you can also use Tear Away Stabilizer underneath the foundation fabric. 7. Place straight end of the machine and bobbin with chenille effects. 1. Chenille Stitching Foot : This is an optional accessory. As you want to have the chenille effect. Machine wash on...
Instruction Manual
Page 46
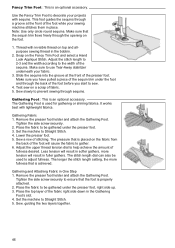
... sequins. Lower the presser foot. 5. Adjust the upper thread tension dial to be used for gathering or shirring fabrics. Less tension will result in the bobbin. 2. The longer the stitch length setting, the more tension will cause the fabric to ensure that is used to Straight Stitch. 4. Gathering and Attaching Fabric...
... sequins. Lower the presser foot. 5. Adjust the upper thread tension dial to be used for gathering or shirring fabrics. Less tension will result in the bobbin. 2. The longer the stitch length setting, the more tension will cause the fabric to ensure that is used to Straight Stitch. 4. Gathering and Attaching Fabric...


