
Instruction Manual and Troubleshooting Guide
Page 2
..., at www.singerco.com 3. An instruction manual with easy-to help and hope that you enjoy your SINGER® sewing machine. It is important to the SINGER® family and CONGRATULATIONS on the web at 1-844-664-5188. (North America Only) We're ready to -...: [email protected] 4. We design our machines for over 160 years. Assistance on purchasing a brand new SINGER® sewing machine! 2 INTRODUCTION Welcome Welcome to us that you have the easiest and most successful sewing experience, so we have provided a wide array of sewing, creating, do-it-yourself, crafting and...
..., at www.singerco.com 3. An instruction manual with easy-to help and hope that you enjoy your SINGER® sewing machine. It is important to the SINGER® family and CONGRATULATIONS on the web at 1-844-664-5188. (North America Only) We're ready to -...: [email protected] 4. We design our machines for over 160 years. Assistance on purchasing a brand new SINGER® sewing machine! 2 INTRODUCTION Welcome Welcome to us that you have the easiest and most successful sewing experience, so we have provided a wide array of sewing, creating, do-it-yourself, crafting and...

Instruction Manual and Troubleshooting Guide
Page 3
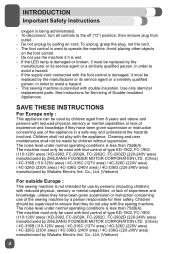
...fire, electric shock, or injury to person : - WARNING - To reduce the risk of electric shock : - Return the sewing machine to the machine. Keep ventilation openings of lint, dust, and loose cloth. - Always use bent needles. - It may deflect the needle ... glasses. - INTRODUCTION Important Safety Instructions This household sewing machine is required around the sewing machine needle. - Make sure to a third party. IMPORTANT SAFETY INSTRUCTIONS When using this household sewing machine. Close attention is necessary when this sewing machine if it has a damaged cord or plug,...
...fire, electric shock, or injury to person : - WARNING - To reduce the risk of electric shock : - Return the sewing machine to the machine. Keep ventilation openings of lint, dust, and loose cloth. - Always use bent needles. - It may deflect the needle ... glasses. - INTRODUCTION Important Safety Instructions This household sewing machine is required around the sewing machine needle. - Make sure to a third party. IMPORTANT SAFETY INSTRUCTIONS When using this household sewing machine. Close attention is necessary when this sewing machine if it has a damaged cord or plug,...
Instruction Manual and Troubleshooting Guide
Page 4
...the LED lamp is not intended for Servicing of Double-Insulated Appliances. Children shall not play with the sewing machine. Use only identical replacement parts. See instructions for use the machine if it must only be used with reduced physical, sensory or mental capabilities or lack of experience and... (including children) with the appliance. To disconnect, turn all controls to avoid a hazard. - Co., Ltd. (Vietnam) For outside Europe : This sewing machine is damaged or broken, it is provided with foot control of type KD-1902, FC-1902 (110-120V area) / KD-2902, FC-2902A, FC...
...the LED lamp is not intended for Servicing of Double-Insulated Appliances. Children shall not play with the sewing machine. Use only identical replacement parts. See instructions for use the machine if it must only be used with reduced physical, sensory or mental capabilities or lack of experience and... (including children) with the appliance. To disconnect, turn all controls to avoid a hazard. - Co., Ltd. (Vietnam) For outside Europe : This sewing machine is damaged or broken, it is provided with foot control of type KD-1902, FC-1902 (110-120V area) / KD-2902, FC-2902A, FC...
Instruction Manual and Troubleshooting Guide
Page 6
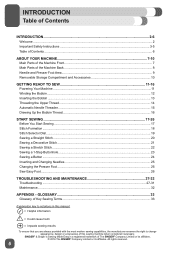
..., the manufacturer reserves the right to notations in this sewing machine when considered necessary. GLOSSARY 33 Glossary of Key Sewing Terms...33 Explanation key to change appearance, design or accessories of The SINGER® Company Limited or its affiliates. © 2016 The SINGER® Company Limited or its affiliates. 2 INTRODUCTION Table of Contents INTRODUCTION...2-6 Welcome...
..., the manufacturer reserves the right to notations in this sewing machine when considered necessary. GLOSSARY 33 Glossary of Key Sewing Terms...33 Explanation key to change appearance, design or accessories of The SINGER® Company Limited or its affiliates. © 2016 The SINGER® Company Limited or its affiliates. 2 INTRODUCTION Table of Contents INTRODUCTION...2-6 Welcome...

Instruction Manual and Troubleshooting Guide
Page 7
...free arm. (See Page 10) 7. BOBBIN holds the thread that forms the stitching that appears on the bottom side of the upper thread while sewing. (See Page 14) 3. BOBBIN WINDING STOPPER determines when bobbin is conveniently located for your stitch, thread and fabric. (See Page 18) 2.... ONE STEP BUTTONHOLE LEVER automatically determines the length of the Machine Front 13 1. NEEDLE THREADER LEVER is used for you sew. (See Page 26) 5. THREAD TENSION DIAL allows you keep seams straight. (See Page 9) 6. PRESSER FOOT holds fabric...
...free arm. (See Page 10) 7. BOBBIN holds the thread that forms the stitching that appears on the bottom side of the upper thread while sewing. (See Page 14) 3. BOBBIN WINDING STOPPER determines when bobbin is conveniently located for your stitch, thread and fabric. (See Page 18) 2.... ONE STEP BUTTONHOLE LEVER automatically determines the length of the Machine Front 13 1. NEEDLE THREADER LEVER is used for you sew. (See Page 26) 5. THREAD TENSION DIAL allows you keep seams straight. (See Page 9) 6. PRESSER FOOT holds fabric...
Instruction Manual and Troubleshooting Guide
Page 8
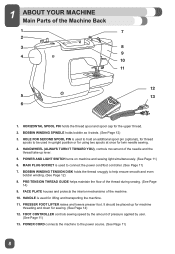
...is used in upright position or for using two spools at once for twin needle sewing. 4. HANDWHEEL (ALWAYS TURN IT TOWARD YOU), controls movement of the machine. 10. POWER AND LIGHT SWITCH turns on machine and sewing light simultaneously. (See Page 11) 6. PRESSER FOOT LIFTER raises and lowers presser...) 3. HANDLE is used for the upper thread. 2. POWER CORD connects the machine to connect the power cord/foot controller. (See Page 11) 7. PRE-TENSION THREAD GUIDE helps maintain the flow of the thread during sewing. (See Page 14) 9. HORIZONTAL SPOOL PIN holds the thread spool and spool...
...is used in upright position or for using two spools at once for twin needle sewing. 4. HANDWHEEL (ALWAYS TURN IT TOWARD YOU), controls movement of the machine. 10. POWER AND LIGHT SWITCH turns on machine and sewing light simultaneously. (See Page 11) 6. PRESSER FOOT LIFTER raises and lowers presser...) 3. HANDLE is used for the upper thread. 2. POWER CORD connects the machine to connect the power cord/foot controller. (See Page 11) 7. PRE-TENSION THREAD GUIDE helps maintain the flow of the thread during sewing. (See Page 14) 9. HORIZONTAL SPOOL PIN holds the thread spool and spool...

Instruction Manual and Troubleshooting Guide
Page 9
... and 5/8" (16mm). FEED TEETH (OR FEED DOGS), which look like rows of teeth under the presser foot. 8. NEEDLE CLAMP holds the machine's needle in hook pin. 3. ONE STEP BUTTONHOLE LEVER automatically determines the length of the buttonhole when lowered. (see page 10) 7. NEEDLE ...THREADER GUIDE holds thread securely before placing it in position. 9. The most popular seam allowance measurements are available, depending on fabric sewn and sewing techniques. (see page 23) 11. PRESSER FOOT SCREW secures the presser foot holder (shank) onto the presser bar. 6. PRESSER FOOT ...
... and 5/8" (16mm). FEED TEETH (OR FEED DOGS), which look like rows of teeth under the presser foot. 8. NEEDLE CLAMP holds the machine's needle in hook pin. 3. ONE STEP BUTTONHOLE LEVER automatically determines the length of the buttonhole when lowered. (see page 10) 7. NEEDLE ...THREADER GUIDE holds thread securely before placing it in position. 9. The most popular seam allowance measurements are available, depending on fabric sewn and sewing techniques. (see page 23) 11. PRESSER FOOT SCREW secures the presser foot holder (shank) onto the presser bar. 6. PRESSER FOOT ...

Instruction Manual and Troubleshooting Guide
Page 10
...Foot (for feed teeth) m. FOR INFORMATION ON PURCHASING THIS ITEM, GO TO WWW.SINGER.COM. f. Darning Plate (cover for sewing accurate seams) THIS BONUS ITEM IS NOT INCLUDED WITH MACHINES SOLD IN SOME AREAS AND MAY BE AN OPTIONAL ACCESSORY. Soft Cover (to remove ... i. Additionally, you will find the machine's accessories stored here (see below). To replace the Removable Storage Compartment, hold it easy to the right. Button Sewing Foot (for various thread spool styles) j. Spool Holders (2 sizes for attaching buttons) e. Bobbins (SINGER® Class 15 transparent bobbins) ...
...Foot (for feed teeth) m. FOR INFORMATION ON PURCHASING THIS ITEM, GO TO WWW.SINGER.COM. f. Darning Plate (cover for sewing accurate seams) THIS BONUS ITEM IS NOT INCLUDED WITH MACHINES SOLD IN SOME AREAS AND MAY BE AN OPTIONAL ACCESSORY. Soft Cover (to remove ... i. Additionally, you will find the machine's accessories stored here (see below). To replace the Removable Storage Compartment, hold it easy to the right. Button Sewing Foot (for various thread spool styles) j. Spool Holders (2 sizes for attaching buttons) e. Bobbins (SINGER® Class 15 transparent bobbins) ...
Instruction Manual and Troubleshooting Guide
Page 11
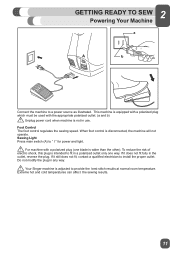
Do not modify the plug in any way. ⚠ Your Singer machine is not in use. To reduce the risk of electric shock, this plug is intended to fit in the outlet, reverse the plug. Sewing Light Press main switch (A) to provide the best stitch results at normal room temperature. Extreme ...hot and cold temperatures can affect the sewing results. 11 This machine is equipped with a polarized plug which must be used with the ...
Do not modify the plug in any way. ⚠ Your Singer machine is not in use. To reduce the risk of electric shock, this plug is intended to fit in the outlet, reverse the plug. Sewing Light Press main switch (A) to provide the best stitch results at normal room temperature. Extreme ...hot and cold temperatures can affect the sewing results. 11 This machine is equipped with a polarized plug which must be used with the ...

Instruction Manual and Troubleshooting Guide
Page 12
A B 6. Lift your machine. 2 GETTING READY TO SEW Winding the Bobbin This machine uses SINGER® Class 15 transparent bobbins. A 3. Check that thread winds onto bobbin smoothly and consistently. (C) Thread bobbin as you hold the thread end. A ... pushed down firmly (A). Place thread spool and corresponding size spool holder onto spool pin. A 5 C B A B A B 2. (A) Snap thread into guide at top of machine. (B) Place thread snuggly around bobbin winding tension disk to cover the end of bobbin when purchasing additional bobbins for your foot off the foot control...
A B 6. Lift your machine. 2 GETTING READY TO SEW Winding the Bobbin This machine uses SINGER® Class 15 transparent bobbins. A 3. Check that thread winds onto bobbin smoothly and consistently. (C) Thread bobbin as you hold the thread end. A ... pushed down firmly (A). Place thread spool and corresponding size spool holder onto spool pin. A 5 C B A B A B 2. (A) Snap thread into guide at top of machine. (B) Place thread snuggly around bobbin winding tension disk to cover the end of bobbin when purchasing additional bobbins for your foot off the foot control...
Instruction Manual and Troubleshooting Guide
Page 14
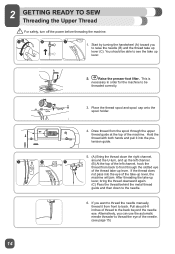
... downward again. (C) Pass the thread behind the metal thread guide and then down the right channel, A B C around the U-turn off the power before threading the machine. Pull about 6-8 inches of the needle. (see the take up lever. 1 2. Raise the presser foot lifter. A B C 1. You should be threaded...the needle (B) and the thread take up lever (C). Place the thread spool and spool cap onto the spool holder. 4. 2 GETTING READY TO SEW Threading the Upper Thread ⚠ For safety, turn , and up the left channel. (B) At the top of the left channel, hook the ...
... downward again. (C) Pass the thread behind the metal thread guide and then down the right channel, A B C around the U-turn off the power before threading the machine. Pull about 6-8 inches of the needle. (see the take up lever. 1 2. Raise the presser foot lifter. A B C 1. You should be threaded...the needle (B) and the thread take up lever (C). Place the thread spool and spool cap onto the spool holder. 4. 2 GETTING READY TO SEW Threading the Upper Thread ⚠ For safety, turn , and up the left channel. (B) At the top of the left channel, hook the ...
Instruction Manual and Troubleshooting Guide
Page 15
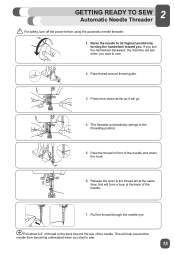
...under the hook. 6. This will jam when you start to sew. 15 Pass the thread in front of the needle. 2 GETTING READY TO SEW Automatic Needle Threader ⚠ For safety, turn the handwheel backward, the machine will help prevent the needle from becoming unthreaded when you start... to sew. 2. The threader automatically swings to its highest position by turning the...
...under the hook. 6. This will jam when you start to sew. 15 Pass the thread in front of the needle. 2 GETTING READY TO SEW Automatic Needle Threader ⚠ For safety, turn the handwheel backward, the machine will help prevent the needle from becoming unthreaded when you start... to sew. 2. The threader automatically swings to its highest position by turning the...
Instruction Manual and Troubleshooting Guide
Page 16
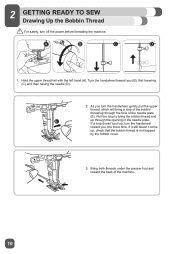
...handwheel toward the back of the needle plate (E). Bring both threads under the presser foot and toward you one more time. 2 GETTING READY TO SEW Drawing Up the Bobbin Thread ⚠ For safety, turn the handwheel toward you (B), first lowering (C) and then raising the needle (D). 2. As ...you turn the handwheel, gently pull the upper thread, which will bring the bobbin thread end E up , turn off the power before threading the machine. Pull the loop to bring a loop of the bobbin thread up , check that the bobbin thread is not trapped by the bobbin cover. 3. If...
...handwheel toward the back of the needle plate (E). Bring both threads under the presser foot and toward you one more time. 2 GETTING READY TO SEW Drawing Up the Bobbin Thread ⚠ For safety, turn the handwheel toward you (B), first lowering (C) and then raising the needle (D). 2. As ...you turn the handwheel, gently pull the upper thread, which will bring the bobbin thread end E up , turn off the power before threading the machine. Pull the loop to bring a loop of the bobbin thread up , check that the bobbin thread is not trapped by the bobbin cover. 3. If...

Instruction Manual and Troubleshooting Guide
Page 17
... the speed of your foot off any excess oil with a soft, dry cloth before you begin: When unpacking the machine, you sew on a piece of scrap fabric to change the needle, see page 18). For information about the various stitches on the foot... , it may have the opportunity to sew along. Using old, damaged or incorrect needles for basic sewing techniques such as: sewing a straight stitch, sewing a decorative stitch, sewing a stretch stitch, sewing a buttonhole and sewing a button. For information on the foot control, the machine will sew. Use the thread cutter on how to...
... the speed of your foot off any excess oil with a soft, dry cloth before you begin: When unpacking the machine, you sew on a piece of scrap fabric to change the needle, see page 18). For information about the various stitches on the foot... , it may have the opportunity to sew along. Using old, damaged or incorrect needles for basic sewing techniques such as: sewing a straight stitch, sewing a decorative stitch, sewing a stretch stitch, sewing a buttonhole and sewing a button. For information on the foot control, the machine will sew. Use the thread cutter on how to...
Instruction Manual and Troubleshooting Guide
Page 19
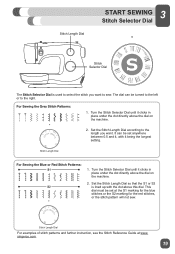
... clicks in place under the dot directly above the dial on the machine. 2. Turn the Stitch Selector Dial until it clicks in place under the dot directly above the dial on the machine. 2. Set the Stitch Length Dial according to sew. singerco.com. 19 This dial must be turned to the left... or to the right. Stitch Length Dial For Sewing the Blue or Red Stitch Patterns: 1. Stitch Length Dial 3 START...
... clicks in place under the dot directly above the dial on the machine. 2. Turn the Stitch Selector Dial until it clicks in place under the dot directly above the dial on the machine. 2. Set the Stitch Length Dial according to sew. singerco.com. 19 This dial must be turned to the left... or to the right. Stitch Length Dial For Sewing the Blue or Red Stitch Patterns: 1. Stitch Length Dial 3 START...
Instruction Manual and Troubleshooting Guide
Page 20
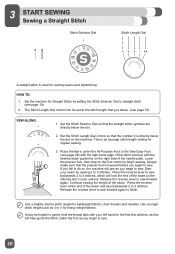
... right-hand edge of the needle plate. Release the reverse lever to do so, the machine will lock the end of the seam. Continue sewing the length of the seam so the stitches don't come undone. Set the machine for the first few stitches, as you begin to finish. Use a slightly shorter...
... right-hand edge of the needle plate. Release the reverse lever to do so, the machine will lock the end of the seam. Continue sewing the length of the seam so the stitches don't come undone. Set the machine for the first few stitches, as you begin to finish. Use a slightly shorter...
Instruction Manual and Troubleshooting Guide
Page 21
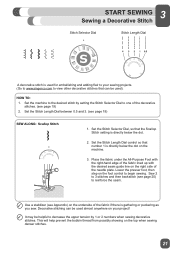
... Selector Dial, so that number 1 is directly below the dot. 2. Set the machine to the desired stitch by setting the Stitch Selector Dial to decrease the upper tension by 1 or 2 numbers when sewing decorative stitches. Decorative stitching can be helpful to one of the needle plate. Set ...of the fabric lined up with the desired seam guide line on the machine. 3. Sew 2 to 3 stitches and then backstitch (see page 20) to begin sewing. Lower the presser foot, then step on the top when sewing denser stitches. 21 This will help prevent the bobbin thread from possibly ...
... Selector Dial, so that number 1 is directly below the dot. 2. Set the machine to the desired stitch by setting the Stitch Selector Dial to decrease the upper tension by 1 or 2 numbers when sewing decorative stitches. Decorative stitching can be helpful to one of the needle plate. Set ...of the fabric lined up with the desired seam guide line on the machine. 3. Sew 2 to 3 stitches and then backstitch (see page 20) to begin sewing. Lower the presser foot, then step on the top when sewing denser stitches. 21 This will help prevent the bobbin thread from possibly ...
Instruction Manual and Troubleshooting Guide
Page 22
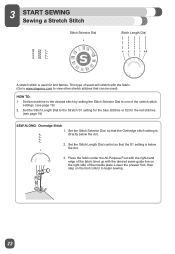
... presser foot, then step on the right side of the needle plate. 23 START SEWING Sewing a Stretch Stitch Stitch Selector Dial Stitch Length Dial A stretch stitch is used ). Set... setting for the blue stitches or S2 for knit fabrics. Set the machine to the desired stitch by setting the Stitch Selector Dial to begin sewing. 22 Place the fabric under the All-Purpose Foot with the right...-hand edge of the stretch stitch settings. (see page 19) SEW ALONG: Overedge Stitch 1. HOW TO: 1. Set the Stitch Length Dial to view other stretch stitches that...
... presser foot, then step on the right side of the needle plate. 23 START SEWING Sewing a Stretch Stitch Stitch Selector Dial Stitch Length Dial A stretch stitch is used ). Set... setting for the blue stitches or S2 for knit fabrics. Set the machine to the desired stitch by setting the Stitch Selector Dial to begin sewing. 22 Place the fabric under the All-Purpose Foot with the right...-hand edge of the stretch stitch settings. (see page 19) SEW ALONG: Overedge Stitch 1. HOW TO: 1. Set the Stitch Length Dial to view other stretch stitches that...
Instruction Manual and Troubleshooting Guide
Page 23
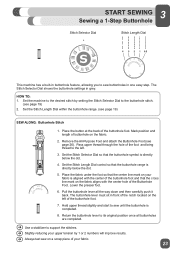
...to the left of the Buttonhole Foot. Lower the presser foot. 6. 3 START SEWING Sewing a 1-Step Buttonhole Stitch Selector Dial Stitch Length Dial This machine has a built-in buttonhole feature, allowing you to sew buttonholes in grey. Mark position and length of the buttonhole foot. Pull the ... desired stitch by 1 or 2 numbers will improve results. Always test sew on the left . 3. Set the Stitch Length Dial within the buttonhole range. (see page 26). Set the machine to sew until the buttonhole is directly below the dot. 5. Set the Stitch Length Dial...
...to the left of the Buttonhole Foot. Lower the presser foot. 6. 3 START SEWING Sewing a 1-Step Buttonhole Stitch Selector Dial Stitch Length Dial This machine has a built-in buttonhole feature, allowing you to sew buttonholes in grey. Mark position and length of the buttonhole foot. Pull the ... desired stitch by 1 or 2 numbers will improve results. Always test sew on the left . 3. Set the Stitch Length Dial within the buttonhole range. (see page 26). Set the machine to sew until the buttonhole is directly below the dot. 5. Set the Stitch Length Dial...

Instruction Manual and Troubleshooting Guide
Page 25
...hear a slight popping sound as it with a new needle and discard the old one. It is showing signs of wear resulting in your SINGER® sewing machine. Loosen the needle clamp screw (A) by turning it is also important to view the Stitch Reference Guide) For best results, use the ... after every 4 projects or approximately every 16 hours of sewing time. Insert the new needle as far up as you are sewing. (Go to www.singerco.com to use SINGER® branded needles in sewing problems. Needles can show signs of the machine (B). Remove and discard the old needle. Generally, the...
...hear a slight popping sound as it with a new needle and discard the old one. It is showing signs of wear resulting in your SINGER® sewing machine. Loosen the needle clamp screw (A) by turning it is also important to view the Stitch Reference Guide) For best results, use the ... after every 4 projects or approximately every 16 hours of sewing time. Insert the new needle as far up as you are sewing. (Go to www.singerco.com to use SINGER® branded needles in sewing problems. Needles can show signs of the machine (B). Remove and discard the old needle. Generally, the...


