Instruction Manual
Page 2
...this appliance only for household use bent needles. 8. Return the appliance to be used as threading needle, changing needle, threading bobbin, or changing presser foot, and the like. 10.Always unplug sewing machine from the electrical outlet when removing covers, lubricating, or when making any air openings blocked...Read all instructions before using and before re-lamping. Always unplug this appliance is intended for its intended use as contained in this sewing machine. To reduce the risk of burns, fire, electric shock, or injury to break. 7. Never operate this manual. Always use...
...this appliance only for household use bent needles. 8. Return the appliance to be used as threading needle, changing needle, threading bobbin, or changing presser foot, and the like. 10.Always unplug sewing machine from the electrical outlet when removing covers, lubricating, or when making any air openings blocked...Read all instructions before using and before re-lamping. Always unplug this appliance is intended for its intended use as contained in this sewing machine. To reduce the risk of burns, fire, electric shock, or injury to break. 7. Never operate this manual. Always use...
Instruction Manual
Page 6
... of the machine 2/4 Accessories 6 Installing the snap-in sewing table 8 Connecting machine to power source 10 Changing the bulb 12 Two-step presser foot lifter/ Adjusting presser foot pressure 14 Attaching the presser foot shank 16 Winding the bobbin 18 Inserting the bobbin 20 Inserting and changing needles 22 Threading the upper thread 24 Automatic...
... of the machine 2/4 Accessories 6 Installing the snap-in sewing table 8 Connecting machine to power source 10 Changing the bulb 12 Two-step presser foot lifter/ Adjusting presser foot pressure 14 Attaching the presser foot shank 16 Winding the bobbin 18 Inserting the bobbin 20 Inserting and changing needles 22 Threading the upper thread 24 Automatic...

Instruction Manual
Page 9
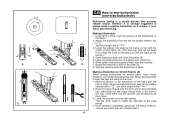
GB Principal parts of the machine 8 1 1. Thread tension dial 9 2. Thread take-up lever 10 4. Needle plate 7. Thread cutter 3 5. Removable sewing table/ accessory storage 4 8. Automatic threader 7 13 14 12 PUSH 2 Stitch length dial 11. Presser foot 11 6. Bobbin stopper 5 10. One step buttonhole lever 14. Drop feed control 6 13. Presser foot pressure adjustment 2 3. Reverse sewing lever 9. Pattern indicator window 12.
GB Principal parts of the machine 8 1 1. Thread tension dial 9 2. Thread take-up lever 10 4. Needle plate 7. Thread cutter 3 5. Removable sewing table/ accessory storage 4 8. Automatic threader 7 13 14 12 PUSH 2 Stitch length dial 11. Presser foot 11 6. Bobbin stopper 5 10. One step buttonhole lever 14. Drop feed control 6 13. Presser foot pressure adjustment 2 3. Reverse sewing lever 9. Pattern indicator window 12.

Instruction Manual
Page 25
... bobbin winder spindle is in "bobbin winding" position, the machine will not sew and the hand wheel will not turn. Snap thread into thread guide. (3) - Press bobbin to the left (10) and remove. Place thread and spool holder onto spool pin (1). For smaller spools of thread place spool holder with small side next to right. (6) - Cut...
... bobbin winder spindle is in "bobbin winding" position, the machine will not sew and the hand wheel will not turn. Snap thread into thread guide. (3) - Press bobbin to the left (10) and remove. Place thread and spool holder onto spool pin (1). For smaller spools of thread place spool holder with small side next to right. (6) - Cut...
Instruction Manual
Page 31
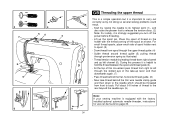
...Now take -up lever and then downwards again. (7) - During this movement pass thread from right to the rear beyond the needle eye. (9) Note: If your sewing machine is strongly suggested you turn off the spool as illustrated. - Lift up left through... the take thread behind the flat, horizontal thread guide. (8) - 3 7 68 9 6 4 54 5 3 2 7 8 9 GB Threading the upper thread This is a simple operation but it is helpful to hold the thread between the spool and thread guide (4). - Pull about 6-8 inches of thread to left channel (6). Start by leading thread down to ...
...Now take -up lever and then downwards again. (7) - During this movement pass thread from right to the rear beyond the needle eye. (9) Note: If your sewing machine is strongly suggested you turn off the spool as illustrated. - Lift up left through... the take thread behind the flat, horizontal thread guide. (8) - 3 7 68 9 6 4 54 5 3 2 7 8 9 GB Threading the upper thread This is a simple operation but it is helpful to hold the thread between the spool and thread guide (4). - Pull about 6-8 inches of thread to left channel (6). Start by leading thread down to ...
Instruction Manual
Page 39
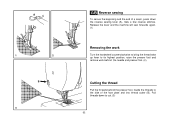
Pull threads down the reverse sewing lever (A). Release the lever and the machine will sew forwards again. (1) Removing the work Turn the handwheel counterclockwise to bring the thread take up lever to cut. (3) 32 Guide the threads to the side of a seam, press down to its highest position, raise the presser foot and remove work behind the needle and presser foot. (2) Cutting the thread Pull the threads behind the presser foot. Sew a few reverse stitches. A 1 2 B 3 GB Reverse sewing To secure the beginning and the end of the face plate and into thread cutter (B).
Pull threads down the reverse sewing lever (A). Release the lever and the machine will sew forwards again. (1) Removing the work Turn the handwheel counterclockwise to bring the thread take up lever to cut. (3) 32 Guide the threads to the side of a seam, press down to its highest position, raise the presser foot and remove work behind the needle and presser foot. (2) Cutting the thread Pull the threads behind the presser foot. Sew a few reverse stitches. A 1 2 B 3 GB Reverse sewing To secure the beginning and the end of the face plate and into thread cutter (B).
Instruction Manual
Page 55
... the foot (b).) 4. Lower the buttonhole lever and gently push it is a simple process that provides reliable results. Hook the heavy thread onto the back end of the buttonhole foot, then bring the two heavy thread ends to the front of the buttonhole on the fabric with the mark on...When the buttonhole is completed, gently pull the heavy thread to match the diameter of the buttonhole on stretch fabric, hook heavy thread or cord under the buttonhole foot. Set stitch length dial to " ". Lower the presser foot and start the machine. 7. Once sewing is sewn the legs will be sewn first.) (...
... the foot (b).) 4. Lower the buttonhole lever and gently push it is a simple process that provides reliable results. Hook the heavy thread onto the back end of the buttonhole foot, then bring the two heavy thread ends to the front of the buttonhole on the fabric with the mark on...When the buttonhole is completed, gently pull the heavy thread to match the diameter of the buttonhole on stretch fabric, hook heavy thread or cord under the buttonhole foot. Set stitch length dial to " ". Lower the presser foot and start the machine. 7. Once sewing is sewn the legs will be sewn first.) (...
Instruction Manual
Page 61
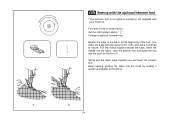
... twice by holding it upright and slightly to secure. Pull the thread slightly towards you and lower the presser foot. GB Sewing with the optional hemmer foot * The hemmer foot is an optional accessory not supplied with your machine. Insert the needle into the fabric, raise the presser foot and... guide the fold into the scroll by about 3 mm (1/8") and sew 4-5 stitches to the left (2). 1 2 54 For hems in fine or sheer fabrics...
... twice by holding it upright and slightly to secure. Pull the thread slightly towards you and lower the presser foot. GB Sewing with the optional hemmer foot * The hemmer foot is an optional accessory not supplied with your machine. Insert the needle into the fabric, raise the presser foot and... guide the fold into the scroll by about 3 mm (1/8") and sew 4-5 stitches to the left (2). 1 2 54 For hems in fine or sheer fabrics...
Instruction Manual
Page 71
... results. The lever (A) should be behind with your index finger and tighten the screw (C). (2) First sew around the edge of the fabric is accomplished without the sewing machine internal feed system. Movement of the hole (to secure the threads) (3). Move the drop feed control to right to the presser foot holder. Turn work from...
... results. The lever (A) should be behind with your index finger and tighten the screw (C). (2) First sew around the edge of the fabric is accomplished without the sewing machine internal feed system. Movement of the hole (to secure the threads) (3). Move the drop feed control to right to the presser foot holder. Turn work from...
Instruction Manual
Page 81
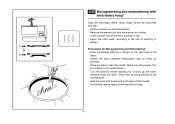
... with embroidery hoop* Drop the feed dogs. (Note: Stitch length cannot be controlled with thumb and forefingers of hoop. 74 Set the machine as possible. - Stretch the fabric between embroidery hoop as firmly as illustrated above. - Lower presser foot lever before starting point. - Adjust ...lettering or design on the right side of lettering or design. Turn the balance wheel towards you to sew. - Sew a few securing stitches at the starting to bring up the lower thread through the fabric. Remove the presser foot and the presser foot holder. - Hold the hoop with ...
... with embroidery hoop* Drop the feed dogs. (Note: Stitch length cannot be controlled with thumb and forefingers of hoop. 74 Set the machine as possible. - Stretch the fabric between embroidery hoop as firmly as illustrated above. - Lower presser foot lever before starting point. - Adjust ...lettering or design on the right side of lettering or design. Turn the balance wheel towards you to sew. - Sew a few securing stitches at the starting to bring up the lower thread through the fabric. Remove the presser foot and the presser foot holder. - Hold the hoop with ...
Instruction Manual
Page 85
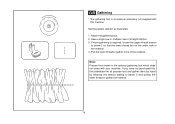
Set the pattern selector as illustrated. 1. Attach the gathering foot. 2. If you have not purchased this machine. Sew a single row or multiple rows of the material. 4. If more of the material. Note: Presser foot shown is the optional gathering foot which does not ... hand by lowering the tension setting to gather the material. 78 Pull the lower thread to gather more gathering is required, loosen the upper thread tension to below 2 and pulling the lower thread to below 2 so that the lower thread lies on the under side of straight stitches. 3. GB Gathering * The gathering foot ...
Set the pattern selector as illustrated. 1. Attach the gathering foot. 2. If you have not purchased this machine. Sew a single row or multiple rows of the material. 4. If more of the material. Note: Presser foot shown is the optional gathering foot which does not ... hand by lowering the tension setting to gather the material. 78 Pull the lower thread to gather more gathering is required, loosen the upper thread tension to below 2 and pulling the lower thread to below 2 so that the lower thread lies on the under side of straight stitches. 3. GB Gathering * The gathering foot ...
Instruction Manual
Page 87
... chiffons to the machine as follows: i) The arm (3) should be used only when necessary. It is optional. Lift the presser foot lifter to sew first without the evenfeed foot accessory which should fit into the presser foot bar. Draw the bobbin thread up and place ...) the presser bar attaching screw (2). 4. a.Arm b.Attaching head c. Attach the evenfeed foot to multiple layers of very difficult fabrics. 1. Your sewing machine offers excellent stitch quality on your left to right so that it is easier to prevent uneven feeding of denim. Needle bar d.Needle screw & ...
... chiffons to the machine as follows: i) The arm (3) should be used only when necessary. It is optional. Lift the presser foot lifter to sew first without the evenfeed foot accessory which should fit into the presser foot bar. Draw the bobbin thread up and place ...) the presser bar attaching screw (2). 4. a.Arm b.Attaching head c. Attach the evenfeed foot to multiple layers of very difficult fabrics. 1. Your sewing machine offers excellent stitch quality on your left to right so that it is easier to prevent uneven feeding of denim. Needle bar d.Needle screw & ...
Instruction Manual
Page 89
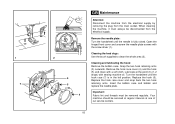
... the bobbin case and bobbin and replace the needle plate. Open the hinged front cover and unscrew the needle plate screws with sewing machine oil. Your machine should be serviced at regular intervals at the point (6) (1-2 drops) with the screw driver (1). Lubricate at one of our... service centers. 82 Replace the hook (5). Important: Fabric lint and threads must always be removed regularly. When cleaning the machine, it must be disconnected from the main socket. Turn the handwheel until the needle is in the left position....
... the bobbin case and bobbin and replace the needle plate. Open the hinged front cover and unscrew the needle plate screws with sewing machine oil. Your machine should be serviced at regular intervals at the point (6) (1-2 drops) with the screw driver (1). Lubricate at one of our... service centers. 82 Replace the hook (5). Important: Fabric lint and threads must always be removed regularly. When cleaning the machine, it must be disconnected from the main socket. Turn the handwheel until the needle is in the left position....
Instruction Manual
Page 91
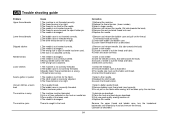
... fabric. 4.Select the correct foot. 1.Check the threading. 2.Thread the bobbin case as described. Remove the upper thread and bobbin case, turn the handwheel backwards and forwards by the machine. 1.Lubricate as described. 2.Clean the hook and feed dog as described. 3.Only use good quality sewing machine oil. 4.Replace the needle. Skipped stitches Needle breaks Loose...
... fabric. 4.Select the correct foot. 1.Check the threading. 2.Thread the bobbin case as described. Remove the upper thread and bobbin case, turn the handwheel backwards and forwards by the machine. 1.Lubricate as described. 2.Clean the hook and feed dog as described. 3.Only use good quality sewing machine oil. 4.Replace the needle. Skipped stitches Needle breaks Loose...


