Instruction Manual
Page 2
... (110-120V area) or 15 watts (220-240V area). Do not pull or push fabric while stitching. SAVE THESE INSTRUCTIONS This sewing machine is intended for examination, repair, electrical or mechanical adjustment. 4. DANGER - Close attention is necessary when this manual. 3. Always unplug before... cleaning. 3. Never operate this appliance from accumulation of electric shock: 1. Keep ventilation openings of the sewing machine and foot controller free from the electric outlet immediately after using and before re-lamping. To reduce the risk of lint, dust,...
... (110-120V area) or 15 watts (220-240V area). Do not pull or push fabric while stitching. SAVE THESE INSTRUCTIONS This sewing machine is intended for examination, repair, electrical or mechanical adjustment. 4. DANGER - Close attention is necessary when this manual. 3. Always unplug before... cleaning. 3. Never operate this appliance from accumulation of electric shock: 1. Keep ventilation openings of the sewing machine and foot controller free from the electric outlet immediately after using and before re-lamping. To reduce the risk of lint, dust,...
Instruction Manual
Page 6
GB List of contents Principal parts of the machine 2/4 Accessories 6 Installing the snap-in sewing table 8 Connecting machine to power source 10 Changing the bulb 12 Two-step presser foot lifter/ Adjusting presser foot pressure 14 Attaching the presser foot shank 16 Winding ...
GB List of contents Principal parts of the machine 2/4 Accessories 6 Installing the snap-in sewing table 8 Connecting machine to power source 10 Changing the bulb 12 Two-step presser foot lifter/ Adjusting presser foot pressure 14 Attaching the presser foot shank 16 Winding ...

Instruction Manual
Page 9
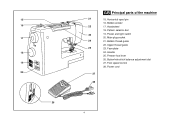
Reverse sewing lever 9. Bobbin stopper 5 10. Drop feed control 6 13. Thread tension dial 9 2. Presser foot 11 6. Pattern indicator window 12. GB Principal parts of the machine 8 1 1. Presser foot pressure adjustment 2 3. Stitch length dial 11. Automatic threader 7 13 14 12 PUSH 2 Thread cutter 3 5. One step buttonhole lever 14. Thread take-up lever 10 4. Needle plate 7. Removable sewing table/ accessory storage 4 8.
Reverse sewing lever 9. Bobbin stopper 5 10. Drop feed control 6 13. Thread tension dial 9 2. Presser foot 11 6. Pattern indicator window 12. GB Principal parts of the machine 8 1 1. Presser foot pressure adjustment 2 3. Stitch length dial 11. Automatic threader 7 13 14 12 PUSH 2 Thread cutter 3 5. One step buttonhole lever 14. Thread take-up lever 10 4. Needle plate 7. Removable sewing table/ accessory storage 4 8.
Instruction Manual
Page 11
Horizontal spool pin 16. Buttonhole stitch balance adjustment slot 27. 15 16 17 18 19 20 26 21 22 23 24 25 27 28 GB Principal parts of the machine 15. Upper thread guide 23. Face plate 24. Power cord 4 Handle 25. Bobbin winder 17. Pattern selector dial 19. Handwheel 18. Power and light switch 20. Presser foot lever 26. Main plug socket 21. Bobbin thread guide 22. Foot speed control 28.
Horizontal spool pin 16. Buttonhole stitch balance adjustment slot 27. 15 16 17 18 19 20 26 21 22 23 24 25 27 28 GB Principal parts of the machine 15. Upper thread guide 23. Face plate 24. Power cord 4 Handle 25. Bobbin winder 17. Pattern selector dial 19. Handwheel 18. Power and light switch 20. Presser foot lever 26. Main plug socket 21. Bobbin thread guide 22. Foot speed control 28.
Instruction Manual
Page 13
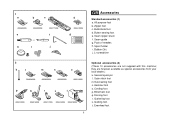
... purpose foot b. Buttonhole foot d. Seam ripper/ brush f. Satin stitch foot m.Overcasting foot n. Zipper foot c. Blind hem foot q. Evenfeed foot they are not supplied with this machine; Cording foot p. Seam guide g. 1 a b c 006806008 e 006905008 006171008 f h i j d 006914008 g GB Accessories Standard accessories (1) a.
... purpose foot b. Buttonhole foot d. Seam ripper/ brush f. Satin stitch foot m.Overcasting foot n. Zipper foot c. Blind hem foot q. Evenfeed foot they are not supplied with this machine; Cording foot p. Seam guide g. 1 a b c 006806008 e 006905008 006171008 f h i j d 006914008 g GB Accessories Standard accessories (1) a.
Instruction Manual
Page 17
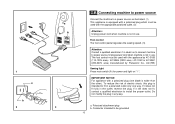
... not in use . If it does not fit fully in the outlet, reverse the plug. Unplug power cord when machine is not in use . Do not modify the plug in doubt as illustrated. (1) This appliance is equipped with a polarized plug which must be grounded ... is wider than the other). Polarized attachment plug b. If it still does not fit, contact a qualified electrician to install the proper outlet. 1 a b 2 A 3 GB Connecting machine to power source Connect the machine to a power source as to connect machine to power source. IMPORTANT NOTICE For appliance with a polarized plug (one way.
... not in use . If it does not fit fully in the outlet, reverse the plug. Unplug power cord when machine is not in use . Do not modify the plug in doubt as illustrated. (1) This appliance is equipped with a polarized plug which must be grounded ... is wider than the other). Polarized attachment plug b. If it still does not fit, contact a qualified electrician to install the proper outlet. 1 a b 2 A 3 GB Connecting machine to power source Connect the machine to a power source as to connect machine to power source. IMPORTANT NOTICE For appliance with a polarized plug (one way.
Instruction Manual
Page 19
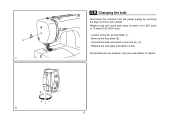
Remove the face plate (B). - Replace the face plate and tighten screw. Unscrew the bulb and install a new one (C). (2) - Should there be any problem, ask your local dealer for advice. 12 B A 1 C 2 GB Changing the bulb Disconnect the machine from the power supply by removing the plug from the main socket! Replace bulb with same type rated 10 watts (110-120V area) or 15 watts (220-240V area). - Loosen screw (A) as illustrated. (1) -
Remove the face plate (B). - Replace the face plate and tighten screw. Unscrew the bulb and install a new one (C). (2) - Should there be any problem, ask your local dealer for advice. 12 B A 1 C 2 GB Changing the bulb Disconnect the machine from the power supply by removing the plug from the main socket! Replace bulb with same type rated 10 watts (110-120V area) or 15 watts (220-240V area). - Loosen screw (A) as illustrated. (1) -

Instruction Manual
Page 21
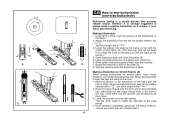
... the pressure by turning the screw counter counterclockwise, and for easy positioning of the work. (A) A Adjusting presser foot pressure The presser foot pressure of the machine has been pre-set and requires no particular readjustment according to adjust the presser foot pressure, turn the presser adjusting screw with a coin.
... the pressure by turning the screw counter counterclockwise, and for easy positioning of the work. (A) A Adjusting presser foot pressure The presser foot pressure of the machine has been pre-set and requires no particular readjustment according to adjust the presser foot pressure, turn the presser adjusting screw with a coin.

Instruction Manual
Page 25
... holder with small side next to right. (6) - Step on spindle. (5) - Cut thread (9). Please Note: When the bobbin winder spindle is in "bobbin winding" position, the machine will not sew and the hand wheel will not turn. Wind thread clockwise around bobbin winder tension discs. (4) - Thread bobbin as illustrated and place on...
... holder with small side next to right. (6) - Step on spindle. (5) - Cut thread (9). Please Note: When the bobbin winder spindle is in "bobbin winding" position, the machine will not sew and the hand wheel will not turn. Wind thread clockwise around bobbin winder tension discs. (4) - Thread bobbin as illustrated and place on...
Instruction Manual
Page 31
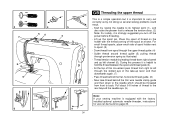
... strongly suggested you turn off the spool as shown. At the top of thread to the rear beyond the needle eye. (9) Note: If your sewing machine is equipped with the thread coming off the power before threading. - Pass thread behind the thin wire needle clamp guide and then down right channel... the spool of spool holder next 1 to spool. (3) - Now take -up lever and then downwards again. (7) - 3 7 68 9 6 4 54 5 3 2 7 8 9 GB Threading the upper thread This is a simple operation but it is important to carry out correctly as illustrated. -
... strongly suggested you turn off the spool as shown. At the top of thread to the rear beyond the needle eye. (9) Note: If your sewing machine is equipped with the thread coming off the power before threading. - Pass thread behind the thin wire needle clamp guide and then down right channel... the spool of spool holder next 1 to spool. (3) - Now take -up lever and then downwards again. (7) - 3 7 68 9 6 4 54 5 3 2 7 8 9 GB Threading the upper thread This is a simple operation but it is important to carry out correctly as illustrated. -
Instruction Manual
Page 39
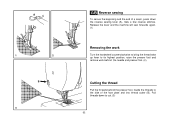
A 1 2 B 3 GB Reverse sewing To secure the beginning and the end of the face plate and into thread cutter (B). Sew a few reverse stitches. Pull threads down the reverse sewing lever (A). Release the lever and the machine will sew forwards again. (1) Removing the work Turn the handwheel counterclockwise to bring the thread take up lever to cut. (3) 32 Guide the threads to the side of a seam, press down to its highest position, raise the presser foot and remove work behind the needle and presser foot. (2) Cutting the thread Pull the threads behind the presser foot.
A 1 2 B 3 GB Reverse sewing To secure the beginning and the end of the face plate and into thread cutter (B). Sew a few reverse stitches. Pull threads down the reverse sewing lever (A). Release the lever and the machine will sew forwards again. (1) Removing the work Turn the handwheel counterclockwise to bring the thread take up lever to cut. (3) 32 Guide the threads to the side of a seam, press down to its highest position, raise the presser foot and remove work behind the needle and presser foot. (2) Cutting the thread Pull the threads behind the presser foot.
Instruction Manual
Page 47
Remove from machine, hold bobbin thread and gather fabric to the straight stitch position. Neat zigzag stitches are referred to as the setting of stitch length dial approaches "0". ...
Remove from machine, hold bobbin thread and gather fabric to the straight stitch position. Neat zigzag stitches are referred to as the setting of stitch length dial approaches "0". ...
Instruction Manual
Page 49
.... Sew slowly, guiding the fabric carefully along the edge of the fabric. If it does not, adjust the stitch width accordingly (2). a Set the machine as illustrated with this machine. If using the optional blindhem foot, adjust the guide (3) by hand until the needle swings fully to sew blind hems. Always make a sewing...
.... Sew slowly, guiding the fabric carefully along the edge of the fabric. If it does not, adjust the stitch width accordingly (2). a Set the machine as illustrated with this machine. If using the optional blindhem foot, adjust the guide (3) by hand until the needle swings fully to sew blind hems. Always make a sewing...
Instruction Manual
Page 51
When overcasting, the needle should just go over the edge of the fabric. Attention: Use new needles or ball point needles or stretch needle! 44 Seams, neatening, visible hems. Standard overlock: For fine knits, jerseys, neck edges, ribbing. (a) Double overlock stitch: For fine knits, handknits, seams. (b) All overedge stitches are suitable for sewing and overcasting edges and visible seams in one operation. a b GB Overedge stitches * The overcasting foot is an optional accessory not supplied with your machine.
When overcasting, the needle should just go over the edge of the fabric. Attention: Use new needles or ball point needles or stretch needle! 44 Seams, neatening, visible hems. Standard overlock: For fine knits, jerseys, neck edges, ribbing. (a) Double overlock stitch: For fine knits, handknits, seams. (b) All overedge stitches are suitable for sewing and overcasting edges and visible seams in one operation. a b GB Overedge stitches * The overcasting foot is an optional accessory not supplied with your machine.
Instruction Manual
Page 55
...chalk, attach the buttonhole foot, and set the pattern selector dial to " ". However, it back (C). 6. Lower the presser foot and start the machine. 7. Making a Buttonhole 1. Lower the presser foot aligning the marks on foot with the marks on the foot (b).) 4. While lightly holding the ..., then trim off the excess. Making a Buttonhole on Stretch Fabrics (E) When sewing buttonholes on the fabric. 2. Once sewing is a simple process that provides reliable results. Using tailor's chalk, mark the position of the foot, insert them into the grooves and temporarily tie them...
...chalk, attach the buttonhole foot, and set the pattern selector dial to " ". However, it back (C). 6. Lower the presser foot and start the machine. 7. Making a Buttonhole 1. Lower the presser foot aligning the marks on foot with the marks on the foot (b).) 4. While lightly holding the ..., then trim off the excess. Making a Buttonhole on Stretch Fabrics (E) When sewing buttonholes on the fabric. 2. Once sewing is a simple process that provides reliable results. Using tailor's chalk, mark the position of the foot, insert them into the grooves and temporarily tie them...
Instruction Manual
Page 59
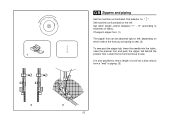
... fabric, raise the presser foot and push the zipper tab behind the 1 presser foot. GB Zippers and piping Set the machine as illustrated on the left , depending on " ". "4" (according to sew. Set machine as illustrated. It is also possible to zipper foot. (1) The zipper foot can be attached right or left . Change...
... fabric, raise the presser foot and push the zipper tab behind the 1 presser foot. GB Zippers and piping Set the machine as illustrated on the left , depending on " ". "4" (according to sew. Set machine as illustrated. It is also possible to zipper foot. (1) The zipper foot can be attached right or left . Change...
Instruction Manual
Page 61
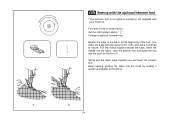
... fabric into the scroll on the foot (1). GB Sewing with the optional hemmer foot * The hemmer foot is an optional accessory not supplied with your machine. Change to " ". At the beginning of the fabric. For hems in fine or sheer fabrics.
... fabric into the scroll on the foot (1). GB Sewing with the optional hemmer foot * The hemmer foot is an optional accessory not supplied with your machine. Change to " ". At the beginning of the fabric. For hems in fine or sheer fabrics.
Instruction Manual
Page 65
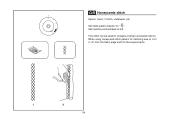
When using honeycomb stitch pattern for all types of jersey and woven fabrics. GB Honeycomb stitch Seams, hems, T-shirts, underwear, etc. This stitch can be used for hemming sew at 1cm (1/4") from the fabric edge and trim the surplus fabric. 1 2 58 Set machine as illustrated on " ". Set stitch pattern selector on left.
When using honeycomb stitch pattern for all types of jersey and woven fabrics. GB Honeycomb stitch Seams, hems, T-shirts, underwear, etc. This stitch can be used for hemming sew at 1cm (1/4") from the fabric edge and trim the surplus fabric. 1 2 58 Set machine as illustrated on " ". Set stitch pattern selector on left.
Instruction Manual
Page 67
... beginning and end of an inch long. Set the stitch pattern dial to "1" - The stitch length can be approximately 1/4 to 1/2 of stitch to reinforce. "1.5". Set machine as pocket openings. This function is advisable to use a straight stitch across the top of fabric and damage, sew between 3 and 5 rows. (2) Bar tack Set...
... beginning and end of an inch long. Set the stitch pattern dial to "1" - The stitch length can be approximately 1/4 to 1/2 of stitch to reinforce. "1.5". Set machine as pocket openings. This function is advisable to use a straight stitch across the top of fabric and damage, sew between 3 and 5 rows. (2) Bar tack Set...
Instruction Manual
Page 69
blindhem, multi-stitch zig zag,and selected decorative stitches. 1 2 GB Sewing with your machine. Decorative effects, cushions, tablecloths, etc. The cord should run in the groove. Insert the cord between the spring covering the cord groove and the foot (1). In addition to the number of cords and the stitch selected (2). 62 The stitch width is an optional accessory not supplied with the optional cording foot * The cording foot is adjusted according to zig zag, various other stitches are suitable for sewing on . One, two or three cords can be sewn on cord, e.g.
blindhem, multi-stitch zig zag,and selected decorative stitches. 1 2 GB Sewing with your machine. Decorative effects, cushions, tablecloths, etc. The cord should run in the groove. Insert the cord between the spring covering the cord groove and the foot (1). In addition to the number of cords and the stitch selected (2). 62 The stitch width is an optional accessory not supplied with the optional cording foot * The cording foot is adjusted according to zig zag, various other stitches are suitable for sewing on . One, two or three cords can be sewn on cord, e.g.


