Instruction Manual
Page 6
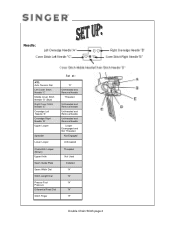
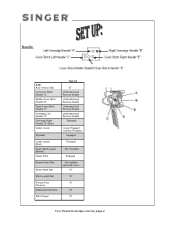
...Tension Dial Left Cover Stitch Needle "C" Middle Cover Stitch Needle "D" (Blue) Right Cover Stitch Needle "E" Overedge Left Needle "A" Overedge Right Needle "B" Upper Looper Spreader Lower Looper Set at:: "D" Unthreaded and Remove Needle Threaded Unthreaded and Remove Needle Unthreaded and Remove Needle Unthreaded and Remove Needle Looper Disengaged and Not Threaded Not Engaged Unthreaded Chainstitch Looper (Brown) Upper Knife Seam Guide Plate Seam Width Dial Stitch Length Dial Presser Foot Pressure Differential Feed Dial Stitch Finger Threaded Not Used Installed "N" "N" "N" "N" "R" Double...
...Tension Dial Left Cover Stitch Needle "C" Middle Cover Stitch Needle "D" (Blue) Right Cover Stitch Needle "E" Overedge Left Needle "A" Overedge Right Needle "B" Upper Looper Spreader Lower Looper Set at:: "D" Unthreaded and Remove Needle Threaded Unthreaded and Remove Needle Unthreaded and Remove Needle Unthreaded and Remove Needle Looper Disengaged and Not Threaded Not Engaged Unthreaded Chainstitch Looper (Brown) Upper Knife Seam Guide Plate Seam Width Dial Stitch Length Dial Presser Foot Pressure Differential Feed Dial Stitch Finger Threaded Not Used Installed "N" "N" "N" "N" "R" Double...

Instruction Manual
Page 12
Thread the top cover thread guide by pulling the thread towards the left until it slips under the guide. Then pull the thread along the right side of the button as illustrated 1-9. 2. Pass thread from back to release the tension disks. Thread the Cover Stitch Middle/Chain Stitch needle as illustrated. 4. While holding the thread, firmly pull the thread between the tension disks. Double Chain Stitch page 8 Thread Middle Cover Stitch Needle with regular overlock thread. 1. Raise the Presser Foot to the front through the thread guide . 3.
Thread the top cover thread guide by pulling the thread towards the left until it slips under the guide. Then pull the thread along the right side of the button as illustrated 1-9. 2. Pass thread from back to release the tension disks. Thread the Cover Stitch Middle/Chain Stitch needle as illustrated. 4. While holding the thread, firmly pull the thread between the tension disks. Double Chain Stitch page 8 Thread Middle Cover Stitch Needle with regular overlock thread. 1. Raise the Presser Foot to the front through the thread guide . 3.
Instruction Manual
Page 18
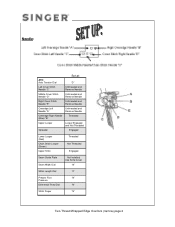
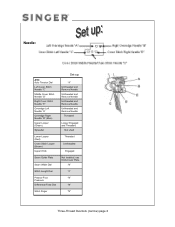
... Dial Set at: "D" Left Cover Stitch Needle "C" Unthreaded and Remove Needle Middle Cover Stitch Needle "D" Unthreaded and Remove Needle Right Cover Stitch Needle "E" Unthreaded and Remove Needle Overedge Left Needle "A" Unthreaded and Remove Needle Overedge Right Needle (Blue) "B" Threaded Upper Looper Looper Engaged and Not Threaded Spreader Engaged Lower Looper (Red) Chain Stitch Looper (Brown) Upper Knife Threaded Not Threaded Engaged Seam Guide Plate Seam Width Dial Not Installed Use Knife Cover "N" Stitch Length Dial "2" Presser Foot "N" Pressure Differential Feed...
... Dial Set at: "D" Left Cover Stitch Needle "C" Unthreaded and Remove Needle Middle Cover Stitch Needle "D" Unthreaded and Remove Needle Right Cover Stitch Needle "E" Unthreaded and Remove Needle Overedge Left Needle "A" Unthreaded and Remove Needle Overedge Right Needle (Blue) "B" Threaded Upper Looper Looper Engaged and Not Threaded Spreader Engaged Lower Looper (Red) Chain Stitch Looper (Brown) Upper Knife Threaded Not Threaded Engaged Seam Guide Plate Seam Width Dial Not Installed Use Knife Cover "N" Stitch Length Dial "2" Presser Foot "N" Pressure Differential Feed...
Instruction Manual
Page 27
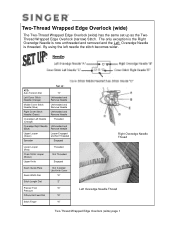
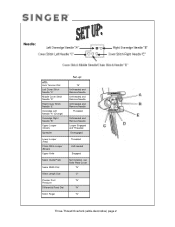
... Right Needle Unthreaded and (Blue) Remove Needle Upper Looper (Green) Looper Engaged and Not Threaded Spreader Engaged Lower Looper (Red) Chain Stitch Looper (Brown) Upper Knife Threaded Not Threaded Engaged Seam Guide Plate Seam Width Dial Not Installed Use Knife Cover "N" Stitch Length Dial "2" Presser Foot "N" Pressure Differential Feed Dial "N" Stitch Finger "N" Right Overedge Needle Thread Left Overedge Needle Thread Two-Thread Wrapped Edge Overlock (wide) page 1 Two-Thread Wrapped Edge Overlock (wide) The Two-Thread Wrapped Edge Overlock (wide) has the same set up...
... Right Needle Unthreaded and (Blue) Remove Needle Upper Looper (Green) Looper Engaged and Not Threaded Spreader Engaged Lower Looper (Red) Chain Stitch Looper (Brown) Upper Knife Threaded Not Threaded Engaged Seam Guide Plate Seam Width Dial Not Installed Use Knife Cover "N" Stitch Length Dial "2" Presser Foot "N" Pressure Differential Feed Dial "N" Stitch Finger "N" Right Overedge Needle Thread Left Overedge Needle Thread Two-Thread Wrapped Edge Overlock (wide) page 1 Two-Thread Wrapped Edge Overlock (wide) The Two-Thread Wrapped Edge Overlock (wide) has the same set up...
Instruction Manual
Page 33
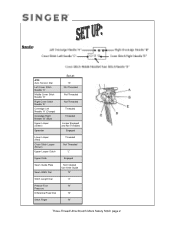
...ATD: Auto Tension Dial Left Cover Stitch Needle "C" Middle Cover Stitch Needle "D" Right Cover Stitch Needle "E" Overedge Left Needle "A" Overedge Right Needle "B" (Blue) Upper Looper Spreader Lower Looper (Red) Chain Stitch Looper (Brown) Upper Knife Seam Guide Plate Seam Width Dial Stitch Length Dial Presser Foot Pressure Differential Feed Dial Stitch Finger Set at: "E" Unthreaded and Remove Needle Unthreaded and Remove Needle Unthreaded and Remove Needle Unthreaded and Remove Needle Threaded Looper Engaged and Not Threaded Engaged Threaded Not Threaded Engaged Not Installed Use Knife Cover...
...ATD: Auto Tension Dial Left Cover Stitch Needle "C" Middle Cover Stitch Needle "D" Right Cover Stitch Needle "E" Overedge Left Needle "A" Overedge Right Needle "B" (Blue) Upper Looper Spreader Lower Looper (Red) Chain Stitch Looper (Brown) Upper Knife Seam Guide Plate Seam Width Dial Stitch Length Dial Presser Foot Pressure Differential Feed Dial Stitch Finger Set at: "E" Unthreaded and Remove Needle Unthreaded and Remove Needle Unthreaded and Remove Needle Unthreaded and Remove Needle Threaded Looper Engaged and Not Threaded Engaged Threaded Not Threaded Engaged Not Installed Use Knife Cover...
Instruction Manual
Page 49
...Tension Dial Left Cover Stitch Needle "C" Middle Cover Stitch Needle "D" Right Cover Stitch Needle "E" Overedge Left Needle "A" Overedge Right Needle "B" (Blue) Upper Looper (Green) Spreader Lower Looper (Red) Chain Stitch Looper (Brown) Upper Knife Seam Guide Plate Seam Width Dial Stitch Length Dial Presser Foot Pressure Differential Feed Dial Stitch Finger Set-up: "A" Unthreaded and Remove Needle Unthreaded and Remove Needle Unthreaded and Remove Needle Unthreaded and Remove Needle Threaded Looper Engaged and Threaded Not Used Threaded Unthreaded Engaged Not Installed, use Knife Cover Plate...
...Tension Dial Left Cover Stitch Needle "C" Middle Cover Stitch Needle "D" Right Cover Stitch Needle "E" Overedge Left Needle "A" Overedge Right Needle "B" (Blue) Upper Looper (Green) Spreader Lower Looper (Red) Chain Stitch Looper (Brown) Upper Knife Seam Guide Plate Seam Width Dial Stitch Length Dial Presser Foot Pressure Differential Feed Dial Stitch Finger Set-up: "A" Unthreaded and Remove Needle Unthreaded and Remove Needle Unthreaded and Remove Needle Unthreaded and Remove Needle Threaded Looper Engaged and Threaded Not Used Threaded Unthreaded Engaged Not Installed, use Knife Cover Plate...

Instruction Manual
Page 63
... Tension Dial Left Cover Stitch Needle "C" Middle Cover Stitch Needle "D" Right Cover Stitch Needle "E" Overedge Left Needle "A" (Orange) Overedge Right Needle "B" Upper Looper (Green) Spreader Lower Looper (Red) Chain Stitch Looper (Brown) Upper Knife Seam Guide Plate Seam Width Dial Stitch Length Dial Presser Foot Pressure Differential Feed Dial Stitch Finger Set-up: "B" Unthreaded and Remove Needle Unthreaded and Remove Needle Unthreaded and Remove Needle Threaded Unthreaded and Remove Needle Looper Engaged and Threaded Disengaged Threaded Unthreaded Engaged Not Installed, use Knife Plate...
... Tension Dial Left Cover Stitch Needle "C" Middle Cover Stitch Needle "D" Right Cover Stitch Needle "E" Overedge Left Needle "A" (Orange) Overedge Right Needle "B" Upper Looper (Green) Spreader Lower Looper (Red) Chain Stitch Looper (Brown) Upper Knife Seam Guide Plate Seam Width Dial Stitch Length Dial Presser Foot Pressure Differential Feed Dial Stitch Finger Set-up: "B" Unthreaded and Remove Needle Unthreaded and Remove Needle Unthreaded and Remove Needle Threaded Unthreaded and Remove Needle Looper Engaged and Threaded Disengaged Threaded Unthreaded Engaged Not Installed, use Knife Plate...
Instruction Manual
Page 68
... Tension Dial Left Cover Stitch Needle "C" Middle Cover Stitch Needle "D" Right Cover Stitch Needle "E" Overedge Left Needle "A" (Orange) Overedge Right Needle "B" Upper Looper (Green) Spreader Lower Looper (Red) Chain Stitch Looper (Brown) Upper Knife Seam Guide Plate Seam Width Dial Stitch Length Dial Presser Foot Pressure Differential Feed Dial Stitch Finger Set-up: "B" Unthreaded and Remove Needle Unthreaded and Remove Needle Unthreaded and Remove Needle Threaded Unthreaded and Remove Needle Looper Engaged and Threaded Disengaged Threaded Unthreaded Engaged Not Installed, use Knife Plate...
... Tension Dial Left Cover Stitch Needle "C" Middle Cover Stitch Needle "D" Right Cover Stitch Needle "E" Overedge Left Needle "A" (Orange) Overedge Right Needle "B" Upper Looper (Green) Spreader Lower Looper (Red) Chain Stitch Looper (Brown) Upper Knife Seam Guide Plate Seam Width Dial Stitch Length Dial Presser Foot Pressure Differential Feed Dial Stitch Finger Set-up: "B" Unthreaded and Remove Needle Unthreaded and Remove Needle Unthreaded and Remove Needle Threaded Unthreaded and Remove Needle Looper Engaged and Threaded Disengaged Threaded Unthreaded Engaged Not Installed, use Knife Plate...
Instruction Manual
Page 99
...: Auto Tension Dial Left Cover Stitch Needle "C" Middle Cover Stitch Needle "D" Right Cover Stitch Needle "E" Overedge Left Needle "A" (Orange) Overedge Right Needle "B" (Blue) Upper Looper (Green) Spreader Set at: "G" Not Threaded Not Threaded Not Threaded Threaded Threaded Looper Engaged and Not Threaded Engaged Lower Looper (Red) Chain Stitch Looper (Brown) Upper Looper Clutch Threaded Not Threaded "L" Upper Knife Engaged Seam Guide Plate Seam Width Dial Not Installed Use Knife Guide "N" Stitch Length Dial "2" Presser Foot "N" Pressure Differential Feed Dial "N" Stitch Finger...
...: Auto Tension Dial Left Cover Stitch Needle "C" Middle Cover Stitch Needle "D" Right Cover Stitch Needle "E" Overedge Left Needle "A" (Orange) Overedge Right Needle "B" (Blue) Upper Looper (Green) Spreader Set at: "G" Not Threaded Not Threaded Not Threaded Threaded Threaded Looper Engaged and Not Threaded Engaged Lower Looper (Red) Chain Stitch Looper (Brown) Upper Looper Clutch Threaded Not Threaded "L" Upper Knife Engaged Seam Guide Plate Seam Width Dial Not Installed Use Knife Guide "N" Stitch Length Dial "2" Presser Foot "N" Pressure Differential Feed Dial "N" Stitch Finger...
Instruction Manual 2
Page 126
Machine Preparation • Differential Feed: • Needles: • • Upper Knife: • Stitch Length: • Foot: Set to "N" Use both the right & left needle for wider elastic, right needle for narrow elastic Engaged Set to 3 or 4 Attach (snap-on) elastic foot Sewing Instructions • Set the needles at the highest position • Raise the presser foot • Loosen screw (2), which will be used for approximately 1 to the back of the foot • Tighten screw (2); ELASTIC FOOT The Elastic Foot is complete, continue to...
Machine Preparation • Differential Feed: • Needles: • • Upper Knife: • Stitch Length: • Foot: Set to "N" Use both the right & left needle for wider elastic, right needle for narrow elastic Engaged Set to 3 or 4 Attach (snap-on) elastic foot Sewing Instructions • Set the needles at the highest position • Raise the presser foot • Loosen screw (2), which will be used for approximately 1 to the back of the foot • Tighten screw (2); ELASTIC FOOT The Elastic Foot is complete, continue to...
Instruction Manual 2
Page 128
... stabilize the seam. 3 Machine Preparation • Differential Feed: • Needles: • Upper Knife: • Stitch Length: • Foot: Set to "N" Use both the right and left needle Engaged Set to "N" Attach (snap-on) Taping Foot Sewing Instructions • Set the needles at the highest position • Raise the presser foot • Insert the tape into seams that will stretch easily. ing screw (3) • Lay the seam under the presser foot, lining up the fabric to sew a 5/8" seam • Lower the presser foot and begin...
... stabilize the seam. 3 Machine Preparation • Differential Feed: • Needles: • Upper Knife: • Stitch Length: • Foot: Set to "N" Use both the right and left needle Engaged Set to "N" Attach (snap-on) Taping Foot Sewing Instructions • Set the needles at the highest position • Raise the presser foot • Insert the tape into seams that will stretch easily. ing screw (3) • Lay the seam under the presser foot, lining up the fabric to sew a 5/8" seam • Lower the presser foot and begin...
Instruction Manual 2
Page 129
... decorating accessories or clothing. Machine Preparation • Differential Feed: • Needles: • Upper knife: • Stitch Length: • Foot: Set to the maximum (highest number ) for shirring or gathering. SHIRRING FOOT The Shirring Foot is the fabric that will be gathered. • Place the top layer of fabric (2) into opening (3) located at the highest position • Place bottom layer of both needles Engaged Set to sew Additional Presser Feet page 6 Use it on ) Shirring Foot Sewing Instructions...
... decorating accessories or clothing. Machine Preparation • Differential Feed: • Needles: • Upper knife: • Stitch Length: • Foot: Set to the maximum (highest number ) for shirring or gathering. SHIRRING FOOT The Shirring Foot is the fabric that will be gathered. • Place the top layer of fabric (2) into opening (3) located at the highest position • Place bottom layer of both needles Engaged Set to sew Additional Presser Feet page 6 Use it on ) Shirring Foot Sewing Instructions...
Instruction Manual 31
Page 3
... loose cloth. * Never drop or insert any object into the water. The wrong plate can cause the needle to break. * Do not use as threading needle and loopers, changing needle, changing throat plate or changing presser foot, etc. * Always unplug the machine from the electric outlet immediately after using and before cleaning. * Always unplug before operating the machine. Use only attachments recommended by the manufacturer as contained in the Instruction Book. * To disconnect, turn all controls...
... loose cloth. * Never drop or insert any object into the water. The wrong plate can cause the needle to break. * Do not use as threading needle and loopers, changing needle, changing throat plate or changing presser foot, etc. * Always unplug the machine from the electric outlet immediately after using and before cleaning. * Always unplug before operating the machine. Use only attachments recommended by the manufacturer as contained in the Instruction Book. * To disconnect, turn all controls...
Instruction Manual 31
Page 5
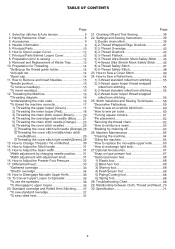
... *How to sew an overlock blind hem 60 *How to sew pin tucks 60 *Turning square corners 61 *Pin placement 62 *Securing the thread chain 62 *How to Adjust the Presser Foot Pressure 32 17. Specification 71 4 Selection stitches & Auto tension 5 2. Principal Parts 10 6. Principal Parts Behind Looper Cover 12 8. Removal and Replacement of Waste Tray 13 10. How to reinforce a seam 63 *Braiding by changing needle position........ 31 *Width adjustment with adjustment knob 31 16...
... *How to sew an overlock blind hem 60 *How to sew pin tucks 60 *Turning square corners 61 *Pin placement 62 *Securing the thread chain 62 *How to Adjust the Presser Foot Pressure 32 17. Specification 71 4 Selection stitches & Auto tension 5 2. Principal Parts 10 6. Principal Parts Behind Looper Cover 12 8. Removal and Replacement of Waste Tray 13 10. How to reinforce a seam 63 *Braiding by changing needle position........ 31 *Width adjustment with adjustment knob 31 16...

Instruction Manual 31
Page 16
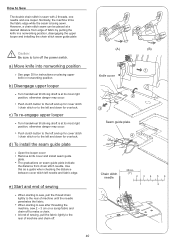
... Screws. When all cover stitch needles are to the rear To tighten To loosen 15 Overedge left needle B. Place a thick piece of fabric [such as shown in the fabric. Then direct it is necessary to different needle positions by illustrating the needle clamp at their highest position. 11. HOW TO REMOVE AND INSERT NEEDLES Needle Position With this machine, five needles can be slightly higher than the center needle. The Instruction Book refers...
... Screws. When all cover stitch needles are to the rear To tighten To loosen 15 Overedge left needle B. Place a thick piece of fabric [such as shown in the fabric. Then direct it is necessary to different needle positions by illustrating the needle clamp at their highest position. 11. HOW TO REMOVE AND INSERT NEEDLES Needle Position With this machine, five needles can be slightly higher than the center needle. The Instruction Book refers...

Instruction Manual 31
Page 40
... When the chain stitch needle thread tension is automatically set at over 2mm. Needle thread Topside Chain stitch looper thread Underside 39 SETTINGS AND SEWING 1) Double Chain stitch Tension is too loose; -Move the needle thread tension fine tuning lever (blue) toward a higher position. -Or, move the chain stitch looper thread tension fine tuning lever (brown) toward a lower position. 22. ATD:D NEEDLE POSITION SEAM WIDTH FINGER KNOB STITCH LENGTH DRIVING CULTCH POSITION R 2~4 C Needle thread Topside Chain stitch looper thread Underside Fabric Tension Dial Orange Blue Green...
... When the chain stitch needle thread tension is automatically set at over 2mm. Needle thread Topside Chain stitch looper thread Underside 39 SETTINGS AND SEWING 1) Double Chain stitch Tension is too loose; -Move the needle thread tension fine tuning lever (blue) toward a higher position. -Or, move the chain stitch looper thread tension fine tuning lever (brown) toward a lower position. 22. ATD:D NEEDLE POSITION SEAM WIDTH FINGER KNOB STITCH LENGTH DRIVING CULTCH POSITION R 2~4 C Needle thread Topside Chain stitch looper thread Underside Fabric Tension Dial Orange Blue Green...
Instruction Manual 31
Page 41
... position, disengaging the upper looper and installing the chain stitch seam guide plate Caution: Be sure to the left needle and fabric edge. At end of sewing, pull the fabric lightly to the rear of fabric by putting the knife in nonworking position. Push clutch button to the left and down for overlock. Use this as a guide when checking the distance between cover stitch left and down for overlock. However, a chain stitch seam...
... position, disengaging the upper looper and installing the chain stitch seam guide plate Caution: Be sure to the left needle and fabric edge. At end of sewing, pull the fabric lightly to the rear of fabric by putting the knife in nonworking position. Push clutch button to the left and down for overlock. Use this as a guide when checking the distance between cover stitch left and down for overlock. However, a chain stitch seam...
Instruction Manual 31
Page 43
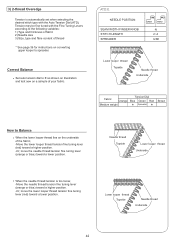
...:E NEEDLE POSITION SEAM WIDTH FINGER KNOB STITCH LENGTH SPREADER N 2~4 USE Lower looper thread Topside Needle thread Underside Fabric Tension Dial Orange Blue Green Red Medium weight Spreader Brown How to Balance When the lower looper thread lies on a sample of thread * See page 36 for instructions on converting upper looper to the following variables: 1) Type and thickness of fabric 2) Needle size 3) Size, type and fibre content of your fabric. Needle thread Topside Lower looper thread Underside When the needle thread tension is automatically set...
...:E NEEDLE POSITION SEAM WIDTH FINGER KNOB STITCH LENGTH SPREADER N 2~4 USE Lower looper thread Topside Needle thread Underside Fabric Tension Dial Orange Blue Green Red Medium weight Spreader Brown How to Balance When the lower looper thread lies on a sample of thread * See page 36 for instructions on converting upper looper to the following variables: 1) Type and thickness of fabric 2) Needle size 3) Size, type and fibre content of your fabric. Needle thread Topside Lower looper thread Underside When the needle thread tension is automatically set...
Instruction Manual 31
Page 49
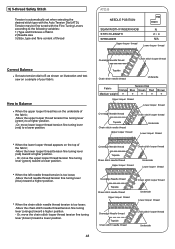
... test sew on the underside of the fabric; -Move the lower looper thread tension fine tuning lever (red) toward a higher position. When the chain stitch needle thread tension is automatically set when seiecting the desired stitch type with the Fine Tuning Levers according to the following variables: 1) Type and thickness of fabric 2) Needle size 3) Size, type and fibre content of thread ATD:B NEEDLE POSITION SEAM WIDTH FINGER KNOB STITCH LENGTH SPREADER Upper looper thread N 2~4 N/A Lower looper thread Correct Balance Set auto tension dial to a lower position. Overedge Needle thread...
... test sew on the underside of the fabric; -Move the lower looper thread tension fine tuning lever (red) toward a higher position. When the chain stitch needle thread tension is automatically set when seiecting the desired stitch type with the Fine Tuning Levers according to the following variables: 1) Type and thickness of fabric 2) Needle size 3) Size, type and fibre content of thread ATD:B NEEDLE POSITION SEAM WIDTH FINGER KNOB STITCH LENGTH SPREADER Upper looper thread N 2~4 N/A Lower looper thread Correct Balance Set auto tension dial to a lower position. Overedge Needle thread...
Instruction Manual 31
Page 70
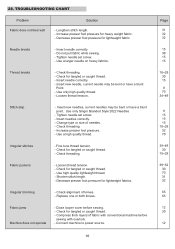
... fabrics. Loosen thread tension. Change type or size of knives. - Fabric puckers - Fabric jams Machine does not operate - Needle breaks - Insert needle correctly. - Use only high quality thread. - Stitch skip - Loosen thread tension. - Replace one or both knives. Increase presser foot pressure for lightweight fabric. Check threading. Use only Singer Branded Style 2022 Needles - Fine tune thread tension. - Decrease presser foot pressure for lightweight fabrics. Insert needles correctly. - Shorten stitch length. - Compress thick layers of fabric with overlock. - Insert...
... fabrics. Loosen thread tension. Change type or size of knives. - Fabric puckers - Fabric jams Machine does not operate - Needle breaks - Insert needle correctly. - Use only high quality thread. - Stitch skip - Loosen thread tension. - Replace one or both knives. Increase presser foot pressure for lightweight fabric. Check threading. Use only Singer Branded Style 2022 Needles - Fine tune thread tension. - Decrease presser foot pressure for lightweight fabrics. Insert needles correctly. - Shorten stitch length. - Compress thick layers of fabric with overlock. - Insert...


