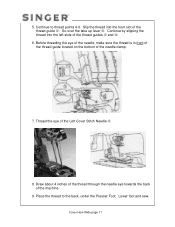
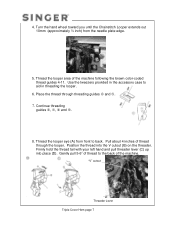
Instruction Manual
Page 3
...-Thread Ultra-Stretch Mock Safety Stitch Chapter 8 Four-Thread Safety Stitch Chapter 9 Five-Thread Safety Stitch Wide Chapter 10 Five-Thread Safety Stitch Narrow Chapter 11 Cover Hem (Cover Stitch) Narrow Chapter 12 Cover Hem (Cover Stitch) Wide Chapter 13 Triple Cover Hem Stitch Chapter 14 Three-Thread Rolled Hem Chapter...
Instruction Manual
Page 11
... you until the Chainstitch Looper extends out 10mm (approximately ½") from front to the back of the machine following the brown color-coded thread guides 4-11. Thread the looper area of the machine. Position the thread into place (D). "V" cutout Threader lever Double Chain Stitch page 7 Firmly hold the thread tail with...
Instruction Manual
Page 15
To remove fabric, gently turn handwheel to see the decorative stitching. Turn fabric over to loosen threads. Double Chain Stitch page 11 Continue sewing, following the drawn marking. When sewing the Double Chainstitch, it is necessary to have fabric under the needle. Avoid sewing off the fabric.
Instruction Manual
Page 58
Thread the looper eye (A) from front to back. Pull about 4 inches of thread. 10. "V" cutout Threader Lever NOTE: Make sure the Upper Looper thread is behind the Lower Looper thread. Position thread into place (D). Three-Thread Overlock (narrow) page 11 Firmly hold thread tail with left hand and pull Threader Lever (C) up into V cutout (B) on threader.
Instruction Manual
Page 72
... right of threading guide . 8. Place the thread slightly from left hand and pull Threader lever (C) up into V cutout (B) on threader. Position thread into place (D). "V" cutout 11. Threader Lever NOTE: Make sure the Upper Looper thread is behind the Lower Looper thread. Thread the looper area of looper. Place the thread slighty...
Instruction Manual
Page 87
"V" cutout Threader Lever NOTE: Make sure the Upper Looper thread is behind the Lower Looper thread. Three-Thread Flatlock (narrow) page 11 Pull about 4 inches of thread. Position thread into place (D). Firmly hold thread tail with left hand and pull Threader lever (C) up into V cutout (B) on threader. 10. Thread the looper eye (A) from front to back.
Instruction Manual
Page 108
... the thread guide . Slip the thread into the middle slot of the machine. 9. Lower foot and sew. Three-Thread Ultra-Stretch Mock Safety Stitch page 11 Continue to the back, under the Presser Foot. Go over the take up lever . Thread the eye of the needle clamp. 7. 5. Before threading the eye...
Instruction Manual 2
Page 12
... with left hand and pull Threader lever (C) up into V cutout (B) on threader. Pull about 4 inches of thread. Four-Thread Ultra-Stretch Mock Safety Stitch page 11 Firmly hold thread tail with regular overlock thread. 1. Position thread into place (D). Pass thread from front to back. "V" cutout Threader Lever NOTE: Make sure the...
Instruction Manual 2
Page 26
... 10mm (approximately ½") from the needle plate edge. 5. Then pull thread along the right side of the machine following the brown color-coded thread guides 4-11. Four-Thread Safety Stitch page 9 Turn the hand wheel toward you until it slips under the guide. Thread the looper area of the button, as...
Instruction Manual 2
Page 28
... towards the left until it slips under the guide. Slip the thread into the right slot of the thread guide . 3. Four-Thread Safety Stitch page 11 Continue to thread points 4-8. Before threading the eye of the needle, make sure the thread is behind the thread guide located on the bottom of...
Instruction Manual 2
Page 43
Raise the Presser Foot to the front through the thread guide . 2.Thread the top cover thread guide by pulling the thread towards the left until it slips under the guide. Thread Chainstitch Looper with regular overlock thread. 1. Pass the thread from the back to release the tension disks. Then pull thread along the right side of the button as illustrated. 3. While holding the thread, firmly pull the thread between the tension disks. Five-Thread Safety Stitch Wide page 11
Instruction Manual 2
Page 44
...) from front to back. Use the tweezers provided in the accessory case to the back of the machine following the brown color-coded thread guides 4-11. Pull about 4 inches of thread through threading guides and . 7. Gently pull 5-6" of thread to aid in threading the looper. 6. 4. Thread the looper eye (A) from the...
Instruction Manual 2
Page 61
Five-Thread Safety Stitch Narrow page 11 Then pull thread along the right side of the button as illustrated. 3. While holding the thread firmly, pull the thread between the tension disks. Thread Chainstitch Looper with regular overlock thread. 1. Pass the thread from the back to release the tension disks. Raise the Presser Foot to the front through the thread guide . 2.Thread the top cover thread guide by pulling the thread towards the left until it slips under the guide.
Instruction Manual 2
Page 62
... lever (C) up into the V cutout (B) on the threader. Gently pull 5-6" of thread to the back of the machine following the brown color-coded thread guides 4-11. 4. Pull about 4 inches of thread through threading guide and . 7. Place the thread through the looper. Continue threading guides , , and . 8. Position the thread into place (D). Thread...
Instruction Manual 2
Page 75
... lever (C) up into the V cutout (B) on the threader. Gently pull 5-6" of thread to the back of the machine following the brown color-coded thread guides 4-11. Continue threading guides , , and . 8. Thread the looper eye (A) from the needle plate edge. 5. Place the thread through the looper. Pull about 4 inches of thread through...
Instruction Manual 2
Page 79
Thread the eye of the needle clamp. 7. Lower foot and sew. Cover Hem Narrow page 11 Before threading the eye of the needle, make sure the thread is in front of the thread guide located on the bottom of the Left ...
Instruction Manual 2
Page 88
... V cutout (B) on the threader. "V" cutout Threader Lever Cover Hem Wide page 7 Thread the looper area of the machine following the brown color-coded thread guides 4-11. Position the thread into place (D).
Instruction Manual 2
Page 92
Slip the thread into the left slots of the thread guides and . 6. Cover Hem Wide page 11 5. Before threading the eye of the needle, make sure the thread is in front of the thread guide located on the bottom of the Left ...
Instruction Manual 2
Page 101
Pull about 4 inches of the machine following the brown color-coded thread guides 4-11. Use the tweezers provided in the accessory case to the back of thread to aid in threading the looper. 6. Firmly hold the thread tail with ...