Instruction Manual
Page 31
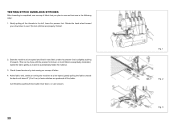
... are produced off the fabric. TESTING STITCH OVERLOCK STITCHES After threading is completed, use scissors. 30 Fig. 1 Fig. 2 Fig. 3 At the fabric end, continue running the machine at low speed and feed in the following order: 1. Start the machine at a low speed, gently pulling the... fabric towards the back until about 3" (5 to the left, lower the presser foot. Check thread tensions by pushing thread cutter lever down on a scarp...
... are produced off the fabric. TESTING STITCH OVERLOCK STITCHES After threading is completed, use scissors. 30 Fig. 1 Fig. 2 Fig. 3 At the fabric end, continue running the machine at low speed and feed in the following order: 1. Start the machine at a low speed, gently pulling the... fabric towards the back until about 3" (5 to the left, lower the presser foot. Check thread tensions by pushing thread cutter lever down on a scarp...
Instruction Manual
Page 39
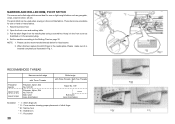
... machine according to the Setting Chart on fine scarf-like fabrics. NOTE: 1. Please make sure it in the front cover as illustrated or in the accessory bag. 4. Open the front cover and working table. 3. When finished, replace the stitch finger in Fig. 1. RECOMMENDED THREAD Thread...Lower looper Narrow overlock edge with Three Threads Polyester, Nylon, Silk No. 50-100 Polyester, Nylon, Silk No. 50-100 Bulk nylon (less stretchable) Rolled edge with Three Threads with Two Threads Nylon No. 100 Bulk nylon (less stretchable) Illustration * I : Stitch finger (A) * II : Cross ...
... machine according to the Setting Chart on fine scarf-like fabrics. NOTE: 1. Please make sure it in the front cover as illustrated or in the accessory bag. 4. Open the front cover and working table. 3. When finished, replace the stitch finger in Fig. 1. RECOMMENDED THREAD Thread...Lower looper Narrow overlock edge with Three Threads Polyester, Nylon, Silk No. 50-100 Polyester, Nylon, Silk No. 50-100 Bulk nylon (less stretchable) Rolled edge with Three Threads with Two Threads Nylon No. 100 Bulk nylon (less stretchable) Illustration * I : Stitch finger (A) * II : Cross ...

Instruction Manual
Page 53
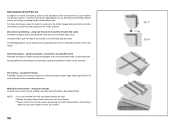
...is guided through the front hole. (Fig. 2) FOR JOINING SIDE SEAMS, pass the cord through both holes. Your machine is positioned under the right needle thread. (Fig. 3) FOR DECORATIVE EFFECTS, pass contrasting color cords through either the front or rear hole on the presser ... or shirring elastic at intervals and pull out looper thread(s). Fig. 2 52 Fig. 3 Fig. 4 See Fig. 1. 2. REMOVING STITCHES FROM SEWN FABRIC To remove stitches already sewn, snip off needle thread(s) at the rear of the machine spool pin. CORDED OVERLOCK Corded overlock can use a Rolled Hem. (See pages 38-...
...is guided through the front hole. (Fig. 2) FOR JOINING SIDE SEAMS, pass the cord through both holes. Your machine is positioned under the right needle thread. (Fig. 3) FOR DECORATIVE EFFECTS, pass contrasting color cords through either the front or rear hole on the presser ... or shirring elastic at intervals and pull out looper thread(s). Fig. 2 52 Fig. 3 Fig. 4 See Fig. 1. 2. REMOVING STITCHES FROM SEWN FABRIC To remove stitches already sewn, snip off needle thread(s) at the rear of the machine spool pin. CORDED OVERLOCK Corded overlock can use a Rolled Hem. (See pages 38-...
Instruction Manual
Page 55
... from you until it all the way toward you until the cutter snaps into the "up" position. 54 using three threads Fold fabric along the edge. DECORATIVE EFFECTS In addition to normal overlocking, which is fully described in this instruction book, your machine can also be enhanced by using buttonhole twist or embroidery...
... from you until it all the way toward you until the cutter snaps into the "up" position. 54 using three threads Fold fabric along the edge. DECORATIVE EFFECTS In addition to normal overlocking, which is fully described in this instruction book, your machine can also be enhanced by using buttonhole twist or embroidery...


