
Instruction Manual 3
Page 7
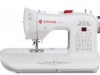
... the tension dial, regulate the amount of machine, allows you . 15. Presser-Foot Lifter, at back of tension on fabric, It has an allpurpose setting plus settings for extra-light and extra -heavy pressure, and for easy removal. Presser Foot holds fabric against feed. Feed moves fabric under the presser foot...
... the tension dial, regulate the amount of machine, allows you . 15. Presser-Foot Lifter, at back of tension on fabric, It has an allpurpose setting plus settings for extra-light and extra -heavy pressure, and for easy removal. Presser Foot holds fabric against feed. Feed moves fabric under the presser foot...
Instruction Manual 4
Page 75
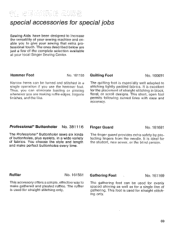
...foot is excellent for the placement of straight stitching in a wide variety of fabrics. The ones described below are making ruffle edges, lingerie finishes, and the like. It is used ...stitching only. Professional* Buttonholer No. 381116 The Professional* Buttonholer sews six kinds of buttonholes, plus eyelets, in block, floral, or scroll designs. This short, open foot permits following curved ... The gathering foot can eliminate basting or pinning whenever you to give your local Singer Sewing Center. It is especially well adapted to stitching lightly padded fabrics. special ...
...foot is excellent for the placement of straight stitching in a wide variety of fabrics. The ones described below are making ruffle edges, lingerie finishes, and the like. It is used ...stitching only. Professional* Buttonholer No. 381116 The Professional* Buttonholer sews six kinds of buttonholes, plus eyelets, in block, floral, or scroll designs. This short, open foot permits following curved ... The gathering foot can eliminate basting or pinning whenever you to give your local Singer Sewing Center. It is especially well adapted to stitching lightly padded fabrics. special ...
Instruction Manual 8
Page 38
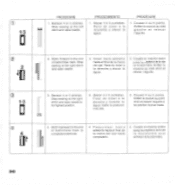
.... I 2 2 1 2. Parar de coser a la derecha y levantar la aguja hasta la posici6n mas alta. 3. Arreter la couture au point droit et relever l'aiguille a sa position la plus haute. 0 4 4. P e s p u n tear h a c i a 4. PROCEDIMIENTO 1. Atacar 4 6 5 puntadas. la marca del ojal hasta la boutonniere pour completarlo. Coudre en marche arriere T of buttonhole mark. Stop sewing at the...
.... I 2 2 1 2. Parar de coser a la derecha y levantar la aguja hasta la posici6n mas alta. 3. Arreter la couture au point droit et relever l'aiguille a sa position la plus haute. 0 4 4. P e s p u n tear h a c i a 4. PROCEDIMIENTO 1. Atacar 4 6 5 puntadas. la marca del ojal hasta la boutonniere pour completarlo. Coudre en marche arriere T of buttonhole mark. Stop sewing at the...
Instruction Manual 13
Page 27
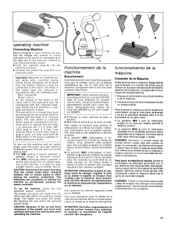
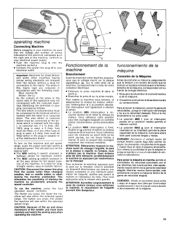
...etre dangereux. 25 fuse must be connected to the mains. IMPORTANT: Votre machine fonctionne exclusivement sur courant 220/230 volts. Plus vous appuyerez, plus la vitesse de la machine sera grande. funcionamiento de la maquina Conexion de Ia Maquina Antes de enchufar su maquina, asegurese... Si vous disposez de courant 110/115 volts, utilisez le transformateur specialement etudie pour votre machine. Renseignez-vous aupres de votre Ami SINGER ou de votre magasin SINGER. • Enfoncez la prise machine b dans le socle c. • Branchez la prise d sur la prise murale. course ...
...etre dangereux. 25 fuse must be connected to the mains. IMPORTANT: Votre machine fonctionne exclusivement sur courant 220/230 volts. Plus vous appuyerez, plus la vitesse de la machine sera grande. funcionamiento de la maquina Conexion de Ia Maquina Antes de enchufar su maquina, asegurese... Si vous disposez de courant 110/115 volts, utilisez le transformateur specialement etudie pour votre machine. Renseignez-vous aupres de votre Ami SINGER ou de votre magasin SINGER. • Enfoncez la prise machine b dans le socle c. • Branchez la prise d sur la prise murale. course ...
Instruction Manual 14
Page 26
...-line plug d to -handle fabrics, CAUTION: Disconnect the power line plug from the factory without a plug for . course illustre en f) limite la vitesse du moteur. Plus vous appuyerez plug la vitesse sera grande. funcionamiento de la maquina Conexion de Ia Maquina Antes de enchufar su maquina, asegurese de que la tension...
...-line plug d to -handle fabrics, CAUTION: Disconnect the power line plug from the factory without a plug for . course illustre en f) limite la vitesse du moteur. Plus vous appuyerez plug la vitesse sera grande. funcionamiento de la maquina Conexion de Ia Maquina Antes de enchufar su maquina, asegurese de que la tension...
Instruction Manual 18
Page 2
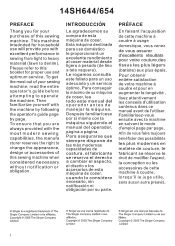
... Limited ou de ses filiales. Afin de vous faire toujours beneficier des possibilites les plus epais. Copyright © 2005 The Singer Company Limited ® Singer es una marca registrada de The Singer Company Limited o sus afiliados. PREFACE En faisant ('acquisition de cette machine a coudre a usage domestique, vous venez de vous assurer d'excellents resultats pour...
... Limited ou de ses filiales. Afin de vous faire toujours beneficier des possibilites les plus epais. Copyright © 2005 The Singer Company Limited ® Singer es una marca registrada de The Singer Company Limited o sus afiliados. PREFACE En faisant ('acquisition de cette machine a coudre a usage domestique, vous venez de vous assurer d'excellents resultats pour...
Instruction Manual
Page 63
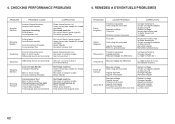
... pied presseur Corriger les tensions Changer l'aiguille Le règler à moins de 1 Ondulations Mauvais règlage de différentiel Le règler à plus de 1 pour les matières tricotées Points de manque Casse de fil Mauvais enfilage Taille d'aiguille mauvaise Aiguille épointée Aiguille...
... pied presseur Corriger les tensions Changer l'aiguille Le règler à moins de 1 Ondulations Mauvais règlage de différentiel Le règler à plus de 1 pour les matières tricotées Points de manque Casse de fil Mauvais enfilage Taille d'aiguille mauvaise Aiguille épointée Aiguille...

Instruction Manual 2
Page 2
... it to the manufacture or service agent to electrical/electronic products. Please note that they have been given supervision or instruction concerning use , or equivalent. SINGER and ONE PLUS are being administered. 10. Do not use the product and send it is intended to fit in a polarized outlet only... one blade wider than the other). To avoid electrical shock never put the machine nor the mains cable or mains plug into water. To reduce the...
... it to the manufacture or service agent to electrical/electronic products. Please note that they have been given supervision or instruction concerning use , or equivalent. SINGER and ONE PLUS are being administered. 10. Do not use the product and send it is intended to fit in a polarized outlet only... one blade wider than the other). To avoid electrical shock never put the machine nor the mains cable or mains plug into water. To reduce the...
Instruction Manual 32
Page 16
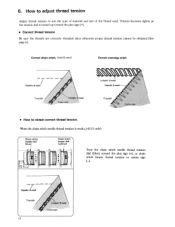
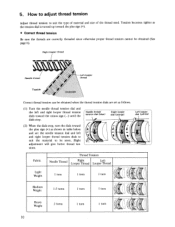
When the chain stitch needle thread tension is turned up toward the plus sign (+). • Correct thread tension Be sure the threads are correctly threaded since otherwise proper thread tension cannot be obtained (See page 6). How to adjust ... 00 0 Needle thread Topside 14 LOoper ti,read Underside LIII I® IIII ICI ID Turn the chain stitch needle thread tension dial (blue) toward the plus sign (+), or chain stitch looper thread tension to suit the type of material and size of the thread used. Tension becomes tighter as the tension...
When the chain stitch needle thread tension is turned up toward the plus sign (+). • Correct thread tension Be sure the threads are correctly threaded since otherwise proper thread tension cannot be obtained (See page 6). How to adjust ... 00 0 Needle thread Topside 14 LOoper ti,read Underside LIII I® IIII ICI ID Turn the chain stitch needle thread tension dial (blue) toward the plus sign (+), or chain stitch looper thread tension to suit the type of material and size of the thread used. Tension becomes tighter as the tension...
Instruction Manual 32
Page 17
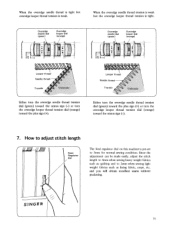
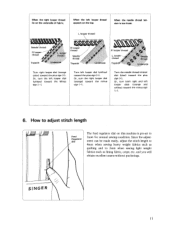
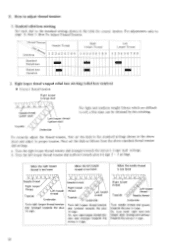
... needle thread tension dial (green) toward the minus sign (-) or turn the overedge looper thread tension dial (orange) toward the plus sign (+). When the overedge needle thread is tight but the overedge looper thread tension is tight. Looper thread Needle thread Topside Underside... Either turn the overedge needle thread tension dial (green) toward the plus sign (+) or turn the overedge looper thread tension dial (orange) toward the minus sign (-). 7. SINGER 15 How to adjust stitch length r L ,--11 Feed Regulator dial The feed regulator dial...
... needle thread tension dial (green) toward the minus sign (-) or turn the overedge looper thread tension dial (orange) toward the plus sign (+). When the overedge needle thread is tight but the overedge looper thread tension is tight. Looper thread Needle thread Topside Underside... Either turn the overedge needle thread tension dial (green) toward the plus sign (+) or turn the overedge looper thread tension dial (orange) toward the minus sign (-). 7. SINGER 15 How to adjust stitch length r L ,--11 Feed Regulator dial The feed regulator dial...
Instruction Manual 33
Page 12
... Weight 1 turn 1 turn I 1 turn 1 A 1 - 1 Medium Weight Heavy Weight 1.5 turns 2 turns 1 turn 1 turn 1 turn IlI AI - 1 turn the dials toward the plus sign (+). • Correct thread tension Be sure the threads are set the needle tension dial and left and right looper thread tension dials toward the... plus sign (+) as shown in table below A and set as follows. (1) Turn the needle thread tension dial and the left and right ...
... Weight 1 turn 1 turn I 1 turn 1 A 1 - 1 Medium Weight Heavy Weight 1.5 turns 2 turns 1 turn 1 turn 1 turn IlI AI - 1 turn the dials toward the plus sign (+). • Correct thread tension Be sure the threads are set the needle tension dial and left and right looper thread tension dials toward the... plus sign (+) as shown in table below A and set as follows. (1) Turn the needle thread tension dial and the left and right ...
Instruction Manual 33
Page 13
...sewing light weight fabrics such as lining fabric, crepe, etc. Turn the needle thread tension dial (blue) toward the plus sign (+). and you will obtain excellent seams without puckerings. SINGER 11 Turn left looper dial (yellow) toward the minus sign (-). Or, turn the right looper dial (orange) ...toward the Minus sign (-). Or, turn both right and left looper thread appears on the top. Or, turn the left looper dial (yellow) toward the plus sign (+). ...
...sewing light weight fabrics such as lining fabric, crepe, etc. Turn the needle thread tension dial (blue) toward the plus sign (+). and you will obtain excellent seams without puckerings. SINGER 11 Turn left looper dial (yellow) toward the minus sign (-). Or, turn the right looper dial (orange) ...toward the Minus sign (-). Or, turn both right and left looper thread appears on the top. Or, turn the left looper dial (yellow) toward the plus sign (+). ...
Instruction Manual 35
Page 12
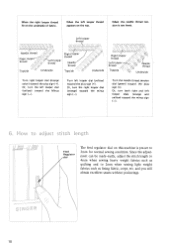
Or, turn the right looper dial (orange) toward the plus sign (+). Turn the needle thread tension dial (green) toward the minus sign (-). and you will... dial The feed regulator dial on the underside of fabric. Or, turn the left looper dials (orange and yellow) toward the plus sign (+). When the left looper dial (yellow) toward the Minus sign (-). Since the adjustment can be made easily, adjust the... fabric, crepe, etc. Or, turn both right and left looper dial (yellow) toward the plus sign (+). When the right looper thread lie on this machine is too loose.
Or, turn the right looper dial (orange) toward the plus sign (+). Turn the needle thread tension dial (green) toward the minus sign (-). and you will... dial The feed regulator dial on the underside of fabric. Or, turn the left looper dials (orange and yellow) toward the plus sign (+). When the left looper dial (yellow) toward the Minus sign (-). Since the adjustment can be made easily, adjust the... fabric, crepe, etc. Or, turn both right and left looper dial (yellow) toward the plus sign (+). When the right looper thread lie on this machine is too loose.
Instruction Manual 35
Page 14
... proper tension. Needle thread Right looper - Turn needle thread dial (green) towards plus (+) sign. Or, turn both right and left looper thread tension dial (yellow) towards the plus (+) sign 2 - 3 settings. Turn the right looper thread tension dial (orange) towards the plus (+) sign. I Left Looper Thread 1 234 56789 2. thread 1 Left looper Topside thread )T Underside... loose When the left looper thread tension dial (yellow) towards the minus (-) sign half settings. Or, turn right looper thread tension dial (orange) towards the plus (+) sign.
... proper tension. Needle thread Right looper - Turn needle thread dial (green) towards plus (+) sign. Or, turn both right and left looper thread tension dial (yellow) towards the plus (+) sign 2 - 3 settings. Turn the right looper thread tension dial (orange) towards the plus (+) sign. I Left Looper Thread 1 234 56789 2. thread 1 Left looper Topside thread )T Underside... loose When the left looper thread tension dial (yellow) towards the minus (-) sign half settings. Or, turn right looper thread tension dial (orange) towards the plus (+) sign.


