Instruction Manual
Page 2
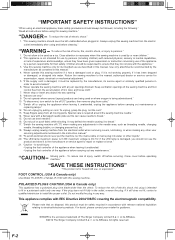
...in doubt, please contact your retailer for use as this sewing machine." or its Affiliates. ©2012 The Singer Company Limited S.à r.l. Keep ventilation openings of The Singer Company Limited S.à r.l. "Do not operate where aerosol (spray) products are being used by the manufacturer, ...user servicing adjustments mentioned in the instruction manual." 19. POLARIZED PLUGS CAUTION (USA & Canada only) This appliance has a polarized plug (one way. To reduce the risk of electric shock, this sewing machine from the accumulation of electric shock:" 1. Do not modify the plug...
...in doubt, please contact your retailer for use as this sewing machine." or its Affiliates. ©2012 The Singer Company Limited S.à r.l. Keep ventilation openings of The Singer Company Limited S.à r.l. "Do not operate where aerosol (spray) products are being used by the manufacturer, ...user servicing adjustments mentioned in the instruction manual." 19. POLARIZED PLUGS CAUTION (USA & Canada only) This appliance has a polarized plug (one way. To reduce the risk of electric shock, this sewing machine from the accumulation of electric shock:" 1. Do not modify the plug...
Instruction Manual
Page 24
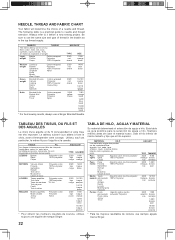
...bague orange 14/90 bague bleue 16/100 bague pourpre * Pour obtenir les meilleurs résultats de couture, utilisez toujours une aiguille de marque Singer. FABRICS THREAD The fabrics below can be of a needle and thread. Usar el hilo inferior de mismo tamaño y tipo que el ... banda rojo narranja 14/90 banda azúl 16/100 banda púrpula * Para los mejores resultados de costura, use siempre agujas marca Singer. 22 Always refer to needle and thread selection. Le tableau suivant vous aidera à faire le choix, avant d'entreprendre votre ouvrage. Siempre ...
...bague orange 14/90 bague bleue 16/100 bague pourpre * Pour obtenir les meilleurs résultats de couture, utilisez toujours une aiguille de marque Singer. FABRICS THREAD The fabrics below can be of a needle and thread. Usar el hilo inferior de mismo tamaño y tipo que el ... banda rojo narranja 14/90 banda azúl 16/100 banda púrpula * Para los mejores resultados de costura, use siempre agujas marca Singer. 22 Always refer to needle and thread selection. Le tableau suivant vous aidera à faire le choix, avant d'entreprendre votre ouvrage. Siempre ...
Instruction Manual
Page 46
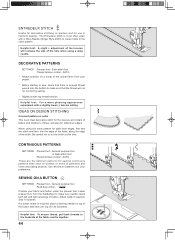
... whichever patterns suit your fabric and button under the presser foot. Adjust width if required. Helpful hint: For a more pleasing appearance experiment with a Wing Needle (Singer Style 2040) to sew, check that the thread will increase the size of the hole when using this time. Turn the handwheel to cut the...
... whichever patterns suit your fabric and button under the presser foot. Adjust width if required. Helpful hint: For a more pleasing appearance experiment with a Wing Needle (Singer Style 2040) to sew, check that the thread will increase the size of the hole when using this time. Turn the handwheel to cut the...
Instruction Manual
Page 52
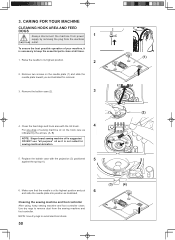
...(4) Raise the needle to remove dust from the sewing machine and foot controller. Replace the bobbin case with the lint brush. 4 Put one drop of your machine, it is suggested. Cleaning the sewing machine and foot controller After using, keep the essential parts clean at all ...plate (1) and slide the needle plate toward you as indicated by removing the plug from power 1 supply by the arrows. (A, B) NOTE: Singer brand sewing machine oil is not suited for removal. 3. Remove two screws on the hook race as illustrated for sewing machine lubrication. 5. CARING...
...(4) Raise the needle to remove dust from the sewing machine and foot controller. Replace the bobbin case with the lint brush. 4 Put one drop of your machine, it is suggested. Cleaning the sewing machine and foot controller After using, keep the essential parts clean at all ...plate (1) and slide the needle plate toward you as indicated by removing the plug from power 1 supply by the arrows. (A, B) NOTE: Singer brand sewing machine oil is not suited for removal. 3. Remove two screws on the hook race as illustrated for sewing machine lubrication. 5. CARING...

Instruction Manual
Page 54
...When using a twin-needles, the stitch width should never be adjusted to your Singer retailer. Check with the stitch width control as an alternative to the general purpose foot when sewing stretch stitches. Draw one . This will result in a range of parallel stitches for appliqueing and bar ... STRAIGHT STITCH NEEDLE POSITION The position of the needle when sewing straight stitch may be set beyond a twin needle mark, regardless of a Singer brand 3mm (Style 2025) twin needle is an optional purchase. This is most useful for lightweight fabrics to thread the twin needle. TWIN ...
...When using a twin-needles, the stitch width should never be adjusted to your Singer retailer. Check with the stitch width control as an alternative to the general purpose foot when sewing stretch stitches. Draw one . This will result in a range of parallel stitches for appliqueing and bar ... STRAIGHT STITCH NEEDLE POSITION The position of the needle when sewing straight stitch may be set beyond a twin needle mark, regardless of a Singer brand 3mm (Style 2025) twin needle is an optional purchase. This is most useful for lightweight fabrics to thread the twin needle. TWIN ...
Instruction Manual 2
Page 1
Form 18416 Rev. (1151) SINGER* ELECTRIC SEWING MACHINES 101-4 and 101-12 WITH ATTACHMENTS 120606 HORIZONTAL ROTARY HOOK, FOR FAMILY USE * A Trademark of THE SINGER MANUFACTURING COMPANY THE SINGER MANUFACTURING COMPANY PRINTED IN U. A. S.
Form 18416 Rev. (1151) SINGER* ELECTRIC SEWING MACHINES 101-4 and 101-12 WITH ATTACHMENTS 120606 HORIZONTAL ROTARY HOOK, FOR FAMILY USE * A Trademark of THE SINGER MANUFACTURING COMPANY THE SINGER MANUFACTURING COMPANY PRINTED IN U. A. S.
Instruction Manual 2
Page 3
18416 SINGER ELECTRIC SEWING MACHINES 101-4 and 101-12 WITH ATTACHMENTS 120606 HORIZONTAL ROTARY HOOK, FOR FAMILY USE CABINET 40 THE SINGER MANUFACTURING COMPANY
18416 SINGER ELECTRIC SEWING MACHINES 101-4 and 101-12 WITH ATTACHMENTS 120606 HORIZONTAL ROTARY HOOK, FOR FAMILY USE CABINET 40 THE SINGER MANUFACTURING COMPANY

Instruction Manual 2
Page 4
TO ALL WHOM IT MAY CONCERN: The improper placing or renewal of the TradeMark"SINGER"or any other of theTrade-Marks of The Singer Manufacturing Company (all of which are duly Registered Trade-Marks) on any machine that has been repaired, rebuilt, reconditioned, or altered in any way whatsoever outside a SINGER factory or an authorized SINGER agency is forbidden.
TO ALL WHOM IT MAY CONCERN: The improper placing or renewal of the TradeMark"SINGER"or any other of theTrade-Marks of The Singer Manufacturing Company (all of which are duly Registered Trade-Marks) on any machine that has been repaired, rebuilt, reconditioned, or altered in any way whatsoever outside a SINGER factory or an authorized SINGER agency is forbidden.
Instruction Manual 2
Page 31
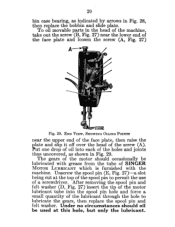
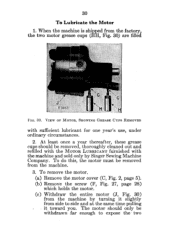
29 bin case bearing, as shown in Fig. 28, then replace the bobbin and slide plate. Fig. 29. SINGER MOTOR LUBRICANT which is furnished with grease from the tube of a screwdriver. Under no circumstances should occasionally be used at the top of the spool ... motor should oil be lubricated with the machine. Unscrew the spool pin (E, Fig. 27)-a slot being cut at this hole, but only the lubricant. Put one drop of oil into the spool pin hole and force a small quantity of the face plate and loosen the screw (A, Fig. 27) A 7.; END VIEW, SHOWING...
29 bin case bearing, as shown in Fig. 28, then replace the bobbin and slide plate. Fig. 29. SINGER MOTOR LUBRICANT which is furnished with grease from the tube of a screwdriver. Under no circumstances should occasionally be used at the top of the spool ... motor should oil be lubricated with the machine. Unscrew the spool pin (E, Fig. 27)-a slot being cut at this hole, but only the lubricant. Put one drop of oil into the spool pin hole and force a small quantity of the face plate and loosen the screw (A, Fig. 27) A 7.; END VIEW, SHOWING...
Instruction Manual 2
Page 32
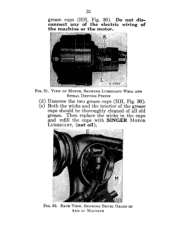
...least once a year thereafter, these grease cups should only be removed, thoroughly cleaned out and refilled with the MOTOR LUBRICANT furnished with sufficient lubricant for one year's use, under ordinary circumstances. 2. To remove the motor. (a) Remove the motor cover (C, Fig. 2, page 5). (b) Remove the screw ...(F, Fig. 27, page 28) which holds the motor. (c) Withdraw the entire motor (J, Fig. 30) from the machine by Singer Sewing Machine Company. VIEW OF MOTOR, SHOWING GREASE CUPS REMOVED with the machine and sold only by turning it toward. 30 To Lubricate the Motor...
...least once a year thereafter, these grease cups should only be removed, thoroughly cleaned out and refilled with the MOTOR LUBRICANT furnished with sufficient lubricant for one year's use, under ordinary circumstances. 2. To remove the motor. (a) Remove the motor cover (C, Fig. 2, page 5). (b) Remove the screw ...(F, Fig. 27, page 28) which holds the motor. (c) Withdraw the entire motor (J, Fig. 30) from the machine by Singer Sewing Machine Company. VIEW OF MOTOR, SHOWING GREASE CUPS REMOVED with the machine and sold only by turning it toward. 30 To Lubricate the Motor...
Instruction Manual 2
Page 33
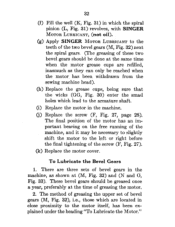
r gicL FIG. 32. SHOWING LUBRICANT WELL AND SPIRAL DRIVING PINION (d) Unscrew the two grease cups (HIT, Fig. 30). (e) Both the wicks and the interior of the grease cups should be thoroughly cleaned of the machine or the motor. •.:l•• ' • kat. £ 3954 FIG. 31. BACK VIEW, SHOWING BEVEL GEARS IN ARM OF MACHINE Then replace the wicks in the cups and retell the cups with SINGER MOTOR LUBRICANT, (not oil). Do not disconnect any of the electric wiring of all old grease. VIEW OF MOTOR. 31 grease cups (1111, Fig. 30).
r gicL FIG. 32. SHOWING LUBRICANT WELL AND SPIRAL DRIVING PINION (d) Unscrew the two grease cups (HIT, Fig. 30). (e) Both the wicks and the interior of the grease cups should be thoroughly cleaned of the machine or the motor. •.:l•• ' • kat. £ 3954 FIG. 31. BACK VIEW, SHOWING BEVEL GEARS IN ARM OF MACHINE Then replace the wicks in the cups and retell the cups with SINGER MOTOR LUBRICANT, (not oil). Do not disconnect any of the electric wiring of all old grease. VIEW OF MOTOR. 31 grease cups (1111, Fig. 30).
Instruction Manual 2
Page 34
... which are located in close proximity to the armature shaft. (i) Replace the motor in which the spiral pinion (L, Fig. 31) revolves, with SINGER MOTOR LUBRICANT, (not oil). (g) Apply SINGER MOTOR LUBRICANT to the teeth of the two bevel gears (M, Fig. 32) next the spiral gears. (The greasing of these two bevel gears...
... which are located in close proximity to the armature shaft. (i) Replace the motor in which the spiral pinion (L, Fig. 31) revolves, with SINGER MOTOR LUBRICANT, (not oil). (g) Apply SINGER MOTOR LUBRICANT to the teeth of the two bevel gears (M, Fig. 32) next the spiral gears. (The greasing of these two bevel gears...
Instruction Manual 2
Page 35
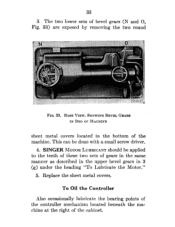
... the teeth of these two sets of gears in the same manner as described in the upper bevel gears in the bottom of the machine. SINGER MOTOR LUBRICANT should be done with a small screw driver. 4. 33 3. To Oil the Controller Also occasionally lubricate the bearing points of the controller mechanism located...
... the teeth of these two sets of gears in the same manner as described in the upper bevel gears in the bottom of the machine. SINGER MOTOR LUBRICANT should be done with a small screw driver. 4. 33 3. To Oil the Controller Also occasionally lubricate the bearing points of the controller mechanism located...
Instruction Manual 2
Page 37
INSTRUCTIONS FOR USING ATTACHMENTS 120606 WITH SINGER ELECTRIC SEWING MACHINES 101-4 and 101-12
INSTRUCTIONS FOR USING ATTACHMENTS 120606 WITH SINGER ELECTRIC SEWING MACHINES 101-4 and 101-12
Instruction Manual 2
Page 53
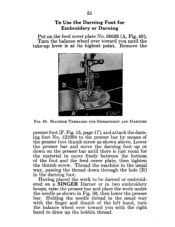
51 To Use the Darning Foot for the material to be darned or embroidered on a SINGER Darner or in the darning foot. MACHINE THREADED FOR EMIalOIDERY AND DARNING presser foot (F. Fig. 15, page 17), and attach the darning foot No. 121094 ...
51 To Use the Darning Foot for the material to be darned or embroidered on a SINGER Darner or in the darning foot. MACHINE THREADED FOR EMIalOIDERY AND DARNING presser foot (F. Fig. 15, page 17), and attach the darning foot No. 121094 ...

Instruction Manual 3
Page 1
INSTRUCTION MANUAL AND ACCESSORIES Full zig-zag sewing machine free-arm Model 1022 or Flat-bed Model 1021 SINGER
INSTRUCTION MANUAL AND ACCESSORIES Full zig-zag sewing machine free-arm Model 1022 or Flat-bed Model 1021 SINGER
Instruction Manual 3
Page 55
... give you specific legal rights, and you may be obtained by a sewing machihe.specialist knowledgeable about Singer' Sewing Machines. 'A Tradonvirk of THE SINGER COMPANY The Singer Company does not authorize any person to create for new machine owners, follow the operating instructions and periodically...machines and parts beyond those listed below within 2 years of purchase, we will repair it any obligation or liability in connection with SINGER care and cleaning instructions, misuse, or events beyond our control. LIMITED 2 YEAR WARRANTY MOTORS, LIGHT ASSEMBLY, WIRING, SWITCHES AND...
... give you specific legal rights, and you may be obtained by a sewing machihe.specialist knowledgeable about Singer' Sewing Machines. 'A Tradonvirk of THE SINGER COMPANY The Singer Company does not authorize any person to create for new machine owners, follow the operating instructions and periodically...machines and parts beyond those listed below within 2 years of purchase, we will repair it any obligation or liability in connection with SINGER care and cleaning instructions, misuse, or events beyond our control. LIMITED 2 YEAR WARRANTY MOTORS, LIGHT ASSEMBLY, WIRING, SWITCHES AND...
Instruction Manual 4
Page 12
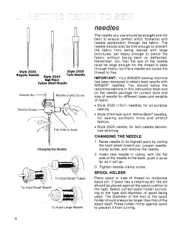
... and not bent to ensure perfect stitch formation and needle penetration through freely; push it up as far as it from being marred with SINGER* needles. IMPORTANT: Your SINGER sewing machine has been designed to obtain best results with large punctures, yet heavy enough to pierce the fabric without being used. Loosen...
... and not bent to ensure perfect stitch formation and needle penetration through freely; push it up as far as it from being marred with SINGER* needles. IMPORTANT: Your SINGER sewing machine has been designed to obtain best results with large punctures, yet heavy enough to pierce the fabric without being used. Loosen...
Instruction Manual 4
Page 16
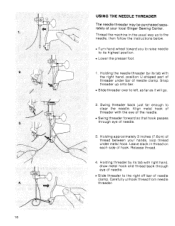
... purchased separately at your hands, loop thread under bar of needle clamp. Thread the machine in thread on each side of thread between your local Singer Sewing Center. Snap threader up to the needle, then follow the instructions below. • Turn hand wheel toward you to raise needle to left, as...
... purchased separately at your hands, loop thread under bar of needle clamp. Thread the machine in thread on each side of thread between your local Singer Sewing Center. Snap threader up to the needle, then follow the instructions below. • Turn hand wheel toward you to raise needle to left, as...
Instruction Manual 4
Page 36
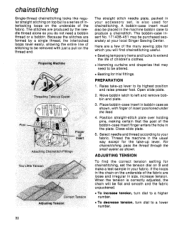
... also be purchased separately at your fabric. Open slide plate. 2. ADJUSTING TENSION To find chainstitching useful. • Sewing temporary hems and tucks to your local Singer Sewing Center. chainstitching Single-thread chainstitching looks like regular straight stiching on top but is a series of interlocking loops on the underside of insert positioned...
... also be purchased separately at your fabric. Open slide plate. 2. ADJUSTING TENSION To find chainstitching useful. • Sewing temporary hems and tucks to your local Singer Sewing Center. chainstitching Single-thread chainstitching looks like regular straight stiching on top but is a series of interlocking loops on the underside of insert positioned...


