

Instruction Manual 3
Page 7
.... 4. Extension Table lets you . 15. The numbers eliminate guesswork in position. 11. Take-up lever and needle. Guidelines on fabric, It has an allpurpose setting plus settings for extra-light and extra -heavy pressure, and for bobbin winding. 2. Hand Wheel positions take-up Lever controls flow of thread from spool holder...
.... 4. Extension Table lets you . 15. The numbers eliminate guesswork in position. 11. Take-up lever and needle. Guidelines on fabric, It has an allpurpose setting plus settings for extra-light and extra -heavy pressure, and for bobbin winding. 2. Hand Wheel positions take-up Lever controls flow of thread from spool holder...
Instruction Manual 4
Page 75
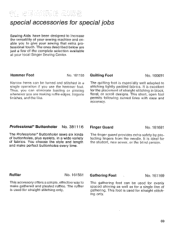
...No. 161561 This accessory offers a simple, effective way to make perfect buttonholes every time. The ones described below are making ruffle edges, lingerie finishes, and the like. Thus, you can be used... stitching only. 69 Professional* Buttonholer No. 381116 The Professional* Buttonholer sews six kinds of buttonholes, plus eyelets, in block, floral, or scroll designs. Finger Guard No. 161681 The finger guard provides extra...and enable you to give your local Singer Sewing Center. tecting fingers from the needle. It is especially well adapted to stitching lightly ...
...No. 161561 This accessory offers a simple, effective way to make perfect buttonholes every time. The ones described below are making ruffle edges, lingerie finishes, and the like. Thus, you can be used... stitching only. 69 Professional* Buttonholer No. 381116 The Professional* Buttonholer sews six kinds of buttonholes, plus eyelets, in block, floral, or scroll designs. Finger Guard No. 161681 The finger guard provides extra...and enable you to give your local Singer Sewing Center. tecting fingers from the needle. It is especially well adapted to stitching lightly ...
Instruction Manual 8
Page 38
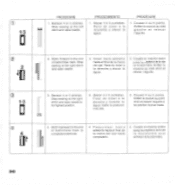
... 4 6 5 puntadas. la marca del ojal hasta la boutonniere pour completarlo. Bartack 4 or 5 stitches. -4-). Arreter la couture au point droit et relever l'aiguille a sa position la plus haute. 0 4 4. T 1-3 PROCEDURE 1.
... 4 6 5 puntadas. la marca del ojal hasta la boutonniere pour completarlo. Bartack 4 or 5 stitches. -4-). Arreter la couture au point droit et relever l'aiguille a sa position la plus haute. 0 4 4. T 1-3 PROCEDURE 1.
Instruction Manual 13
Page 27
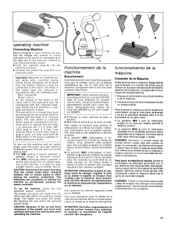
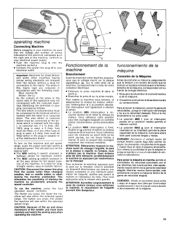
... vitesse du moteur, enfoncez ('interrupteur e a la position desiree. course illustre en f) limite la vitesse du moteur. Plus vous appuyerez, plus la vitesse de la machine sera grande. Renseignez-vous aupres de votre Ami SINGER ou de votre magasin SINGER. • Enfoncez la prise machine b dans le socle c. • Branchez la prise d sur la prise...
... vitesse du moteur, enfoncez ('interrupteur e a la position desiree. course illustre en f) limite la vitesse du moteur. Plus vous appuyerez, plus la vitesse de la machine sera grande. Renseignez-vous aupres de votre Ami SINGER ou de votre magasin SINGER. • Enfoncez la prise machine b dans le socle c. • Branchez la prise d sur la prise...
Instruction Manual 14
Page 26
... les coutures au point droit ou au point zig-zag, sur les tissus faciles manier et pour la plupart des ouvrages requerant des vitesses variables. Plus vous appuyerez plug la vitesse sera grande. maximum control • The MAX setting g (switch pressed in halfway) allows for •full speed capacity of the...
... les coutures au point droit ou au point zig-zag, sur les tissus faciles manier et pour la plupart des ouvrages requerant des vitesses variables. Plus vous appuyerez plug la vitesse sera grande. maximum control • The MAX setting g (switch pressed in halfway) allows for •full speed capacity of the...
Instruction Manual 18
Page 2
...operador antes de manejar la maquina. Afin de vous faire toujours beneficier des possibilites les plus epais. Copyright © 2005 The Singer Company Limited ® Singer est une marque deposee de The Singer Company Limited ou de ses filiales. Then familiarize yourself with the most out of ... (batiste) aux plus modernes en matiere de couture, le fabricant se reserve le droit de modifier ('aspect, la conception ou les accessoires de cette machine a coudre, lorsqu'il le juge utile, sans aucun autre preavis. ® Singer is a registered trademark of this booklet for household...
...operador antes de manejar la maquina. Afin de vous faire toujours beneficier des possibilites les plus epais. Copyright © 2005 The Singer Company Limited ® Singer est une marque deposee de The Singer Company Limited ou de ses filiales. Then familiarize yourself with the most out of ... (batiste) aux plus modernes en matiere de couture, le fabricant se reserve le droit de modifier ('aspect, la conception ou les accessoires de cette machine a coudre, lorsqu'il le juge utile, sans aucun autre preavis. ® Singer is a registered trademark of this booklet for household...
Instruction Manual
Page 63
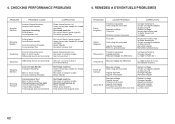
... pied presseur Corriger les tensions Changer l'aiguille Le règler à moins de 1 Ondulations Mauvais règlage de différentiel Le règler à plus de 1 pour les matières tricotées Points de manque Casse de fil Mauvais enfilage Taille d'aiguille mauvaise Aiguille épointée Aiguille...
... pied presseur Corriger les tensions Changer l'aiguille Le règler à moins de 1 Ondulations Mauvais règlage de différentiel Le règler à plus de 1 pour les matières tricotées Points de manque Casse de fil Mauvais enfilage Taille d'aiguille mauvaise Aiguille épointée Aiguille...

Instruction Manual 2
Page 2
.... - Close cover before carrying out any way. Do not modify the plug in . or its Affiliates. ©2012 The Singer Company Limited S.à r.l. Do not operate where aerosol (spray) products are the exclusive trademarks of the appliance before operating SAVE THESE... his appliance is damaged, it still does not fit, contact a qualified electrician to avoid injury: - SINGER and ONE PLUS are being administered. 10. Unplug the foot controller of The Singer Company Limited S.à r.l. All rights reserved. If the LED light is being used by persons (including...
.... - Close cover before carrying out any way. Do not modify the plug in . or its Affiliates. ©2012 The Singer Company Limited S.à r.l. Do not operate where aerosol (spray) products are the exclusive trademarks of the appliance before operating SAVE THESE... his appliance is damaged, it still does not fit, contact a qualified electrician to avoid injury: - SINGER and ONE PLUS are being administered. 10. Unplug the foot controller of The Singer Company Limited S.à r.l. All rights reserved. If the LED light is being used by persons (including...
Instruction Manual 32
Page 16
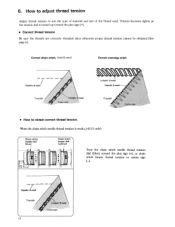
... otherwise proper thread tension cannot be obtained (See page 6). LIII I® IIII ICI ID Turn the chain stitch needle thread tension dial (blue) toward the plus sign (+), or chain stitch looper thread tension to minus sign 00 0 Needle thread Topside 14 LOoper ti,read Underside Tension becomes tighter as the tension...
... otherwise proper thread tension cannot be obtained (See page 6). LIII I® IIII ICI ID Turn the chain stitch needle thread tension dial (blue) toward the plus sign (+), or chain stitch looper thread tension to minus sign 00 0 Needle thread Topside 14 LOoper ti,read Underside Tension becomes tighter as the tension...
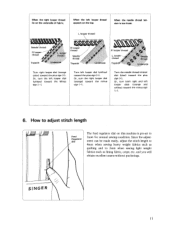
Instruction Manual 32
Page 17
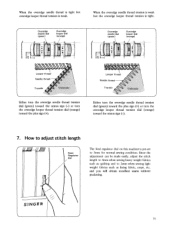
... thread tension dial (green) toward the minus sign (-) or turn the overedge looper thread tension dial (orange) toward the plus sign (+) or turn the overedge needle thread tension dial (green) toward the minus sign (-). 7. and you will obtain excellent...is tight. Looper thread Needle thread Topside Underside Either turn the overedge looper thread tension dial (orange) toward the plus sign (+). Since the adjustment can be made easily, adjust the stitch length to 4mm when sewing heavy weight ... 2mm when sewing light weight fabrics such as lining fabric, crepe, etc. SINGER 15
... thread tension dial (green) toward the minus sign (-) or turn the overedge looper thread tension dial (orange) toward the plus sign (+) or turn the overedge needle thread tension dial (green) toward the minus sign (-). 7. and you will obtain excellent...is tight. Looper thread Needle thread Topside Underside Either turn the overedge looper thread tension dial (orange) toward the plus sign (+). Since the adjustment can be made easily, adjust the stitch length to 4mm when sewing heavy weight ... 2mm when sewing light weight fabrics such as lining fabric, crepe, etc. SINGER 15
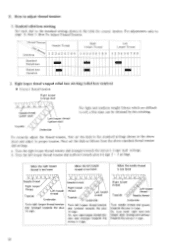
Instruction Manual 33
Page 12
... Weight 1 turn 1 turn I 1 turn 1 A 1 - 1 Medium Weight Heavy Weight 1.5 turns 2 turns 1 turn 1 turn 1 turn IlI AI - 1 turn the dials toward the plus sign (+). • Correct thread tension Be sure the threads are set the needle tension dial and left and right looper thread tension dials toward the... plus sign (+) as shown in table below A and set as follows. (1) Turn the needle thread tension dial and the left and right ...
... Weight 1 turn 1 turn I 1 turn 1 A 1 - 1 Medium Weight Heavy Weight 1.5 turns 2 turns 1 turn 1 turn 1 turn IlI AI - 1 turn the dials toward the plus sign (+). • Correct thread tension Be sure the threads are set the needle tension dial and left and right looper thread tension dials toward the... plus sign (+) as shown in table below A and set as follows. (1) Turn the needle thread tension dial and the left and right ...
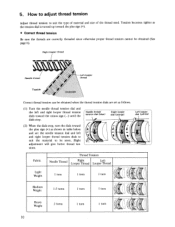
Instruction Manual 33
Page 13
... R looper thread Needle thread Topside Underside R looper thread L looper thread Topsid Needle thread Underside Turn right looper dial (orange color) toward the plus sign (+). Or, turn the left looper dial (yellow) toward the minus sign (-). 6. and you will obtain excellent seams without puckerings. Turn left... and left looper dials (orange and yellow) toward the Minus sign (-). Or, turn the right looper dial (orange) toward the plus sign (+). SINGER 11 How to adjust stitch length Feed Regulator dial The feed regulator dial on the top. When the right looper thread lie on...
... R looper thread Needle thread Topside Underside R looper thread L looper thread Topsid Needle thread Underside Turn right looper dial (orange color) toward the plus sign (+). Or, turn the left looper dial (yellow) toward the minus sign (-). 6. and you will obtain excellent seams without puckerings. Turn left... and left looper dials (orange and yellow) toward the Minus sign (-). Or, turn the right looper dial (orange) toward the plus sign (+). SINGER 11 How to adjust stitch length Feed Regulator dial The feed regulator dial on the top. When the right looper thread lie on...
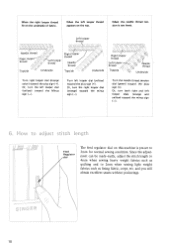
Instruction Manual 35
Page 12
...lining fabric, crepe, etc. Or, turn the left looper dial (yellow) toward the minus sign (-). Turn left looper dial (yellow) toward the plus sign (+). Or, turn both right and left looper thread appears on the underside of fabric. Or, turn the right looper dial (orange) toward the...when sewing heavy weight fabrics such as quilting and to 3mm for normal sewing condition. When the left looper dials (orange and yellow) toward the plus sign (+). Turn the needle thread tension dial (green) toward the minus sign (-). L Feed Regulator dial The feed regulator dial on this machine...
...lining fabric, crepe, etc. Or, turn the left looper dial (yellow) toward the minus sign (-). Turn left looper dial (yellow) toward the plus sign (+). Or, turn both right and left looper thread appears on the underside of fabric. Or, turn the right looper dial (orange) toward the...when sewing heavy weight fabrics such as quilting and to 3mm for normal sewing condition. When the left looper dials (orange and yellow) toward the plus sign (+). Turn the needle thread tension dial (green) toward the minus sign (-). L Feed Regulator dial The feed regulator dial on this machine...
Instruction Manual 35
Page 14
... which are difficult to the standard settings shown in the above standard thread tension dial settings. b. Turn needle thread dial (green) towards plus (+) sign. A -- Turn the right looper thread tension dial (orange) towards the minus (-) sign. 12 Or, turn both right and... left looper thread tension dial (yellow) towards the plus (+) sign 2 - 3 settings. How To Adjust Thread Tension. For adjustments refer to adjust thread tension 1. To correctly adjust the thread tension...
... which are difficult to the standard settings shown in the above standard thread tension dial settings. b. Turn needle thread dial (green) towards plus (+) sign. A -- Turn the right looper thread tension dial (orange) towards the minus (-) sign. 12 Or, turn both right and... left looper thread tension dial (yellow) towards the plus (+) sign 2 - 3 settings. How To Adjust Thread Tension. For adjustments refer to adjust thread tension 1. To correctly adjust the thread tension...


